I may be biased, but I think the appeal of macro photography is rather obvious: the wonder and fascination of being able to capture in fine, “life-size” proportion the details of things otherwise beyond the scope of what the naked eye is capable of discerning. Macro photography is like experiencing another dimension of reality.
Macro photography can also prove to be a formidable challenge for many shooters, as the levels of precision, persistence, and patience needed to produce a satisfactory image are arguably of greater importance than some other genres of photography. If you have found yourself frustrated by your attempts at macro photography or are experiencing some trepidation about diving into macro photography, don’t start tearing your hair out just yet. You will be glad to know that successful macro photography rests primarily on four essential factors.
Sharpness
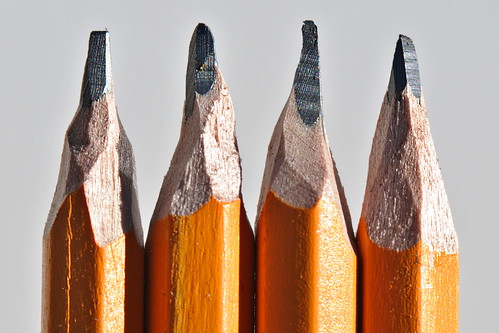
Photo by theilr
While there’s some creative wiggle room in certain other types of photography, macro photography is virtually always benefited by sharpness — tack sharpness. How do you achieve ultimate sharpness? Here are some suggestions:
- Use a sharp lens – Dedicated macro lenses are designed to be especially sharp, but you don’t necessarily have to shell out a lot of money on a new lens just to get involved in macro photography. You can go the smart, cost-effective route reverse mounting a lens onto your camera; if all you’ve got is a 50mm f/1.8 lens, then that’s all you need — these lenses are inexpensive and sharp and will serve more than admirably to ease you into the alluring world of macro photography.
- Know your lens’ minimum focus distance – And don’t try to override it. All lenses have a minimum focus distance (MFD) — the closest distance from a subject from which focus can be achieved. Of course, if you happen to be using autofocus, the camera won’t let you take the shot if you violate the MFD threshold. But considering that you will be using manual focus probably 100% of the time, it is easy to play fast and loose with MFD (especially when you’re using a macro lens, which allows much closer focusing than standard lenses) and end up with out of focus shots. Be sure to work within the parameters of your particular lens.
- Use a tripod – Many people will hate this one, myself included, but if tack sharp macro images are what you’re after, then using a tripod is perhaps the most effective means to that end.
Depth of Field
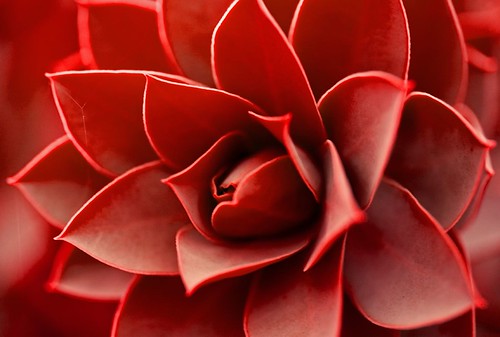
Photo by Stuart Richards
Depth of field is always an issue in macro work; you have likely heard how important it is to maximize depth of field, yet your shots always seem to exhibit a shallow depth of field. Well, that’s just kind of how it is with macro photography, so don’t blame yourself. It’s not you, it’s physics. To get the most out of depth of field (to bring as much of your subject as possible into sharp focus), try one of the following:
- Set an aperture of f/16; depending on your lens you may be able to go as high as f/22, but beware that nasty image-degrading diffraction. Experiment with your lens to determine at what f-stop diffraction sets in and you’ll know how small of an aperture you can safely set.
- Align the elements of your subject that you want in focus so that they are parallel with the camera’s image sensor.
- Try focus stacking. This technique can increase depth of field by combining (stacking) multiple exposures with different focal points. You’ll have to spend some time with Photoshop, but you may find the results are worth the effort.
- Embrace shallow depth of field. Use it to your advantage — it can give an image a 3D-like quality.
Focus

When doing macro photography, you can’t simply focus on some random part of your subject. The issues related to depth of field and sharpness discussed above make it essential that you not only nail focus (using manual focus), but also focus on the part of your subject that you want to be the primary point of interest. When you take a portrait of a person you focus on the eyes, right? Many of your macro subjects may not have eyes, but you can still think of them as portrait subjects and call to attention their most inviting features.
Lighting
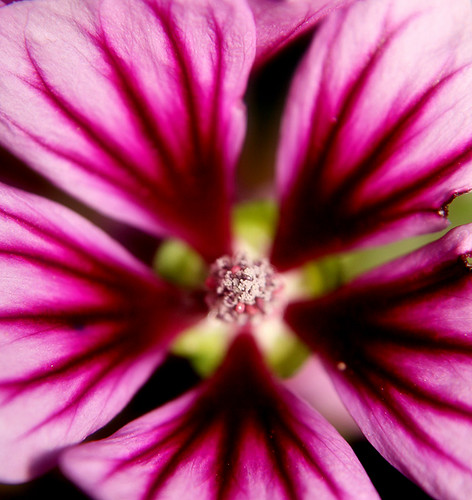
Photo by aussiegall
Whenever possible I like to use natural light and natural light alone for my macro work (nothing beats diffuse sunlight). This isn’t always a feasible option, however. If there’s not adequate ambient light you will have to resort to using flash. There are photographers who view using flash in the field to be as much of a drag as using a tripod, but sometimes it’s the only answer. Macro photography demands good lighting; after all, you’re typically working with small apertures, fast shutter speeds (this is especially if you’re photographing insects; using flash will also aid in freezing motion), and tiny subjects.
So do whatever it takes to properly illuminate your subject, even if that means using a flash. If you use extensions tubes, which increase magnification, you will experience even more loss of light, making the use of flash almost indispensable. If you plan to do macro work on a regular basis you might want to invest in a ring flash, which attaches to the front end of a lens and proves to be far more effective than a standard flash unit at providing even lighting. A ring flash also eliminates the concern of having your lens block the light.
Conclusion
Sharpness, depth of field, focus, and lighting. After some time you will discover that these aren’t the only factors that play a role in successful macro photography, but they are four essential elements that you need to address if you want to see significant improvements in your macro images. Additionally, lots of practice and perseverance are called for; just know you will take multiple bad shots before you get a good one. But that good one will make you jump for joy and make all your hard work worthwhile.


5 Comments
Yep, that was a worthwhile read for me as I am just now starting to spend a lot more time learning how to shoot macro and until about 6 months ago, I knew absolutely nothing about it really, except what little I had read and I find the technique just incredibly fascinating! I bought one of the cheaper Nikon macro lens to start with and, just like you said, one day, I accidentally took a very decent shot of a beetle on a flower and that is still my only keeper. From my brief time of studying , reading numerous articles and then getting out there shooting and practicing what I am learning, I find that you are definitely correct in the basic challenges that you will first encounter, such as sharpness, lighting, depth of field, etc., that will either make or brake your shot. I quickly learned that just because I have a macro lens, it doesn’t magically focus itself! I still have to work on composition, lighting, focusing, depth of field and everything else there is to learn to eventually get a few more good shots and less bad ones. But actually, your article is good timing for me just now because what I really enjoyed reading was your coverage on the other very interesting methods and techniques in shooting macro photography that I happen to be extremely interested in learning and putting to practice, such as focus stacking , using a ring flash and I have never even tried my hand at using extension tubes. Thanks again for the good and very useful tips that I will definitely put to use while trying to better my macro photography and eventually capture some cool macros that I can be proud of.
Thanks, Raden. Macro photography is so easy to get addicted to — it was for me, at least. And even though I’ve been doing it for a while, I’ve just recently picked up a ring flash and am finding different ways to incorporate it into my work. Always something new to learn!
I absolutely LOVE shooting macro! I am an artist and I have recently started incorporating my macro photos into my painted/mixed media pieces. Oh, and I’ve only shot my macro pieces with my little point and shoot! People don’t believe me when I tell them that. 🙂 Anyway, great advice! Thank you very much!
It might solve the money problem but how do I mount a lens backward?
Google “macro reversing ring” – you can get them on ebay for about $10