var advanced_ads_pro_visitor_conditions = {"referrer_cookie_name":"advanced_ads_pro_visitor_referrer","referrer_exdays":"365","page_impr_cookie_name":"advanced_ads_page_impressions","page_impr_exdays":"3650"};
var essb_settings = {"ajax_url":"https:\/\/www.lightstalking.com\/wp-admin\/admin-ajax.php","essb3_nonce":"b635cd7947","essb3_plugin_url":"https:\/\/www.lightstalking.com\/wp-content\/plugins\/easy-social-share-buttons3","essb3_stats":true,"essb3_ga":false,"essb3_ga_ntg":false,"blog_url":"https:\/\/www.lightstalking.com\/","post_id":"181831","internal_stats":true};
Since the beginning of the digital age in photography, stacking images has become much more common than it used to be earlier. But what are the benefits of stacking images? Well, as simple as it may sound, you are able to achieve results you wouldn't have been able to obtain with a single photo. You can get a cleaner, sharper image and you can compress tones to gain better dynamic range in your photos by stacking. Let's look at them in detail.
1. Creating HDR Photos
Stacking 3 or more images shot at different exposure settings (underexposed, normal, and overexposed) can be used in order to expand the dynamic range beyond the capabilities of the camera. Usually, 3 shots 1 EV apart do the trick. However, there are no limitations (at least by software) to the number of photos you can use. Generally, more than 5 photos is not worth the hassle since they don’t help much. With the improvement HDR software solutions offers, processing RAW bracketed files is an option nowadays. That is great improvement on the amount of quality and detail over JPEG HDR processing. That’s true especially when it comes to noise.
The 3 sample images are blended together through HDR software to create a composite with greater amount of dynamic range
2. Focus Stacking for Macro Photography
We can call it “macro photographer’s way of life”. Having enough depth of field to squeeze the whole subject into focus when focusing up close is really hard. The only way to go usually is to shoot more images at different focus and then stack them together in order to create a composite image which will have bigger field of focus than a single shot would have. This process usually requires a tripod and some fiddling to get it right, however image alignment in Photoshop is so advanced nowadays that you can do it handheld with some practice. The only issue here is to have the same light during these shots. If the light changes it might pose some issues with the stacking. Whether it will confuse the algorithm or it will show up when stacked, the fact is that you’ll have issues and the result won’t be perfect. Make sure your light is constant between the shots and that you don’t shift your perspective too much. Image alignment and focus stacking algorithms in Photoshop will do the rest for you.
Example of a focus stacked image. Photos shot hand-held.
3. Image Stacking for Noise Reduction
If you are photographing some products and you want the most noise-free image possible, image stacking is the best way to go. This means essentially shooting the identical image over and over again, and then stacking all of it with median to reduce the noise. Median essentially averages out each pixel position value between shot, thus effectively reducing random noise. You can achieve further noise reduction if you shoot a black frame and then use that to reduce hot pixel noise (usually present with longer exposures). Hot pixel noise occurs when some pixels get exposed differently than others, and since that is more or less constant, it is easy to eliminate. Exposing a bit to the right (over exposing but without clipping) will ease the process because you’ll have better signal-to-noise ratio. Combine exposing to the right, black frame and image stacking and your product shots won’t have a hint of noise.
Example of the amount of noise being reduced with just 10 photos merged together.
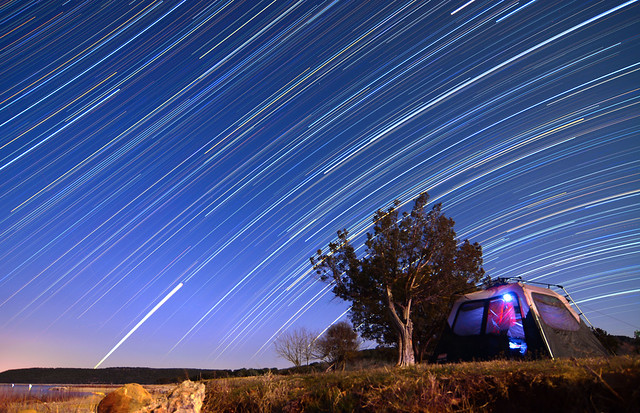
4. Star Trails and Cloud Brushing
All those who are inclined towards more abstract and artistic styles will be happy to know that image stacking can make cool effects, too. Like star trails, for example. When shooting stars you use longer exposures than the 500 rule states in order to create star trails in your image, and you essentially shoot the same image over and over again. The stars moving on the horizon create trails, so when you stack those photos together with a software like StarStax you can create whole trails of stars from the beginning to the end of the horizon, all depending on the amount of frames you have shot. You’ll ask: what about the time between frames, wouldn’t that create intermissions in the trails? The answer is yes. But do not despair, StarStax and similar software solutions correct that so the lines are whole and look good in the picture.
Multiple star trail images being stacked into one. Photo by Robert Hensley
The same thing can be done with moving clouds in a cool landscape. You could easily do it with a long exposure, but clouds often move too slow for the longest exposure to make nice and long cloud motions, thus you’ll need more than one exposure – the longest possible ones for the smoothest effect.
So, I suppose you’ll use stacking more often from now on to get better results. Photographers use this technique for even more than what’s mentioned in the article. Do you know any other creative ideas where stacking plays a crucial part? Let me know in the comments.
About Author
Photographer who loves challenging and experimental photography and loves sharing his knowledge about it.
I have used multiple exposures in photoshop to remove people from the scene
Well Ian, it is the same process as noise reduction, too bad I forgot to mention that median can be used remove people from your shots as well. 🙂
I thought it was ‘Maximum’
I am wondering what software you are using for method 3 with the image stacking for resolution/noise reduction? is that done in photoshop as well?
Yes, it is done in photoshop, but there are other smaller pieces of software that do it as well. I think Gimp can do it too.
what menu selections do I use in Photoshop to stack images?
File > Scripts > Load Files into Stack For different stacking modes: File > Scripts > Statistics
Or, if you have the layers already loaded up for alignment, first align them (Edit -> Auto Align) then select all layers, and right click -> Convert To Smart Object, then go to Layers -> Smart Objects -> Stack Mode.
Maybe I’m blind but I can’t see any difference between the two images in the “noise reduction” example.
Patrick, look in the dark areas, you can see they are less grainy. Look at the edges of the stripes, you can clearly see that there is less noise/grain there.
I was once on a hike and i saw a nice scenery of waves crashing on cliffs. unfortunately, i didn’t have my tripod. I shot 50 photos in burst mode, handheld, then in Photoshop stacked, aligned them and used the same method as in noise reduction In the end, i had a reult very similar to a long exposure
Yes, that will happen if the subject moves too much, that is why it is more suitable to do on static subjects. Practically when you stack more images together you are actually doing a longer exposure but in short bursts, thus avoiding sensor heat which avoids generating hot pixel noise. On top of that with more examples of the same image by averaging each pixel (median) you effectively remove random noise.
“On top of that with more examples of the same image by averaging each pixel (median) you effectively remove random noise.” No, median does not average the pixels. From the multiple shots it chooses the middle value for each pixel instead of calculating an average from the shots (for example from a series of the following values: 3 -5 – 14 – 17 – 75 it will choose 14 instead of the average (3+5+14+17+75):5=22.8 ). In practice when you take a small amount of shots let’s say a series of 5 shots of a building where on 1 shot a person walks into the composition: If you use average that person will be barely visible on the final image like a ghost (will be visible with a 20% opacity). If you use median then the person will completely missing from the final picture as “his pixels” are most likely on the side of the series and the algorithm chooses the middle values.
Ia it possible to run Median Stacking and HDR together using Photoshop CC 2015?
I use image stacking a lot, in macro photography, Dzvonko – but with some subjects the software that merges the stackshots seems to have difficulty selecting the sharpest points, so I found with one shot (an orchid) the edges of the petals were slightly feathery. So I whipped out my w/angle (because it has a greater depth of field than my macro lens), did the calculations to set the camera to capture the field I wanted to be sharp, and got a much sharper result, with a single image.
I don’t know what other ‘togs use – my gear for stackshots like that is a Cognisys Stackshot, and I use Zerene’s software to merge the stackshots. It works perfectly on subjects with more defined edges – eg jewellery, watches, whatever – but the w/angle gave a better result on a subject with softer edges.
var advanced_ads_cookies = {"cookie_path":"\/","cookie_domain":""};
var advadsCfpInfo = {"cfpExpHours":"3","cfpClickLimit":"3","cfpBan":"7","cfpPath":"","cfpDomain":"www.lightstalking.com"};
var beloadmore = {"url":"https:\/\/www.lightstalking.com\/wp-admin\/admin-ajax.php","query":{"post__not_in":[181831],"category_name":"post-production","posts_per_page":3}};
var tve_dash_front = {"ajaxurl":"https:\/\/www.lightstalking.com\/wp-admin\/admin-ajax.php","force_ajax_send":"1","is_crawler":"","recaptcha":[],"post_id":"181831"};
var TVE_Ult_Data = {"ajaxurl":"https:\/\/www.lightstalking.com\/wp-admin\/admin-ajax.php","ajax_load_action":"tve_ult_ajax_load","conversion_events_action":"tve_ult_conversion_event","shortcode_campaign_ids":[],"matched_display_settings":[],"campaign_ids":[],"post_id":181831,"is_singular":true,"tu_em":"","evergreen_redirects":[]};
(function() { var po = document.createElement('script'); po.type = 'text/javascript'; po.async=true;; po.src = 'https://www.lightstalking.com/wp-content/plugins/easy-social-share-buttons3/lib/modules/conversions-pro/assets/share-conversions-tracker.js'; var s = document.getElementsByTagName('script')[0]; s.parentNode.insertBefore(po, s); })();(function() { var po = document.createElement('script'); po.type = 'text/javascript'; po.async=true;; po.src = 'https://www.lightstalking.com/wp-content/plugins/easy-social-share-buttons3/assets/modules/pinterest-pro.min.js'; var s = document.getElementsByTagName('script')[0]; s.parentNode.insertBefore(po, s); })();(function() { var po = document.createElement('script'); po.type = 'text/javascript'; po.async=true;; po.src = 'https://www.lightstalking.com/wp-content/plugins/easy-social-share-buttons3/assets/modules/subscribe-forms.min.js'; var s = document.getElementsByTagName('script')[0]; s.parentNode.insertBefore(po, s); })();(function() { var po = document.createElement('script'); po.type = 'text/javascript'; po.async=true;; po.src = 'https://www.lightstalking.com/wp-content/plugins/easy-social-share-buttons3/assets/js/essb-core.min.js'; var s = document.getElementsByTagName('script')[0]; s.parentNode.insertBefore(po, s); })();
let ccwpDOMLoaded=!1;
let ccwp_loaded = false;
let resources_length=0;
let resources =undefined;
let is_last_resource = 0;
ccwpUserInteractions=["keydown","mousemove","wheel","touchmove","touchstart","touchend","touchcancel","touchforcechange"];
ccwpUserInteractions.forEach(function(e){
window.addEventListener(e,calculate_load_times);
});
function calculate_load_times() {
// Check performance support
if (performance === undefined) {
console.log("Performance NOT supported");
return;
}
// Get a list of "resource" performance entries
resources = performance.getEntriesByType("resource");
if (resources === undefined || resources.length <= 0) {
console.log("NO Resource performance records");
}
if(resources.length){
resources_length=resources.length;
}
for(let i=0; i < resources.length; i++) {
if(resources[i].responseEnd>0){
is_last_resource = is_last_resource + 1;
}
}
let uag = navigator.userAgent;
let gpat = /Google Page Speed Insights/gm;
let gres = uag.match(gpat);
let cpat = /Chrome-Lighthouse/gm;
let cres = uag.match(cpat);
let wait_till=300;
let new_ua = "Mozilla/5.0 (Linux; Android 11; moto g power (2022)) AppleWebKit/537.36 (KHTML, like Gecko) Chrome/109.0.0.0 Mobile Safari/537.36";
let new_ua2 = "Mozilla/5.0 (Macintosh; Intel Mac OS X 10_15_7) AppleWebKit/537.36 (KHTML, like Gecko) Chrome/109.0.0.0 Safari/537.36";
if(gres || cres || uag==new_ua || uag==new_ua2){
wait_till = 3000;
}
if(is_last_resource==resources.length){
setTimeout(function(){
console.log("ccwpTriggerDelayedScripts timeout : "+wait_till);
ccwpTriggerDelayedScripts();
},wait_till);
}
}
window.addEventListener("load", function(e) {
console.log("load complete");
setTimeout(function(){
calculate_load_times();
},100);
});async function ccwpTriggerDelayedScripts() {
if(ccwp_loaded){ return ;}
ccwpPreloadStyles();
ccwpPreloadDelayedScripts();
ccwpLoadCss();
ccwpScriptLoading();
ccwp_loaded=true;
}
function ccwpPreloadStyles() {
let e = document.createDocumentFragment();
var cssEle = document.querySelectorAll("link[rel=ccwpdelayedstyle]");
for(let i=0; i <= cssEle.length;i++){
if(cssEle[i]){
cssEle[i].href = removeVersionFromLink(cssEle[i].href);
let r = document.createElement("link");
r.href = cssEle[i].href;
r.rel = "preload";
r.as = "style";
e.appendChild(r);
}
}
document.head.appendChild(e);
}
function ccwpPreloadDelayedScripts() {
var e = document.createDocumentFragment();
document.querySelectorAll("script[type=ccwpdelayedscript]").forEach(function(t) {
var n = removeVersionFromLink(t.getAttribute("src"));
if (n) {
t.setAttribute("src", n);
var r = document.createElement("link");
r.href = n, r.rel = "preload", r.as = "script", e.appendChild(r)
}
}), document.head.appendChild(e)
}
function ccwpScriptLoading(){
var jsEle = document.querySelectorAll("script[type=ccwpdelayedscript]");
jsEle.forEach(function(t) {
t.type = "text/javascript";
if(t.src)
{
t.src = removeVersionFromLink(t.src);
}
});
}function ccwpLoadCss(){
var cssEle = document.querySelectorAll("link[rel=ccwpdelayedstyle]");
for(let i=0; i <= cssEle.length;i++){
if(cssEle[i]){
cssEle[i].href = removeVersionFromLink(cssEle[i].href);
cssEle[i].rel = "stylesheet";
cssEle[i].type = "text/css";
}
}var cssEle = document.querySelectorAll("style[type=ccwpdelayedstyle]");
for(let i=0; i <= cssEle.length;i++){
if(cssEle[i]){
cssEle[i].type = "text/css";
}
}
}
function removeVersionFromLink(link)
{
if(ccwpIsValidUrl(link))
{
const url = new URL(ccwpFormatLink(link));
url.searchParams.delete("ver");
url.searchParams.delete("time");
return url.href;
}
else{
return link;
}
}
function ccwpIsValidUrl(urlString)
{
if(urlString){
var expression =/[-a-zA-Z0-9@:%_\+.~#?&//=]{2,256}\.[a-z]{2,4}\b(\/[-a-zA-Z0-9@:%_\+.~#?&//=]*)?/gi;
var regex = new RegExp(expression);
return urlString.match(regex);
}
return false;
}
function ccwpFormatLink(link)
{
let http_check=link.match("http:");
let https_check=link.match("https:");
if(!http_check && !https_check)
{
return location.protocol+link;
}
return link;
}


15 Comments
I have used multiple exposures in photoshop to remove people from the scene
Well Ian, it is the same process as noise reduction, too bad I forgot to mention that median can be used remove people from your shots as well. 🙂
I thought it was ‘Maximum’
I am wondering what software you are using for method 3 with the image stacking for resolution/noise reduction? is that done in photoshop as well?
Yes, it is done in photoshop, but there are other smaller pieces of software that do it as well. I think Gimp can do it too.
what menu selections do I use in Photoshop to stack images?
File > Scripts > Load Files into Stack
For different stacking modes:
File > Scripts > Statistics
Or, if you have the layers already loaded up for alignment, first align them (Edit -> Auto Align) then select all layers, and right click -> Convert To Smart Object, then go to Layers -> Smart Objects -> Stack Mode.
Maybe I’m blind but I can’t see any difference between the two images in the “noise reduction” example.
Patrick, look in the dark areas, you can see they are less grainy. Look at the edges of the stripes, you can clearly see that there is less noise/grain there.
I was once on a hike and i saw a nice scenery of waves crashing on cliffs. unfortunately, i didn’t have my tripod.
I shot 50 photos in burst mode, handheld, then in Photoshop stacked, aligned them and used the same method as in noise reduction
In the end, i had a reult very similar to a long exposure
Yes, that will happen if the subject moves too much, that is why it is more suitable to do on static subjects. Practically when you stack more images together you are actually doing a longer exposure but in short bursts, thus avoiding sensor heat which avoids generating hot pixel noise. On top of that with more examples of the same image by averaging each pixel (median) you effectively remove random noise.
“On top of that with more examples of the same image by averaging each pixel (median) you effectively remove random noise.”
No, median does not average the pixels.
From the multiple shots it chooses the middle value for each pixel instead of calculating an average from the shots (for example from a series of the following values: 3 -5 – 14 – 17 – 75 it will choose 14 instead of the average (3+5+14+17+75):5=22.8 ).
In practice when you take a small amount of shots let’s say a series of 5 shots of a building where on 1 shot a person walks into the composition:
If you use average that person will be barely visible on the final image like a ghost (will be visible with a 20% opacity).
If you use median then the person will completely missing from the final picture as “his pixels” are most likely on the side of the series and the algorithm chooses the middle values.
Ia it possible to run Median Stacking and HDR together using Photoshop CC 2015?
I use image stacking a lot, in macro photography, Dzvonko – but with some subjects the software that merges the stackshots seems to have difficulty selecting the sharpest points, so I found with one shot (an orchid) the edges of the petals were slightly feathery. So I whipped out my w/angle (because it has a greater depth of field than my macro lens), did the calculations to set the camera to capture the field I wanted to be sharp, and got a much sharper result, with a single image.
I don’t know what other ‘togs use – my gear for stackshots like that is a Cognisys Stackshot, and I use Zerene’s software to merge the stackshots. It works perfectly on subjects with more defined edges – eg jewellery, watches, whatever – but the w/angle gave a better result on a subject with softer edges.