var advanced_ads_pro_visitor_conditions = {"referrer_cookie_name":"advanced_ads_pro_visitor_referrer","referrer_exdays":"365","page_impr_cookie_name":"advanced_ads_page_impressions","page_impr_exdays":"3650"};
var essb_settings = {"ajax_url":"https:\/\/www.lightstalking.com\/wp-admin\/admin-ajax.php","essb3_nonce":"97530ac94c","essb3_plugin_url":"https:\/\/www.lightstalking.com\/wp-content\/plugins\/easy-social-share-buttons3","essb3_stats":true,"essb3_ga":false,"essb3_ga_ntg":false,"blog_url":"https:\/\/www.lightstalking.com\/","post_id":"89306","internal_stats":true};
Shutter speed is one of the three pillars of the exposure triangle along with aperture and ISO. It is also one of the fundamental ways that we can control the creative look of our images. It is a vital part of our photographic knowledge, understanding it is a prerequisite to become an accomplished photographer.
How Shutters Work
So lets start with the basics, what is it and how is it achieved. There are a number of different types of shutters in cameras. Most common are focal plane shutters found in DSLRs and diaphragm shutters more often found in compact cameras. The principle is the same, the shutter opens for a set period of time, allowing light to enter the lens and expose the image, either to film or on a digital sensor.
How long we open the shutter will determine how bright the image will be. Imagine the sensor as a water bucket and above it a tap. This is the shutter. When we open the tap the bucket fills. Open the tap for too short a period and there is not enough water and so we get a dark, under exposed image. Open it for too long and we have an over exposed image. If the tap is on for far too long, the bucket overflows, these are your unrecoverable clipped highlights.
The typical range of speed for most shutter is from around 1-2 seconds through to 1/4000 or even less. For average everyday daylight photography we would be using shutter speeds of 1/60th to 1/1000th of a second depending on conditions, aperture and ISO, however it is the way that we use these and the other shutter speeds that allow us to define how our images look. Lets look at what effect shutter speed has on images.
What Do Differing Shutter Speeds Do to an Image?
Slow Shutter Speeds – Slow shutter speeds can generally be regarded as those of 1/30th of a second and more, all the way up to times in the minutes. For the most part, when using a slow shutter speeds you will need to be using a tripod as any motion in your body is going to be transmitted to the camera (and final image), when hand holding. The longer the focal length of the lens the more chance there is of this happening.
To increase you control over slow shutter speeds, it may be worth investing in a remote control unit for your camera, these allow you set very slow shutter speeds and also mean that you are not directly touching the camera, reducing the possibility of camera shake.
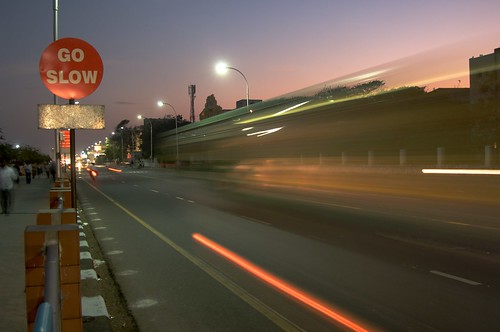
An ironic use of a slow shutter speed. Photo by the Odessa Files
Slow shutter speeds are a wonderful creative tool if used well. You can created ethereal effects in bodies of water such as oceans or waterfalls, or imprint traffic light trails over your cityscape images. One of the main problems in using slow shutter speeds, is actually having too much light available, even when you have closed the aperture down to its minimum. To solve this issue you can use neutral density filters. These are graded by the amount of light they reduce, an ND 0.3 will reduce your exposure by one stop, an ND 0.6 two stops etc, allowing you to reduce your shutter speed to get the required effect.
The use of a slow shutter speed to show light trails Photo by the Odessa Files
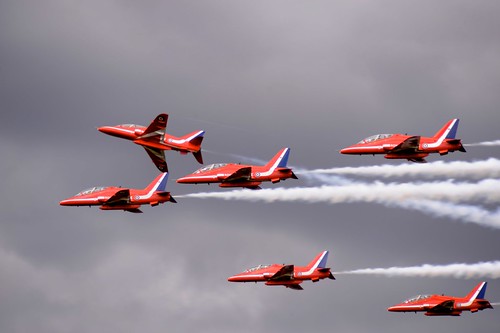
Fast Shutter Speeds – These can generally be regarded as speed of less than 1/500 of a second and are a powerful tool for freezing motion. Typical uses of high shutter speeds are in wildlife photography, to freeze the motion of an animal at speed and, for in sports photography where you can capture the action at its optimum moment.
Exposure wise we have the opposite problem to slow shutter speeds in that there may not be enough light. This is why you often see wildlife and sports photographers with fast, large aperture lenses. In low light even the fast lens may not be enough meaning that you have to increase your ISO to maintain the required shutter speed, which will introduce an increase in image noise levels.
Using Panning
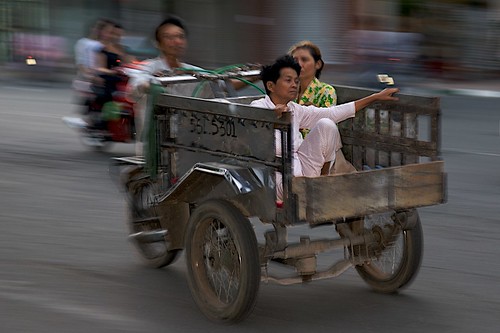
A way around this in certain shots, is to use panning. When we pan, we follow the action of the subject with the lens, moving our upper body to keep up. This in turn allows us to reduce the shutter speed to a certain extent. For example if we where shooting a fast moving racing car, it may require a shutter speed of 1/1000 of a second or less to freeze the action. By using panning we can reduce this to 1/250 or even more with the added bonus of the background being out of focus, this conveys a sense of speed in the image that would be lost using a high shutter speed.
Freezing the action using a high shutter speed. Photo by the Odessa Files
Using a slower shutter speed and panning. Photo by the Odessa Files
This article only briefly touches on the power of shutter speed as a creative tool. As with all photographic techniques, the best way to learn and understand fully the effect of shutter speed is to go out and practice, then practice some more.
var advanced_ads_cookies = {"cookie_path":"\/","cookie_domain":""};
var advadsCfpInfo = {"cfpExpHours":"3","cfpClickLimit":"3","cfpBan":"7","cfpPath":"","cfpDomain":"www.lightstalking.com"};
var beloadmore = {"url":"https:\/\/www.lightstalking.com\/wp-admin\/admin-ajax.php","query":{"post__not_in":[89306],"category_name":"camera-craft","posts_per_page":3}};
var tve_dash_front = {"ajaxurl":"https:\/\/www.lightstalking.com\/wp-admin\/admin-ajax.php","force_ajax_send":"1","is_crawler":"","recaptcha":[],"post_id":"89306"};
var TVE_Ult_Data = {"ajaxurl":"https:\/\/www.lightstalking.com\/wp-admin\/admin-ajax.php","ajax_load_action":"tve_ult_ajax_load","conversion_events_action":"tve_ult_conversion_event","shortcode_campaign_ids":[],"matched_display_settings":[],"campaign_ids":[],"post_id":89306,"is_singular":true,"tu_em":"","evergreen_redirects":[]};
(function() { var po = document.createElement('script'); po.type = 'text/javascript'; po.async=true;; po.src = 'https://www.lightstalking.com/wp-content/plugins/easy-social-share-buttons3/lib/modules/conversions-pro/assets/share-conversions-tracker.js'; var s = document.getElementsByTagName('script')[0]; s.parentNode.insertBefore(po, s); })();(function() { var po = document.createElement('script'); po.type = 'text/javascript'; po.async=true;; po.src = 'https://www.lightstalking.com/wp-content/plugins/easy-social-share-buttons3/assets/modules/pinterest-pro.min.js'; var s = document.getElementsByTagName('script')[0]; s.parentNode.insertBefore(po, s); })();(function() { var po = document.createElement('script'); po.type = 'text/javascript'; po.async=true;; po.src = 'https://www.lightstalking.com/wp-content/plugins/easy-social-share-buttons3/assets/modules/subscribe-forms.min.js'; var s = document.getElementsByTagName('script')[0]; s.parentNode.insertBefore(po, s); })();(function() { var po = document.createElement('script'); po.type = 'text/javascript'; po.async=true;; po.src = 'https://www.lightstalking.com/wp-content/plugins/easy-social-share-buttons3/assets/js/essb-core.min.js'; var s = document.getElementsByTagName('script')[0]; s.parentNode.insertBefore(po, s); })();
let ccwpDOMLoaded=!1;
let ccwp_loaded = false;
let resources_length=0;
let resources =undefined;
let is_last_resource = 0;
ccwpUserInteractions=["keydown","mousemove","wheel","touchmove","touchstart","touchend","touchcancel","touchforcechange"];
ccwpUserInteractions.forEach(function(e){
window.addEventListener(e,calculate_load_times);
});
function calculate_load_times() {
// Check performance support
if (performance === undefined) {
console.log("Performance NOT supported");
return;
}
// Get a list of "resource" performance entries
resources = performance.getEntriesByType("resource");
if (resources === undefined || resources.length <= 0) {
console.log("NO Resource performance records");
}
if(resources.length){
resources_length=resources.length;
}
for(let i=0; i < resources.length; i++) {
if(resources[i].responseEnd>0){
is_last_resource = is_last_resource + 1;
}
}
let uag = navigator.userAgent;
let gpat = /Google Page Speed Insights/gm;
let gres = uag.match(gpat);
let cpat = /Chrome-Lighthouse/gm;
let cres = uag.match(cpat);
let wait_till=300;
let new_ua = "Mozilla/5.0 (Linux; Android 11; moto g power (2022)) AppleWebKit/537.36 (KHTML, like Gecko) Chrome/109.0.0.0 Mobile Safari/537.36";
let new_ua2 = "Mozilla/5.0 (Macintosh; Intel Mac OS X 10_15_7) AppleWebKit/537.36 (KHTML, like Gecko) Chrome/109.0.0.0 Safari/537.36";
if(gres || cres || uag==new_ua || uag==new_ua2){
wait_till = 3000;
}
if(is_last_resource==resources.length){
setTimeout(function(){
console.log("ccwpTriggerDelayedScripts timeout : "+wait_till);
ccwpTriggerDelayedScripts();
},wait_till);
}
}
window.addEventListener("load", function(e) {
console.log("load complete");
setTimeout(function(){
calculate_load_times();
},100);
});async function ccwpTriggerDelayedScripts() {
if(ccwp_loaded){ return ;}
ccwpPreloadStyles();
ccwpPreloadDelayedScripts();
ccwpLoadCss();
ccwpScriptLoading();
ccwp_loaded=true;
}
function ccwpPreloadStyles() {
let e = document.createDocumentFragment();
var cssEle = document.querySelectorAll("link[rel=ccwpdelayedstyle]");
for(let i=0; i <= cssEle.length;i++){
if(cssEle[i]){
cssEle[i].href = removeVersionFromLink(cssEle[i].href);
let r = document.createElement("link");
r.href = cssEle[i].href;
r.rel = "preload";
r.as = "style";
e.appendChild(r);
}
}
document.head.appendChild(e);
}
function ccwpPreloadDelayedScripts() {
var e = document.createDocumentFragment();
document.querySelectorAll("script[type=ccwpdelayedscript]").forEach(function(t) {
var n = removeVersionFromLink(t.getAttribute("src"));
if (n) {
t.setAttribute("src", n);
var r = document.createElement("link");
r.href = n, r.rel = "preload", r.as = "script", e.appendChild(r)
}
}), document.head.appendChild(e)
}
function ccwpScriptLoading(){
var jsEle = document.querySelectorAll("script[type=ccwpdelayedscript]");
jsEle.forEach(function(t) {
t.type = "text/javascript";
if(t.src)
{
t.src = removeVersionFromLink(t.src);
}
});
}function ccwpLoadCss(){
var cssEle = document.querySelectorAll("link[rel=ccwpdelayedstyle]");
for(let i=0; i <= cssEle.length;i++){
if(cssEle[i]){
cssEle[i].href = removeVersionFromLink(cssEle[i].href);
cssEle[i].rel = "stylesheet";
cssEle[i].type = "text/css";
}
}var cssEle = document.querySelectorAll("style[type=ccwpdelayedstyle]");
for(let i=0; i <= cssEle.length;i++){
if(cssEle[i]){
cssEle[i].type = "text/css";
}
}
}
function removeVersionFromLink(link)
{
if(ccwpIsValidUrl(link))
{
const url = new URL(ccwpFormatLink(link));
url.searchParams.delete("ver");
url.searchParams.delete("time");
return url.href;
}
else{
return link;
}
}
function ccwpIsValidUrl(urlString)
{
if(urlString){
var expression =/[-a-zA-Z0-9@:%_\+.~#?&//=]{2,256}\.[a-z]{2,4}\b(\/[-a-zA-Z0-9@:%_\+.~#?&//=]*)?/gi;
var regex = new RegExp(expression);
return urlString.match(regex);
}
return false;
}
function ccwpFormatLink(link)
{
let http_check=link.match("http:");
let https_check=link.match("https:");
if(!http_check && !https_check)
{
return location.protocol+link;
}
return link;
}


1 Comment
I just found your site and I’m thrilled. Playing with depth of field is one of my favorite things.