Digital photography has brought with it a whole host of acronyms, technical terminology and undecipherable jargon, image resolution being one of the most mysterious. In this short guide we will attempt to explain and hopefully demystify the strange pixelated world of resolution.
So lets start with what comes out of your camera. Your sensor is measured in megapixels, but what does this mean? Put simply, your camera sensor is not unlike the photographs you see in a newspaper. If you look closely, in the case of a newspaper print, it is in fact nothing but a series of tiny ink dots that combine to make up an image. You camera sensor is much the same only the ink is replaced by photodetectors, the pixel. To make up an image you need millions of these pixels close together, in order to fool the eye into believing that you are looking at a continuous series of tone and colour. The more pixels you have the more realistic that image will look.
Whilst your camera specifications may state 10, 12 or 16 megapixels, the more important figure is the number or pixels width and height, in the case of my 12 megapixel camera it produces images that are 4256 pixels wide and 2832 pixels in height. However there is a third number not usually quoted but important to the whole equation of image resolution: PPI.
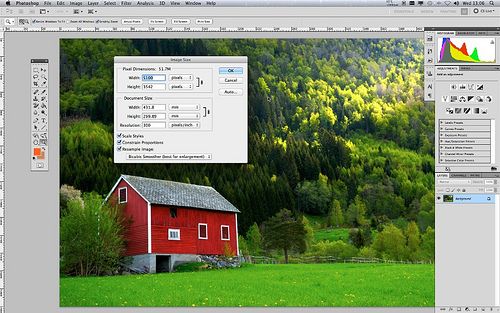
PPI means pixels per inch and defines the resolution of an image. When your camera saves an image it needs assign a pixels per inch value to the image. Most modern cameras will save either as 72ppi or 300ppi. So what is the difference, well in terms of the overall digital image quality, there is no difference, but when it comes to outputting the image for print or web there are important differences.
So lets explain PPI a little. If we assume your camera saved the image at 4000×3000 72ppi this means if you were to print the image directly, the size of the image would be roughly 55 inches by 41 inches, 4000 pixels divided by 72 pixels in each inch, giving us as shade over 55 inches. Sounds great doesn't it? There is or course a big caveat and that goes back to what we were talking about at start. 72 pixels per inch is quite a low resolution so looking at that magnificent 55 inch print you will probably be sorely disappointed with it’s quality. This is because those pixels have been spread wide apart.
Now lets take that image and in Photoshop change it’s ppi to 300. If with do the maths again we will now only get a print size of 13 by 10 inches. Much smaller in size but because those pixels are crammed much closer together the image will be of a much higher quality when looked at from the same distance as the 72 dpi image.
So what ppi should I use? Well if you are sizing an image for the web, use 72ppi. The reason for this is two fold: firstly you will be down-sizing the image to fit on a computer screen. Most computer screens only display roughly 72ppi so there is no point in using 300ppi. Secondly because the resolution is lower, the file size is smaller hence the image will load faster on a web page.
Now lets assume you wish to print the image, ideally you would work from 300ppi, your 4000×3000 pixel image giving you a good quality print at 13×10 inches. But what if you wanted to print bigger. Well you have two options here, firstly you could reduce the ppi. Whilst this will lower the print resolution it probably will not become visible until you start to go below 200ppi. So getting the calculator out again, our 4000×3000 pixel image, if set to 200ppi would give us a print size of 20 by 15 inches. Obviously this is much bigger but maybe not enough.
Should you wish to go further, you can do what is known as up-rezzing. This can be done in Photoshop using the image size tool or using 3rd party software. What happens in this case is the software basically recreates new pixels in between the originals and based on what the pixels surrounding it look like. The most current algorithms used in Photoshop and others are extremely efficient and can allow images to be enlarged by up to 400% with careful manipulation.
So that is a brief explanation of PPI – many of you will also have heard of the term DPI, this relates more to printer settings and we will talk about that in a later tutorial.
Jason Row is a British born travel photographer now living in Ukraine. You can follow him on Facebook or visit his site, The Odessa Files. He also maintains a blog chronicling his exploits as an Expat in the former Soviet Union

8 Comments
Some good advice but that old saw about 72ppi for computer display is years out of date.
There are two misunderstandings here.
First, computers don’t care what the resolution is. They display pixels at 100%. That is a 1200 pixel wide image will display at 1200 pixels at a 1-to-1 mapping of the monitor pixels, regardless of what resolution you specify.
Second: Look at the resolution of any current computer and you will see that most go well above 100ppi, some as high as 135ppi. The 72ppi number referred to old Macs. That has been irrelevant for at least 15 years.
THANK YOU! I stopped reading the article the minute I saw it mentioning the 72 deal.
For a better understanding, check out this writeup https://www.scantips.com/no72dpi.html
I would echo Michael’s comments.
Digital display is resolution irrelevant. Only when you affix an image to physical media is resolution appropriate to the discussion.
Michael’s comments about this being irrelevant for 15 years are conservative.
Yes, Thank you. Very helpful.
Yep. As Michael said above: DPI and PPI have no affect on the file size when it comes to computers or the web.
All that matters is the width and height in pixels. You know, apart from any compression or saving for the web and so on. But DPI, no.
Try in Photoshop. Save a file as a jpeg. Then, save the file again in a different name with a different DPI but same height and width. Compare.
As Michael said, the web is resolution independent due to the design of HTML. The only thing that matters is the pixel height and pixel width. One small thing is that the 72ppi was and is a Windows thing. Most Apple digital devices went beyond that very quickly. In the 1990’s Macs used 96ppi instead of the Windows 72ppi and that is why almost all graphic art shops used Macs for design work. I did see where the new display for the “new Ipad” is somewhere around 135ppi and is breaking new ground in graphic displays. I guess there have been very high end monitors for designers out a while now that also go to these levels.
While I do use upsampling somewhat on images to fill the frame with wildlife subjects, the algorithm used really does matter. And I really don’t suggest doing the upsampling yourself if you are using a print lab for your images. Most will take your 12 MP image at 4256 pixels wide and 2832 pixels in height and print it for you at 48″ wide and their upsampling algorithms are much better than you can get in an image editing program. Thus I give my shop the best image I can at camera resolution and let them worry about the upsampling for me. I have never been disappointed but I do use a very good professional service (not Walmart)!
If you end up unhappy with what they can do with your image at that size, the best option is to upgrade your camera to 18 MP or more. Give them more to work with.
By the way, a good print shop can take the image from my 18 MP Canon 7D and print it as a billboard, but don’t expect them to do it from an 18 MP point and shoot. The sensor pixel receptor size matters when you get to really large prints. All megapixels are not created equally!
Ok, so I need a little help on this one. I am desperately trying to find the best “average” size to create a background image for my website (different displays view it) AND I need to figure out the best dimensions, size (whatever it’s called) for Facebook images. I’m a photographer and having my work properly represented is HUGE for me… help? Please 🙁