window._wpemojiSettings = {"baseUrl":"https:\/\/s.w.org\/images\/core\/emoji\/14.0.0\/72x72\/","ext":".png","svgUrl":"https:\/\/s.w.org\/images\/core\/emoji\/14.0.0\/svg\/","svgExt":".svg","source":{"concatemoji":"\/\/www.lightstalking.com\/wp-includes\/js\/wp-emoji-release.min.js?ver=00ee2dc9c4a47c0421c3a1063c12ecee"}};
/*! This file is auto-generated */
!function(i,n){var o,s,e;function c(e){try{var t={supportTests:e,timestamp:(new Date).valueOf()};sessionStorage.setItem(o,JSON.stringify(t))}catch(e){}}function p(e,t,n){e.clearRect(0,0,e.canvas.width,e.canvas.height),e.fillText(t,0,0);var t=new Uint32Array(e.getImageData(0,0,e.canvas.width,e.canvas.height).data),r=(e.clearRect(0,0,e.canvas.width,e.canvas.height),e.fillText(n,0,0),new Uint32Array(e.getImageData(0,0,e.canvas.width,e.canvas.height).data));return t.every(function(e,t){return e===r[t]})}function u(e,t,n){switch(t){case"flag":return n(e,"\ud83c\udff3\ufe0f\u200d\u26a7\ufe0f","\ud83c\udff3\ufe0f\u200b\u26a7\ufe0f")?!1:!n(e,"\ud83c\uddfa\ud83c\uddf3","\ud83c\uddfa\u200b\ud83c\uddf3")&&!n(e,"\ud83c\udff4\udb40\udc67\udb40\udc62\udb40\udc65\udb40\udc6e\udb40\udc67\udb40\udc7f","\ud83c\udff4\u200b\udb40\udc67\u200b\udb40\udc62\u200b\udb40\udc65\u200b\udb40\udc6e\u200b\udb40\udc67\u200b\udb40\udc7f");case"emoji":return!n(e,"\ud83e\udef1\ud83c\udffb\u200d\ud83e\udef2\ud83c\udfff","\ud83e\udef1\ud83c\udffb\u200b\ud83e\udef2\ud83c\udfff")}return!1}function f(e,t,n){var r="undefined"!=typeof WorkerGlobalScope&&self instanceof WorkerGlobalScope?new OffscreenCanvas(300,150):i.createElement("canvas"),a=r.getContext("2d",{willReadFrequently:!0}),o=(a.textBaseline="top",a.font="600 32px Arial",{});return e.forEach(function(e){o[e]=t(a,e,n)}),o}function t(e){var t=i.createElement("script");t.src=e,t.defer=!0,i.head.appendChild(t)}"undefined"!=typeof Promise&&(o="wpEmojiSettingsSupports",s=["flag","emoji"],n.supports={everything:!0,everythingExceptFlag:!0},e=new Promise(function(e){i.addEventListener("DOMContentLoaded",e,{once:!0})}),new Promise(function(t){var n=function(){try{var e=JSON.parse(sessionStorage.getItem(o));if("object"==typeof e&&"number"==typeof e.timestamp&&(new Date).valueOf()<e.timestamp+604800&&"object"==typeof e.supportTests)return e.supportTests}catch(e){}return null}();if(!n){if("undefined"!=typeof Worker&&"undefined"!=typeof OffscreenCanvas&&"undefined"!=typeof URL&&URL.createObjectURL&&"undefined"!=typeof Blob)try{var e="postMessage("+f.toString()+"("+[JSON.stringify(s),u.toString(),p.toString()].join(",")+"));",r=new Blob([e],{type:"text/javascript"}),a=new Worker(URL.createObjectURL(r),{name:"wpTestEmojiSupports"});return void(a.onmessage=function(e){c(n=e.data),a.terminate(),t(n)})}catch(e){}c(n=f(s,u,p))}t(n)}).then(function(e){for(var t in e)n.supports[t]=e[t],n.supports.everything=n.supports.everything&&n.supports[t],"flag"!==t&&(n.supports.everythingExceptFlag=n.supports.everythingExceptFlag&&n.supports[t]);n.supports.everythingExceptFlag=n.supports.everythingExceptFlag&&!n.supports.flag,n.DOMReady=!1,n.readyCallback=function(){n.DOMReady=!0}}).then(function(){return e}).then(function(){var e;n.supports.everything||(n.readyCallback(),(e=n.source||{}).concatemoji?t(e.concatemoji):e.wpemoji&&e.twemoji&&(t(e.twemoji),t(e.wpemoji)))}))}((window,document),window._wpemojiSettings);
window.advanced_ads_ready=function(e,a){a=a||"complete";var d=function(e){return"interactive"===a?"loading"!==e:"complete"===e};d(document.readyState)?e():document.addEventListener("readystatechange",(function(a){d(a.target.readyState)&&e()}),{once:"interactive"===a})},window.advanced_ads_ready_queue=window.advanced_ads_ready_queue||[];
//www.lightstalking.com/wp-includes/js/jquery/jquery.min.js
//www.lightstalking.com/wp-includes/js/jquery/jquery-migrate.min.js
var breeze_prefetch = {"local_url":"https:\/\/www.lightstalking.com","ignore_remote_prefetch":"1","ignore_list":["\/wp-admin\/"]};
//www.lightstalking.com/wp-content/plugins/breeze/assets/js/js-front-end/breeze-prefetch-links.min.js
//www.lightstalking.com/wp-content/plugins/intelly-countdown-pro/assets/deps/moment/moment.js
//www.lightstalking.com/wp-content/plugins/intelly-countdown-pro/assets/js/icp.library.js
//www.lightstalking.com/wp-content/plugins/wp-user-avatar/assets/flatpickr/flatpickr.min.js
//www.lightstalking.com/wp-content/plugins/wp-user-avatar/assets/select2/select2.min.js
//www.lightstalking.com/wp-content/plugins/tag-groups/assets/js/frontend.min.js
var advads_options = {"blog_id":"1","privacy":{"enabled":false,"state":"not_needed"}};
//www.lightstalking.com/wp-content/plugins/advanced-ads/public/assets/js/advanced.min.js
var advanced_ads_pro_visitor_conditions = {"referrer_cookie_name":"advanced_ads_pro_visitor_referrer","referrer_exdays":"365","page_impr_cookie_name":"advanced_ads_page_impressions","page_impr_exdays":"3650"};
//www.lightstalking.com/wp-content/plugins/advanced-ads-pro/modules/advanced-visitor-conditions/inc/conditions.min.js
//www.lightstalking.com/wp-content/themes/lightstalking/assets/js/index.js
document.createElement( "picture" );if(!window.HTMLPictureElement && document.addEventListener) {window.addEventListener("DOMContentLoaded", function() {var s = document.createElement("script");s.src = "https://www.lightstalking.com/wp-content/plugins/webp-express/js/picturefill.min.js";document.body.appendChild(s);});}
var essb_settings = {"ajax_url":"https:\/\/www.lightstalking.com\/wp-admin\/admin-ajax.php","essb3_nonce":"ad3c4bb2f8","essb3_plugin_url":"https:\/\/www.lightstalking.com\/wp-content\/plugins\/easy-social-share-buttons3","essb3_stats":true,"essb3_ga":false,"essb3_ga_ntg":false,"blog_url":"https:\/\/www.lightstalking.com\/","post_id":"138061","internal_stats":true};
https://www.lightstalking.com/wp-content/uploads/breeze/google/gtag.js
!function(f,b,e,v,n,t,s)
{if(f.fbq)return;n=f.fbq=function(){n.callMethod?
n.callMethod.apply(n,arguments):n.queue.push(arguments)};
if(!f._fbq)f._fbq=n;n.push=n;n.loaded=!0;n.version='2.0';
n.queue=[];t=b.createElement(e);t.async=!0;
t.src=v;s=b.getElementsByTagName(e)[0];
s.parentNode.insertBefore(t,s)}(window, document,'script',
'https://connect.facebook.net/en_US/fbevents.js');
fbq('init', '1079708588874183');
fbq('track', 'PageView');
var head = document.head;var script = document.createElement('script');script.type = 'text/javascript';script.src = "https://178444.tracking.hyros.com/v1/lst/universal-script?ph=6df64206c166a45894d8b8d2beeed3f98ece187ef7e83c10a2acca9a68e688a5&tag=!tracking";head.appendChild(script);
(function(c,l,a,r,i,t,y){
c[a]=c[a]||function(){(c[a].q=c[a].q||[]).push(arguments)};
t=l.createElement(r);t.async=1;t.src="https://www.clarity.ms/tag/"+i;
y=l.getElementsByTagName(r)[0];y.parentNode.insertBefore(t,y);
})(window, document, "clarity", "script", "jzjsbgih7m");
var advadsCfpQueue = [];
var advadsCfpAd = function( adID ){
if ( 'undefined' == typeof advadsProCfp ) { advadsCfpQueue.push( adID ) } else { advadsProCfp.addElement( adID ) }
};
document.documentElement.className = document.documentElement.className.replace( 'no-js', 'js' );
Skip to the contentWhen we start out on our journey into photography, one thing we strive for is image sharpness. We are often criticized by photographic peers and non photographers alike if an image is “blurry”. Because of this, it is easy to become fixated with sharpness, making sure every last pixel is in focus to the detriment of the actual composition. Whilst sharpness in an image is a good thing in general, there are times when a little blur adds a huge amount of visual weight to a shot. One such case is motion blur. Motion blur is something that is most often created in the shooting phase, deliberately shooting at a slower shutter speed when photographing moving subjects to capture a sense of motion. Sometimes, however, we do not get it right. So, as always, there is the old fallback – Photoshop. Today we will look at adding motion blur to an image in Photoshop.
Separating the Subject from the Background
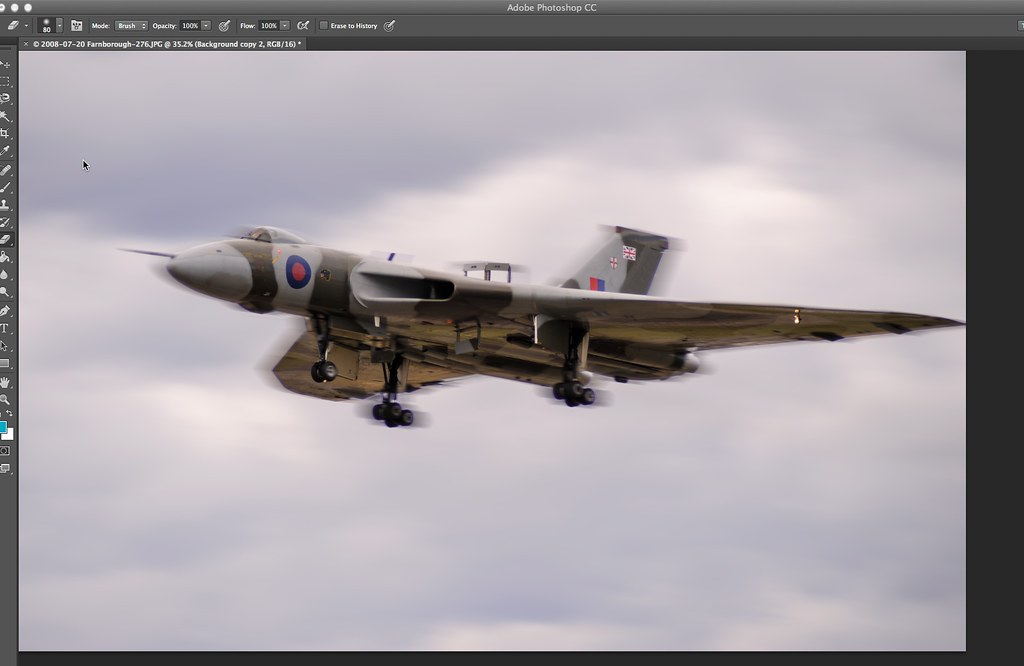
With our image open in Photoshop, the first stage is to separate our subject, in this case the aircraft, from the background. The reason for this is that when panning motion with a camera, there will be a difference in motion blur between the background and the foreground.
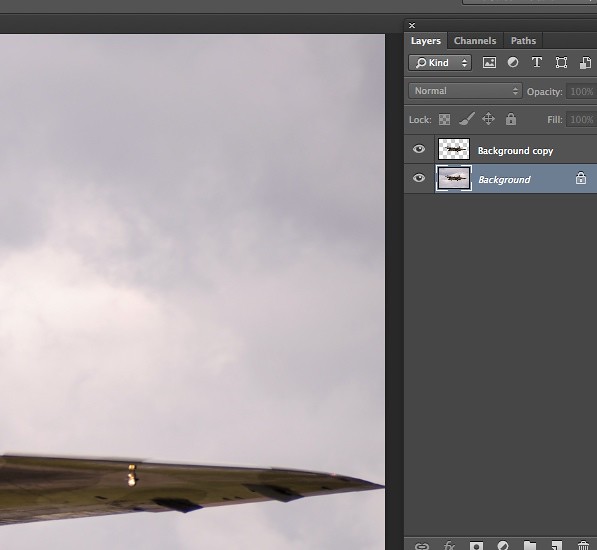
1. Duplicate the Layer and Isolate the Subject
First from the Layers, menu item select Duplicate Layer and give it a suitable name. Now we are going to use the magnetic lasso tool to isolate the subject, I used a feather of 2px and 5% contrast to isolate the aircraft from the clouds. It should be noted here that depending on the kind of subject in the photo, the selection tool may have to be chosen accordingly. (Click on the images for a bigger version of the image)
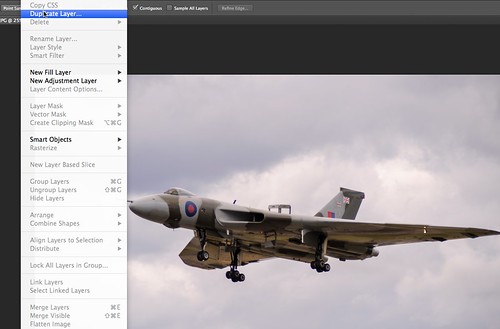
Duplicating the background layer
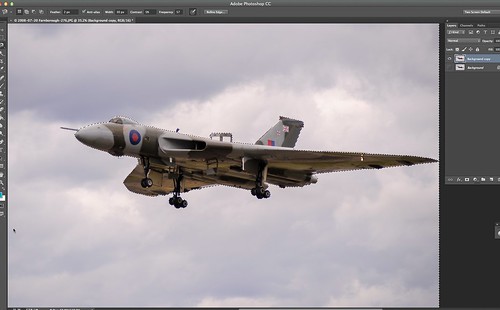
Selecting the subject using the magnetic lasso tool
2. Invert the Selection and Remove the Background
Once you have a good selection, we need to remove the clouds leaving just the aircraft. From the menu go to Select – Inverse. Now we can cut out the clouds by going to Edit – Cut. From the layers palette, switch off the visibility of the original background layer by clicking on the small eye icon.
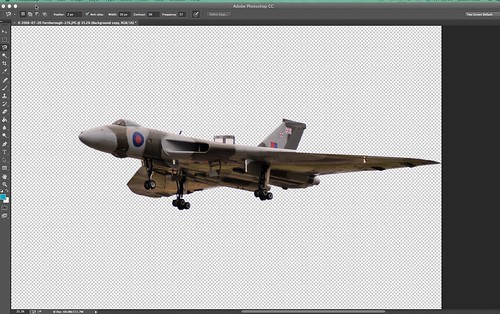
The cut out subject
3. Apply a Motion Blur to the Background Layer
Now turn the visibility of the original background layer back on and make sure that this layer is now active and selected in the layers palette. From the filters menu, select Blur – Motion Blur. Play around with the Angle and Distance settings to get a reasonable looking motion effect. In this case I have used an angle of -7 with a pixel distance of 183. Click Ok when happy.

Select the original background
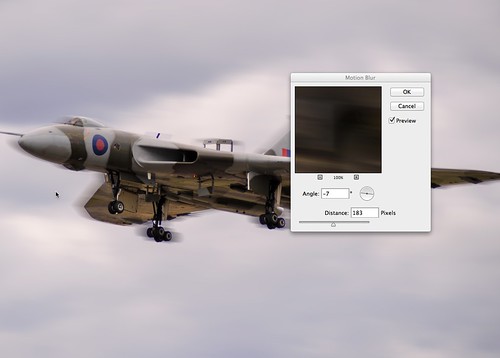
Blur the background layer with Motion Blur
4. Apply a Subtle Motion Blur to the Subject Too
Reselect the cut out aircraft layer and duplicate it by going to Layer – Duplicate. Give it a suitable name. Now we are going to apply a motion blur to this new aircraft layer. Select the motion blur tool but this time use a reduced amount of effect. In this sample, the pixel distance was only 20. This added a subdued motion to the aircraft compared to the clouds in the background.
5. Restrict the Blur to the Edges
Now to simulate the effect of panning, we are going to erase the interior parts of the aircraft leaving just the edges blurred. To do this, select the eraser tool from the tool bar and use a largish soft edge brush. Erase only the central areas of your subject. In this case, I have erased the fuselage and the underside of the wings as well as the tail. This reveals the static version of the aircraft underneath but maintains a blurring to the outer edges of the plane.

Erase the blur from the center parts of the image
And You're Done!
Once you are happy with the effect, you can flatten the image by going to Layer – Flatten Image. If you plan to work on the image further, don’t flatten the layers and save the image as a Photoshop PSD file.

The final image
As with many effects in Photoshop, it is important to pick the right image for conversion. With the right image the technique can look very authentic, but choosing an image that is less than suitable will result in a fake looking motion blur. And do remember to share your images created using this tutorial in the comments below, we'd love to see your results.
(function(d, s, id) {
var js, fjs = d.getElementsByTagName(s)[0];
if (d.getElementById(id)) return;
js = d.createElement(s); js.id = id;
js.src = "//forms.aweber.com/form/96/435600896.js";
fjs.parentNode.insertBefore(js, fjs);
}(document, "script", "aweber-wjs-8cq4o7hvd"));
document.getElementById( "ak_js_1" ).setAttribute( "value", ( new Date() ).getTime() );
if (typeof jQuery !== 'undefined' && typeof jQuery.ui !== 'undefined' && typeof jQuery.ui.tabs !== 'undefined' && typeof jQuery.widget !== 'undefined' && typeof TagGroupsBase !== 'undefined') {
TagGroupsBase.tabs('tag-groups-cloud-tabs-66212b88e228a', {"active":false}, true);
} else {
jQuery(document).ready(function(){
setTimeout(function(){
if (typeof jQuery !== 'undefined' && typeof jQuery.ui !== 'undefined' && typeof jQuery.ui.tabs !== 'undefined' && typeof jQuery.widget !== 'undefined') {
TagGroupsBase.tabs('tag-groups-cloud-tabs-66212b88e228a', {"active":false}, true);
} else {
console.log('[Tag Groups] Error: jQuery UI Tabs is missing!');
}
}, 500);
});
}
( $ => {
/**
* Displays toast message from storage, it is used when the user is redirected after login
*/
if ( window.sessionStorage ) {
$( window ).on( 'tcb_after_dom_ready', () => {
const message = sessionStorage.getItem( 'tcb_toast_message' );if ( message ) {
tcbToast( sessionStorage.getItem( 'tcb_toast_message' ), false );
sessionStorage.removeItem( 'tcb_toast_message' );
}
} );
}/**
* Displays toast message
*
* @param {string} message - message to display
* @param {Boolean} error - whether the message is an error or not
* @param {Function} callback - callback function to be called after the message is closed
*/
function tcbToast( message, error, callback ) {
/* Also allow "message" objects */
if ( typeof message !== 'string' ) {
message = message.message || message.error || message.success;
}
if ( ! error ) {
error = false;
}
TCB_Front.notificationElement.toggle( message, error ? 'error' : 'success', callback );
}
} )( typeof ThriveGlobal === 'undefined' ? jQuery : ThriveGlobal.$j );
(function($) {
$('.home #custom-home-more-categories').on("click", function() {
$(this).parent('.custom-home-categories').find('.custom-home-categories-list').toggleClass('show');
});
})(jQuery);
//www.lightstalking.com/wp-content/plugins/metronet-profile-picture/js/mpp-frontend.js
var pp_ajax_form = {"ajaxurl":"https:\/\/www.lightstalking.com\/wp-admin\/admin-ajax.php","confirm_delete":"Are you sure?","deleting_text":"Deleting...","deleting_error":"An error occurred. Please try again.","nonce":"080d501080","disable_ajax_form":"false","is_checkout":"0","is_checkout_tax_enabled":"0"};
//www.lightstalking.com/wp-content/plugins/wp-user-avatar/assets/js/frontend.min.js
//www.lightstalking.com/wp-includes/js/jquery/ui/core.min.js
//www.lightstalking.com/wp-includes/js/jquery/ui/tabs.min.js
//www.lightstalking.com/wp-includes/js/jquery/ui/accordion.min.js
var advanced_ads_cookies = {"cookie_path":"\/","cookie_domain":""};
var advadsCfpInfo = {"cfpExpHours":"3","cfpClickLimit":"3","cfpBan":"7","cfpPath":"","cfpDomain":"www.lightstalking.com"};
//www.lightstalking.com/wp-content/plugins/advanced-ads-pro/assets/js/advanced-ads-pro.min.js
//www.lightstalking.com/wp-includes/js/comment-reply.min.js
var beloadmore = {"url":"https:\/\/www.lightstalking.com\/wp-admin\/admin-ajax.php","query":{"post__not_in":[138061],"category_name":"photoshop","posts_per_page":3}};
//www.lightstalking.com/wp-content/themes/lightstalking/assets/js/load-more.js
var tve_dash_front = {"ajaxurl":"https:\/\/www.lightstalking.com\/wp-admin\/admin-ajax.php","force_ajax_send":"1","is_crawler":"","recaptcha":[],"post_id":"138061"};
//www.lightstalking.com/wp-content/plugins/thrive-visual-editor/thrive-dashboard/js/dist/frontend.min.js
_stq = window._stq || [];
_stq.push([ "view", JSON.parse("{\"v\":\"ext\",\"blog\":\"12538233\",\"post\":\"138061\",\"tz\":\"-4\",\"srv\":\"www.lightstalking.com\",\"j\":\"1:13.3.1\"}") ]);
_stq.push([ "clickTrackerInit", "12538233", "138061" ]);
//www.lightstalking.com/wp-content/plugins/akismet/_inc/akismet-frontend.js
var eztoc_smooth_local = {"scroll_offset":"30","add_request_uri":""};
//www.lightstalking.com/wp-content/plugins/easy-table-of-contents/assets/js/smooth_scroll.min.js
//www.lightstalking.com/wp-content/plugins/easy-table-of-contents/vendor/js-cookie/js.cookie.min.js
//www.lightstalking.com/wp-content/plugins/easy-table-of-contents/vendor/sticky-kit/jquery.sticky-kit.min.js
var ezTOC = {"smooth_scroll":"1","scroll_offset":"30","fallbackIcon":"<span class=\"\"><span class=\"eztoc-hide\" style=\"display:none;\">Toggle<\/span><span class=\"ez-toc-icon-toggle-span\"><svg style=\"fill: #666666;color:#666666\" xmlns=\"http:\/\/www.w3.org\/2000\/svg\" class=\"list-377408\" width=\"20px\" height=\"20px\" viewBox=\"0 0 24 24\" fill=\"none\"><path d=\"M6 6H4v2h2V6zm14 0H8v2h12V6zM4 11h2v2H4v-2zm16 0H8v2h12v-2zM4 16h2v2H4v-2zm16 0H8v2h12v-2z\" fill=\"currentColor\"><\/path><\/svg><svg style=\"fill: #666666;color:#666666\" class=\"arrow-unsorted-368013\" xmlns=\"http:\/\/www.w3.org\/2000\/svg\" width=\"10px\" height=\"10px\" viewBox=\"0 0 24 24\" version=\"1.2\" baseProfile=\"tiny\"><path d=\"M18.2 9.3l-6.2-6.3-6.2 6.3c-.2.2-.3.4-.3.7s.1.5.3.7c.2.2.4.3.7.3h11c.3 0 .5-.1.7-.3.2-.2.3-.5.3-.7s-.1-.5-.3-.7zM5.8 14.7l6.2 6.3 6.2-6.3c.2-.2.3-.5.3-.7s-.1-.5-.3-.7c-.2-.2-.4-.3-.7-.3h-11c-.3 0-.5.1-.7.3-.2.2-.3.5-.3.7s.1.5.3.7z\"\/><\/svg><\/span><\/span>"};
//www.lightstalking.com/wp-content/plugins/easy-table-of-contents/assets/js/front.min.js
var tcb_current_post_lists=JSON.parse('[]'); var tcb_post_lists=tcb_post_lists?[...tcb_post_lists,...tcb_current_post_lists]:tcb_current_post_lists;
/(trident|msie)/i.test(navigator.userAgent)&&document.getElementById&&window.addEventListener&&window.addEventListener("hashchange",function(){var t,e=location.hash.substring(1);/^[A-z0-9_-]+$/.test(e)&&(t=document.getElementById(e))&&(/^(?:a|select|input|button|textarea)$/i.test(t.tagName)||(t.tabIndex=-1),t.focus())},!1);
if ( !window.TL_Const ) {var TL_Const={"security":"9e69748025","ajax_url":"https:\/\/www.lightstalking.com\/wp-admin\/admin-ajax.php","action_conversion":"tve_leads_ajax_conversion","action_impression":"tve_leads_ajax_impression","custom_post_data":{"http_referrer":"https:\/\/www.lightstalking.com\/add-a-realistic-motion-blur-in-photoshop-with-these-5-steps"},"current_screen":{"screen_type":4,"screen_id":138061},"ignored_fields":["email","_captcha_size","_captcha_theme","_captcha_type","_submit_option","_use_captcha","g-recaptcha-response","__tcb_lg_fc","__tcb_lg_msg","_state","_form_type","_error_message_option","_back_url","_submit_option","url","_asset_group","_asset_option","mailchimp_optin","tcb_token","tve_labels","tve_mapping","_api_custom_fields","_sendParams","_autofill"],"ajax_load":1};} else { window.TL_Front && TL_Front.extendConst && TL_Front.extendConst({"security":"9e69748025","ajax_url":"https:\/\/www.lightstalking.com\/wp-admin\/admin-ajax.php","action_conversion":"tve_leads_ajax_conversion","action_impression":"tve_leads_ajax_impression","custom_post_data":{"http_referrer":"https:\/\/www.lightstalking.com\/add-a-realistic-motion-blur-in-photoshop-with-these-5-steps"},"current_screen":{"screen_type":4,"screen_id":138061},"ignored_fields":["email","_captcha_size","_captcha_theme","_captcha_type","_submit_option","_use_captcha","g-recaptcha-response","__tcb_lg_fc","__tcb_lg_msg","_state","_form_type","_error_message_option","_back_url","_submit_option","url","_asset_group","_asset_option","mailchimp_optin","tcb_token","tve_labels","tve_mapping","_api_custom_fields","_sendParams","_autofill"],"ajax_load":1})}
window.advads_admin_bar_items = [];
var TVE_Ult_Data = {"ajaxurl":"https:\/\/www.lightstalking.com\/wp-admin\/admin-ajax.php","ajax_load_action":"tve_ult_ajax_load","conversion_events_action":"tve_ult_conversion_event","shortcode_campaign_ids":[],"matched_display_settings":[],"campaign_ids":[],"post_id":138061,"is_singular":true,"tu_em":"","evergreen_redirects":[]};
https://www.lightstalking.com/wp-content/plugins/thrive-ultimatum/js/dist/no-campaign.min.js
!function(){window.advanced_ads_ready_queue=window.advanced_ads_ready_queue||[],advanced_ads_ready_queue.push=window.advanced_ads_ready;for(var d=0,a=advanced_ads_ready_queue.length;d<a;d++)advanced_ads_ready(advanced_ads_ready_queue[d])}();
(function() { var po = document.createElement('script'); po.type = 'text/javascript'; po.async=true;; po.src = 'https://www.lightstalking.com/wp-content/plugins/easy-social-share-buttons3/lib/modules/conversions-pro/assets/share-conversions-tracker.js'; var s = document.getElementsByTagName('script')[0]; s.parentNode.insertBefore(po, s); })();(function() { var po = document.createElement('script'); po.type = 'text/javascript'; po.async=true;; po.src = 'https://www.lightstalking.com/wp-content/plugins/easy-social-share-buttons3/assets/modules/pinterest-pro.min.js'; var s = document.getElementsByTagName('script')[0]; s.parentNode.insertBefore(po, s); })();(function() { var po = document.createElement('script'); po.type = 'text/javascript'; po.async=true;; po.src = 'https://www.lightstalking.com/wp-content/plugins/easy-social-share-buttons3/assets/modules/subscribe-forms.min.js'; var s = document.getElementsByTagName('script')[0]; s.parentNode.insertBefore(po, s); })();(function() { var po = document.createElement('script'); po.type = 'text/javascript'; po.async=true;; po.src = 'https://www.lightstalking.com/wp-content/plugins/easy-social-share-buttons3/assets/js/essb-core.min.js'; var s = document.getElementsByTagName('script')[0]; s.parentNode.insertBefore(po, s); })();
let ccwpDOMLoaded=!1;
let ccwp_loaded = false;
let resources_length=0;
let resources =undefined;
let is_last_resource = 0;
ccwpUserInteractions=["keydown","mousemove","wheel","touchmove","touchstart","touchend","touchcancel","touchforcechange"];
ccwpUserInteractions.forEach(function(e){
window.addEventListener(e,calculate_load_times);
});
function calculate_load_times() {
// Check performance support
if (performance === undefined) {
console.log("Performance NOT supported");
return;
}
// Get a list of "resource" performance entries
resources = performance.getEntriesByType("resource");
if (resources === undefined || resources.length <= 0) {
console.log("NO Resource performance records");
}
if(resources.length){
resources_length=resources.length;
}
for(let i=0; i < resources.length; i++) {
if(resources[i].responseEnd>0){
is_last_resource = is_last_resource + 1;
}
}
let uag = navigator.userAgent;
let gpat = /Google Page Speed Insights/gm;
let gres = uag.match(gpat);
let cpat = /Chrome-Lighthouse/gm;
let cres = uag.match(cpat);
let wait_till=300;
let new_ua = "Mozilla/5.0 (Linux; Android 11; moto g power (2022)) AppleWebKit/537.36 (KHTML, like Gecko) Chrome/109.0.0.0 Mobile Safari/537.36";
let new_ua2 = "Mozilla/5.0 (Macintosh; Intel Mac OS X 10_15_7) AppleWebKit/537.36 (KHTML, like Gecko) Chrome/109.0.0.0 Safari/537.36";
if(gres || cres || uag==new_ua || uag==new_ua2){
wait_till = 3000;
}
if(is_last_resource==resources.length){
setTimeout(function(){
console.log("ccwpTriggerDelayedScripts timeout : "+wait_till);
ccwpTriggerDelayedScripts();
},wait_till);
}
}
window.addEventListener("load", function(e) {
console.log("load complete");
setTimeout(function(){
calculate_load_times();
},100);
});async function ccwpTriggerDelayedScripts() {
if(ccwp_loaded){ return ;}
ccwpPreloadStyles();
ccwpPreloadDelayedScripts();
ccwpLoadCss();
ccwpScriptLoading();
ccwp_loaded=true;
}
function ccwpPreloadStyles() {
let e = document.createDocumentFragment();
var cssEle = document.querySelectorAll("link[rel=ccwpdelayedstyle]");
for(let i=0; i <= cssEle.length;i++){
if(cssEle[i]){
cssEle[i].href = removeVersionFromLink(cssEle[i].href);
let r = document.createElement("link");
r.href = cssEle[i].href;
r.rel = "preload";
r.as = "style";
e.appendChild(r);
}
}
document.head.appendChild(e);
}
function ccwpPreloadDelayedScripts() {
var e = document.createDocumentFragment();
document.querySelectorAll("script[type=ccwpdelayedscript]").forEach(function(t) {
var n = removeVersionFromLink(t.getAttribute("src"));
if (n) {
t.setAttribute("src", n);
var r = document.createElement("link");
r.href = n, r.rel = "preload", r.as = "script", e.appendChild(r)
}
}), document.head.appendChild(e)
}
function ccwpScriptLoading(){
var jsEle = document.querySelectorAll("script[type=ccwpdelayedscript]");
jsEle.forEach(function(t) {
t.type = "text/javascript";
if(t.src)
{
t.src = removeVersionFromLink(t.src);
}
});
}function ccwpLoadCss(){
var cssEle = document.querySelectorAll("link[rel=ccwpdelayedstyle]");
for(let i=0; i <= cssEle.length;i++){
if(cssEle[i]){
cssEle[i].href = removeVersionFromLink(cssEle[i].href);
cssEle[i].rel = "stylesheet";
cssEle[i].type = "text/css";
}
}var cssEle = document.querySelectorAll("style[type=ccwpdelayedstyle]");
for(let i=0; i <= cssEle.length;i++){
if(cssEle[i]){
cssEle[i].type = "text/css";
}
}
}
function removeVersionFromLink(link)
{
if(ccwpIsValidUrl(link))
{
const url = new URL(ccwpFormatLink(link));
url.searchParams.delete("ver");
url.searchParams.delete("time");
return url.href;
}
else{
return link;
}
}
function ccwpIsValidUrl(urlString)
{
if(urlString){
var expression =/[-a-zA-Z0-9@:%_\+.~#?&//=]{2,256}\.[a-z]{2,4}\b(\/[-a-zA-Z0-9@:%_\+.~#?&//=]*)?/gi;
var regex = new RegExp(expression);
return urlString.match(regex);
}
return false;
}
function ccwpFormatLink(link)
{
let http_check=link.match("http:");
let https_check=link.match("https:");
if(!http_check && !https_check)
{
return location.protocol+link;
}
return link;
}


1 Comment
I use Elements, the motion blur does not have all the features that PS has. Been using Topaz Remask to get the results I want. Thanks for another lesson.