Welcome to the second of our tutorial series on Gimp. As we have said before Gimp has evolved into an extremely powerful tool for photographers, having many of the features contained in it’s payware cousin, Photoshop. Today we are going to take a look at one of those features, layers and as before, the best way to do this is by doing something constructive, in this case adding a graduated filter to an image with a dull sky. For the first tutorial in the series, check out the post on how to make your images sparkle using levels and curves.
Open the Image
The image I am using in this tutorial has a potentially interesting sky that needs livening up. Click here to download the image to work along. With the image open in Gimp, check that you can see the layers palette to the right and make sure the layers tab is selected.
Create a Duplicate Layer
First thing we need to do is create a duplicate of our original image. To do this, we go to the main menu and select Layer – Duplicate Layer. We will now see our duplicate layer appear above the original in the layers palette. Unlike Photoshop, in Gimp you do not get the option to rename a layer when creating it, however, you can double click on the layer in the palette to rename it. In this case we will call it Graduated Sky.
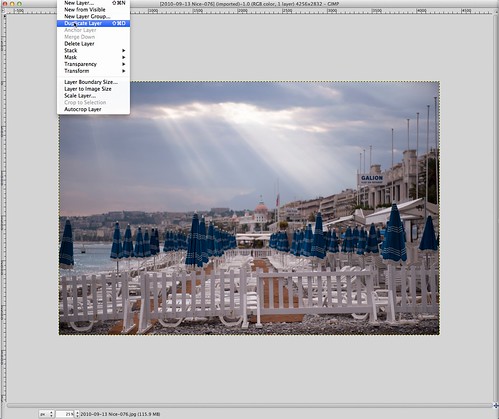
Duplicate the background layer
Darken the Sky
Now with the duplicated layer selected, we are going to darken the sky to get the effect of a graduated filter. To do this you can use either the levels or curves tool that we learned about in the previous tutorial. The curves tool is preferable here as it gives you a whole lot more control. As you can see from the image, I have created a luminance curve to darken both the darkest parts of the clouds but also to add definition to the god rays breaking through the clouds. To give the image an end of day, sunset feel, I have also put a slight curve into the blue and red channels. Curving the blue channel down in the mid tone regions adds a subtle yellow feel to the image and curving the red very slightly up has added a touch of warmth. By using the individual RGB curves you can theme your graduated filter to more or less any color. For example, adding a deeper blue to a blue sky. Click OK once you are happy with your curve.
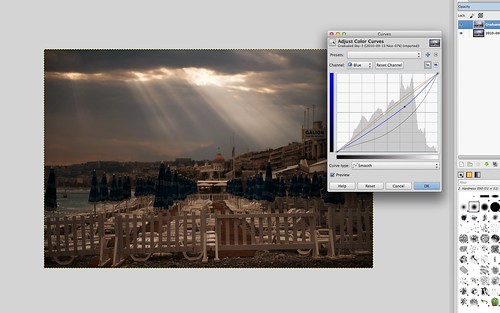
Using curves to get the sky as we want it
Add a Layer Mask
Next we are going to use another technique that Photoshop users may be familiar with, adding a layer mask. Make sure your duplicate layer is still selected and from the menu select Layer – Mask – Add Layer Mask. You can also right click on the duplicate layer to do this. Make sure White (Full Opacity) is selected from the pop up dialogue box and click Add.
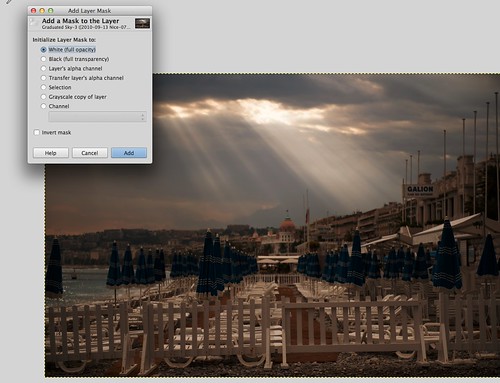
Adding a Layer Mask
Set Foreground and Background Color
From the tool box on the right, you will see the foreground and background colors, again very similar to Photoshop. Make sure that the foreground is set to white and the background to black. By default, it is the other way round but by clicking on the reverse arrow you can switch them. If either the foreground or background is not black or white, clicking on either color swatch will bring up a color palette, allowing you to select the correct color.
Use Blend Fill Tool for a Graduated Fill Effect
Using another familiar tool select the Blend Fill tool similar to the Graduated Fill tool in Photoshop. With this tool, we can draw a line from the top of our image down towards the bottom. You need to judge where to stop the Blend Fill, I usually find around one third of the distance from the bottom of the sky to the bottom of the image works well. If you a have more foreground subjects to one side, you can angle the Blend Fill. When you release the mouse, your will see the sky remains dark but your foreground returns to the brightness of the original. If you are not happy with the position of the blend, simply repeating the exercise will replace it with a new version.
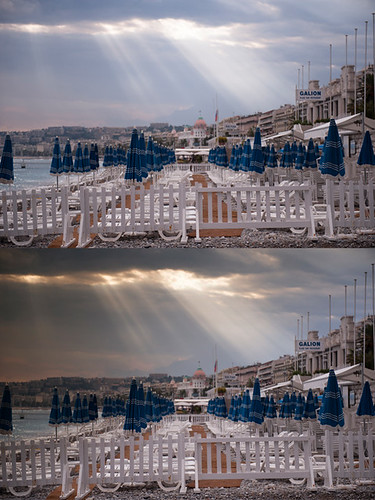
Before and After
If you want your sky darker, you now have two options. You can make a further curves correction on the duplicate layer or you can duplicate the layer again and back off the opacity to suit your need.
So there you have it, a simple technique to add drama to your skies using a very powerful yet free image manipulation program.


1 Comment
Great post, there are a lot of GIMP users these days, and with all the LR-PS jargon that flies around, it is really helpful to get some important functions – like this one translated into GIMP-speak. Your technique works well for me. Thanks!!