Ahh, the romance of piers in photographs, novels and movies. They evoke many memories – of storms, sunsets, family vacations, loneliness and the power of the ocean. Piers can be warm and inviting. They can also be mysterious and haunting. The same pier captured at the same time by two photographers can have completely different moods. The mood and atmosphere depends on the perspective at the time of capture and that produced during post-processing.

Blue Dawn on the Pier. Photo by Sheen's Nature Photography
There are three key elements to use in pier photography. These elements include:
- Leading lines
- Movement
- Vanishing points
While pier photographs will typically have all three, using one as the objective at the time of capture helps answer the question, “What do I want the image to reflect”?
Use Leading Lines
These lines may be straight, such as the railing on a pier. Lines with movement and shape, such as the edge of the wave or bubbly foam left in the wave's wake, draw an interesting line for the viewer to follow. Leading lines pull the eye directionally to a point of interest. This could be a vanishing point or a subject along the line's path.
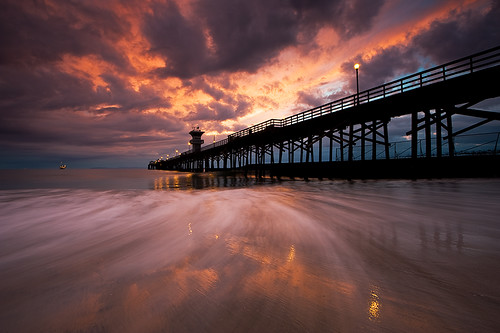
Photo by Eric Bryan
Other lines that can be effectively used include trails of lights, rocks on the edge, sandy ridges created by the tide, fascinating series of clouds, or even the angles of sailboats tied at the pier.
Some lines are not immediately obvious.
As many of the writers here at Light Stalking have shared for other types of photography, step back and study the area. Interesting patterns, shadows, structures and lines will potentially emerge in unexpected places.
When working with leading lines, a big depth of field is typically desired. Working with a small aperture (high f-stop number such as f/16 or f/22) pulls the perspective of ‘everything in focus' to the viewer.
A shallower depth of field could be preferred for a subject in the foreground that is balanced by soft leading lines in the background. In this case the eyes are pulled into the distance only to come back and rest the eyes on the focal point.
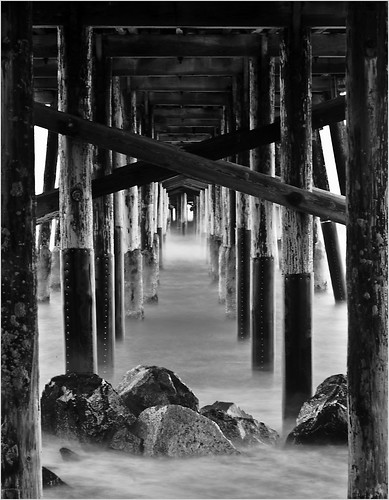
Photo by Rex Boggs
Capture Movement
Slow shutter speeds embrace and soften the movement of the water. Depending on the shutter speed, the water flow may be a gentle, milky movement, a haze, or a foggy cast.
Clouds with long exposures appear mysterious, as if they are actually gliding in the same direction as patterns in the water. Working with a large depth of field, wide angle lenses and long exposures (slow shutter speeds) produces the best results.
If working after sunrise, using neutral density filters will darken the setting to allow for slower shutter speeds.
Include Vanishing Points
The long, leading parallel lines that give the appearance of joining in the distance is a base definition of a vanishing point. Vanishing points closely reflect a three dimensional perspective in a two dimension photograph.
Wide and extra wide angle lenses emphasize that dramatic effect when the lines start in the foreground and extend to infinity. Using small apertures (large f/stop numbers) and applying hyperfocal distance creates a large depth of field.
Many articles have been written about hyperfocal distances being used to maximize the depth of field. Charts, equations, apps all have their place and effective uses. For those who work with specificity, here's a couple of sources to help calculate optimum hyperfocal distance.
- DOF Master Depth of Field Calculator
- DOF and Hyperfocal Distance, Tables and Calculator – this article has an excellent comparison of focusing at infinity vs. using hyperfocal distance.
Before going into the field, I review the charts in advance to get an idea of recommended ranges and use those initially. Then I will shift focus points to different areas to see what effects can be achieved.

Gloom on the Gray. Photo by Sheen's Nature Photography
Bonus Tips
- Shoot in raw – more detail and more to work with during processing
- Gear – tripod, remote cable release, wide angle lenses
- Neutral density filters – for use after sunrise and before sunset
- Circular polarizing filters – for use in bright conditions when needing to reduce glare, bring out definition – such as fluffy, white clouds
When considering piers, oceans and large lakes immediately come to mind. However, small piers, boating areas and small boardwalks can also create some fascinating images and may be closer to home.