Headshot, at first glance might seem like a fairly simple photograph to shoot, but when you get into it, you realize that it is a whole job description. There are many professional photographers that do only headshots. They specialize in it only because it takes great amount of time to master it.
However, there are few general guidelines which you can follow in order to improve your headshot and portrait photography. It does require some advanced knowledge of photography, photo gear and post-processing, but that shouldn’t be a problem if you are a dedicated photographer.
Composition
The most important of all. The composition marks the difference between snapshot and great photograph. There are many things involving composition that one has to look out for. Composing by the rules of thirds and golden ratio is often advised. Those rules existed even before photography was invented. You’ll need to compose in such way so the model has room to “breathe”. Meaning not too tight, but then again not too wide.

Photo by prosto photos
Light
First and foremost is the foreground vs background light. Simply put, your model has to be a tad brighter than the background in order for the eye to seek out for it. On another note, the light diffusion is also important. Soft light is preferable but doesn’t have to be the only thing that you should go for. There are many creative ways to use harsh light. While lighting up the portrait, take extra time to make the light so it lights up the eyes good. Eyes are the most important part of a headshot, so they have to be lit good, have decent catchlight (in order to get that image pop) and be well defined.
Focus and Selective Focus
Separating the model from the background is always a smart thing to do. Having smooth and uncluttered background leads the eye right on the subject and also makes the photographs look more professional to the untrained eye. To achieve selective focus wide aperture is a must, but then again the focus field is small. What you need to do is focus on the eye which is closest to the camera, thus bring the attention to the eyes of the person you photograph. You can have the whole subject in focus while having nicely blurred background, but for that you need long lens – 200 mm or longer – which has great compression and often can look less flattering than 85mm or 135mm lens would look.
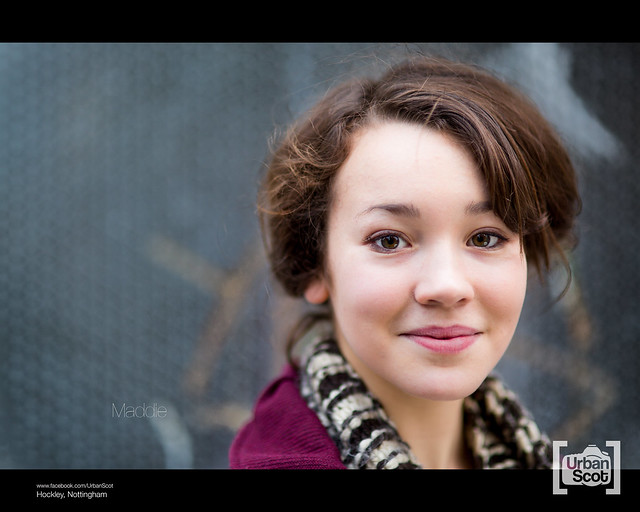
Photo by The Urban Scot
Lens
As mentioned before, you need a lens which is sharp, has nice and wide aperture and is long enough not to suffer from distortion and short enough to avoid zoom compression. But, most importantly you need a good sharp prime lens, since there is good amount of sharpness lost on zoom lenses even if it were an L series.
Model
It is important for the model to feel comfortable around the photographer, so make sure you communicate enough, be nice and polite and keep in mind that the models aren’t mind readers. You’ll have to tell them what you want them to do, even show them if necessary. “Please”, “Thank You”, and “You are doing great” are some wise words to remember.

Photo by The Urban Scot
Post-processing
This would be the second half of having the headshot done. Most likely you’ll need the same amount of time spent here as you’d have shooting the image. First of all, you’ll need to correct the meterings that the camera has missed, then enhance the prominent features of the image, smoothen the skin, correct the imperfections (blemishes, red spots and so on). There are various techniques for post-processing, but no matter which one you use you need to be careful on one key thing: Do not overdo anything. Keep it real. Nobody wants to see portraiture that looks like it has been washed through loads of filters. Keep the skin smooth but texturised, and do not kill all the details available. Make sure all the tonalities are correct, saturation also. Skin has to have the color of the skin, not orange or purple.
After all that is done, let the image sleep for a while and come back at it in 48 hours when your eyes and perspective are fresh. You’ll probably be able to notice small mistakes which you have missed earlier on. Or you’ll redo the whole post-processing because you didn’t do it properly the first time.
That would be that, so practice your portraiture, do everything in moderation and your headshot photography will improve in no time.


1 Comment
Thank you for all the superbe hints and techniques you share.