window._wpemojiSettings = {"baseUrl":"https:\/\/s.w.org\/images\/core\/emoji\/14.0.0\/72x72\/","ext":".png","svgUrl":"https:\/\/s.w.org\/images\/core\/emoji\/14.0.0\/svg\/","svgExt":".svg","source":{"concatemoji":"\/\/www.lightstalking.com\/wp-includes\/js\/wp-emoji-release.min.js?ver=00ee2dc9c4a47c0421c3a1063c12ecee"}};
/*! This file is auto-generated */
!function(i,n){var o,s,e;function c(e){try{var t={supportTests:e,timestamp:(new Date).valueOf()};sessionStorage.setItem(o,JSON.stringify(t))}catch(e){}}function p(e,t,n){e.clearRect(0,0,e.canvas.width,e.canvas.height),e.fillText(t,0,0);var t=new Uint32Array(e.getImageData(0,0,e.canvas.width,e.canvas.height).data),r=(e.clearRect(0,0,e.canvas.width,e.canvas.height),e.fillText(n,0,0),new Uint32Array(e.getImageData(0,0,e.canvas.width,e.canvas.height).data));return t.every(function(e,t){return e===r[t]})}function u(e,t,n){switch(t){case"flag":return n(e,"\ud83c\udff3\ufe0f\u200d\u26a7\ufe0f","\ud83c\udff3\ufe0f\u200b\u26a7\ufe0f")?!1:!n(e,"\ud83c\uddfa\ud83c\uddf3","\ud83c\uddfa\u200b\ud83c\uddf3")&&!n(e,"\ud83c\udff4\udb40\udc67\udb40\udc62\udb40\udc65\udb40\udc6e\udb40\udc67\udb40\udc7f","\ud83c\udff4\u200b\udb40\udc67\u200b\udb40\udc62\u200b\udb40\udc65\u200b\udb40\udc6e\u200b\udb40\udc67\u200b\udb40\udc7f");case"emoji":return!n(e,"\ud83e\udef1\ud83c\udffb\u200d\ud83e\udef2\ud83c\udfff","\ud83e\udef1\ud83c\udffb\u200b\ud83e\udef2\ud83c\udfff")}return!1}function f(e,t,n){var r="undefined"!=typeof WorkerGlobalScope&&self instanceof WorkerGlobalScope?new OffscreenCanvas(300,150):i.createElement("canvas"),a=r.getContext("2d",{willReadFrequently:!0}),o=(a.textBaseline="top",a.font="600 32px Arial",{});return e.forEach(function(e){o[e]=t(a,e,n)}),o}function t(e){var t=i.createElement("script");t.src=e,t.defer=!0,i.head.appendChild(t)}"undefined"!=typeof Promise&&(o="wpEmojiSettingsSupports",s=["flag","emoji"],n.supports={everything:!0,everythingExceptFlag:!0},e=new Promise(function(e){i.addEventListener("DOMContentLoaded",e,{once:!0})}),new Promise(function(t){var n=function(){try{var e=JSON.parse(sessionStorage.getItem(o));if("object"==typeof e&&"number"==typeof e.timestamp&&(new Date).valueOf()<e.timestamp+604800&&"object"==typeof e.supportTests)return e.supportTests}catch(e){}return null}();if(!n){if("undefined"!=typeof Worker&&"undefined"!=typeof OffscreenCanvas&&"undefined"!=typeof URL&&URL.createObjectURL&&"undefined"!=typeof Blob)try{var e="postMessage("+f.toString()+"("+[JSON.stringify(s),u.toString(),p.toString()].join(",")+"));",r=new Blob([e],{type:"text/javascript"}),a=new Worker(URL.createObjectURL(r),{name:"wpTestEmojiSupports"});return void(a.onmessage=function(e){c(n=e.data),a.terminate(),t(n)})}catch(e){}c(n=f(s,u,p))}t(n)}).then(function(e){for(var t in e)n.supports[t]=e[t],n.supports.everything=n.supports.everything&&n.supports[t],"flag"!==t&&(n.supports.everythingExceptFlag=n.supports.everythingExceptFlag&&n.supports[t]);n.supports.everythingExceptFlag=n.supports.everythingExceptFlag&&!n.supports.flag,n.DOMReady=!1,n.readyCallback=function(){n.DOMReady=!0}}).then(function(){return e}).then(function(){var e;n.supports.everything||(n.readyCallback(),(e=n.source||{}).concatemoji?t(e.concatemoji):e.wpemoji&&e.twemoji&&(t(e.twemoji),t(e.wpemoji)))}))}((window,document),window._wpemojiSettings);
window.advanced_ads_ready=function(e,a){a=a||"complete";var d=function(e){return"interactive"===a?"loading"!==e:"complete"===e};d(document.readyState)?e():document.addEventListener("readystatechange",(function(a){d(a.target.readyState)&&e()}),{once:"interactive"===a})},window.advanced_ads_ready_queue=window.advanced_ads_ready_queue||[];
//www.lightstalking.com/wp-includes/js/jquery/jquery.min.js
//www.lightstalking.com/wp-includes/js/jquery/jquery-migrate.min.js
var breeze_prefetch = {"local_url":"https:\/\/www.lightstalking.com","ignore_remote_prefetch":"1","ignore_list":["\/wp-admin\/"]};
//www.lightstalking.com/wp-content/plugins/breeze/assets/js/js-front-end/breeze-prefetch-links.min.js
//www.lightstalking.com/wp-content/plugins/intelly-countdown-pro/assets/deps/moment/moment.js
//www.lightstalking.com/wp-content/plugins/intelly-countdown-pro/assets/js/icp.library.js
//www.lightstalking.com/wp-includes/js/imagesloaded.min.js
//www.lightstalking.com/wp-includes/js/masonry.min.js
//www.lightstalking.com/wp-includes/js/jquery/jquery.masonry.min.js
var tve_frontend_options = {"is_editor_page":"","page_events":[],"is_single":"1","ajaxurl":"https:\/\/www.lightstalking.com\/wp-admin\/admin-ajax.php","social_fb_app_id":"234010690138279","dash_url":"https:\/\/www.lightstalking.com\/wp-content\/plugins\/thrive-visual-editor\/thrive-dashboard","translations":{"Copy":"Copy"},"post_id":"16786","user_profile_nonce":"04876fb9ff","ip":"64.227.14.160","current_user":[],"post_title":"How to Photograph Senior Portraits That Will Take Pride of Place on the Mantlepiece","post_type":"post","post_url":"https:\/\/www.lightstalking.com\/how-to-photograph-senior-portraits-that-will-be-loved\/","is_lp":"","post_request_data":[],"conditional_display":{"is_tooltip_dismissed":false}};
//www.lightstalking.com/wp-content/plugins/thrive-visual-editor/editor/js/dist/modules/general.min.js
//www.lightstalking.com/wp-content/plugins/wp-user-avatar/assets/flatpickr/flatpickr.min.js
//www.lightstalking.com/wp-content/plugins/wp-user-avatar/assets/select2/select2.min.js
//www.lightstalking.com/wp-content/plugins/tag-groups/assets/js/frontend.min.js
var advads_options = {"blog_id":"1","privacy":{"enabled":false,"state":"not_needed"}};
//www.lightstalking.com/wp-content/plugins/advanced-ads/public/assets/js/advanced.min.js
var advanced_ads_pro_visitor_conditions = {"referrer_cookie_name":"advanced_ads_pro_visitor_referrer","referrer_exdays":"365","page_impr_cookie_name":"advanced_ads_page_impressions","page_impr_exdays":"3650"};
//www.lightstalking.com/wp-content/plugins/advanced-ads-pro/modules/advanced-visitor-conditions/inc/conditions.min.js
//www.lightstalking.com/wp-content/themes/lightstalking/assets/js/index.js
document.createElement( "picture" );if(!window.HTMLPictureElement && document.addEventListener) {window.addEventListener("DOMContentLoaded", function() {var s = document.createElement("script");s.src = "https://www.lightstalking.com/wp-content/plugins/webp-express/js/picturefill.min.js";document.body.appendChild(s);});}
var essb_settings = {"ajax_url":"https:\/\/www.lightstalking.com\/wp-admin\/admin-ajax.php","essb3_nonce":"f6325c5592","essb3_plugin_url":"https:\/\/www.lightstalking.com\/wp-content\/plugins\/easy-social-share-buttons3","essb3_stats":true,"essb3_ga":false,"essb3_ga_ntg":false,"blog_url":"https:\/\/www.lightstalking.com\/","post_id":"16786","internal_stats":true};
https://www.lightstalking.com/wp-content/uploads/breeze/google/gtag.js
!function(f,b,e,v,n,t,s)
{if(f.fbq)return;n=f.fbq=function(){n.callMethod?
n.callMethod.apply(n,arguments):n.queue.push(arguments)};
if(!f._fbq)f._fbq=n;n.push=n;n.loaded=!0;n.version='2.0';
n.queue=[];t=b.createElement(e);t.async=!0;
t.src=v;s=b.getElementsByTagName(e)[0];
s.parentNode.insertBefore(t,s)}(window, document,'script',
'https://connect.facebook.net/en_US/fbevents.js');
fbq('init', '1079708588874183');
fbq('track', 'PageView');
var head = document.head;var script = document.createElement('script');script.type = 'text/javascript';script.src = "https://178444.tracking.hyros.com/v1/lst/universal-script?ph=6df64206c166a45894d8b8d2beeed3f98ece187ef7e83c10a2acca9a68e688a5&tag=!tracking";head.appendChild(script);
(function(c,l,a,r,i,t,y){
c[a]=c[a]||function(){(c[a].q=c[a].q||[]).push(arguments)};
t=l.createElement(r);t.async=1;t.src="https://www.clarity.ms/tag/"+i;
y=l.getElementsByTagName(r)[0];y.parentNode.insertBefore(t,y);
})(window, document, "clarity", "script", "jzjsbgih7m");
var advadsCfpQueue = [];
var advadsCfpAd = function( adID ){
if ( 'undefined' == typeof advadsProCfp ) { advadsCfpQueue.push( adID ) } else { advadsProCfp.addElement( adID ) }
};
document.documentElement.className = document.documentElement.className.replace( 'no-js', 'js' );
Skip to the contentBravo! You've got that nice camera and a great lens, why not put it to good use? You can have some fun, and perhaps, maybe even save a few bucks along the way. However, here is a secret you may not know. It's not as easy as it looks. It doesn't take a whole trunk-load of gear to get great results. What it does take is a little time, a small investment in materials, a good sense of humor, and a willingness to work with your subject.
No problem! Right?
So, what do you need to do to capture your senior in a way that proves fruitful to you and them?
Here's a checklist to get you started.
- You need a location.
- Clothing and perhaps props.
- A camera and lens. A DSLR with a selection of lenses would be nice but it's not mandatory. You can also do this with a point-and-shoot camera as well.
- Simple lighting and light modification gear.
- A few extra human bodies will come in handy.
Let's look at these one at a time.
How to Choose a Great Location
There are basically two types of senior portraits: the close-up which is commonly referred to as a headshot and the half-length to full length body shot. We'll assume you have no access to a studio so essentially we're talking about a location shoot, whether it's indoors or outdoors. If you've never attempted this before, an outdoor shoot will provide an easier time for you.
A common location for portraits is a park area. Parks are fine but remember, kids are often looking for something different. Try to think outside the box.
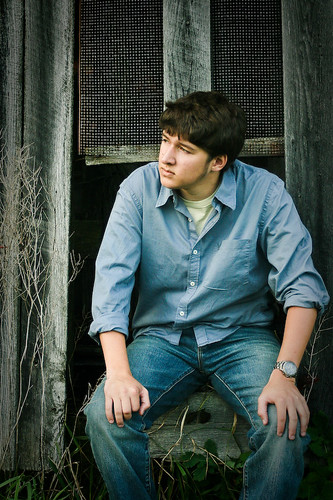
A grunge look is very popular. Ask your child's opinion. Do you have an accessible old warehouse near your home? How about a boat harbor? Perhaps a junkyard? Or an abandoned house? (Just keep it safe, folks.) Try to tie in your child's interests. Think stadium if your child is athletic. A theatrical stage if they're into the arts? Or, a racetrack if they love motorsports – you get the idea.
No matter what location you choose, you should be able to get your headshots and full-length shots at the same spot.
Scout your location prior to your shoot day. The best time of day for portrait work is early hours or late in the day. Given that you're working with a teenager, we suggest late in the day; start about an hour before sunset. Avoid midday light as it creates harsh shadows. Visit your location at the same time of day you want to shoot. Make notes about the location of the sun, possible backgrounds, and general conditions. If it's a controlled area do you need permission and are there set hours? Try to answer as many questions as possible so that there are no surprises on shoot day.
What About Clothing and Props?
Here is a big piece of advice. Let your senior choose the clothing. We're not saying that you should give them carte blanche, but remember these pictures are for the them, if you dress them in a way they hate, those photographs will never see the light of day.
As for props, that should be a lot simpler, what does your child like to do? Bring a football, baseball glove, soccer ball, painting easel, motorcycle, the family dog, etc.
How About Camera Equipment?
The dream outfit would be a DLSR with lenses ranging from wide-angle to moderate telephoto. However, senior portraits can be accomplished with a simple point-and-shoot camera that sports a 3x to 5x optical zoom.
Use a telephoto for the headshots and a moderate wide-angle to normal lens for the full-length.
Don't overlook a good tripod. Not only does it provide stability for sharp images; it also frees you up from burying your face behind the camera. Good portraiture results from a connection between photographer and subject. Frame your subject then interact with them.
Lighting and Light modification
While it's possible to produce good results with no additional lighting, or light modification, it is very limiting. You'll find a good external bounce flash an invaluable tool for creating directional light. You'll also want some bounce cards. These devices will vastly improve your senior portraits by filling in the shadows with bounced light. That light might come from your flash, the sun, or even just the sky. A bounce card can be as simple as cardboard painted white on one side and tinfoil glued on the other side. Generally you will use the white side, but if you need a little extra “pop” flip it to the shiny side.
Here's a good rule of thumb: with guys some shadows are okay, with girls you want to lighten those shadows as much as possible.
If you don't have any bounce cards try to position your subject close to a white wall. If you're indoors place the subject near a large window with indirect light.
A few extra bodies
We encourage you to invite a few of your senior's friends to the shoot. Hopefully, they'll lighten your load by carrying some gear and holding bounce cards. But even more importantly, they'll provide a young eye to the posing process.
Here are a few final pointers:
- When doing your headshots, surround your subject's face with bounce cards to provide broad even lighting.
- When posing girls stretch them out long and thin. Boys like to appear strong and masculine, so lean them forward toward the camera.
- It is best to light girls with little or no shadowing. The opposite is true for boys.
- Keep the ISO setting on your camera as low as possible for minimal noise and use manual settings for consistency.
- Focus on the eyes.
- When outdoors, shoot in the shade with even lighting. Then add your own lighting for modeling. Try to avoid harsh light and shadows unless going for a special effect.
- Finally, and most importantly, have fun with it. It will show in the final product.
Kent is an occasional writer at our place, and also handles the weekly “Picture of the Week” contest. He has been involved with photography since 1974 and you can get to know him better here.
(function(d, s, id) {
var js, fjs = d.getElementsByTagName(s)[0];
if (d.getElementById(id)) return;
js = d.createElement(s); js.id = id;
js.src = "//forms.aweber.com/form/96/435600896.js";
fjs.parentNode.insertBefore(js, fjs);
}(document, "script", "aweber-wjs-8cq4o7hvd"));
document.getElementById( "ak_js_1" ).setAttribute( "value", ( new Date() ).getTime() );
if (typeof jQuery !== 'undefined' && typeof jQuery.ui !== 'undefined' && typeof jQuery.ui.tabs !== 'undefined' && typeof jQuery.widget !== 'undefined' && typeof TagGroupsBase !== 'undefined') {
TagGroupsBase.tabs('tag-groups-cloud-tabs-6612baa45a7de', {"active":false}, true);
} else {
jQuery(document).ready(function(){
setTimeout(function(){
if (typeof jQuery !== 'undefined' && typeof jQuery.ui !== 'undefined' && typeof jQuery.ui.tabs !== 'undefined' && typeof jQuery.widget !== 'undefined') {
TagGroupsBase.tabs('tag-groups-cloud-tabs-6612baa45a7de', {"active":false}, true);
} else {
console.log('[Tag Groups] Error: jQuery UI Tabs is missing!');
}
}, 500);
});
}
( $ => {
/**
* Displays toast message from storage, it is used when the user is redirected after login
*/
if ( window.sessionStorage ) {
$( window ).on( 'tcb_after_dom_ready', () => {
const message = sessionStorage.getItem( 'tcb_toast_message' );if ( message ) {
tcbToast( sessionStorage.getItem( 'tcb_toast_message' ), false );
sessionStorage.removeItem( 'tcb_toast_message' );
}
} );
}/**
* Displays toast message
*
* @param {string} message - message to display
* @param {Boolean} error - whether the message is an error or not
* @param {Function} callback - callback function to be called after the message is closed
*/
function tcbToast( message, error, callback ) {
/* Also allow "message" objects */
if ( typeof message !== 'string' ) {
message = message.message || message.error || message.success;
}
if ( ! error ) {
error = false;
}
TCB_Front.notificationElement.toggle( message, error ? 'error' : 'success', callback );
}
} )( typeof ThriveGlobal === 'undefined' ? jQuery : ThriveGlobal.$j );
(function($) {
$('.home #custom-home-more-categories').on("click", function() {
$(this).parent('.custom-home-categories').find('.custom-home-categories-list').toggleClass('show');
});
})(jQuery);
//www.lightstalking.com/wp-content/plugins/metronet-profile-picture/js/mpp-frontend.js
//www.lightstalking.com/wp-content/plugins/thrive-leads/js/frontend.min.js
var pp_ajax_form = {"ajaxurl":"https:\/\/www.lightstalking.com\/wp-admin\/admin-ajax.php","confirm_delete":"Are you sure?","deleting_text":"Deleting...","deleting_error":"An error occurred. Please try again.","nonce":"6c2ac53fc7","disable_ajax_form":"false","is_checkout":"0","is_checkout_tax_enabled":"0"};
//www.lightstalking.com/wp-content/plugins/wp-user-avatar/assets/js/frontend.min.js
//www.lightstalking.com/wp-includes/js/jquery/ui/core.min.js
//www.lightstalking.com/wp-includes/js/jquery/ui/tabs.min.js
//www.lightstalking.com/wp-includes/js/jquery/ui/accordion.min.js
var advanced_ads_cookies = {"cookie_path":"\/","cookie_domain":""};
var advadsCfpInfo = {"cfpExpHours":"3","cfpClickLimit":"3","cfpBan":"7","cfpPath":"","cfpDomain":"www.lightstalking.com"};
//www.lightstalking.com/wp-content/plugins/advanced-ads-pro/assets/js/advanced-ads-pro.min.js
//www.lightstalking.com/wp-includes/js/comment-reply.min.js
var beloadmore = {"url":"https:\/\/www.lightstalking.com\/wp-admin\/admin-ajax.php","query":{"post__not_in":[16786],"category_name":"portrait","posts_per_page":3}};
//www.lightstalking.com/wp-content/themes/lightstalking/assets/js/load-more.js
var tve_dash_front = {"ajaxurl":"https:\/\/www.lightstalking.com\/wp-admin\/admin-ajax.php","force_ajax_send":"1","is_crawler":"","recaptcha":[],"post_id":"16786"};
//www.lightstalking.com/wp-content/plugins/thrive-visual-editor/thrive-dashboard/js/dist/frontend.min.js
_stq = window._stq || [];
_stq.push([ "view", JSON.parse("{\"v\":\"ext\",\"blog\":\"12538233\",\"post\":\"16786\",\"tz\":\"-4\",\"srv\":\"www.lightstalking.com\",\"j\":\"1:13.3\"}") ]);
_stq.push([ "clickTrackerInit", "12538233", "16786" ]);
//www.lightstalking.com/wp-content/plugins/akismet/_inc/akismet-frontend.js
var eztoc_smooth_local = {"scroll_offset":"30","add_request_uri":""};
//www.lightstalking.com/wp-content/plugins/easy-table-of-contents/assets/js/smooth_scroll.min.js
//www.lightstalking.com/wp-content/plugins/easy-table-of-contents/vendor/js-cookie/js.cookie.min.js
//www.lightstalking.com/wp-content/plugins/easy-table-of-contents/vendor/sticky-kit/jquery.sticky-kit.min.js
var ezTOC = {"smooth_scroll":"1","scroll_offset":"30","fallbackIcon":"<span class=\"\"><span class=\"eztoc-hide\" style=\"display:none;\">Toggle<\/span><span class=\"ez-toc-icon-toggle-span\"><svg style=\"fill: #666666;color:#666666\" xmlns=\"http:\/\/www.w3.org\/2000\/svg\" class=\"list-377408\" width=\"20px\" height=\"20px\" viewBox=\"0 0 24 24\" fill=\"none\"><path d=\"M6 6H4v2h2V6zm14 0H8v2h12V6zM4 11h2v2H4v-2zm16 0H8v2h12v-2zM4 16h2v2H4v-2zm16 0H8v2h12v-2z\" fill=\"currentColor\"><\/path><\/svg><svg style=\"fill: #666666;color:#666666\" class=\"arrow-unsorted-368013\" xmlns=\"http:\/\/www.w3.org\/2000\/svg\" width=\"10px\" height=\"10px\" viewBox=\"0 0 24 24\" version=\"1.2\" baseProfile=\"tiny\"><path d=\"M18.2 9.3l-6.2-6.3-6.2 6.3c-.2.2-.3.4-.3.7s.1.5.3.7c.2.2.4.3.7.3h11c.3 0 .5-.1.7-.3.2-.2.3-.5.3-.7s-.1-.5-.3-.7zM5.8 14.7l6.2 6.3 6.2-6.3c.2-.2.3-.5.3-.7s-.1-.5-.3-.7c-.2-.2-.4-.3-.7-.3h-11c-.3 0-.5.1-.7.3-.2.2-.3.5-.3.7s.1.5.3.7z\"\/><\/svg><\/span><\/span>"};
//www.lightstalking.com/wp-content/plugins/easy-table-of-contents/assets/js/front.min.js
var tcb_current_post_lists=JSON.parse('[]'); var tcb_post_lists=tcb_post_lists?[...tcb_post_lists,...tcb_current_post_lists]:tcb_current_post_lists;
/(trident|msie)/i.test(navigator.userAgent)&&document.getElementById&&window.addEventListener&&window.addEventListener("hashchange",function(){var t,e=location.hash.substring(1);/^[A-z0-9_-]+$/.test(e)&&(t=document.getElementById(e))&&(/^(?:a|select|input|button|textarea)$/i.test(t.tagName)||(t.tabIndex=-1),t.focus())},!1);
if ( !window.TL_Const ) {var TL_Const={"security":"04a6d4aa2d","ajax_url":"https:\/\/www.lightstalking.com\/wp-admin\/admin-ajax.php","forms":[],"action_conversion":"tve_leads_ajax_conversion","action_impression":"tve_leads_ajax_impression","ajax_load":1,"main_group_id":478648,"display_options":{"allowed_post_types":[],"flag_url_match":false},"custom_post_data":{"http_referrer":"https:\/\/www.lightstalking.com"},"current_screen":{"screen_type":4,"screen_id":16786},"ignored_fields":["email","_captcha_size","_captcha_theme","_captcha_type","_submit_option","_use_captcha","g-recaptcha-response","__tcb_lg_fc","__tcb_lg_msg","_state","_form_type","_error_message_option","_back_url","_submit_option","url","_asset_group","_asset_option","mailchimp_optin","tcb_token","tve_labels","tve_mapping","_api_custom_fields","_sendParams","_autofill"]};} else { window.TL_Front && TL_Front.extendConst && TL_Front.extendConst({"security":"04a6d4aa2d","ajax_url":"https:\/\/www.lightstalking.com\/wp-admin\/admin-ajax.php","forms":[],"action_conversion":"tve_leads_ajax_conversion","action_impression":"tve_leads_ajax_impression","ajax_load":1,"main_group_id":478648,"display_options":{"allowed_post_types":[],"flag_url_match":false},"custom_post_data":{"http_referrer":"https:\/\/www.lightstalking.com"},"current_screen":{"screen_type":4,"screen_id":16786},"ignored_fields":["email","_captcha_size","_captcha_theme","_captcha_type","_submit_option","_use_captcha","g-recaptcha-response","__tcb_lg_fc","__tcb_lg_msg","_state","_form_type","_error_message_option","_back_url","_submit_option","url","_asset_group","_asset_option","mailchimp_optin","tcb_token","tve_labels","tve_mapping","_api_custom_fields","_sendParams","_autofill"]})}
window.advads_admin_bar_items = [];
var TVE_Ult_Data = {"ajaxurl":"https:\/\/www.lightstalking.com\/wp-admin\/admin-ajax.php","ajax_load_action":"tve_ult_ajax_load","conversion_events_action":"tve_ult_conversion_event","shortcode_campaign_ids":[],"matched_display_settings":[],"campaign_ids":[],"post_id":16786,"is_singular":true,"tu_em":"","evergreen_redirects":[]};
https://www.lightstalking.com/wp-content/plugins/thrive-ultimatum/js/dist/no-campaign.min.js
!function(){window.advanced_ads_ready_queue=window.advanced_ads_ready_queue||[],advanced_ads_ready_queue.push=window.advanced_ads_ready;for(var d=0,a=advanced_ads_ready_queue.length;d<a;d++)advanced_ads_ready(advanced_ads_ready_queue[d])}();
(function() { var po = document.createElement('script'); po.type = 'text/javascript'; po.async=true;; po.src = 'https://www.lightstalking.com/wp-content/plugins/easy-social-share-buttons3/lib/modules/conversions-pro/assets/share-conversions-tracker.js'; var s = document.getElementsByTagName('script')[0]; s.parentNode.insertBefore(po, s); })();(function() { var po = document.createElement('script'); po.type = 'text/javascript'; po.async=true;; po.src = 'https://www.lightstalking.com/wp-content/plugins/easy-social-share-buttons3/assets/modules/pinterest-pro.min.js'; var s = document.getElementsByTagName('script')[0]; s.parentNode.insertBefore(po, s); })();(function() { var po = document.createElement('script'); po.type = 'text/javascript'; po.async=true;; po.src = 'https://www.lightstalking.com/wp-content/plugins/easy-social-share-buttons3/assets/modules/subscribe-forms.min.js'; var s = document.getElementsByTagName('script')[0]; s.parentNode.insertBefore(po, s); })();(function() { var po = document.createElement('script'); po.type = 'text/javascript'; po.async=true;; po.src = 'https://www.lightstalking.com/wp-content/plugins/easy-social-share-buttons3/assets/js/essb-core.min.js'; var s = document.getElementsByTagName('script')[0]; s.parentNode.insertBefore(po, s); })();
let ccwpDOMLoaded=!1;
let ccwp_loaded = false;
let resources_length=0;
let resources =undefined;
let is_last_resource = 0;
ccwpUserInteractions=["keydown","mousemove","wheel","touchmove","touchstart","touchend","touchcancel","touchforcechange"];
ccwpUserInteractions.forEach(function(e){
window.addEventListener(e,calculate_load_times);
});
function calculate_load_times() {
// Check performance support
if (performance === undefined) {
console.log("Performance NOT supported");
return;
}
// Get a list of "resource" performance entries
resources = performance.getEntriesByType("resource");
if (resources === undefined || resources.length <= 0) {
console.log("NO Resource performance records");
}
if(resources.length){
resources_length=resources.length;
}
for(let i=0; i < resources.length; i++) {
if(resources[i].responseEnd>0){
is_last_resource = is_last_resource + 1;
}
}
let uag = navigator.userAgent;
let gpat = /Google Page Speed Insights/gm;
let gres = uag.match(gpat);
let cpat = /Chrome-Lighthouse/gm;
let cres = uag.match(cpat);
let wait_till=300;
let new_ua = "Mozilla/5.0 (Linux; Android 11; moto g power (2022)) AppleWebKit/537.36 (KHTML, like Gecko) Chrome/109.0.0.0 Mobile Safari/537.36";
let new_ua2 = "Mozilla/5.0 (Macintosh; Intel Mac OS X 10_15_7) AppleWebKit/537.36 (KHTML, like Gecko) Chrome/109.0.0.0 Safari/537.36";
if(gres || cres || uag==new_ua || uag==new_ua2){
wait_till = 3000;
}
if(is_last_resource==resources.length){
setTimeout(function(){
console.log("ccwpTriggerDelayedScripts timeout : "+wait_till);
ccwpTriggerDelayedScripts();
},wait_till);
}
}
window.addEventListener("load", function(e) {
console.log("load complete");
setTimeout(function(){
calculate_load_times();
},100);
});async function ccwpTriggerDelayedScripts() {
if(ccwp_loaded){ return ;}
ccwpPreloadStyles();
ccwpPreloadDelayedScripts();
ccwpLoadCss();
ccwpScriptLoading();
ccwp_loaded=true;
}
function ccwpPreloadStyles() {
let e = document.createDocumentFragment();
var cssEle = document.querySelectorAll("link[rel=ccwpdelayedstyle]");
for(let i=0; i <= cssEle.length;i++){
if(cssEle[i]){
cssEle[i].href = removeVersionFromLink(cssEle[i].href);
let r = document.createElement("link");
r.href = cssEle[i].href;
r.rel = "preload";
r.as = "style";
e.appendChild(r);
}
}
document.head.appendChild(e);
}
function ccwpPreloadDelayedScripts() {
var e = document.createDocumentFragment();
document.querySelectorAll("script[type=ccwpdelayedscript]").forEach(function(t) {
var n = removeVersionFromLink(t.getAttribute("src"));
if (n) {
t.setAttribute("src", n);
var r = document.createElement("link");
r.href = n, r.rel = "preload", r.as = "script", e.appendChild(r)
}
}), document.head.appendChild(e)
}
function ccwpScriptLoading(){
var jsEle = document.querySelectorAll("script[type=ccwpdelayedscript]");
jsEle.forEach(function(t) {
t.type = "text/javascript";
if(t.src)
{
t.src = removeVersionFromLink(t.src);
}
});
}function ccwpLoadCss(){
var cssEle = document.querySelectorAll("link[rel=ccwpdelayedstyle]");
for(let i=0; i <= cssEle.length;i++){
if(cssEle[i]){
cssEle[i].href = removeVersionFromLink(cssEle[i].href);
cssEle[i].rel = "stylesheet";
cssEle[i].type = "text/css";
}
}var cssEle = document.querySelectorAll("style[type=ccwpdelayedstyle]");
for(let i=0; i <= cssEle.length;i++){
if(cssEle[i]){
cssEle[i].type = "text/css";
}
}
}
function removeVersionFromLink(link)
{
if(ccwpIsValidUrl(link))
{
const url = new URL(ccwpFormatLink(link));
url.searchParams.delete("ver");
url.searchParams.delete("time");
return url.href;
}
else{
return link;
}
}
function ccwpIsValidUrl(urlString)
{
if(urlString){
var expression =/[-a-zA-Z0-9@:%_\+.~#?&//=]{2,256}\.[a-z]{2,4}\b(\/[-a-zA-Z0-9@:%_\+.~#?&//=]*)?/gi;
var regex = new RegExp(expression);
return urlString.match(regex);
}
return false;
}
function ccwpFormatLink(link)
{
let http_check=link.match("http:");
let https_check=link.match("https:");
if(!http_check && !https_check)
{
return location.protocol+link;
}
return link;
}


9 Comments
I’m actually about to go shoot my first senior portrait for the wife’s coworker’s friend, and this was invaluable! Thanks! Taking my T3i, Canon 28mm 1.8, 60mm 2.8, and 70-200mm 4L and tripod. Bounce cards might be a good idea, too. Thank you again!
I think it’s very attractive, and thanks for the tips.. will really try that..
I was hoping for something that would make me look good but this is rediculous. Being a senior in Australia means you get your Seniors Card at 65. Now if you can make me look this good you’re hired.
The title of this post is a bit confusing for people from the non US side of the Atlantic. I was expecting to read about photographing elderly people!
We embrace cultural and linguistic differences which is why you will see both US and UK spelling on the site (and probably a few others too). We’re even looking at ways to get different languages on the site. I am Australian and we have writers from New Zealand, the UK, USA, Canada and even a few expats. Diversity is what makes life interesting. I am looking for ways to make the site even more diverse – not less.
I hadn’t intended to be critical. I was merely pointing out the amusing consequences of our different use of the same language.
Had the same problem with the title as you ;-P Because I’, not anglophone; I’m Swiss.
Yes, being form Down Under it took me a little way into the article to realise what it was about, but once I did that was all fine. I agree with being open to more diversity, and along with that we may all need to be a little aware of our words meaning different things to different people. I’ve see people here ready to ask for a clarification, and that is probably the way to go. @tomdinning, your comment made me laugh. 😉
I’m from the U.S., and my first thought was close up portraits for the elderly. I loved the Admin’s reply. Keep up the good work, I love this site!!!