For many people, their first introduction to panoramic photography was using an Advantix or APS film camera. These cameras had a pseudo panoramic mode that really only cropped the top and bottom of the negative. With the advent of digital, it was realized that you could take several images and “stitch” them together in editing software and so the digital panoramic was born. So how do you take panos? Well really there are two stages, the taking stage and the post production stage. Lets start at the beginning.
Round and Round – Taking the shot
Taking a panoramic photograph can be as simple as shooting a few frames and turning the camera as you go but if you want to get a descent result that will stitch together well, then you will need to follow a few basic rules.
- First, use a tripod. This will allow you not only to make sure that your horizon is level but it will also make composition easier. You can define your start and finish points and work out how many shots you will need overall. If possible use a tripod with a built in spirit level or use a hot shoe mounted one and check that the camera remains level throughout the pan.
- Secondly and maybe a little counter intuitively, shoot with your camera in portrait format. This is because you will have less lens distortion at the frame’s edges.
- Where possible use a lens in the “normal” range for a zoom i.e. between 35-70mm. Again this will reduce excessive distortion.
- Pre-focus the first shot and then switch the camera to manual focus, this will prevent the lens changing the focus point through the subsequent shots
- Watch your exposure very carefully, if you can set your camera to manual exposure. If there is going to be large shifts in exposure through the pano, then it may be worth shooting a bracket to get the right exposure.
- Manually set your white balance, on auto white balance you may find the color shifting as you move the camera around.
- Use a small aperture to get a good depth of field on the image and try to avoid prominent foreground objects. These can cause parallax issues for the stitching software
- Work fast but carefully because the light can change quickly.
- Allow for a generous overlap between the images between 20-30% of the frame size should be sufficient as you move the camera around. This is to give the stitching software something to “bite”.
If you want the ultimate in panoramic quality, look at getting a panoramic head for your tripod. These allow the camera to pan around the center of the lens rather than the camera and greatly reduce parallax issues. To further improve image quality use a remote shutter release and mirror lock to minimize any vibration.

The Stitch Up
So we have the shots, now we need to put them all together. There are a number of dedicated panoramic stitching programs available, but also it can be done in Photoshop or Photoshop elements. We will assume Photoshop for this section but the procedure will be similar in other programs.
- First, select all the images that you want to use and put them in one folder. Keep the original file names so that they will remain in the order that they were shot.
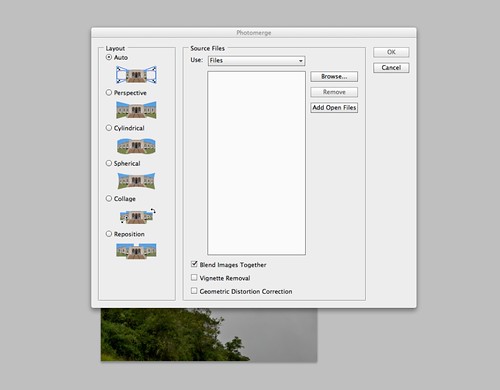
- From Photoshop, open the File – Automate – Photomerge selection
- With the Layout Mode set to auto and Blend Images Together checked, browse for your shots and import them.
- Photoshop will now stitch the images together keeping each shot as a separate layer. If some images are not well aligned you can adjust them by manually dragging them into position. You can also crop the top and bottom to remove any over bleed. Once you are happy, flatten the image and save it.
As mentioned Photoshop is not the only choice to stitch your panoramic shots, there are numerous third party applications available. Many of these will have more advanced controls for stitching and controlling exposure and color and if you are going to be doing a lot of pano work, investment in one of these dedicated programs may be a worthwhile investment.
Jason Row is a British born travel photographer now living in Ukraine. You can follow him on Facebook or visit his site, The Odessa Files. He also maintains a blog chronicling his exploits as an Expat in the former Soviet Union


5 Comments
Sometimes it’s difficult with a tonne of other shots, to figure out after the fact where the panorama began and ends. Some cameras offer a panorama mode which changes the resulting filenames or creates folder, others don’t.
I’ve taken to including a [blurry] finger on the edge of the first and last frames – outside the area of interest. Crude but effective.
Also, there are relatively inexpensive tripod accessories that incorporate a bubble-level. Not the same as a pan head, but gives you a level indication.
Photoshop only uses layer masking, which is wasteful for image-quality – every pixel is only as good as one of the constituent frames as it was processed in the RAW converter.
I second the recommendation for Hugin, especially using enfuse as a backend – this way you can use a 50% overlap at source and every output pixel will be calculated based on two source frames. Heck, if you’re going to the trouble of setting up a tripod for these things, you might as well get the most data from the scene to get the best image out.
Very helpful article. Will be using the tips to improve my panorama shots
Sunset on Happy Hill
(click for larger)
Maggie Valley, NC
(click for larger)
St. Joe, FL
(click for larger)
I remember making panoramas long before digital or even the APS camera (yes, I had one.). In fact I dug out a couple of panoramas I made in the Namib Desert the other day. Sitting there for ages sticking each photo down. 🙂