Have you ever noticed, that when you shoot something that seems perfectly symmetrical that when you look at the resultant image, it seems to be slightly different? Maybe the edges of the subject are bulging out, maybe you have converging verticals. As good as lenses are these days, they all have inherent faults, issues that can change the look of an image. The three main issues that you may find using any lens are:
Distortion – this can be pincushion, where the image seems to fold in towards itself or barrel distortion where the image seems to be bulging outwards.
Vignetting – this manifests itself as a darkening around the edges of the frame.
Chromatic Aberration – this is shown as color fringing in hard, high contrast edges.
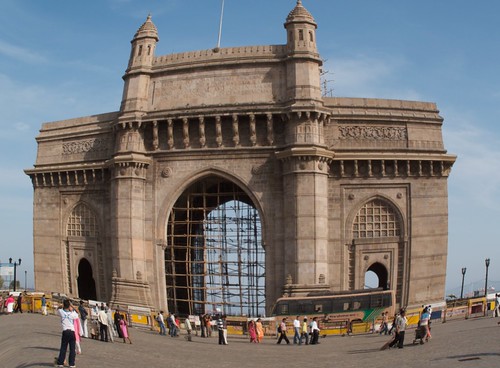
All three lens errors are present in this shot by Jason Row Photography, on Flickr
No matter how expensive your lens, it will have all three of these issues to varying degrees. Many cameras now include algorithms to remove both Vignetting and Chromatic Aberration but as these are built in, you have little or no control on how they work, also they do not apply these adjustments to RAW files.
So how can we correct these issues in post production?
Well fortunately there is now a multitude of software options available, from free to costly. Some are plugins that work with Photoshop, Aperture or Lightroom. Others are dedicated stand alone apps.
In this article we will have a look at Photoshop’s built in Lens Correction Filter found in the menu under Filters. The control on this filter are pretty much the same as on other software.
When you open the Lens Correction filter, you image will open in a new window with a series of controls. On the right of the window you have the option of defining the camera and lens combination that was used for the image, some apps will take this information EXIF data and apply it automatically, but for some you may have to set it manually. It is important to do this as the software manufacturers will have a database of adjustments specifically tailored to the lens that you use. Whilst it will not be perfect, it will get you closer, particularly for Chromatic Aberration and Lens Distortion.
Once you have applied the auto correction it’s time to make some manual adjustments. Lets look at what Photoshop has to offer, bearing in mind most of these are common to all lens correction apps.
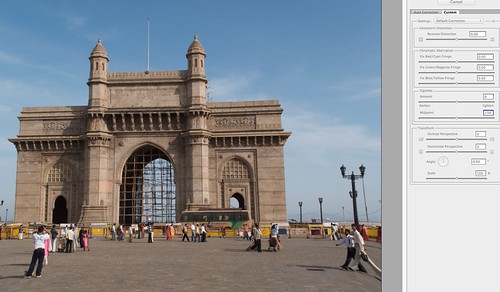
Under the custom tab of the Lens Correction Filter we find at the very top a slider for removing distortion. This will remove the barrel/pincushion distortion we discussed earlier. Slide to the left to remove the barreling and to the right to remove pincushioning. Most apps will allow you to overlay a grid to aid you with this correction.
The Geometric Distortion Tool by Jason Row Photography, on Flickr
Below this we have the chromatic aberration controls. These are split into sliders for red/cyan green/magenta and blue/yellow. To effectively see the problem you will need to zoom the image to 400-800% on a hard, high contrast edge. Try to identify the color of the fringing then apply the appropriate slider to correct the issue.
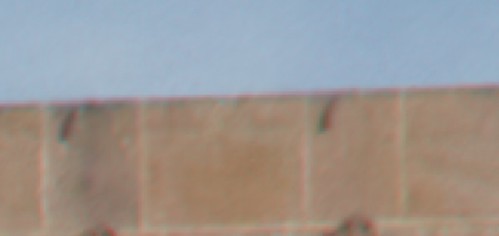
Red/Cyan Fringing at 800% View by Jason Row Photography, on Flickr
The next set of controls are for vignetting. In Photoshop sliding the control to the right will lighten the outer corners of the image to compensate for any vignetting. You can of course go the opposite direction and add vignetting for creative effects and control the diameter of the effect.
Next up we have the Transform controls, these are used to correct errors in vertical and horizontal perspective for example converging verticals. To do this the software will crop the image, for this reason a scale control is also included to resize the image. As with Geometric Distortion, it is worth displaying a grid over the image to aid your correction. Previously we created an article dedicated to correcting converging parallels here.
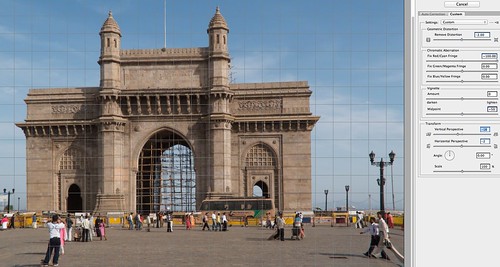
Correcting Perspective by Jason Row Photography, on Flickr
Lastly, one other tool usually found on lens correction software is a horizon straighten tool. In Photoshop this allows you to draw a line along the horizon in your image and it will correct appropriately. Others will draw a grid allowing you to drag the image to get a straight horizon.
Lens correction software is a fairly simple to use yet powerful way to improve the technical look of your images, whether you use one of the free apps, built in correction such as Photoshop and Lightroom or a third party program, with a little experimentation you will soon find yourself a natural at correcting lens issues.


