When first embarking on the journey toward becoming a photographer, you were probably repeatedly told of the importance of exposure and composition. You went through all the pertinent exercises designed to help you grasp the fundamental concepts behind exposure (aperture, shutter speed, ISO). You worked on developing your creative vision because no one wants to be accused of using boring composition. No one with even a basic understanding of photography would suggest that composition and exposure are unimportant, but neither element means much if your photos aren’t in focus.
The viewer needs to know what they are looking at; the subject needs a degree of definition that renders it visually recognizable and conceptually relatable. Of course there are exceptions to be made, such as in the case of abstract photography, but before you can even think about something like that you’ve got to get a handle on the basics of achieving proper focus.

Auto Focus Points
When you look through the viewfinder, of course you see whatever your lens is aimed at, but you also see the camera’s focus points. Their arrangement will vary with what AF mode you are using, and the number of points you see depends on how sophisticated the camera is. Entry level DSLRs, for instance, may have as few as 7 points, while higher end cameras with considerably more complex focusing systems may have as many as 61 focus points.
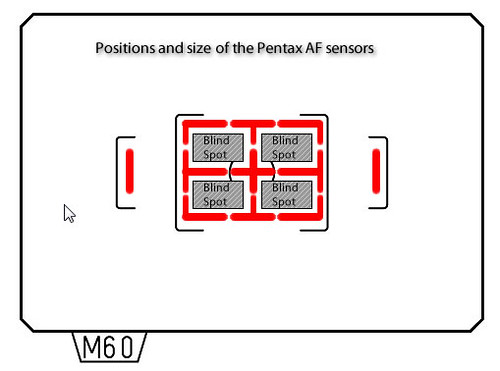
Each focus point is one of two types: vertical type or cross type. Auto focus sensors of the vertical variety detect contrast only along the vertical axis of the area on which the AF point is placed. Cross-type AF sensors are more accurate because they detect contrast along both the vertical and horizontal axis. Most cameras contain a mix of these two kinds of sensors. Basic DSLR models will typically feature one cross-type AF point as the center point, with the remainder being vertical types. As you work your way up the ladder of camera sophistication, the number of cross-type points increases as does the accuracy and responsiveness of the overall AF system.
Auto Focus Modes
Not only do DSLRs make focusing faster and more accurate than their analog predecessors, they also provide a great deal of AF customization designed to be adaptable to the characteristics of the scene/subject you are shooting. Once you’ve learned the options that are available to you, you will be well on your way to new heights of photographic efficiency.
Single Shot AF – This is the mode you will want to use for stationary subjects such as portraits (people or animals), flowers, architecture, cars, or landscapes. By pressing the shutter button halfway the camera will meter the shot and lock focus on the AF point that you chose, so long as the subject stays at that selected point. If the subject moves, focus will not be acquired and if you try to press the shutter button completely no shot will be taken.
Continuous AF – This mode works by using the AF point that you choose to continuously focus on a subject while you keep the shutter button pressed halfway. As you might have guessed, continuous AF is the perfect solution to focusing on moving subjects such as your kids running around the yard, birds in flight, or athletes in motion. You would also use this mode for the panning technique, in which you track the motion of subject to convey a sense of movement.
Hybrid AF – This mode is ostensibly the best of both worlds. Under this setting the camera will automatically choose single shot AF if the subject is not moving. However, if the subject moves, the camera will switch into continuous AF mode as long as you keep the shutter button pressed halfway and follow the subject’s movement with the selected AF point. More experienced photographers often find that hybrid AF isn’t as intelligent as it is made out to be by camera makers; in fact, hybrid AF is missing from some high-end/professional DSLR models, as it is thought to be of greater assistance to beginners.
Live View
Live view is a feature that allows you to use the rear LCD as a viewfinder. This is the standard means of operating for point and shoot cameras and cellphone cameras, as they don’t have a traditional viewfinder. Many mirrorless cameras also use the rear LCD as the default but they provide ways to add an optional viewfinder. Virtually all DSLRs manufactured since about 2008 feature the live view function, though this is not the primary means framing and focusing a shot. The optical viewfinder remains the preferred method among DSLR users.
Live view does, however, serve as an extremely valuable option for DSLR users. When auto focus isn’t successful, the prevailing advice is to turn to manual focus so that you control the operation yourself. But there are times when even manual focus is an ordeal. Live view can be very useful for achieving focus in challenging scenarios due to its ability to magnify subjects. Using live view in tandem with manual focus can make the difference between sharp and almost-sharp images.
Do not hesitate to use your live view function whenever you need it.
Learning all the auto focus methods available to you will be a boon to your photography experience and will have a significant impact on your photos themselves; once you’re comfortable with the fundamentals of focusing, you can harness those principles and use them in all sorts of creative ways. All it takes is patience, practice, and perseverance.


3 Comments
I think I’ve discovered another focus issue, but would be interested in your opinion … how does poor eyesight affect the auto focus / view into the viewfinder?
I am starting with the premise, that if I select a focus point (AF-Single), the camera will be right whether or not it looks sharp to me in the viewfinder.
Now, to make me see what the camera is seeing, I can adjust the diopter on the camera until the same point appears to my eyes to be in focus.
However, there probably aren’t sufficient ticks or it could be less sensitive than I want so that my eyes are in synch with the camera.
I found one solution on the oh so smart web that instructed me to remove the lens, point the camera to a white wall or into the sky and move the diopter until the grid lines that appear look sharp.
I’ve done that, and I think that has helped.
Any thoughts?
I would not recommend removing the lens as described, as you take the chance of introducing dust onto the sensor. Instead just point your lens towards a featureless subject such as a wall or the sky. Don’t focus the lens but concentrate on the information display in the viewfinder and adjust the diopter setting until you get a sharp display. If you can turn on grid lines, do so to help with this process.
Are you using your diopter? I just looked up an article on calibrating your diopter for you
on line from B&H
https://www.bhphotovideo.com/explora/content/calibrating-diopter-your-camera