There are quite a few common questions that any photographer gets asked regularly. As they're so common, we thought we would cover a few of them!
1) How Do I Get the Background Blurry? – So you have taken a beautiful portrait of your newborn child with beautiful light and a wonderful and peaceful expression and there, 10 meters in the background, is their older brother, unmistakably in the act of picking his nose. Shot ruined, right? Not necessarily. If you know how to blur the background, then you could have had 100% of the viewer's attention squarely on your newborn.
The trick here is to blur the background. That is as simple as controlling your depth of field (you can download our detailed guide to depth of field for free here). The way to do that is to shoot with a wide aperture. You can manually set your camera with a wide aperture, you can set your camera on aperture priority mode and shoot with a wide aperture (f1.4-f5ish) or you can set your camera on portrait mode.

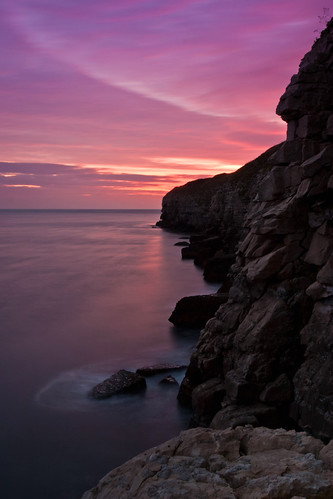
2) How Do I Get the Background Sharp? – Another common scenario is finding the perfect landscape. You get there before sunset, a light sprinkling of clouds is reflecting the warm colours of the sun. The scene is perfect and you take the shot. When you get home, you find that the blade of grass in the foreground is in perfect focus, but the rest of that glorious landscape is blurry. What happened?
The trick with this one is to maximise your depth of field so that all of the scene is in focus from the foreground (mostly) through to the horizon. This is done by shooting with a narrow aperture (f16 to f22ish). In fact, f22 is commonly called the “story telling aperture” as it means almost all of a scene will be in sharp focus. Set the aperture manually, shoot in aperture priority mode and close it up or shoot on landscape mode.
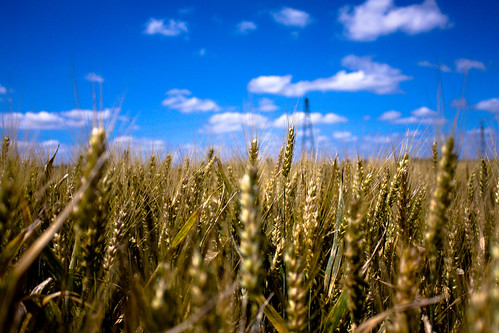
3) Why Are My Skies Not As Blue As I Remember It? – Many people will take a photograph in the middle of a sunny day, when the clouds are clear and the sky is a deep blue. Then, when they get the image onto their computer (or processed at a lab) they will find that the sky is a far paler blue and maybe a little washed out. What happened? The fact is that most cameras find it difficult to produce strong the strong colours you remember in your head when there is so much light around. Shooting at midday has its limitations.
There are several remedies for this, but the easiest one is to come back when the sun isn't shining so brightly (like at golden hour). If that's not possible, then you can do a few other things. Shoot with a narrow aperture (f18 or f22ish) or follow the sunny f16 rule. Use a ND filter to take some of the brightness out of the light. Consider a polarizing filter. Each of these tactics serves to restrict the amount of light hitting the sensor or film. They will theoretically result in stronger colours too.
4) Why Are My Flash Shots So Harsh? – You're at party or in a dark setting and you decide to shoot off a few frames of your friends. The problem is that they look like a deer caught in headlights. The flash is way over powered and showered them in in a harsh and white light that looks less than flattering.
Again, don't fret! There are a couple of different things you can do to help this. Firstly, read our guide to how to fight the bright in flash photography. That will give you several options. You can start by diffusing the light from the flash in several possible ways. Put a piece of material in front of the flash (like a light coloured scarf or handkerchief) or, better still, get a proper pop-on flash diffuser for your flash (easy to find for a off camera flash, but slightly difficult for a lot of on-camera flashes). Another option (if possible) is to redirect the flash so that the light bounces off the ceiling, wall or other surface onto the subject. That will result in a more diffused, pleasant light.

5) Why Don't My Shots Have Any Impact? – This problem is a little more difficult to define, but it usually starts with a photography novice comparing their own shots to that of a technically proficient photographer who has shot the same scene and wondering why the images are so different.
Now there can be a lot of different reasons for this. But there is also a single mistake that 90% of new photographers make. They stand too far away from their subject. A big part of good composition in photography is moving your feet so that your subject fills the frame of your image. In short, get closer! The saying that the first three rules of photography are, “get closer, get closer, get closer,” is only partially in jest.


13 Comments
great article, it was very helpful
Very good article for the beginners. Accompanying pictures are really good.
Where is the link for the detailed guide you speak of in section 1 for blurry backgrounds?
https://lightstalking.com/dof/
Very nice
Good article, particularly point 5. Cheers
Good tips simply explained and entertaining to read.
Great stuff.
Very helpful,simple and clear.Thank you.
Really it is very nice to know about the basic photography for begineers, I request to add some more info so that it will be helpfull to others including me,
thanks in advance
Thanks for this Very important information.
Thanks for using my image (Ann) as a description of how to make background blurred.
HOWEVER I should notice that the reason this image has blurred background is not because it’s shot with f/1.4-ish wide aperture.
Instead, it’s f/2.8, but the focus range (80 mm) and frame size (6×6 cm) made this image look the way it does.
A very informative article, explained very well for beginners thank you. That polarizing filter really does work with sunny days, i tried it and it made all the difference to my photo’s.
Good article for beginners. The best answer for all seems to be to take the camera off of AUTO mode and learn what the controls do. And for shallow depth-of-field (large aperture), you will probably need a different lens. A 35mm or 50mm prime is a cost effective solution. I gotta say – Andrew Losurdo (Facebook comments) should move on. He clearly has all the answers, even though the most in-focus thing in his Facebook profile photo is the wall in the background.