When I was asked if I would like to review the Portrait Pro 12 software package for Lightstalking.com, I got pretty excited.
I became excited because – just like you; I like playing with new stuff!
On top of that, I take my job seriously. When I’m asked to write a review, I attempt to put that product through its paces. I want to discern quickly, whether I believe that the product would be a value – to you – the Lightstalking.com readership.
First of all, if you don’t like shooting portraits, you might as well move on right now.
Portrait Pro 12 has but one purpose in life – the retouching and enhancement of the human face. There’s nothing else that can be done with this program.
Now, that being said – it goes about making the process of retouching and enhancement a lot easier.
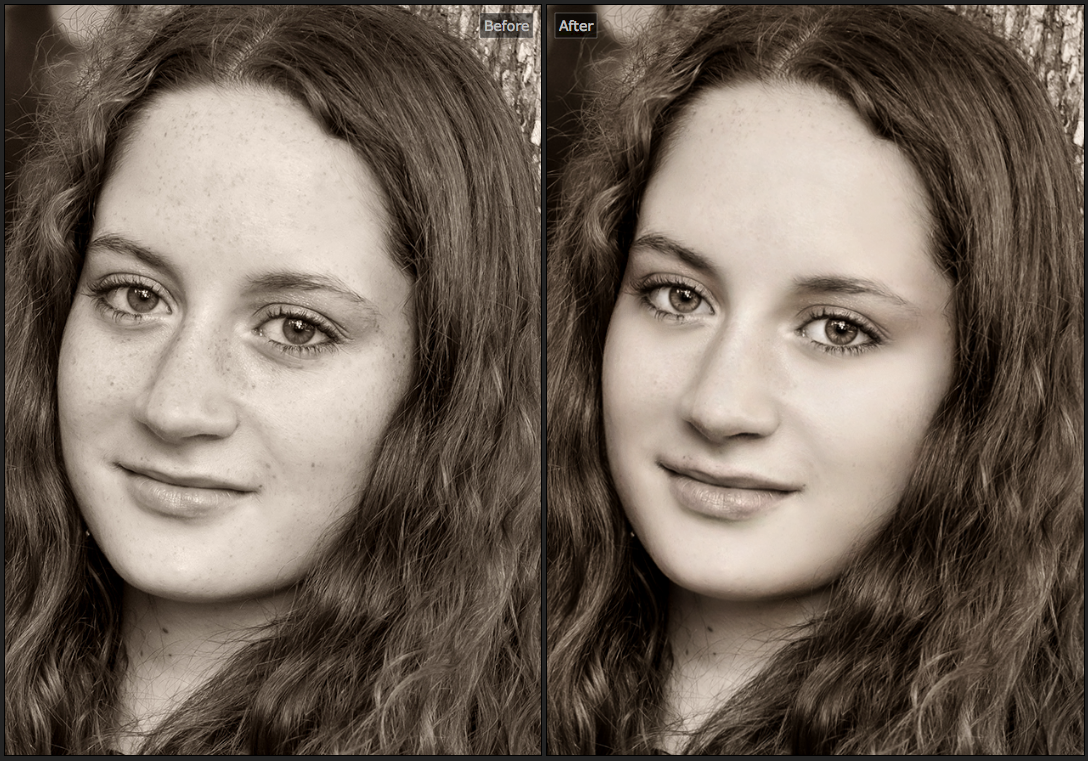
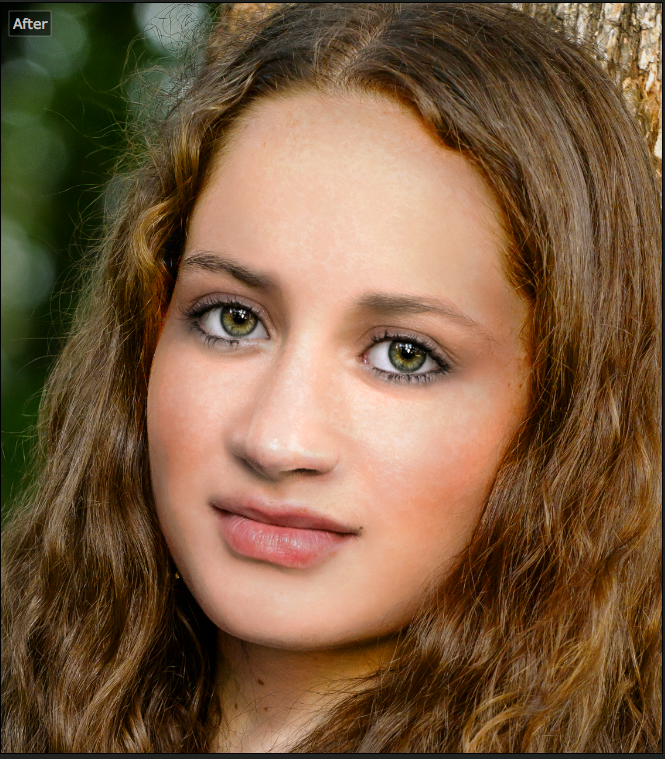
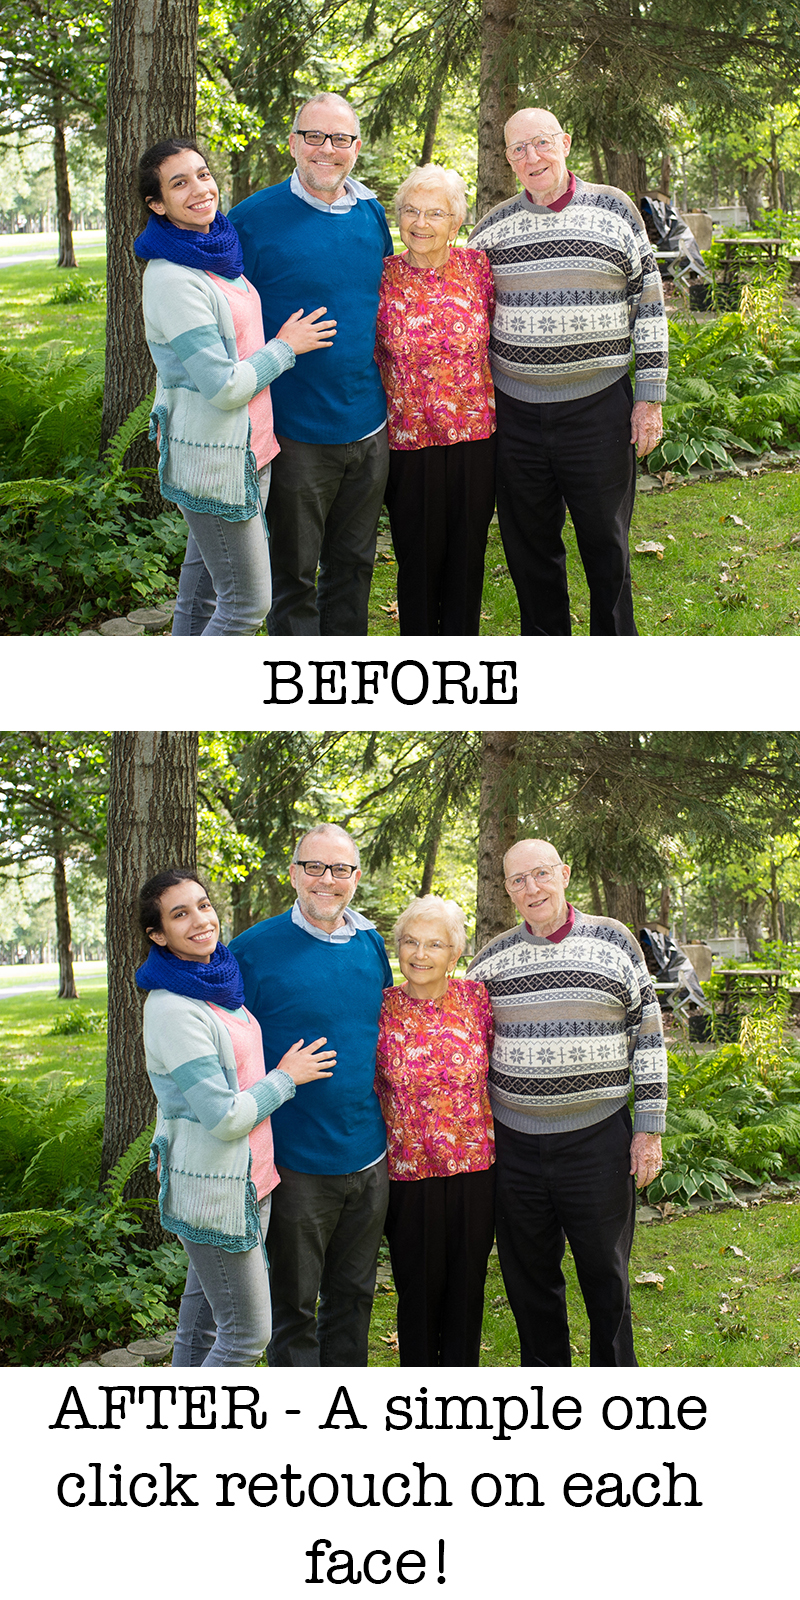
In fact, for the “before & after” sample image above, all I did was load the image, let the program execute its default settings, and then save the file.
Pretty dramatic improvement for doing nothing except those basic steps (and that took less than 30 seconds)!
But… like anything in life, I did find a few quirks.
It’s like buying a new car. You test-drove the vehicle, and it drove really nice, so you purchased the car. But, you never tested the radio, and now you turn it on for the first time… and you discover that you can’t stand the way the buttons are configured.
It doesn’t change how nice the car is- it’s just something to consider.
For my review of Portrait Pro 12, I wanted to get into the nitty-gritty of three factors.
- Does the program perform as advertised?
- Does the program perform as easily as advertised?
- Where might this program fit into the toolbox of the average Lightstalking.com reader?
Who Makes Portrait Pro?
First of all, here is a little information about the company that developed Portrait Pro 12?
The software was developed, and is distributed, by Anthropics Technology, Ltd. They have offices in London, U.K. and Elkhart, Indiana, U.S.A.
The “original” Portrait Pro was released in 2006. Portrait Pro 12.0, the version that I’m reviewing today, was released in January of 2014.
In my opinion, the company seems well organized, on top of things, and not going anywhere soon. (Which is always a good feeling to know, when you’re buying software, and might require tech support down the line.)
Their website claims that they will answer tech support questions within 48 hours and sometimes less.
I generated a support ticket to test that claim. I received an initial response within ten hours and a final follow up at 24 hours. That’s pretty darn good in my opinion.
About the Software
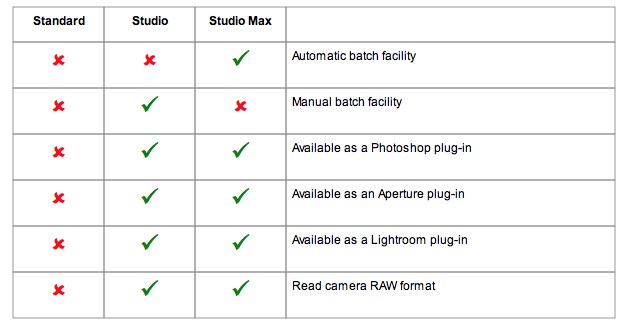
The Portrait Pro software is available in three versions. I would think that all Lightstalking.com users would want the “Studio” or “Studio Max” versions over the standard version.
Why? Because those two, (slightly pricier), studio versions can work with RAW files, can batch process multiple images, and they will work as an integrated plugin for Photoshop or Lightroom.
Portrait Pro 12 is compatible with Apple Mac and Microsoft Windows, and it’s also available in a 64 bit, as well as a 32 bit version.
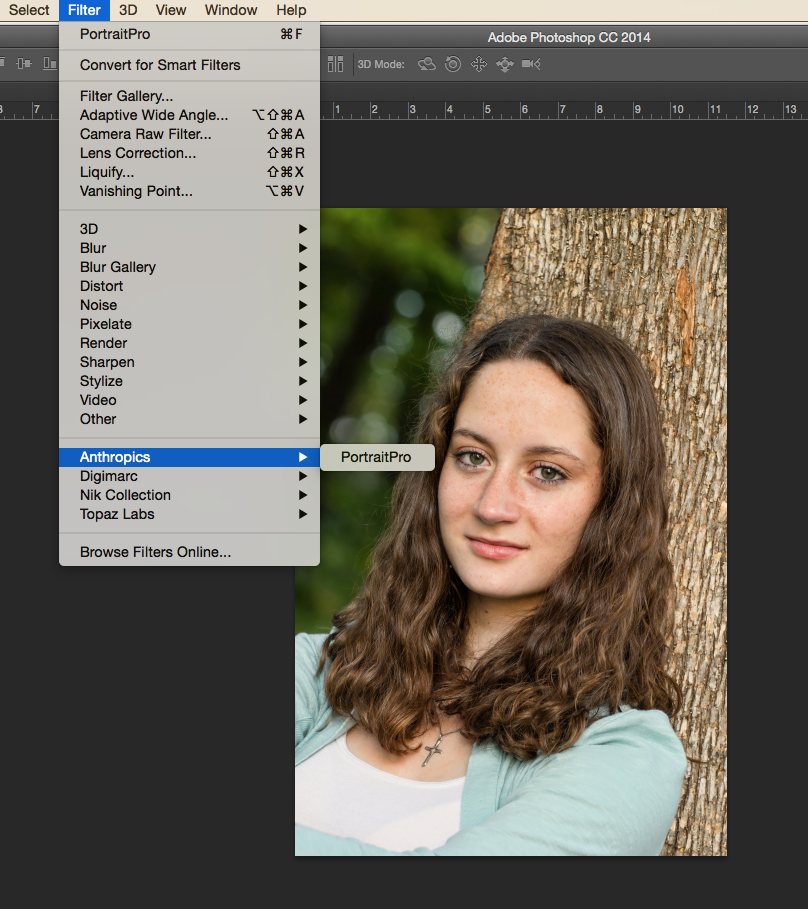
I will be testing the software on an Apple iMac that is running OS X Yosemite while using Adobe Photoshop CC.
Once the software is installed it can also be opened “independent” of the Adobe Mother-ship program.
The program begins with a dialog box that asks if the subject is female or male. It also asks if the subject is pre, or post, 12 years old.
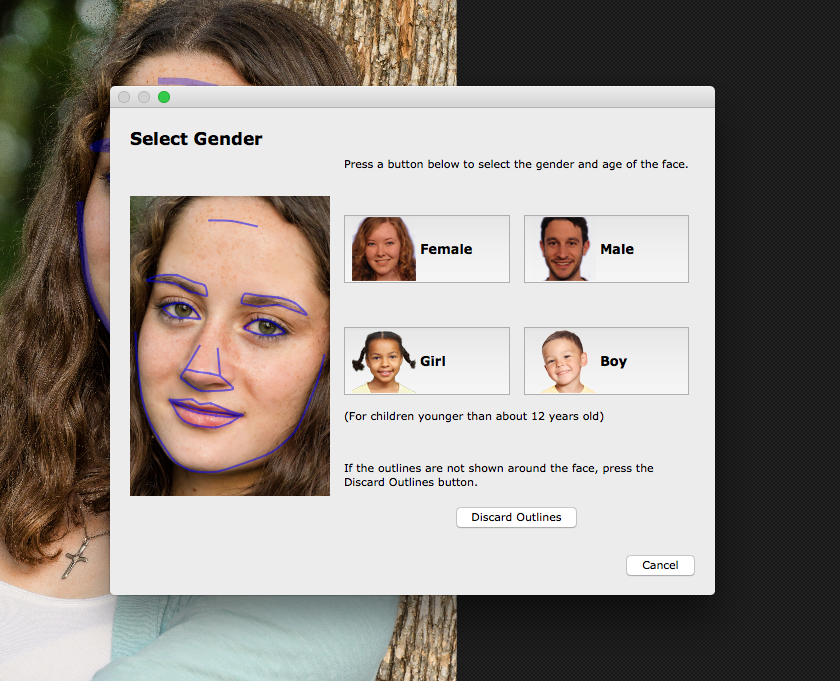
These questions allow the software to open up with a slew of adjustments already in place.
I have to be honest. Most of the time, I was happy with the opening default adjustments and I felt no need to go any further – with one caveat…
I only felt that way with single person portraits – not group shots.
We'll talk a little more about group shots in a minute.
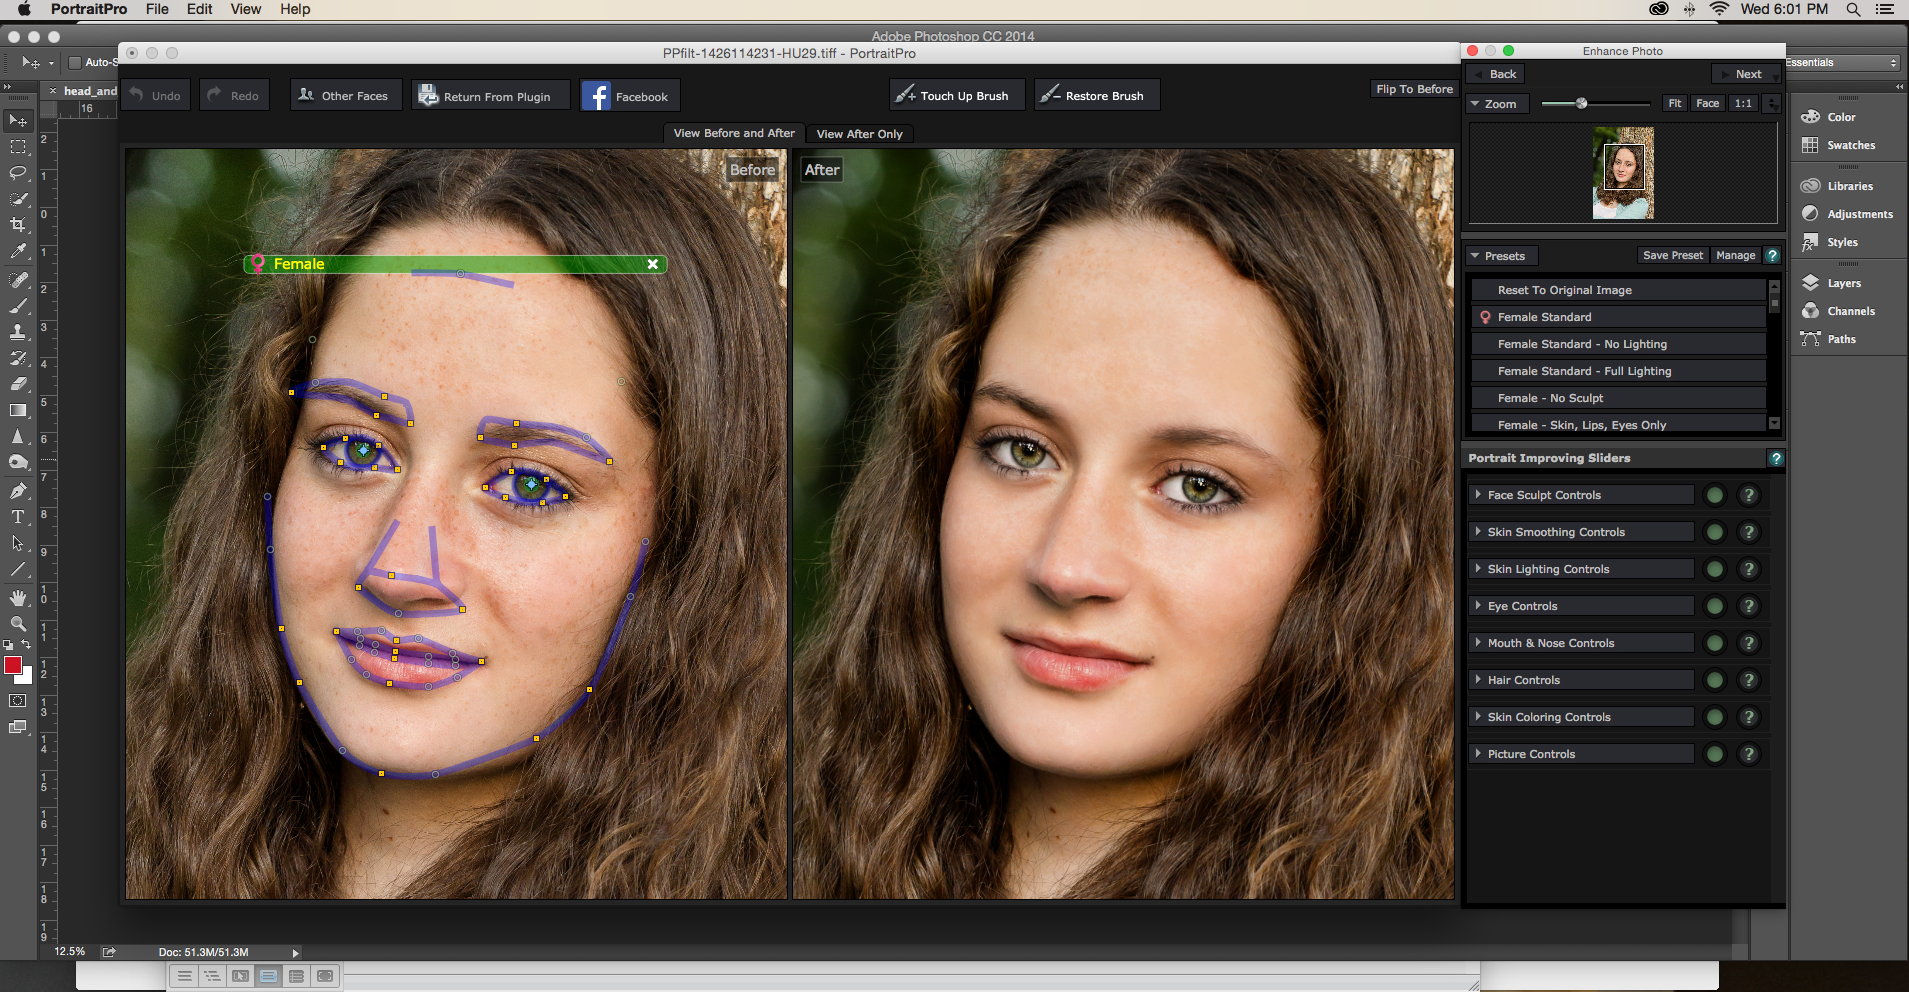
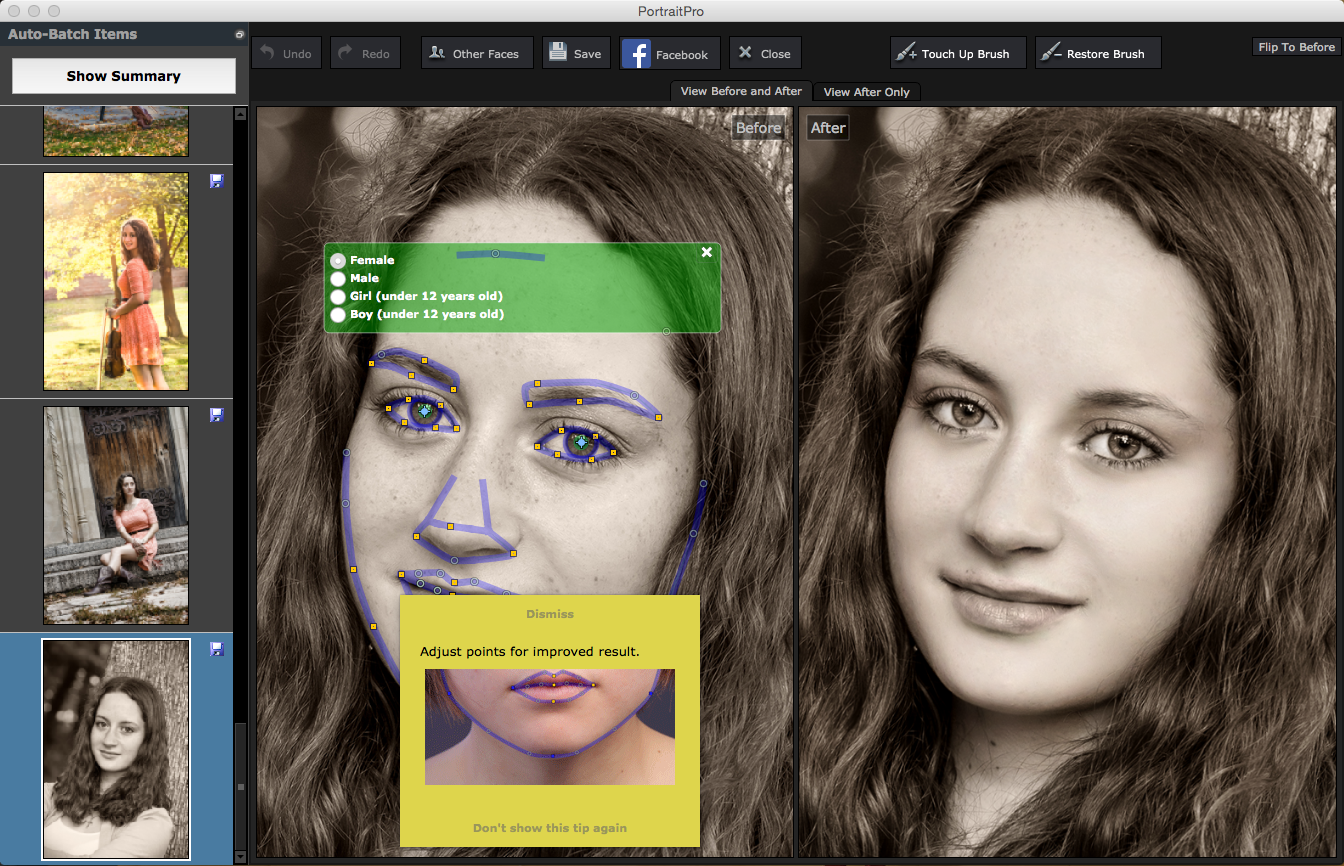
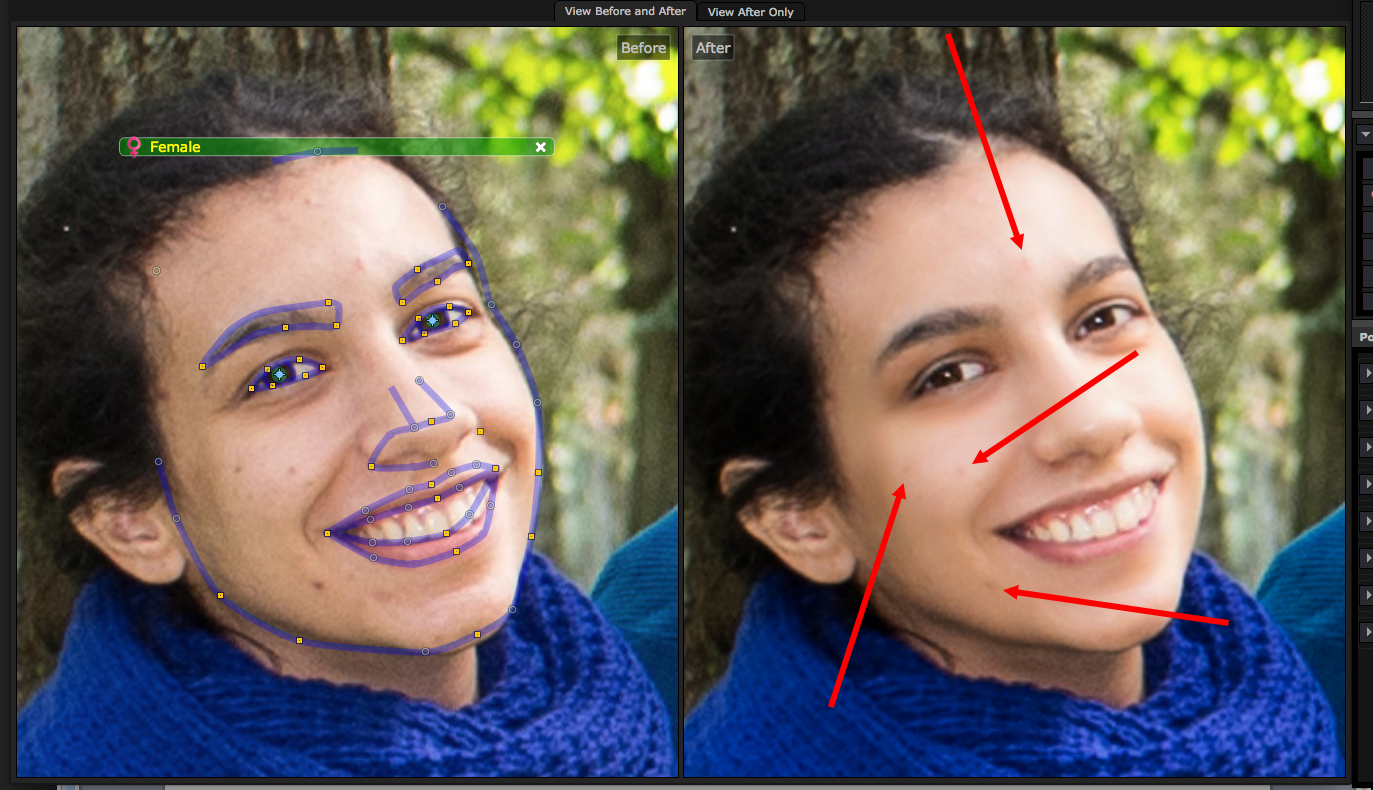
This is the main interface when you open up your image.
You'll see a before and after view of the initial settings. On the right, will be the menu palette for making additional adjustments. All the windows are floating and independent of the host program, so I was able to them around and resize them until I got them just the way I wanted them.
Those purple lines and the green bar that you see on the left… They appear when you move your mouse over that image and disappear when you remove the cursor.
Those purple lines are super important because they tell the software where to apply the lighting effects and contouring adjustments to the face.
Portrait Pro 12 does an amazing job of detecting the correct features. But the purple lines can be fine-tuned by grabbing the yellow handles and adjusting. I tried this on numerous pictures with different head sizes and different models. It worked pretty darn well.
The one place that the software seemed to consistently miss getting it right- was the forehead height.
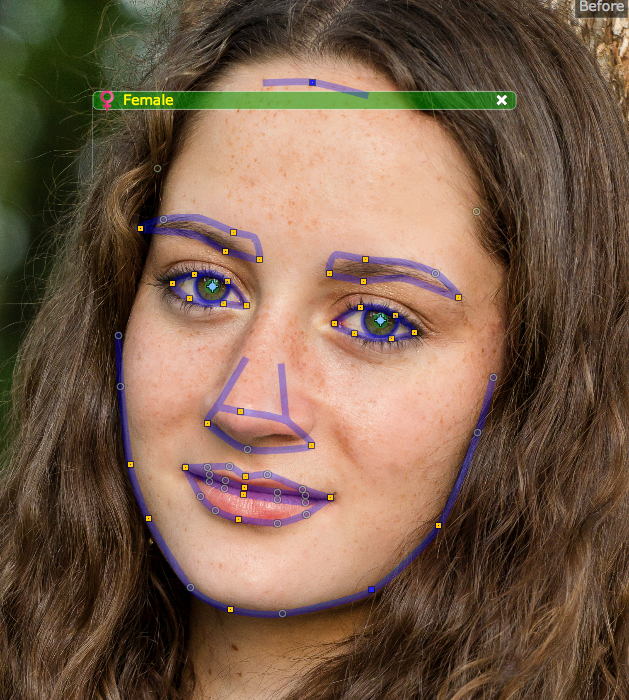
If you compare this image with the previous one, you will see that I have moved the forehead bar up, and I adjusted around the chin on the lower right.
Now, this is one of the coolest features of Portrait Pro 12. When you’re making these adjustments, you can see the effects happening in real time to the “after” image on the right. This means no guessing at the results and having to do something over and over.
I was very impressed with that feature.
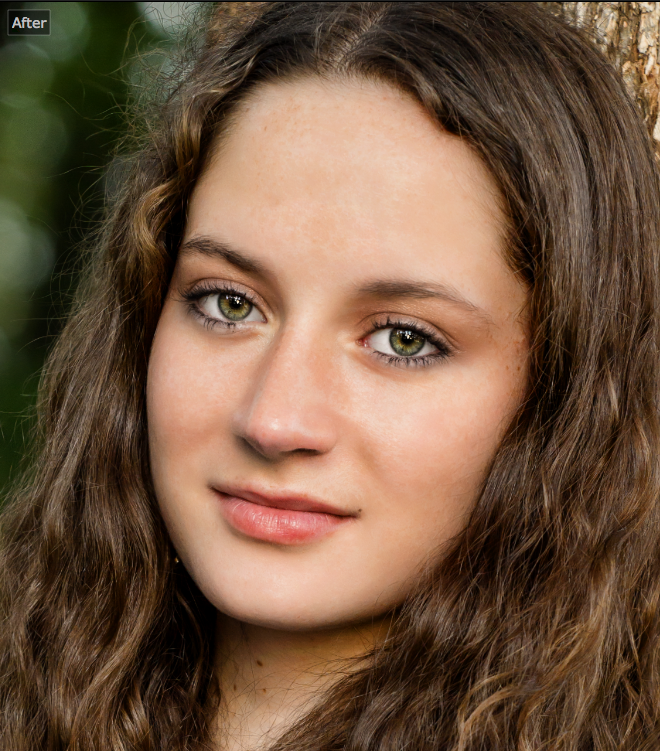
Here is a close-up view of the “after” image with no other adjustments. This is really impressive!
But, let’s say you're one of those folks that likes to get in there and really noodle around with your photographs.
You can do that with the control palettes on the right.
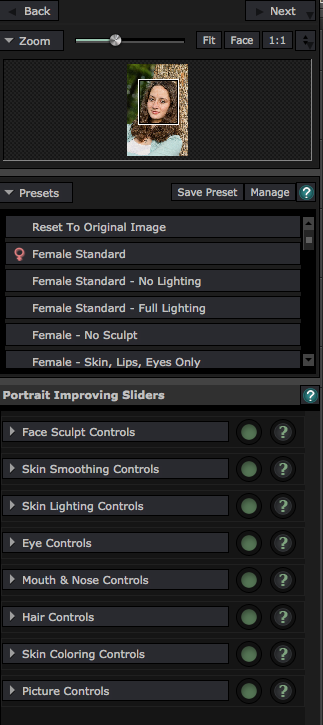
There are three areas within the control palette box. The top is a navigator. The middle section is the presets that really provide some sweeping changes to the retouching. The bottom section provides fine-tuning controls.
Now, this is kind of cool feature when you’re getting started. See the question marks to the right. If you click on one of those, it takes you to a web page that provides detailed information on how that particular function works: pretty sweet.
But- some folks, (and I'm one of them), really like easy access to a full manual. There is no access provided to a manual within the software itself – not even under the help menu.
I did find a manual online, but I had to go searching for it. A button under the help menu that took you directly to the manual would have been nice.
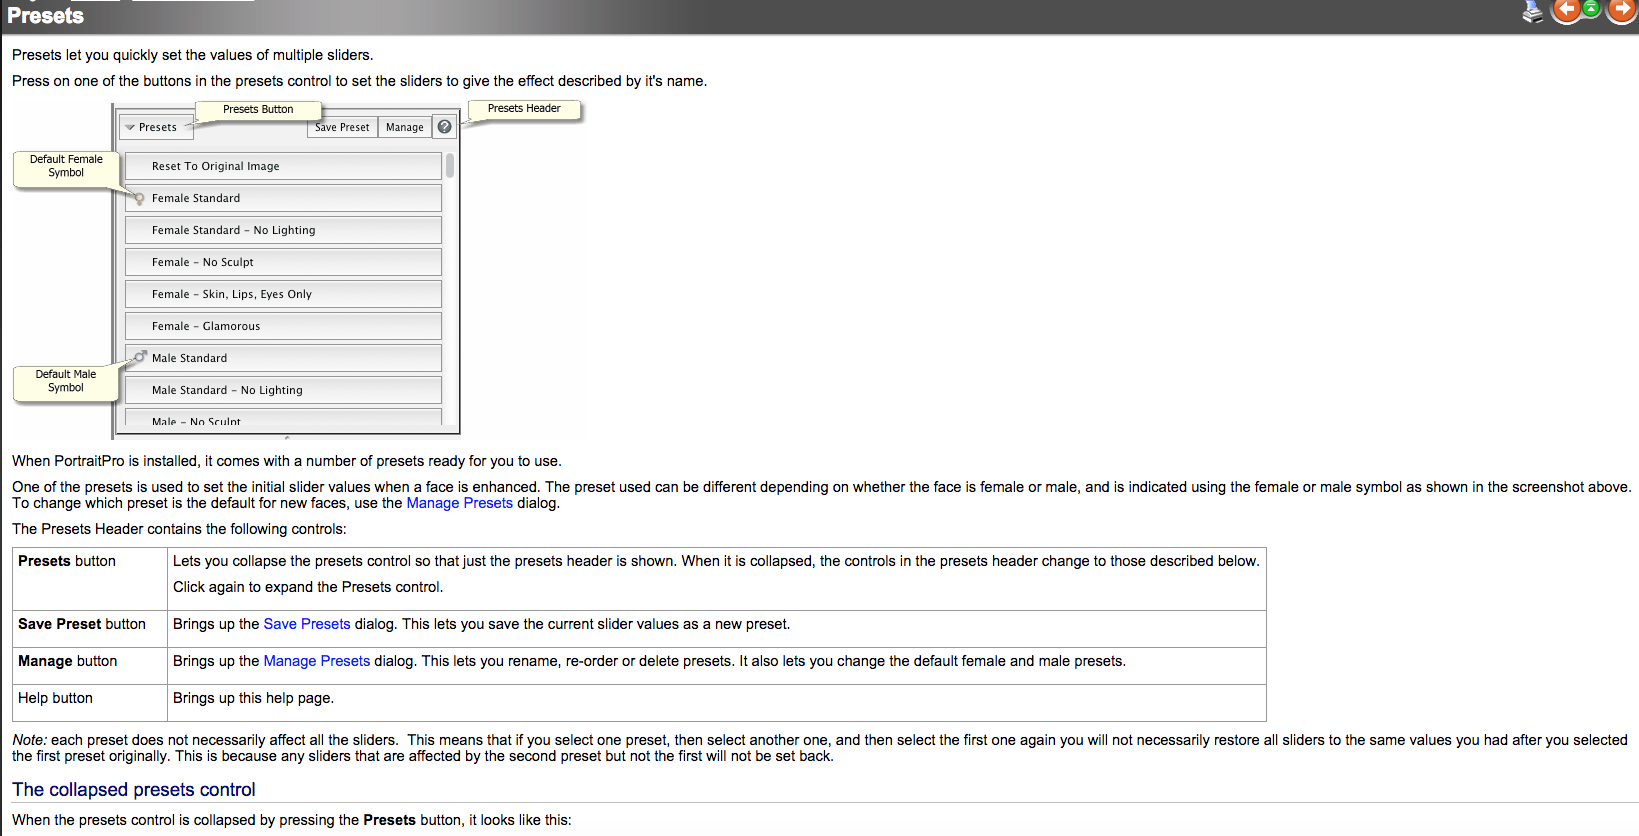
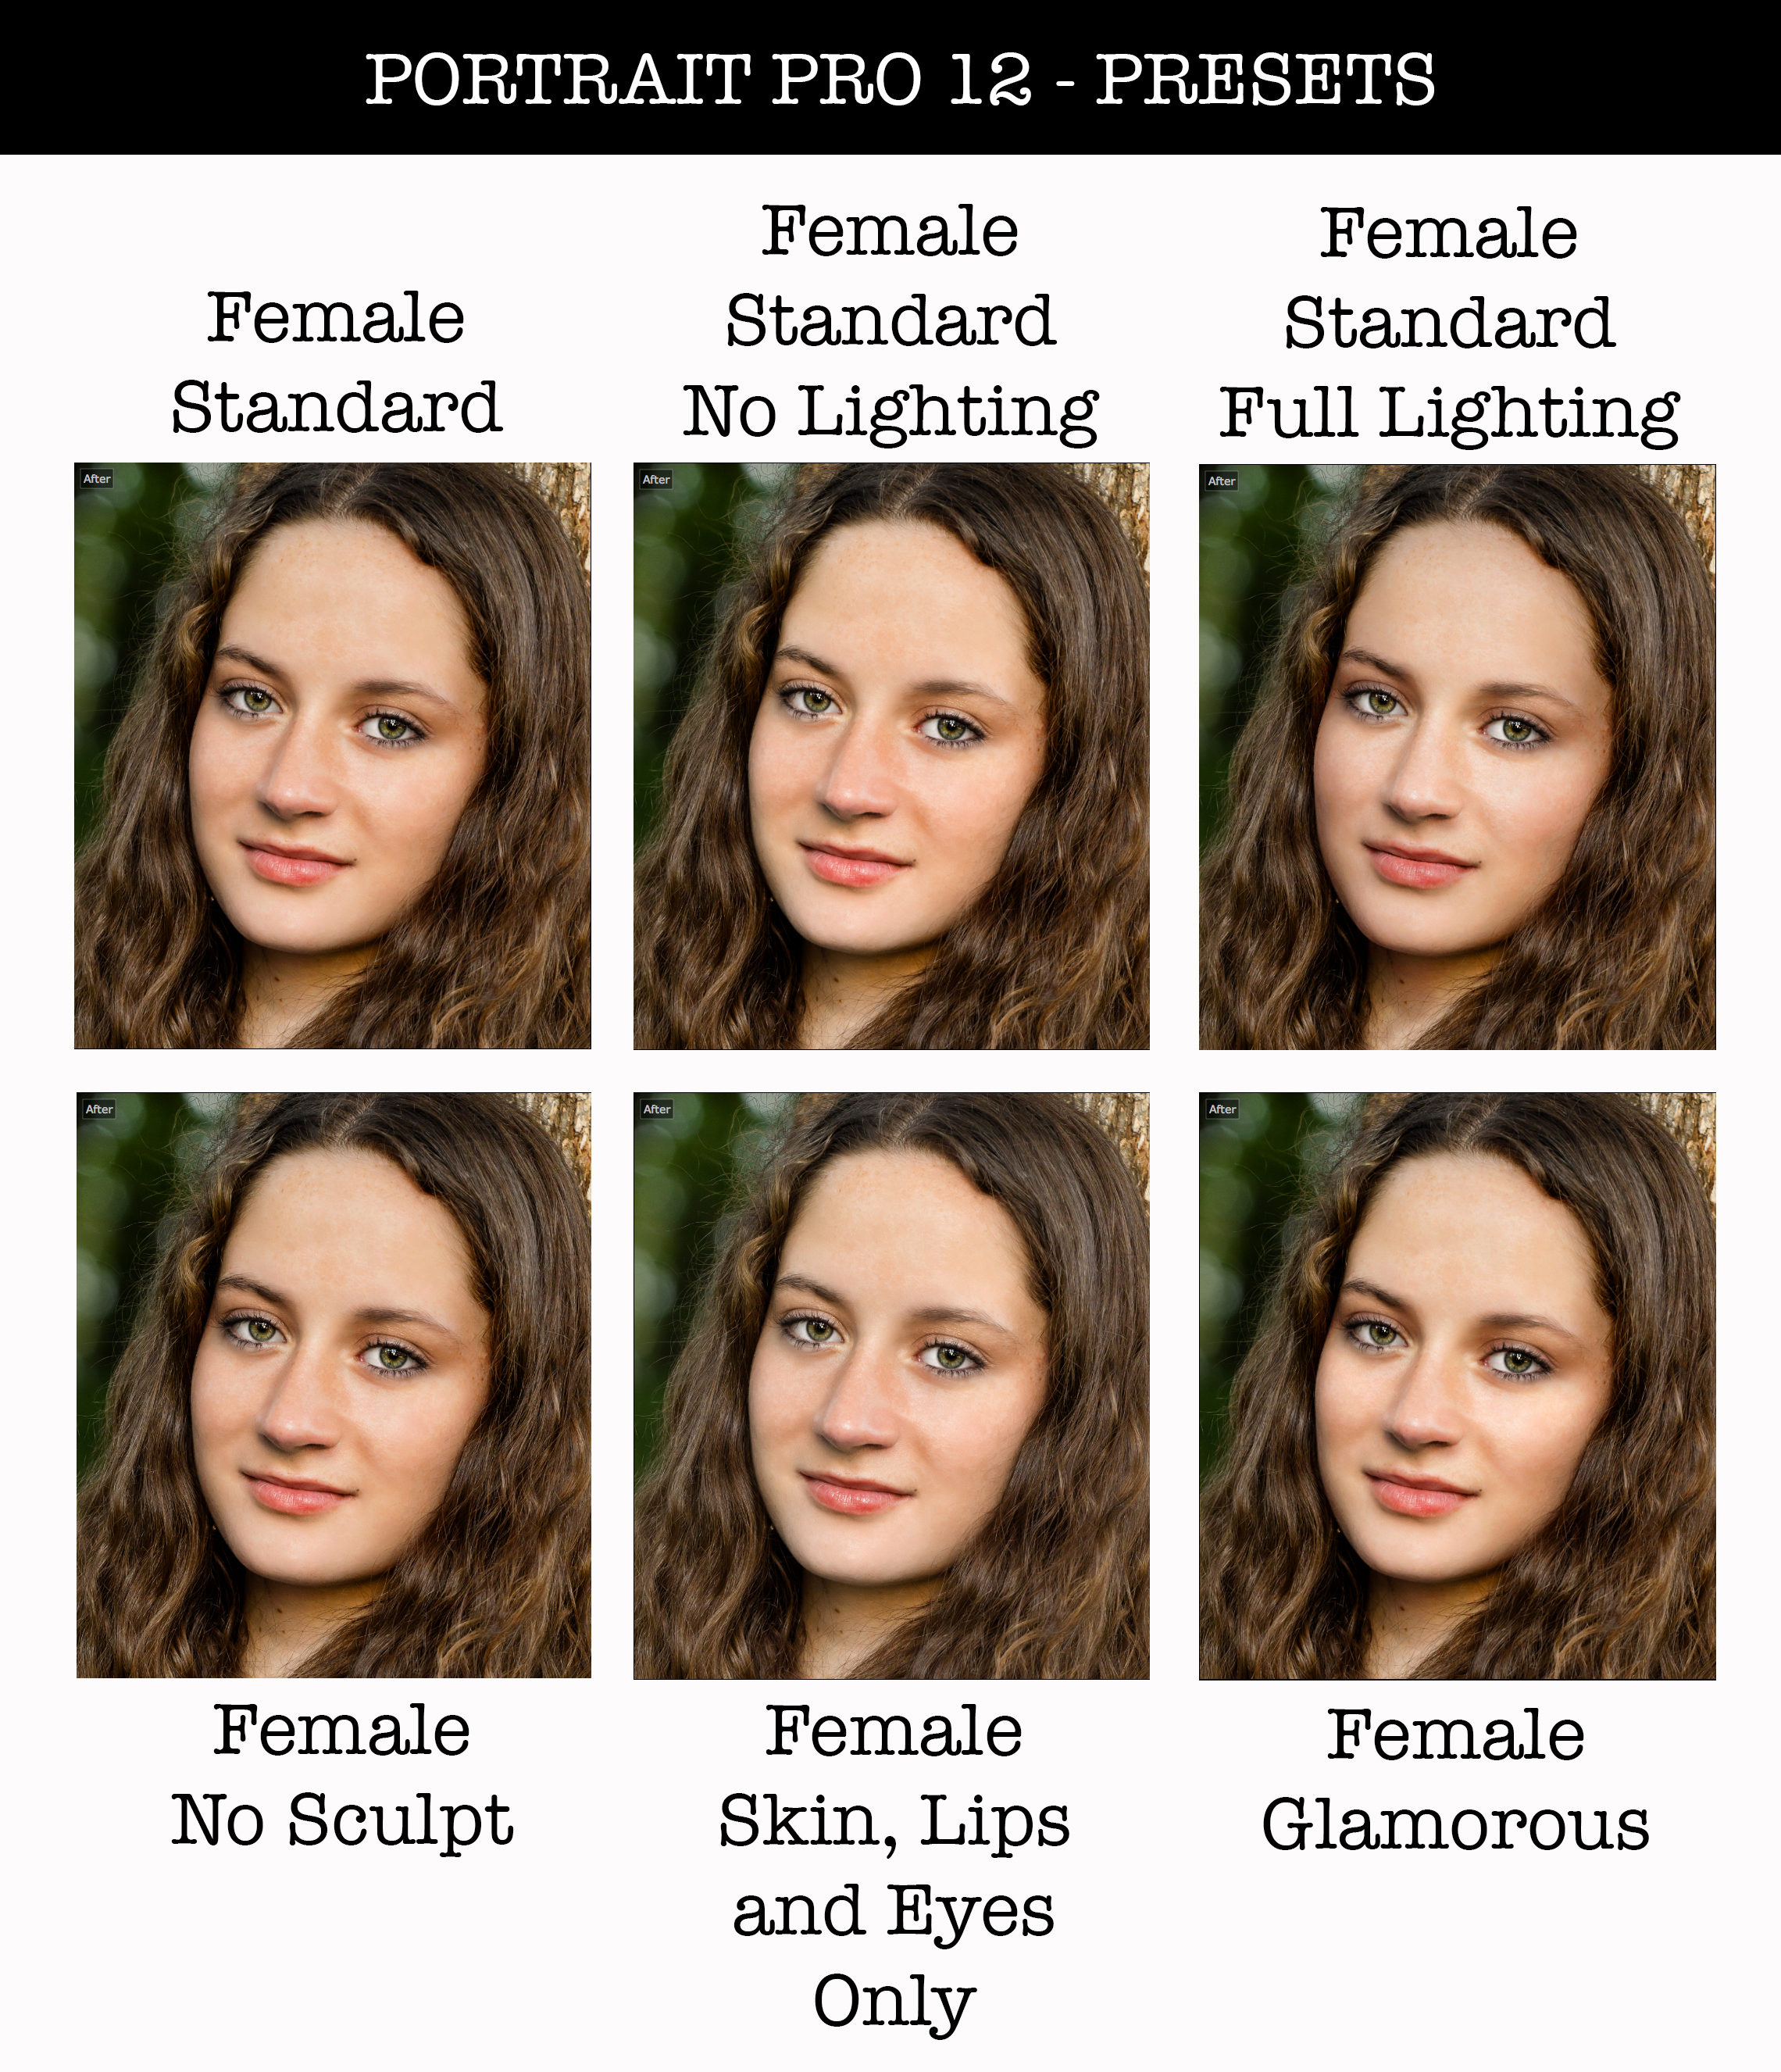
It may be difficult to discern (in these tiny thumbnails) some of the subtle differences between the presets. But, I have to say; “I was amazed at the range of changes that could be applied with the simple click of one of these six buttons”.
I now decided to dive into the into the individual sliders at the bottom of the tools palette…
At this point, I just wanted to have some fun and see what the program could do if I pushed it to the limits.
As you can see, you can create a face that barely resembles the original. And, you can do this fairly quickly. Or, if you’re like me, you might just spend an hour trying everything that’s available.
I have to admit; I had a lot more fun playing with this program than I thought I would. It’s amazingly fast and accurate.
So kudos, kudos, kudos – but there must be some downside, right?
What Could Be Better About Portrait Pro?
Well, I found three things that I thought could be improved.
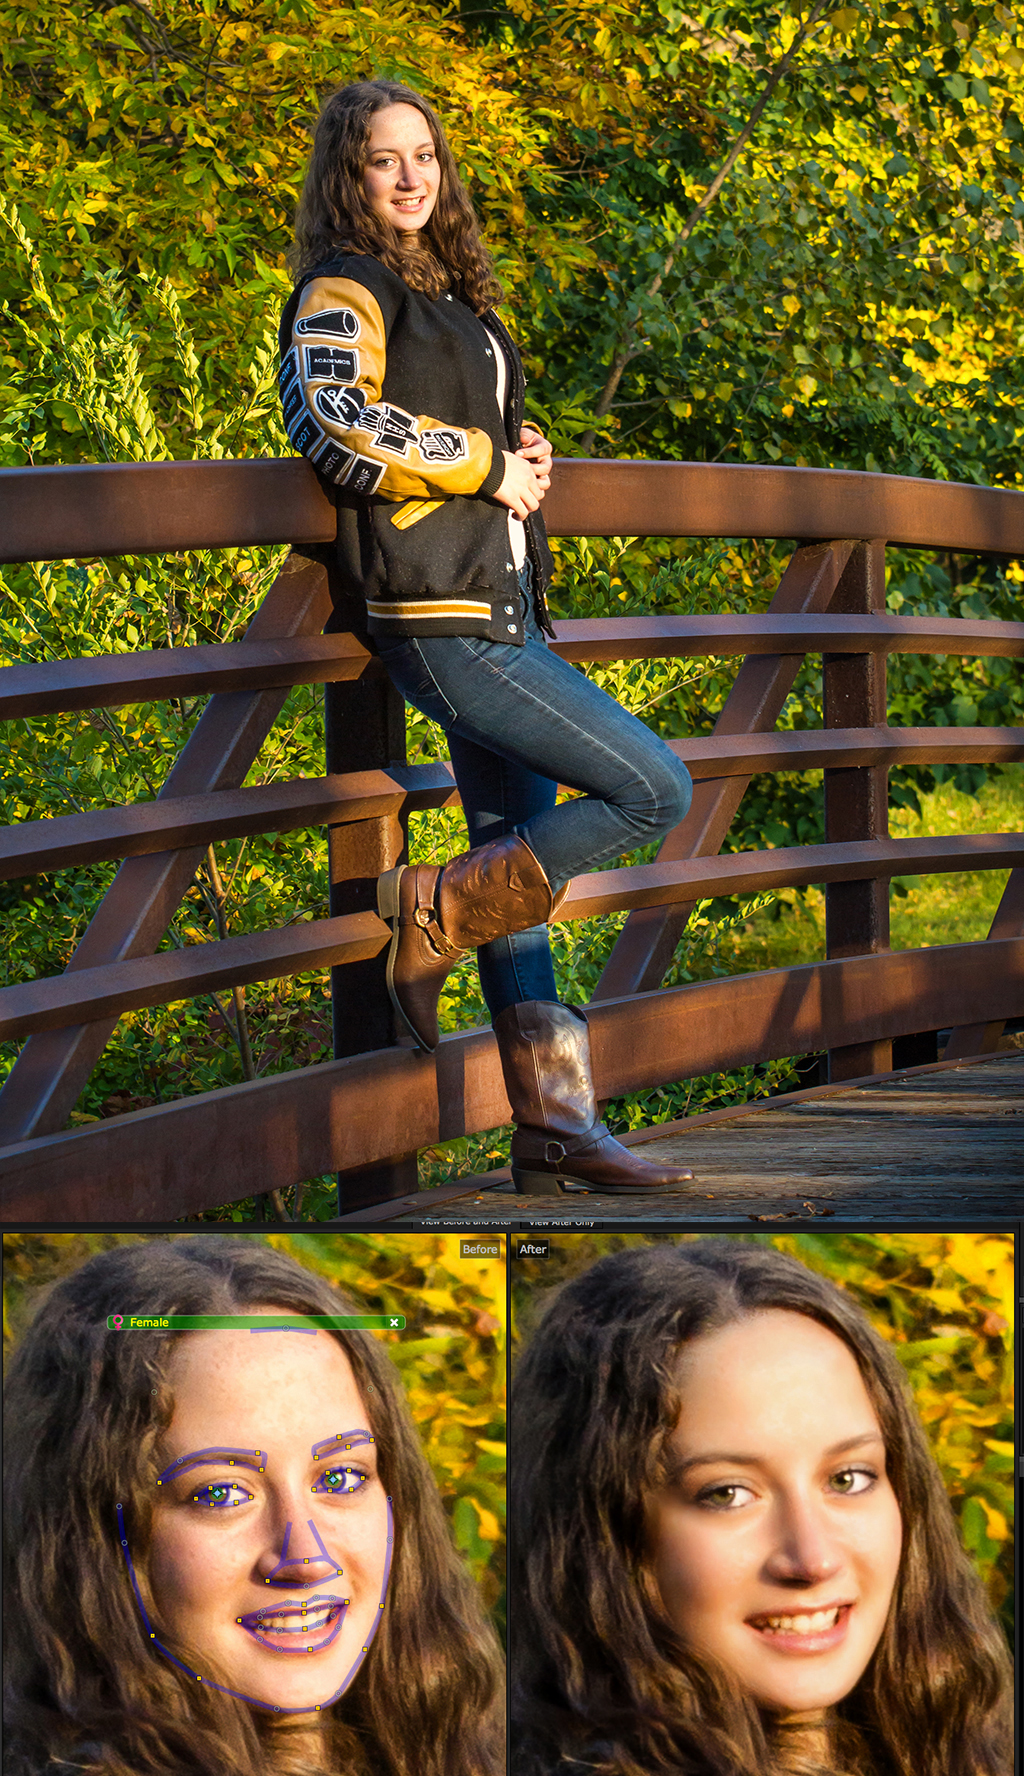
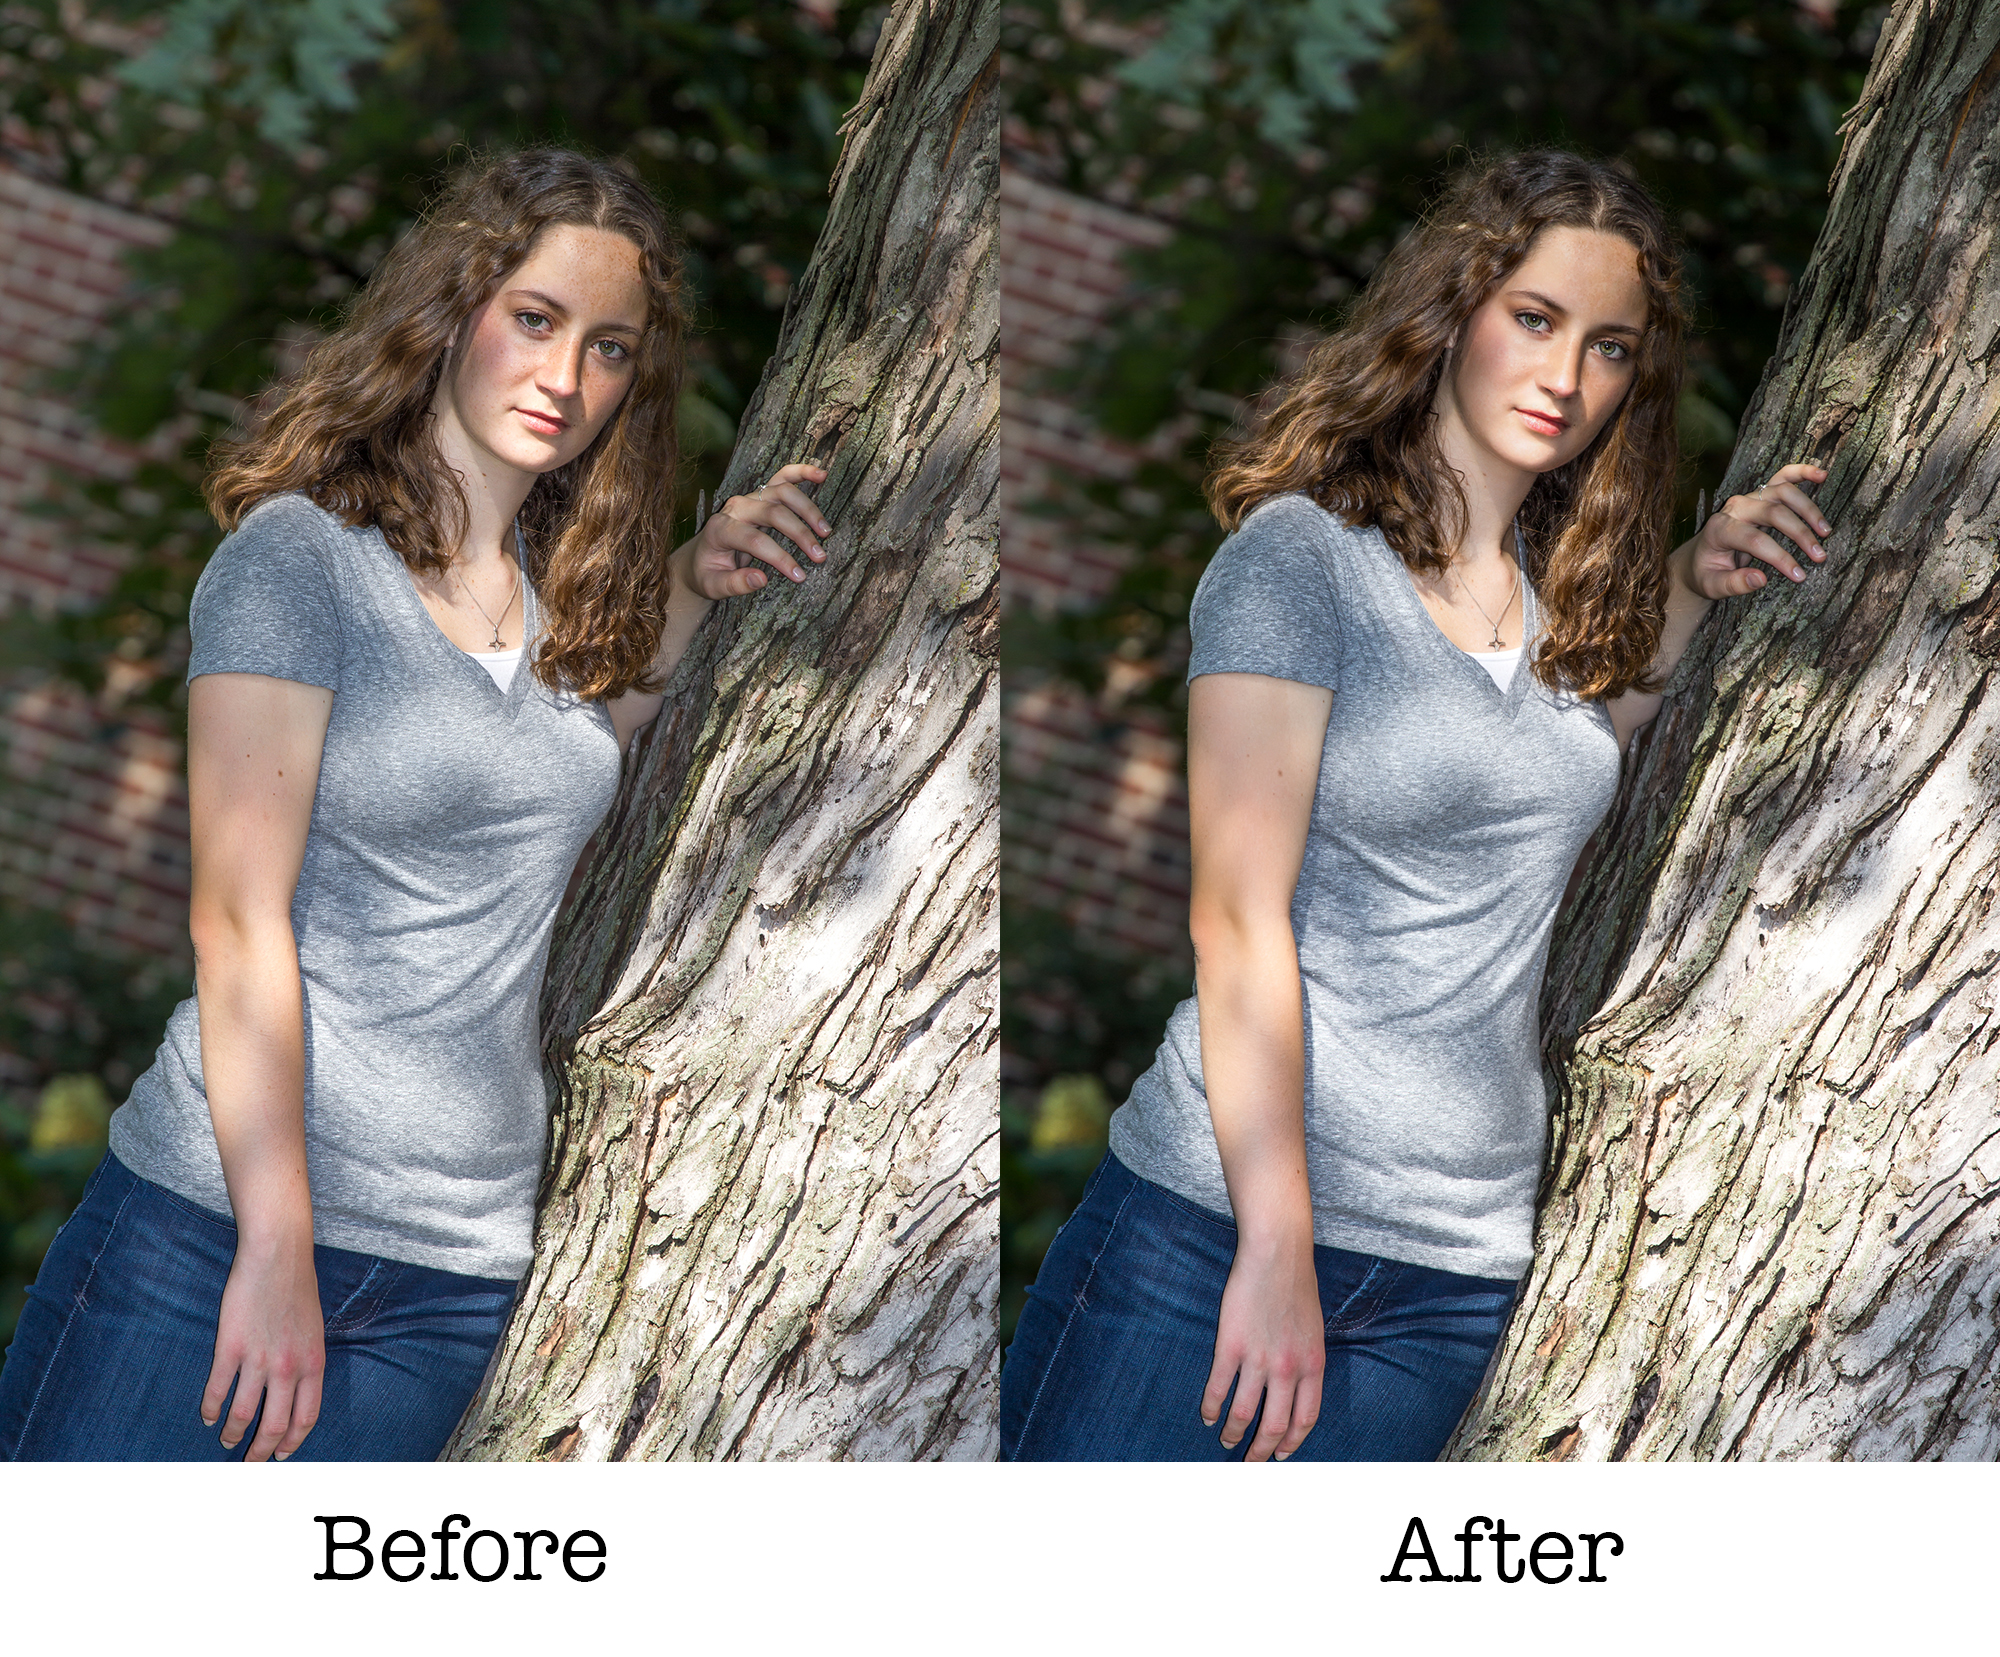
The first issue is with full-length portraits: or any portrait that is wider than half-length. With these wider shots there is a noticeable loss of sharpness to the facial features when the image is processed through Portrait Pro 12.
It also pulled at my nerves because it’s blurry in the preview window. Take the above example of the high school senior portrait. I know that the facial features of the girl are in focus and sharp in detail, (in the original file).
Just knowing that, and having to look at a blurry preview, was almost enough to make me want to quit using the software on this photograph.
I exchanged emails with Andrew Berend, the CEO of Anthropics Technology, on this issue.
He acknowledged that this was indeed the reality, and the company was aware of it. He also gave me a technical reason why this was happening, and said that they were working on it.
He expects the issue to be resolved with the next release.
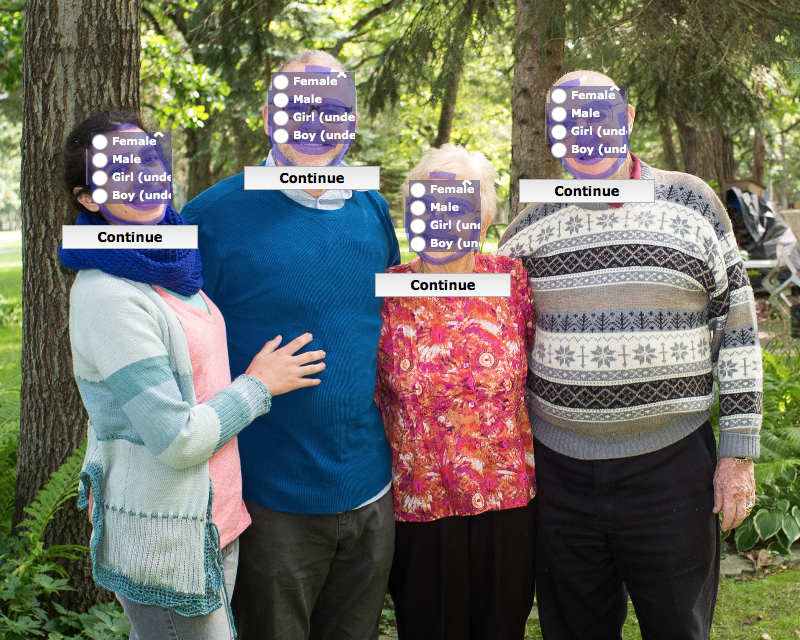
My next trouble spot was working with group shots.
One of the main selling points for Portrait Pro 12 is “speed”.
But with group shots things kind of bogged down; especially groups with varying sexes and ages.
Each face must be individually worked on. So, it’s not awful: just more time consuming.
I also found that I needed to be careful when making adjustments. It was easy to over-retouch one face, and then it no longer matched the others.
There were also a few group shots where the software would not detect all the faces present in the photograph. The program does allow for a manual selection, but the process is time consuming, especially if you think about using the program to retouch an entire wedding.
Finally, if a subject has larger marks that need retouching, Portrait Pro 12 will not eliminate them completely. You still have to take the image back into Photoshop, or Lightroom, for additional retouching.
Andrew Berend, also addressed this issue with me. He stated that Anthropics Technology hopes to have a fix for this in the next release as well.
There’s one last tool that we haven't talked about, and this is a good place to bring this up.
I’m sure you realize by now that Portrait Pro 12 is all about fixing faces. What if you need to retouch other areas of the photograph? Well, you’re pretty much out of luck, and you’re going to have to revert back to your other editing programs.
I understand the logic behind this – but I still wish for a one-stop shop…
The last tool that we will talk about is called the “Touch Up Brush”. It basically provides a localized blurring and blending effect. I found the effect to kind of destructive for my taste, and it wasn’t my favorite part of the program. It is reversible, however: should you go too far with it.
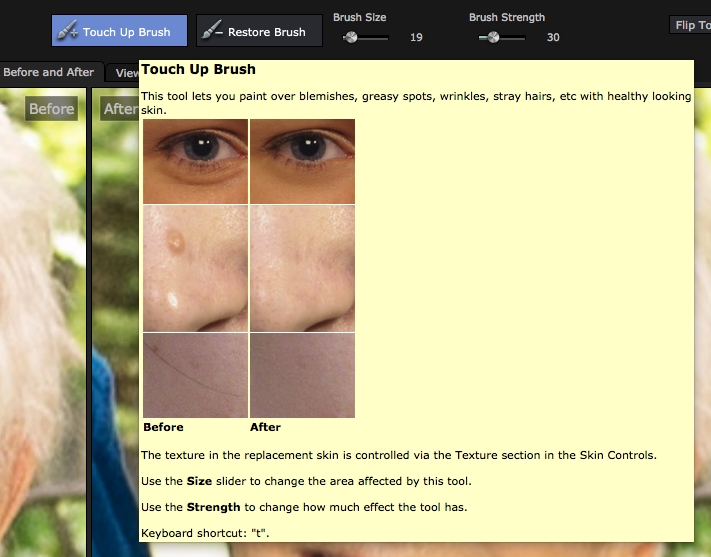
I did find it useful for one thing. Retouching the neck. Most people are very conscious of how their neck looks in a portrait. This is especially true with older folks.
The purple bars that provide the parameter data for the presets- don’t include the neck area.
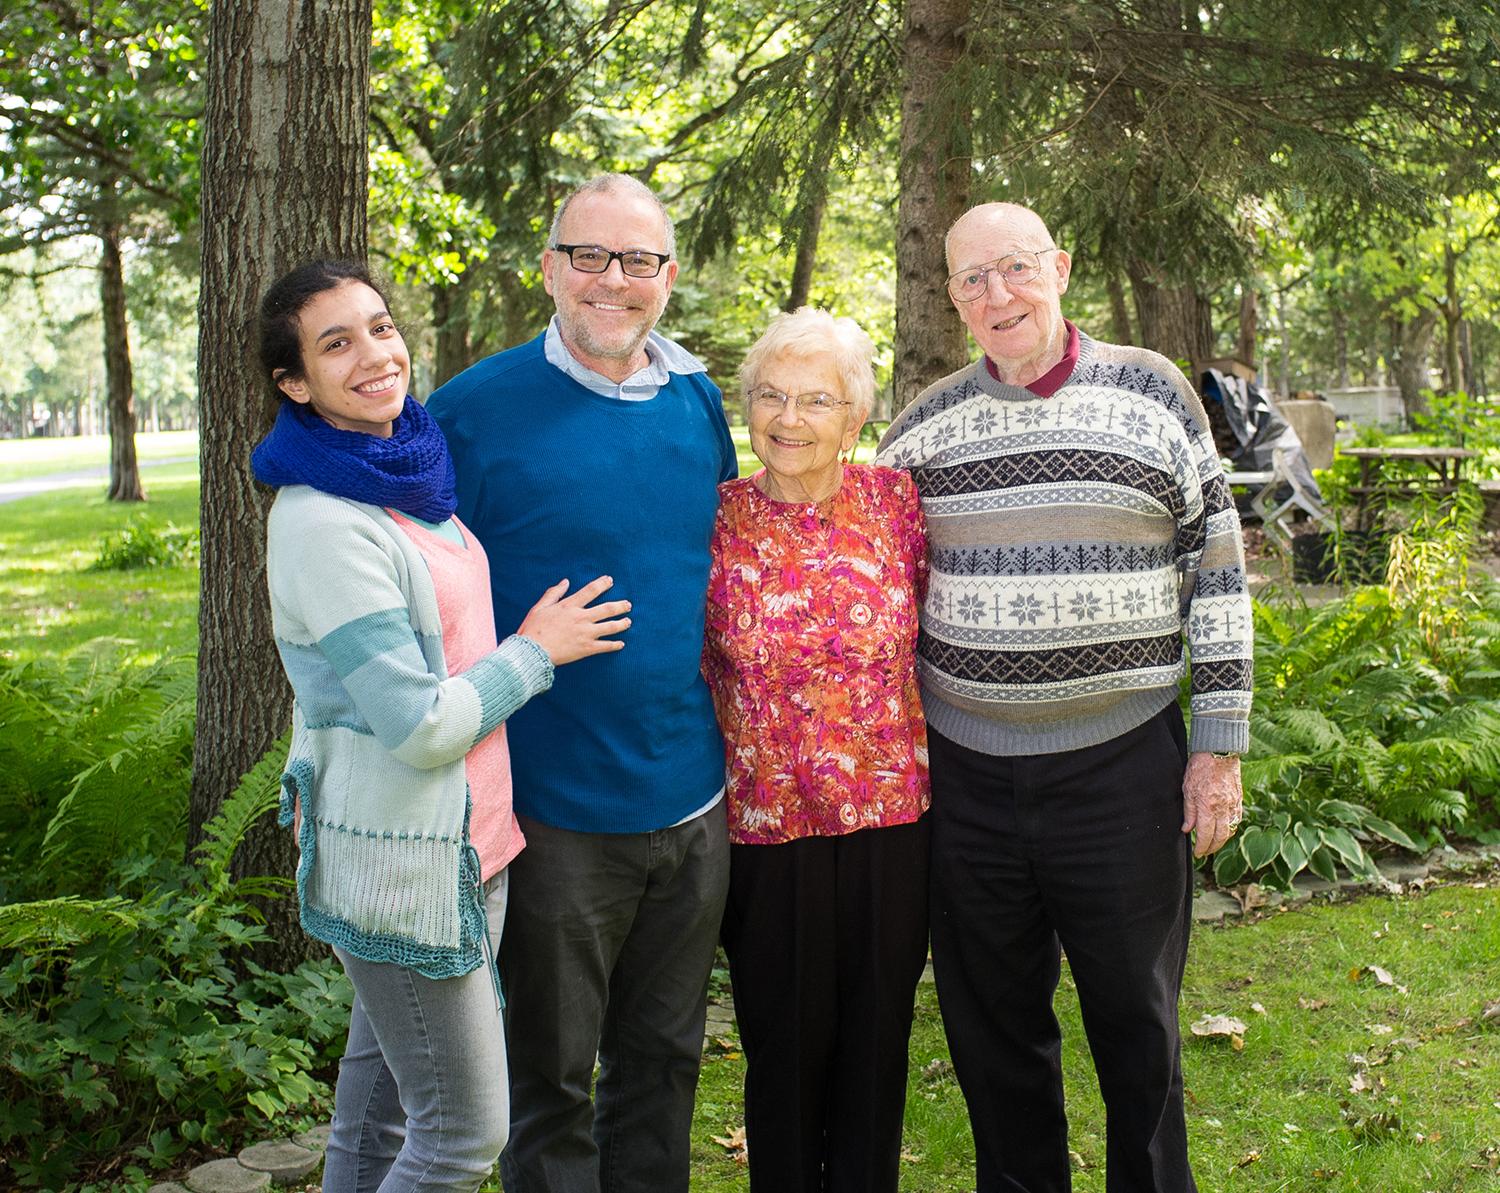
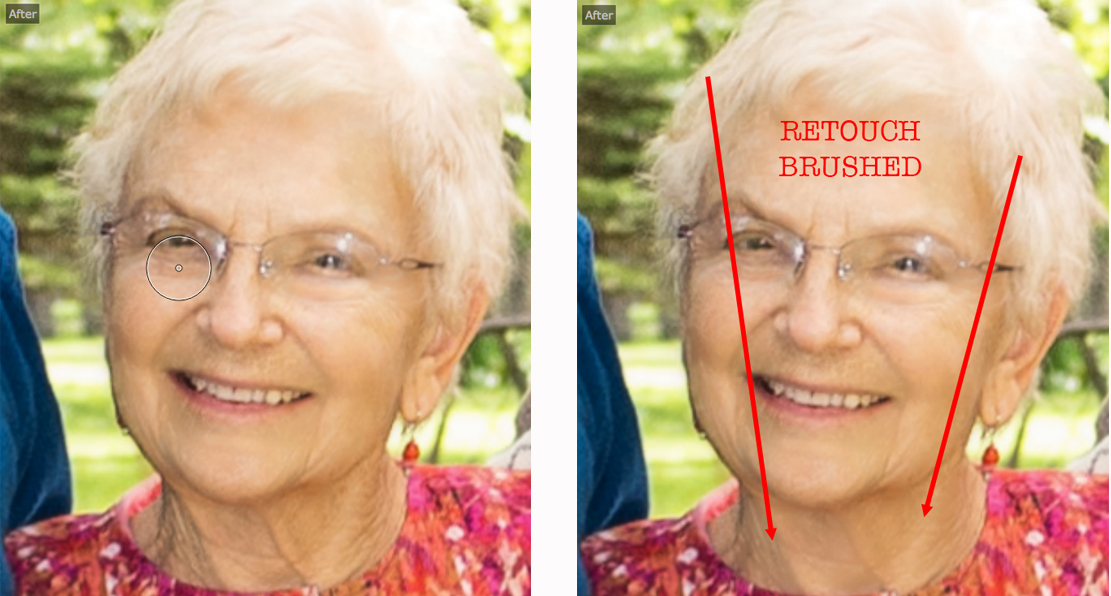
So, for the older woman in this group portrait, I smoothed out her neck using the Touch Up Brush.
The Verdict on Portrait Pro 12
I feel that the Portrait Pro 12 software delivers a solid 8 out of 10 in performance and functionality – for what it does.
That’s the key – understanding exactly what it does. I read a number of negative reviews about the software on Amazon. It was evident that most of those folks didn’t clearly understand what the software was meant to do before they purchased it.
It only does faces! Repeat. It only does faces!
I actually went into this thinking, “Why would anybody want this product?”
However, I have to admit; I’ve been sold. If you’re a wedding, portrait, or just plain old people photographer – there’s a definite place for Portrait Pro 12 in your toolbox.
Sure. You can do this work with Photoshop, Lightroom, or any other of the myriad of plugins that are available for skin smoothing and other retouching efforts.
But, Portrait Pro 12 really shines, especially with single person portraits that are half-length or closer. 90% of the time, I simply loaded an image into the software, and I was happy with the result of the default settings.
We’re talking less than a minute. That’s a real time saver if you have an entire wedding or portrait session to retouch. And that’s not even including the use of the batch setting.
I did point out that there is room for some improvement. The company is trying to make those improvements. Hopefully, future upgrades would be free, or at a reduced price.
I give Portrait Pro 12 by Anthropics Technology, Ltd. a solid thumbs up!


29 Comments
Thanks for the informative review Kent, I found it to be most helpful!
You’re welcome!
Great review–hit nearly all the questions I would have except one: do you know if when if you can go back and forth between P/S or Lightroom and Portrait Pro without losing all (or most) of your edit history?
Thanks for the great write-up, Kent.
No… Once you’ve done your Edit, it’s Saved…
But, you can bring the PP file in OVER the Original in PS, and ‘Paint’ in what you need/wait…
– Andrew
I’ve bought and used PP12 on a couple of sessions, and it does speed SOME things up.
For me, the Defaults are a little too ‘soft/blurred’, but there is enough control within the software to reduce the effect and make it look more natural. Time Saved (for the most part)
Another issue, be careful when moving your purple lines to fine-tune… On numerous occasions, I make an adjustment in one place, and the edges of the section may not redraw/update correctly, and can not be fixed in PP… In general, I just used the defaults… Time Lost
PP is a great first step on tight head shoots, but doing a wedding… Not me…
It is a fun program to play with, and one can drastically change a face very easily, sort of like over-doing-hdr/tone-mapping…
I’m glad that I have it, but it is just another tool in the box…
– Andrew
Thanks for the comment, Andrew.
Hi Jeffrey. That was a good question, and quite frankly, I didn’t know the answer. So, I tested it with Photoshop CC and indeed all the history was saved. I don’t use Lightroom- so that I can’t answer for you. However, I would assume it works there as well.
Sending me back to the program reminding of something that I wanted to mention in the article and forgot…
There is no “save” button. That kind of threw me at first… we are so used to clicking save. When you’ve completed your work in Portrait Pro 12 there is a button that you can click at the top of the workspace that says, “Return From Plugin”. Clicking that button will automatically “save” your work. If you wish to close the program without “saving” the work- you must click “close” or “quit” in which case the program will ask if you want to save the work or not.
I have used Portrait Professional since the first version, I believe. I love it. Just to add one note to your comment about the neck — unless it changed in the latest update, there is a setting for both hair and skin, where you can highlight the areas to be edited. So you can include the neck, even upper arms, etc. for the editing. I highly recommend this software. Once when I changed computers, they worked with me and were very helpful in getting my license transferred to the new computer. BTW, I use it on an iMac.
Mary, thank you for pointing that out. I completely missed that. You are the voice of wisdom! I appreciate that. So, folks- Mary is right. There is a slider, and some adjustment tools, under the “skin” heading that allows you to retouch the neck.
Thanks for the review! Because of it, I just downloaded the free trial version. However I noticed that on the download page you also DO have the option to download the manual, so the “hard to find” manual shouldn’t deter anyone.
I missed it on the download page. So, I was trying to find it after the fact. I still think that a button in the “Help” menu that led to the manual would be a nice feature. Thanks for your comment!!
Good review. One point Iwould like to add is the fact that the licensing system behind the software to protect it agianst illegal copies is the worst. I am working with Portrait pro from version 10, and now two full versions further they still did not fix this problem. Changing wifi network, or installing some small operating software can disable the installed license. In that case you have to contact Anthropics helpdesk begging to release the license, because it does not allow you to reactivate the license. I have lost valuable time and money sitting behind a computer with a broken license and a deadline for delivering pictures. At the moment I write this, my license again has been blokked and even the workaround the helpdesk gave me in the past is not working anymore. Big shame for such a nice product with lots of potential.
Thank you! And thank you for the additional information.
I find the changes a little too much for my taste. I guess I could back the settings off a bit and save a preset but I think it’s going to be just as quick using brushes n Lightroom. It seems to have difficulty with hats in some situations (specifically where the eyebrows can’t be seen because of a wide rim). It takes a guess where the forehead might be and then all the softening effects get applied to the hat also. If I try and move the forehead line it distorts the face. That’s just a quick first impression. I will need to play some more to get a better idea.
Interesting… I did not try a photograph with a hat. In my group shot example, I noticed that it had some difficulty with the eyeglasses. However, I was able to correct it quickly and easily.
I have been using Port Pro for a couple of years now and have finally figured out most of the quirks.
Regarding hats – under the skin smooting and face lighting controls there is an option called view skin area or something like that (don’t have the program in front of me). If you click that then you can see a purple overlay over all the areas that PP thinks is skin. there is an extend and cut back brush. Use the cut back brush to remove the purple areas over the hat and then the skin softeng won’t be applied to that area of the image.
Another area that took me a while to figure out is how to handle closed or partially closed eyes. On images with closed eyes you can still see the iris an pupil even though the lids are closed. In that case you need you use the outline controls to reduce the size of the iris/pupil and the use the eye outline controls to “close” the eye. this should fix that problem.
Occassionally I do find an image that because of the angle I can not retouch in port pro so I just do my best in Photoshop
Thank you Ira.
I have been using OnOne’s Perfect Portrait (8) to scratch this itch. It’s similar in function to Portrait Pro but not nearly as accurate in detecting facial features. It does have an option to limit its corrections to face only or all skin. This program is but one “blade” in OnOne’s swiss army knife Perfect Suite where all blades do a credible job. If Portraits are your business then it might make more sense to go with the reviewed tool.
Thank you for your input Phil!
I’ve tried it a few times but wasn’t particularly impressed. Most of my portraits are close-ups so I want to fine tune EVERYTHING. The subject knows their face very well and if I overdo something or don’t address something else, they’ll see it right away so I want full control over every detail. I imagine it would be good for weddings and other times when you have a lot of portraits to edit but not for my work.
Thank you Patrick!
I’ve been using PP since version 10, and have it on a laptop and my home desktop – the laptop constantly moves location and wi-fi and I have never had the problem Marc mentioned. I’ve altered the components in my desktop, and reinstalled the OS several times, and again never had a problem. Just the luck of the draw I guess.
My BIG problem with PP is the “resculpt” function in group portraits, having got one face just right, you move to the next and the resculpt reshapes that face, and in doing so distorts the nearby faces, including the completed one. I often turn the face sculpturing off. It also can have problems where part of the face is obscured, eg by long hair, a hand or a prop. You have to alter the area as Mary said above.
In short, it is my #1 tool for portraits. Yes, there is room for improvements, but, as is, it saves me hours and does what I need. Great program.
Thank you for your input Trevor.
I’d love to see your review/comparison of Version 15 (what happened to 13 and 14?….) So far I cannot find enough improvement over version 12 to justify the expense of the upgrade.
I just bought the v15 for speed up the workflow. All automatic functions off and I just use it on layers in photoshop. Makes easy to pop the eyes and fix the skin. The default settings are too much and far from life like.
Thanks for the review. This software keeps coming up in my social media feeds and I have been thinking of purchasing. As a beginner to photography I welcome anything to make things a bit easier.
I’ve had PP for years. When they added “adult/child” options, I started using the child option, as it makes less drastic changes. I can then make specific corrections that don’t leave clients looking plastic.
Thanks for the tips on dealing with hats, necks and arms. Very helpful.
Does anyone have solutions for eye or sunglasses? (I shoot a particular group of women who wear Aviators for all outside events)
It really tries to make a bit of a mess of photos, if you dial it back it’s handy. BUT, they have some sort of bug, it blocks me every 2nd or third time opening it with a “this token has been used and cannot activate this software” then they take days to respond and “fix” it and make ridiculous excuses, too much of a headache for what it does…
I’ve been using this software for several months now. Not being the best at knowing all of the nuances in LR/PS, I’ve found this program to be a handy little tool for my portrait work. I did notice that, when photographing models wearing sunglasses, it was easier to do a PS mask and adjust the opacity when dealing with facial skin corrections. If you let the program have its way with a subject who is wearing sunglasses, you’ll get these creepy eyes staring at you through the lenses. I suppose you could take the eyes out of the equation by using one of the appropriate presets (?). I’m happy with the direction my images are moving now; gotta get practiced – shooting my first wedding in September :-O