Retouching portraits can be a controversial subject, but it is also very often requested of portrait photographers to edit out minor blemishes and skin imperfections. We're going to go through one of the methods used by professional retouchers to make subtle changes to portraits without overdoing the corrections and ending up with blurry or obviously airbrushed images. I've made a screencast walk through of the entire process as a visual compliment to this tutorial, feel free to watch it by clicking here. Let's get started.
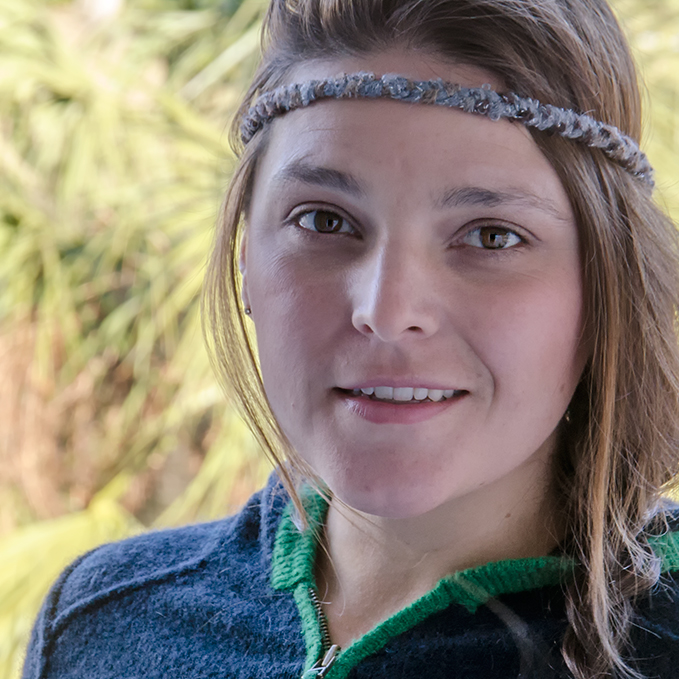
This is the snapshot, in it's before state, that we'll be using throughout the tutorial, feel free to grab a copy of it or work through the steps using one of your own images.
Yellow Channel Adjustments
Once you have an image opened up in Photoshop, the first step is to adjust the Yellow channel to balance out skin flaws. In order to do this we have to first convert the image from RGB color to CMYK.
- Click Image > Mode > CMYK Color
- Head over the Channels Palette and click on the Yellow channel. Your image should change to a funny looking grayscale.
- Press CTRL + A to select all, then press CTRL + C to copy it.
Now, we have to go back to RGB color, since we've made no other changes at this point, it's quickest to go back to the History palette and just click at the top on the original image.
- Once back in RGB mode, press CTRL + V to past the yellow channel onto the image.
- Rename this layer Skin Flaws
- Change the Blending Mode to Soft Light, that should restore the color to the image.
- If the changes look too strong, adjust the Opacity of the until you are happy with the adjustments.
- Add a layer mask by holding the ALT key and clicking on Add Layer Mask icon found on the bottom of the Layers pallette.
- Ensure the Layer Mask is selected in the Layers Palette, and grab the paintbrush tool. The foreground color should be set to white.
- Paint over the skin using a soft brush. Adjust opacity again, if needed.

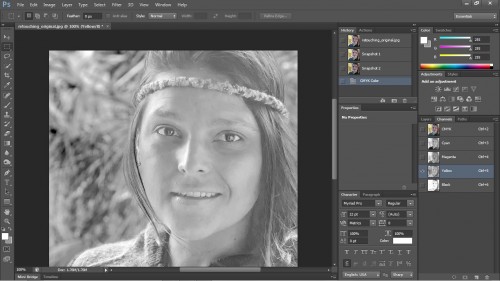
The screencap above shows where we should be after painting in on the Flaws Layer Mask.
Removing Blemish and Skin Imperfections
We're simply going to clone out the blemishes using the Spot Healing Brush Tool. Many of you are probably familiar with this step already, but let's go through it quickly for those who are new to image retouching.
- Select the Original or Background layer in the Layers palette and press CTRL + J to duplicate the layer. Rename the new layer Blemish Removal.
- Select the Spot Healing Brush Tool and brush over any blemishes, wrinkles, or skin imperfections you wish to remove. In some instances it make take several passes to get it correct. You can also use this time to shape eyebrows, remove dust, etc depending on how much work you want to do.
- When finished, adjust the opacity to bring back some of the blemishes and maintain a realistic look.

Airbrushing
This is where you really start to see some changes come through and it's also where it starts getting easy to overdo corrections. When working on the next couple of steps, keep a discerning eye so you don't get too carried away and create overly dramatic effects.
- Select all of the Layers by holding CTRL and clicking on each of the layers. They should be Background, Skin Flaws, and Blemish Removal. Right click and select Convert To Smart Object. This will allow you to go back at a later date to make adjustments. Rename the Smart Object Layer to Original.
- Select Original Layer and press CTRL + J to duplicate it, rename it to Skin Smoothing.
- Go to Filter > Blur > Surface Blur. In the pop up window set the Threshold to 255 and boost up the Radius until you can barely see that your looking at a face. Now bring the Threshold slide down until you can just start making out the features of the face such as the eyes and mouth. The image will still look very blurry and distorted, not to worry. This will be corrected in the next step. Click OK to apply the blur.

- Select the Original Layer once again and duplicate it by pressing CTRL + J. Rename this layer Skin Details and drag it to the top of the other layers.
- Go to Filters > Other > High Pass. In the pop up menu, adjust the radius until you can see the finer details–like wrinkles–start to come through. For our photo, we used a radius of around 1.7. Press OK to apply the filter.

- Change the Blending Mode of the Skin Details layer to Hard Light.
- Chances are the airbrushed skin we just edited will look too strong. To fix this we're going to group the Skin Smoothing Layer and Skin Details Layers by selecting both layers using the CTRL key then press CTRL + G. Rename to Airbrushing
- With the Skin Smoothing group still selected, press and hold the ALT key and click on the Add Layer Mask icon at the bottom of the Layers Palette to create an inverted layer mask.
- Select the Paintbrush Tool, set the foreground color to white, and decrease the opacity of the brush to about 50%. Paint over the skin anywhere you want the airbrushing to appear.
- Adjust the Opacity of the Layer Group Airbrushing to fine tune the airbrushing.

Correct Skin Color
For the last step we're going to cover in this tutorial, we're going to balance out the skin tones using the eyedropper tool. Almost finished!
- Select on the Original Image layer, then select the Eyedropper tool. Make sure the eyedropper tool is set to Sample All Layers. It's important you don't have a layer mask selected in the Layers Palette.
- Click on an area of the skin which has a nice skin tone which you want to use as the base color for the skin color corrections.
- Collapse the Airbrushing Layer if you have not already done so. With the Airbrushing Layer still selected, add a Solid Color Adjustment Layer from the icon located on the bottom of the Layers Palette. It should automatically go to the color you selected with the Eyedropper tool. Press OK to apply the Adjustment Layer.

- Rename the layer Skin Color and change the Blending Mode to Color.
- Click on the Layer Mask of the Skin Color Layer and press CTRL + I to invert it.
- Select the Paintbrush Tool and brush over the skin to apply the color corrections. If you do not like the color you originally selected, you can change it by clicking on the color box in the Skin Color Layer and selecting a new one.
- As a final step, adjust the Opacity of the Skin Color Layer until everything looks just right.
Finishing Touches
Many people like to add some finishing touches at this point. The most popular is to use the Dodge and Burn Tools to restore some shadows and highlights. Depending on your image, you may wish to do this, too. It should also be noted that if you don't like the effects of any of the steps we went through above, you can always skip over them. And by all means, experiment with the sliders and values in all of the steps until you find settings which think look best. Since each photo will be just as different as our personal preferences, there are no hard set values to use. Do what looks right to and be sure to not overdo the skin.
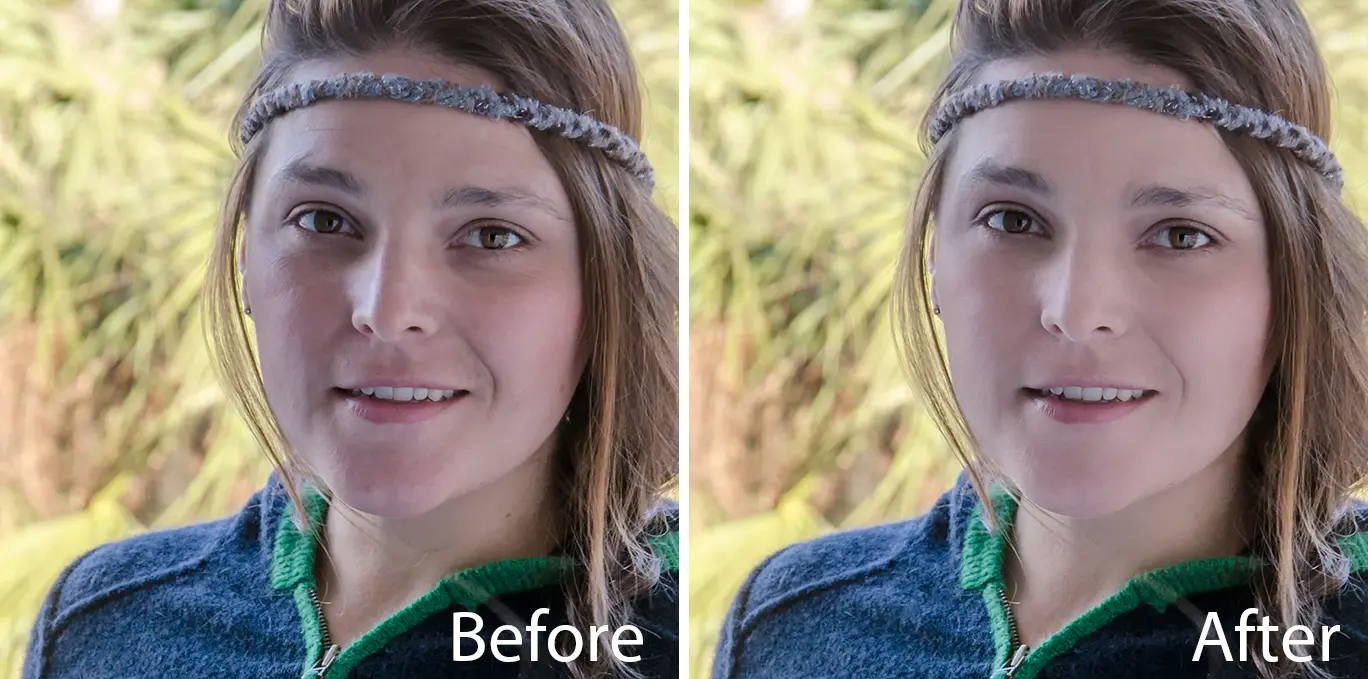
When all is said and done you should a final image in which the skin has maintained its natural texture and still looks like skin, not porcelain.
If all this wasn't enough, you can also check out this useful article on portrait retouching!


3 Comments
This was fantastic! I love the step by step on the actual screen. Can’t find one anywhere like this 🙁
Is there one just like this on PS Elements? I am a beginner and have started out with Elements.
Thank you!
– Mari
I can’t wait to try this out on my own pictures. It’ll make it look like I actually got some rest on vacation!
Your directions and screen shots make this a thorough, well done post.
It’s always interesting to see how other people edit their images. The great thing about Photoshop is that there’s usually a lot of ways to do the same thing.
There’s one thing I’m a stickler for when changing color modes. I _always_ “convert to” the desired color mode so that I don’t get any strange colors when switching between modes, then if I need to go back to a previous color mode I again “convert to” the original color mode, You can see this happen if you check the preview toggle.
Since you revert back to your original color mode through your history, I imagine this also fixes the problem! Got to love Photoshop’s million ways to do the same stuff!
Kudos!
@Bruce, if you like any parts of this tutorial and would like to add it to your own bag of tricks, I’m sure you can automate some of it with actions to get you into the ballpark for close up head shots, and make another version for farther away family shots, have the layers all set up in the actions with blend modes, masks, general opacity and then fine tune, select a color for skin, etc. They can be a bit time consuming to make but then it saves you so much time in the long run. Hope this helps.