We want you to close your eyes for a moment and imagine the following scenario. You've been saving for the last two years to go on your dream vacation; a photographic expedition to a an exotic location, let's say China. Your budget only allowed a certain number of days, and you're attempting to take in as many locations as possible in the time that you have. Today, is your day trip to the Great Wall of China. You get up extra early, go through all your camera gear; batteries are charged, lenses are cleaned, Media cards are formatted. You are ready. At the appointed hour you rush down to the hotel lobby to board your bus. The glass doors slide open, you step outside, and your heart slowly sinks into your stomach.
Why? Because your chosen day has dreary and dull weather.
This has happened to us all. It's heart-wrenching to finally make it to a location you've always wanted to photograph and you've got…
A Lousy Weather Day!
Because we all know, when the sun isn't shining (or at least partially shining), it ain't pretty!
And you end up with flat, low contrast images that don't sparkle.
Sure there are things that you can do in Photoshop to try and pump some life into that image. But quite often too much manipulation leads to unsightly artifacts and ultra-high contrast images that aren't all that appealing.
We would like to offer another alternative – HDR
Most of us are familiar with what HDR is these days, but in case we have readers who are not, here's the scoop. HDR is a digital processing technique that stands for high-dynamic-range-imaging. To boil that down into everyday terms it means- HDR allows you to capture the whitest whites, the blackest blacks, and a full range of mid-tones, and it allows you to do this under almost any lighting conditions.
The concept of HDR has been around for a long time. But slow computing power made it impractical until 1997. It was then that mainstream photographers began to see the benefit of the technique. A software program called Photomatix by HDRsoft was introduced in 2003, and Photoshop introduced an HDR tool in 2005 with the release of CS2; it was the introduction of these programs that made HDR available to everyone.
If you're not familiar with how HDR works – Check out this link
Most folks, these days, use HDR to create hyper-creative imagery that just isn't possible without the process. And then there are the technical shooters like Architectural photographers. They use it because it makes their interior shooting a whole lot easier.
But recently we gave HDR a try for a lousy weather day. We had an exciting photo-opportunity, a location we rarely get to, and the lighting conditions just plain sucked. We do want to clarify one thing- We weren't really looking for the hyper-creative look that is so common with HDR images. What we attempted was to capture the natural beauty of our surroundings, beauty that our eyes could see, but the camera could not record accurately.
San Diego, California – raining – heavily overcast sky with occasion breaking sun
We recently had four days to shoot in beautiful San Diego, California. The entire time we were there, the weather was cold, raining, and windy. Our host told us that they couldn't remember another four day period with weather like that in the ten years that they'd lived there. Just our luck, right?
HDR to the Rescue
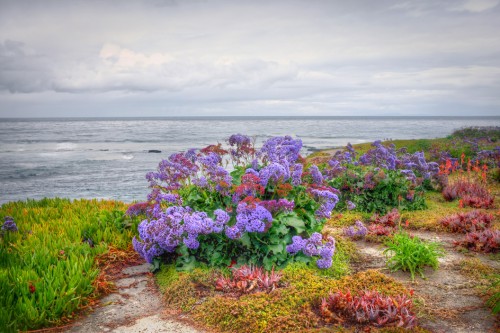
First Stop – La Jolla Beach
This is one of our favorite spots to take photographs in Southern California. It's filled with natural beauty, wildlife, flowers, and colorful characters. Below was our first image using the HDR technique.
The Same Image Without HDR
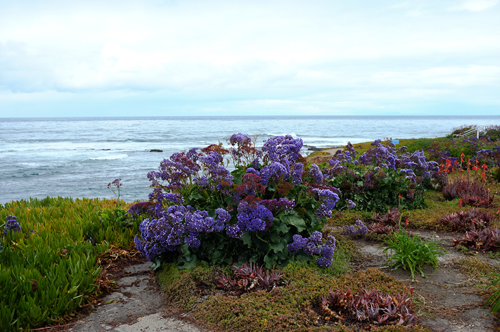
Pretty dramatic difference, wouldn't you say? Did you notice how the process bumped up all the middle tones while maintaining the highlight and shadow levels. Using HDR, you can also control color saturation and color balance to take out the dreary cyan color of an overcast day.
The above HDR image was taken with a FujiFilm X100, Auto-bracketing set at nominal, 1-stop over, and 1-stop under. The sun (what little there was) was behind the photographer's right shoulder. Let's look at another example.
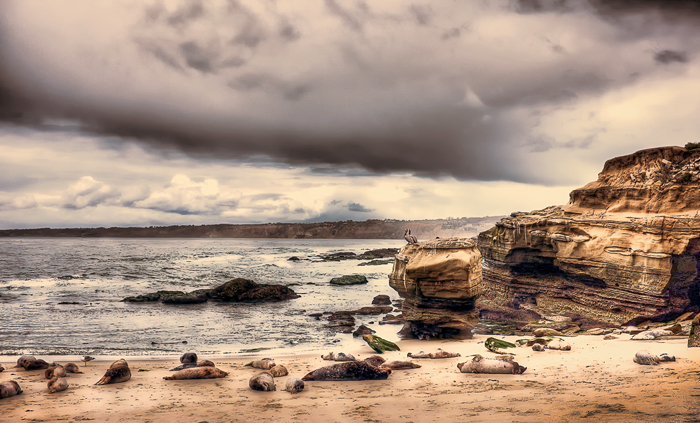
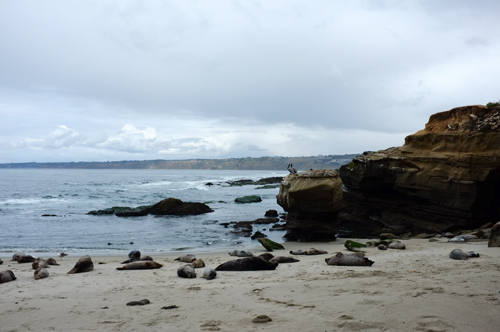
This image was taken at La Jolla Beach facing north. So, now the sun (again, what little there was) was at slightly different angle; more to the photographer's right and ahead of him. What we would like you to take note of is – all the detail that was pulled out of the rock formation. Also, did you notice how much the pelicans, and sea lions, now stand out from the background instead of blending in? How about that dramatic affect to the clouds? And finally, the removal of the overcast cyan color balance. Below is an accurately exposed single image.
Here is how HDR can save you from your lousy weather day
- Increased contrast
- Expansion of captured tonal range
- Increased color saturation
- Color balance adjustment
- A single source option for making enhanced, yet normal looking photographs- up to creating images with hyper creative effects
It doesn't take much to incorporate HDR into your shooting!
When we encounter a scene such as those illustrated above, this is what we do. (Many HDR tutorials will recommend you put the camera on a tripod. This is a good idea if you carry one. When traveling, we travel light. So, no tripod.)
- Determine your nominal exposure
- Set your camera to auto-bracketing (We use 3 exposures at nominal, +1, -1 stop. Some cameras will do up to 5 exposures. If you're not using a tripod, use 3 exposures. Play with your bracketing settings because this will affect your final image)
- Set your drive to its maximum frames per second
- Frame your shot
- Brace your elbows against your chest
- Hold your breath
- Slowly squeeze the shutter and bang off all three exposures
Once you have your exposures, you'll need software. If you have Photoshop CS2 or later it's built into the program under the File menu / Automate sub-menu / and labeled Merge To HDR.
Another option is the Photomatix software. This is what we use. It's relatively inexpensive and it offers an almost infinite level of creative control. You could literally spend an entire afternoon playing with one image!


5 Comments
With the second shot, I like the natural white-balance of the original. I’d like to see just a touch of contrast boost on the sky, then bring out the shadows on the cliff and sea lions. Blue-gray days by the sea bring back a lot of memories. Thanks for the posts.
Thank you Craig!
For those who are using GIMP ( an open source free photography editing tool), there is a plug in called “exposure-blend” which will do the same thing- although with less settings/options!
https://graphicssoft.about.com/od/gimptutorials/ss/Exposure-Merge.htm
I see a LR preset that makes the most of individual shots without the need for bracketing. Not as good as a well-worked photomatix image, but it works for me. I can click once on the preset and know that, because I got it as close to right in camera as I could, it will look good.