Food photography is a highly specialized niche in the world of professional photography. A food shoot often includes a team of experts (including a food stylist) whose sole purpose is to make sure the food looks delicious and edible. You don't have to go to this extreme with your own food photography. There are techniques that are utilized by the best in business that you can employ with ease. This bit of food photo knowledge will vastly improve your efforts! Here are a few of the secrets of professional food photographers.
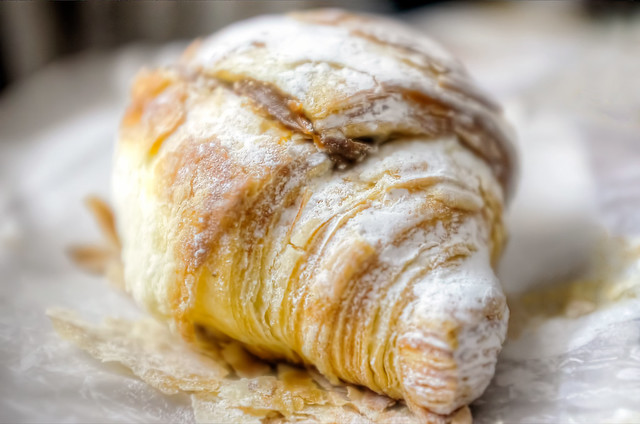
Factura by Kent DuFault, on Flickr
This food photograph was taken in a crowded coffee shop using a Fuji X100 rangefinder camera in macro mode. The lighting consisted of a large window placed behind and to the left of the pastry. The front fill light was provided by the built-in flash set to -1.5 stops flash adjustment. This photograph illustrates how a few simple choices can help you create a strong food shot in almost any location. It was accomplished quickly and with a minimum of equipment.
Secret #1 – Back Lighting
Back lighting is a key element to great food photography. It accentuates the texture of the food and highlights important details such rising steam. Your back lighting can be a wide soft source such as window light, or, it can be more direct and harsh. your choice of light should depend on the food you are photographing. This is where experience and experimentation are important. Rarely will a single light source provide the best lighting for food. At a minimum, you will need white cards to provide fill light to various parts of your plate.
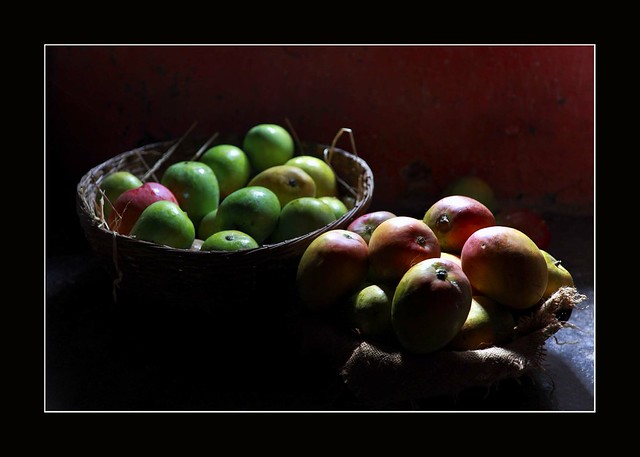
Mangos by ramnath bhat, on Flickr
Here we have a nice strong directional back lighting scenario. It highlights the shapes of the mangoes perfectly. But, without a front fill light, the details facing the camera are lost. While this might fall into the category of a good “art” photograph. It is not a good food photograph. Remember food photography is about the food!
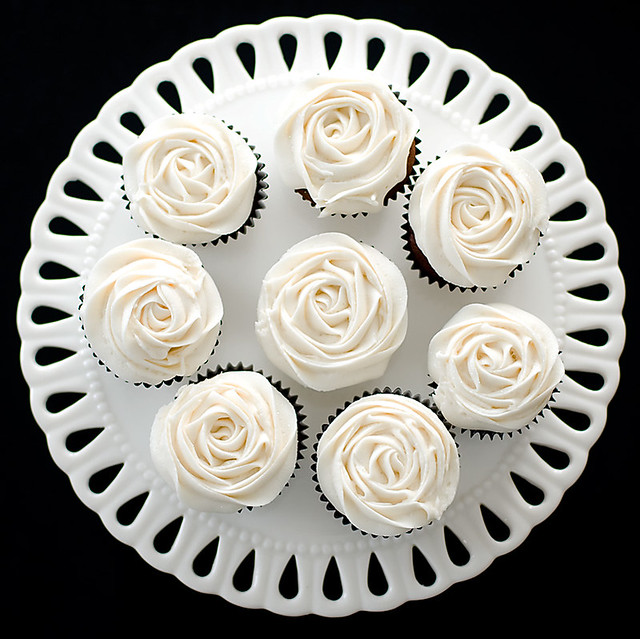
Cupcake Roses by *Ann Gordon, on Flickr
Our final example shows a proper balance between back lighting and front fill lighting. Did you notice how the back lighting accentuates the texture of the frosting? Yet, the front fill light brings up all the details of the plate, cupcake wrappers, and the shadow side of the cupcakes.
Here are a few quick tips-
1. If you don't have a lot of lighting equipment, your best main light source will be a large window with indirect sunlight. Place it behind your food. Then use a collection of white cards and small mirrors to bounce light back into the front of your plate. If you have a flash unit that can provide bounce light, use it to bounce light off of a white card. Make sure that the flash does not overpower the window light. The window is your main light source!
2. Prepare two plates that are exactly alike. Use the first plate to get your equipment set-up. Then, bring out the second plate (often referred to as “the hero”) when you are ready to shoot. If the food you are shooting is a cold dish, keep the hero in the refrigerator until you're ready for it. If the food is a hot dish, under-cook it, and then keep it warm in the oven while you finalize your lighting. The reason you under-cook it, is because it will continue to cook on its own: even if it is just sitting on a counter. This is especially true of pastas and meats.
3. Keep your set mobile, especially if you are dependent on window light. Create your food set on a table with wheels or a tray that you can carry around. The sun moves quickly and lighting can change within minutes. You want to be able to move your set without having to recreate the entire set.
4. Have two spray bottles handy. Fill one with water and the other with vegetable oil. If you have a can of cooking spray, this also works well. If you're shooting a cold dish such as a salad, right before you shoot spritz it with water. If you're shooting a hot dish (especially meat) spritz it with vegetable oil or cooking spray. This will give it a fresh cooked glisten. The key here is- Go lightly!
Secret #2 – Color Balance
Nothing will make your food photography look more yucky than an orange or blue cast to the food. With many forms of photography you can put the camera on auto WB and go with it. With food photography you are going to want to give it a little more attention. Use a manual exposure mode and manually set your white balance. If you're unsure of the color temperature of your source, click through the options until you find the one that appears best. If your original file has a proper color temperature, you can then tweak it in post. Breads, pies, and pastries are often enhanced with a slightly warmer tint. Cooked meats look yummy with a little red added. Go lightly when adjusting color.
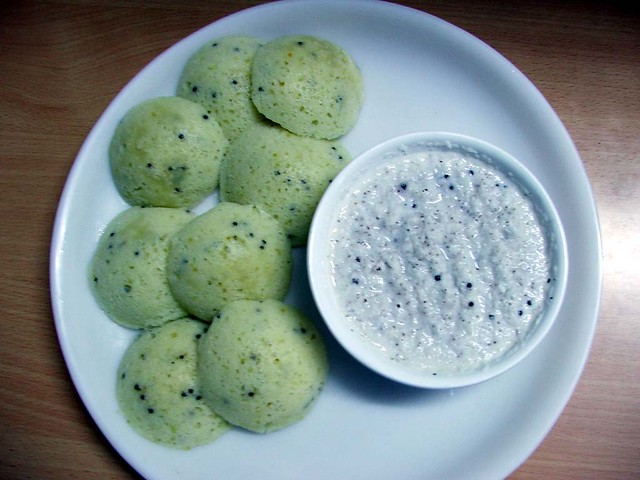
MIRCHI ~ IDLI by J I G I S H A a.k.a Nitin Badhwar, on Flickr
An improper white balance will make your food look unappealing.
Secret #3 – Exposure
Do not underexpose a food photograph! In fact, many food photographs appear more appealing when slightly overexposed. Be critical in your exposure evaluation. As you establish your lighting, keep your contrast ratio (from light to dark) within 3 to 4 stops. If you are using a built-in camera meter, set it to spot mode. Read the various parts of your set to ensure you are within the contrast range. If you have a gray card, use that to determine your accurate exposure.

Underexposure makes food appear drab and lifeless. Create a lighting scenario that has a compressed contrast ratio of 3 to 4 stops and expose for the mid-tone.
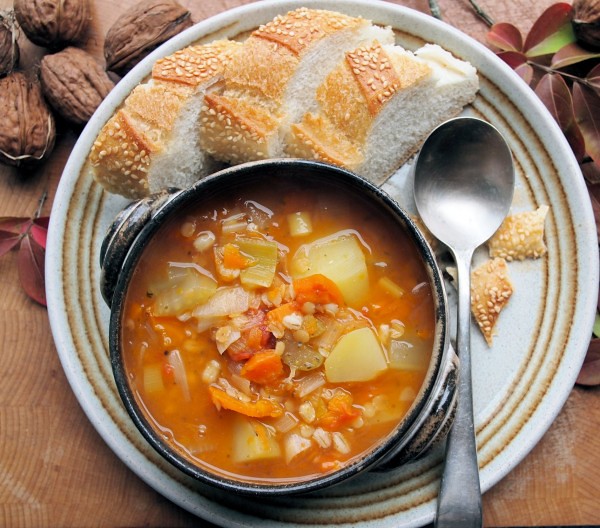
Mid-Week Meal Plan: Meat-Free Scotch Broth Recipe (5:2 Fast and Feast Diet) by French Tart, on Flickr
When your lighting and exposure are accurate, you will have details in the white areas of your food, such as the bread, and you will have details in the shadow areas of your food, such as the soup line next to the bowl.
Important Tip-
While it is possible to hand-hold your camera for a food photograph. It's not recommended due to minimum depth-of-field. You're much better off placing your camera on a tripod.
Secret #4 – Focus
With food photography, you will often have a minimum depth-of-field. This means two things, to you, the photographer. You need to plan your composition carefully, and you need to set your focus in the right place.

This photographer did a good job of composing the image and placing the focus in the right place. However, the lighting is flat and the image is underexposed.

This image depicts good composition. The photographer also placed the point of focus correctly, and the lighting is pretty decent. When composing food photographs, keep this thought in mind. Don't compose so tightly that the viewer can't easily discern what the food is. This shot borders on that problem. Give your shot some breathing room and create an interesting setting around the food.
Good food photography requires all these elements to be successful!
1. Back lighting and fill lighting – Contrast range of no more than 3 to 4 stops.
2. Proper color balance – Even the color temperature of window light will change as the sun moves across the sky.
3. Proper exposure – Underexposure is the kiss of death to a food photograph. If you're new to metering and exposure- set your camera to manual mode and “bracket” your exposure by varying the f/stop or shutter speed. Also, keep your ISO as low as possible.
4. Composition – Food photography requires a good composition. Narrow depth-of field will require critical placement of all your food elements.
5. Critical focus – Use a tripod and pick your point of focus carefully.


7 Comments
A lot of very useful tips and a lot to consider.
Great article! Thanks for the easy-to-understand tips!
I was a little unsure about the metering for food photography, thank you for clearing it up ^_^
Thank you….that was good advice!
Of course, the real secret is in how the food is prepared. Put it this way, you wouldn’t want to eat it.
Dear Kent. I have had a look @ the photographic work that you did on food.
I must congratulated you on such out standding photographers.
The closes up to the different dishes are out staining.
The type of food photography is the type that I would like to qualify in.
An up coming professional freelancer photography.
Seeing the out standding photographic work macs me evening more
Indictment to be come qualified in doing food photography.
Living in South Africa it is extremely difficult to fined some won like your self.
Living in SA sucks a shapely if you what to become a professional freelancer photography.
My 2017 be a good year 4 you.
From
Pictures link are all broken