One of the most important abilities you can have as a photographer is deciphering how other shooters captured their photos. It's not always the easiest thing to do though, so here we'll look at two great photos and explain how they were taken.

Running water, the beach and sunsets are all subjects that make for wonderful photographs, and this one has them all! Taking a page almost from the difficult lighting article, this shot was done on a tripod with a wide angle lens. Because a longer exposure was needed, 1/2 second for this shot, the risk of blowing the highlights in the surf or the sky were fairly high. The shooter used a graduated ND filter to help prevent this from happening. Waiting for the water to come in and then start to rush back out to see before pressing the shutter button gives a great sense of motion to the foreground of this photo while the rest of it remains sharp, with great color.
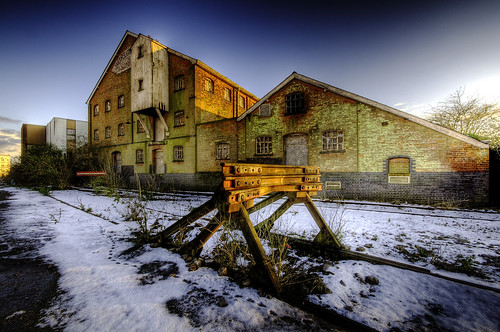
We think HDR is here to stay, and photos like this continue to prove us right. Setting the camera to bracket exposure mode and taking 9 shots, one stop apart and then utilizing Bridge, Photoshop and the plugin Photomatix merged and tweaked them altogether to make this simply stunning photo. Final sharpening done in Photoshop and then output was created in JPG format. This image is more about the post production, however the actual subject in the photo is very well framed and a great subject for HDR.
These two different photos are easy to replicate, once you understand how they were shot. Looking at other photographer's work and reverse engineering it is a fun game to play, and will improve your knowledge and capabilities to photograph more complex subjects.


2 Comments
Hi
As an amatour I’ve struggled to find out how theese “floating” images was made. But when I got the hang of it, it was quite easy.
Equipment:
Nikon D90, Sigma 10-20 mm f/3.5 various ND- and polarizing filters. Tripod and remote control,(not nessesary)
-Frank from Tromsø, Norway
Some pictures from my Facebookprofile:
https://www.facebook.com/photo.php?pid=1445003&id=1276681318
https://www.facebook.com/photo.php?pid=1458247&id=1276681318https://www.facebook.com/photo.php?pid=1458247&id=1276681318
The first image is a totally perfect exposure, I love it. It is bright and punchy and is composed nicely. The only thing I would have done differently was maybe crop the left side off a little bit. The color, brightness, and contrast is absolutely brilliant.
The second image is an awesome idea, setting up a little studio like that…. We could just take tons of images of objects in front of a bokeh lights XD