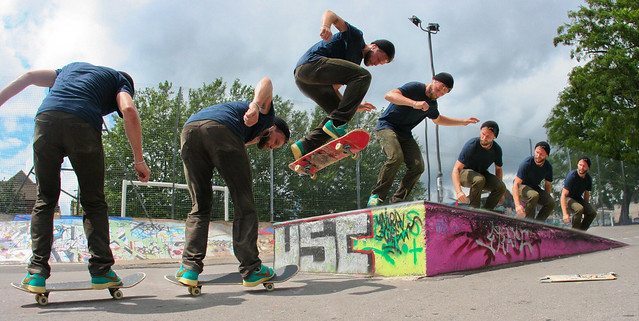
As our camera and software technology improve, the opportunities to push the limits of our creativity grows exponentially. Not that many of today's techniques were not possible in days of film, but these advances make it less time consuming and more cost effective to create photographs that are outside of the box. Such is the case with composite photography, that is combining multiple photographs into one image, which can produce some pretty cool effects when photographing moving objects such as athletes. Here's a quick primer to get you on your way to creating some great action sequence shots of your own.
The Keys to Getting The Best Shots for Composite Photographs
There's more than one way to capture usable images to composite together, but since this is just a primer we're going to start with the most basic, easy way–by using a tripod. The idea is to keep the background of your image as consistent as possible to make editing easier. So choose a subject and action that will move across the path of your camera, so you don't have to move the camera to capture the action. It will also ensure that the path of action stays true to reality in your finished image.
Another thing to consider is lighting. Each of the shots should have comparable lighting so they all match. Don't use your flash unless it's capable of recharging and firing for each segment of the action sequence, otherwise you'll end up with some brightly lit segments and some not so brightly lit which will not look cohesive in the final product.
I won't get to caught up in camera settings since they are specific to the situation; however, if your camera offers a continuous shutter mode, use it! Taking photographs at such a high frame rate will help you capture more of the action, more quickly. You may not use all of the frames, but having options to choose from is never a bad thing. So, mount your camera, frame your shot, take a couple test shots to work out exposure, then switch on continuous shutter mode, and collect your shots.
How to Prep The Images for the Best Possible Final Composite
Because we want consistency in all the layers of our photographs, it's usually best to batch edit the frames that you will be using for composite. Adobe Lightroom makes this pretty simple. Just import your frames into the editing software, fine tune the image you will be using as your base or background image in Develop mode, then copy those settings to the other frames. To copy the settings, open the edited frame and click “Copy”–found in the lower left-hand portion of the screen. Below is a screencap of the window that will pop up asking you to select which changes you want to copy. I selected all the changes I made and pressed the “Copy” button to close the window. Next, select the remaining frames and click the “Paste” button which is located next to the “Copy” button in the lower left-hand corner. You can apply the changes either by selecting multiple frames or individually but, either way, quickly go through the frames to make sure they all match before the next step.

Working In Photoshop
The next thing we want to do is import the edited frames into Photoshop. To do this select all of the frames in Lightroom by holding down the CNTRL key and clicking the frames. Once they are all highlighted, right click and select the menu option “Edit In” then choose “Open As Layers In Photoshop.”
Once Photoshop has opened and layered all the images, rename and arrange the layers so the first frame is located on the bottom and work your way up through the sequence stacking the layers respectively.
There are many ways to go about getting just the parts of each layer that we want to show visible. We're going to use one of the simplest routes: the deletion route with a little help from Quick Mask Mode. What we are ultimately trying to accomplish is to isolate the subject in each frame by deleting everything around it except on the bottom layer, which will double as the background.

- To get started turn off all the layers except Layer 2.
- To single out the diver in this frame, I use the quick selection tool and trace around his outline. Don't worry about making your selection perfect at this point.
- Once your selection is made, press “Q” to enter Quick Mask Mode. Everything outside of the selection you've made should turn red.
- Select the paint brush tool, we'll use this to get our selection just perfect. By painting with a black brush (which will appear red), you are making your selection smaller. Using a white brush will make your selection larger. Zoom in close to your subject to decide which you'll need to use. My selection was a little outside of the lines so I will use a black paint brush to “erase” the unwanted border around my selection.
- Once your edges are perfect, press “Q” again to reveal your selection. Now, hold down the “CNTRL” key and press “J” on your keyboard to create a new layer from the selection. By default, this layer will be called Layer 1, rename it to Layer 2 Copy to avoid confusion.
- Turn off Layer 2, and turn on the bottom layer to see how everything looks. Ideally, your selection blends into the background seamlessly. If not, go back a step and refine the edges on your selection.
Continue to work your through the frames, following the above steps until each frame of your sequence has been selected, copied as a layer, and your sequence is complete. I started with a total of eight layers, but left some out after deciding the final product was just too busy. I suggest starting out with just a few until you get the hang of it and develop a few shortcuts for yourself.
Finishing The Sequence for Best Results
Don't worry, the hard part is over. From here on out it should be basic last-minutes adjustments. Simple stuff like cropping, leveling horizon lines, and things like that. Save the .PSD file if you think you'll want to go back to it later to make adjustments. Otherwise, flatten the layers and save it to conserve hard drive space.
As you can see, the process itself isn't too difficult, just very time consuming. The selection and masking process can take a long time but, it will become easier with practice. I find using a mouse, as opposed to my laptops trackpad, speeds things up and helps with my selection accuracy. As with any Photoshop tutorial, these rules are not hard and set, feel free to experiment along the way and develop your own methods!


1 Comment
I’ve read some article says that there are a number of picture styles which can be used when shooting in modes such as manual, aperture and shutter priority. The creative control modes can only be used as their own independent modes, but you can increase or decrease the level of their affect.