As though taking compelling portraits of people wasn't hard enough, there has been an explosion of underwater portrait photography spreading across the internet that steps up the challenge even more. Some of the stunning images being created by photographers like Brooke Shaden and Ben Von Wong are inspiring others to test out the waters but , as you probably assumed, it's a lot harder than it looks. Here are a few tips get you started.
Cameras And Housings
The first thing you will notice when you're underwater with your camera is that everything is more difficult. A lot of this depends on which underwater housing you use. There are several varieties on the market that range from several hundred dollars to several thousand dollars. Let's take a look at some and discuss their pro's and con's.
Soft, Flexible Housings (such as Dicapac, Outex, EwaMarine, etc)
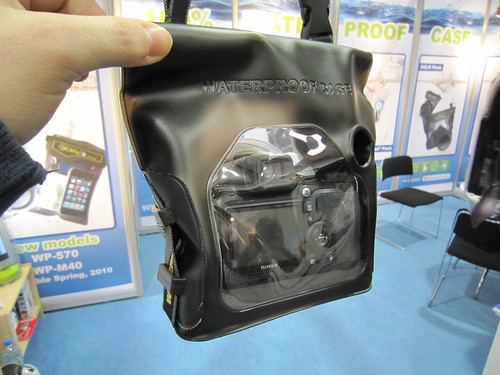
DSLR in a Dicpac. Image by Tobias Bichoff
Pros
- They are inexpensive making them great entry level tools. Prices will range from $60USD to $400USD.
- They are made in a wide variety of sizes to fit many different camera models from compacts to full frame DSLRs.
- They are lightweight, easy to pack, and are for the most part effective.
Cons
- If you are using an expensive camera, you will most likely have anxiety attacks every time you submerge your $3000 camera into water in what is essentially a plastic bag. If you are like me, this feeling will never subside.
- Limited depth rating as these things will typically only go to around 30 feet. This isn't a huge issue, especially for snorkeling shots.
- The deeper you swim underwater the more the building water pressure is apt to start pushing buttons on your camera right through the housing. It also gets very difficult to focus manually and to turn dials on the camera.
Hard, Plastic Housings (Ikelite, Sea & Sea, Aquatica, etc)
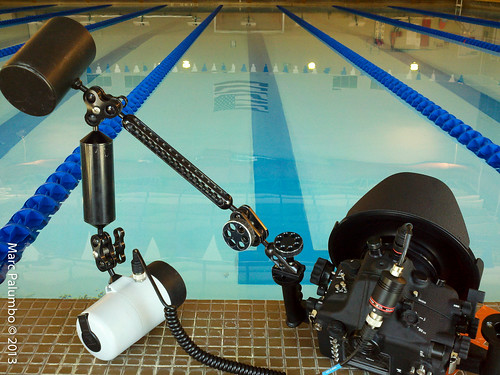
Camera and Aquatica Housing. Image by Marc Palumbo
- Feel more secure and protective than softer houses.
- Design is more ergonomic, easier to hold onto when mounted.
- Depth ratings far deeper than most underwater portrait sessions will ever need to go.
- Price Point is often the same or more than the cost of a DSLR.
- Heavy and bulky make packing and toting them around a hassle.
Another alternative would be to purchase an underwater camera. Sure, you may loose some of the features of shooting a DSLR, but companies like Panasonic and GoPro make great point and shoot underwater cameras that are more than capable of capturing great underwater portraits. They are also considerably more affordable than housings, easier to use, and can also be used when not in water.
Whatever housing you ultimately decide on, you should always protect your investment with an insurance policy. Accidents do happen and when you are bringing your camera underwater they are even more prone to injury. When getting an insurance policy it's important to verify it covers damage and loss due to submersion–not all of them do!
Planning Around The Elements
If you've been considering trying your hand out at underwater portraits, you may have a shooting location or two in mind already. When settling on an official location make sure the water is clear, calm, and has good light on it. Using a swimming pool will be the easiest way to go, but the challenge of shooting in a natural body of water is fun, too.
There will always be times that are better than others to schedule your shoot. Where I live, the ocean water is clearest in the mornings and the light from the morning sun is perfect so I always try to go on AM sessions. That being said, you should familiarize yourself with your location before you go through the trouble of dragging your model and small army of assistants out on a shoot.
Choosing & Working With Models and Assistants
Obviously, your model and assistants need to be a confident swimmers with a lot of experience under their belt. This is for safety reasons as well as more superficial reasons. An experienced swimmer will know how to move through water gracefully without creating a bunch of bubbles and/or getting panicky. Remember, just because someone swims well in a swimming pool doesn't mean they are strong ocean swimmers; there are variables such as currents, waves, and ocean life to deal with. Never ask your model or assistant to do something they are not comfortable doing – this should go without saying.
You should always have at least one assistant in the water with you to help as needed and one who is a very strong swimmer that can recognize and jump into action should a situation arise. When selecting an assistant, it's more important they are solid swimmers than photography savvy – bonus points if they have lifeguard training. Keeping a third person on shore to watch and assist will also be greatly comforting to all. Safety first.
Tips For Getting The Perfect Shot
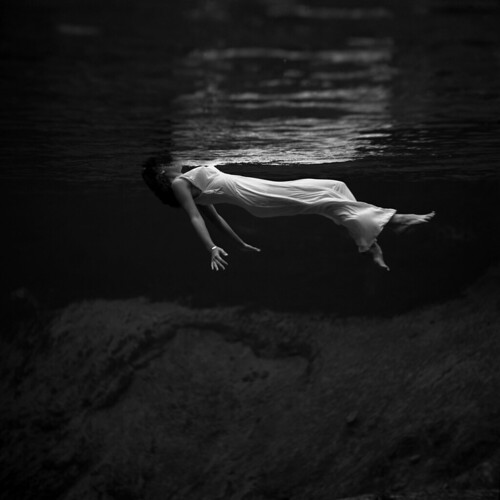
Image by trialsanderrors
- Stay within 7 feet of the surface of the water to get the best light and keep skin tones true. You start to lose reds the deeper you go.
- Use a wide angle lens so you can get in close to your subject, helping to eliminate cloudiness that is caused by too much water between the camera and the model.
- Using props and flowing dresses are great way to add a level of surrealism to your portraits but be prepared for how difficult they are to work with underwater.
- White balance can be tricky, especially underwater. Use a custom white balance settings in manual mode and use a white slate or sand to fine tune it.
- When directing your model, have them swim as deep as the can, get into pose, then float up to the surface to eliminate bubbles and keep your models face from distorting underwater. It's hard to model underwater, be patient.
- Try to keep distractions out of the background. Use any naturally occurring elements, such as coral or fish, to the benefit of your photograph, but make sure the subject is not getting lost or washed out by the background.
- I shoot all my underwater portraits with ambient light as do many other underwater portrait photographers. Always look for light rays in the water and use them to your advantage, they're a great way to highlight the subject.
- Move all around your model. Swim around them, under them, to each side of them until you find the perfect angle.
One last thing, since communication levels drop to near levels of extinction when underwater, it's important to have a plan and discuss it thoroughly with your model and assistants before you even get in the water. Tell your model exactly what poses you want from them and use storyboards and sketches or tear sheets for them to reference. To that end, feel free to improvise a bit, too. You never know what you will see once you get into the water, get creative with the unexpected!


4 Comments
Great tips, I still think finding the right lighting setup has to be a pain in the…
However the results are incredible when you get the lighting right, I don’t think WB is a big deal as long as you are shooting in RAW
Thanks, Diego! You are right, WB is less important when shooting RAW, but I do find it a lot easier in post when the WB is corrected (as much as possible) in camera.
I have mixed feelings on lighting setups, too. I personally don’t like the look of artificial light when doing the “surreal” underwater portraits, but they certainly have their uses.
I’d be interested to hear from our readers on what underwater setups they are using if anyone else cares to chime in, too!
I’m sorry, usually I love your articles and I really don’t want to trash talk this article. I’m doing underwater photography for years and I think this article forgets to mention one very important thing. you should be a very experienced diver when taking up underwater photography. Especially when shooting in open water environments. Your diving equipment and how you react in dangerous situation have to become second nature before you start concentrating on other things. the ziplock bags are a joke and I am stunned that a professional photographer even considers an advise on those! if you want to get into underwater photography, get a housing and not a freezer bag.
I’m currently shooting a Canon 5Ds, housed in an Ikelite housing with 2 Ikelite DS-160 strikes and 2 FixNeo 1200 as focus lights. I don’t really see how light setup is a pain in the … Underwater lighting is just completely different. There are way more things to consider than topside. Let’s start with backscatter. your article doesn’t even take strobe positions into account.
What baffles me is the that no safety divers are mentioned etc. when we do underwater shoots with models there are ALWAYS two safety diver present with regs ready and the models are also certified divers and know how to handle a regulator underwater. Just because you can swim doesn’t mean you know what to do in an emergency underwater.
Please forgive me but this article gives the impression that you just can strap on a tank, jump in and start shooting. This is completely false and very dangerous for crew and talent. I would never do a shoot with just a “good” swimmer.
Lightstalking is awesome, for topside! But there are sites and companies out there which are 100% focused on that subject and it needs to be that way. Underwater photography is not a thing you can threw people in. it is way to dangerous for that! I really don’t want to offend you. Sorry if I did!
I think you’re confusing deep dive photography with surface shots. Clearly the author isn’t talking about being submerged more than a few feet. So I don’t know where the tank comment fits in. I’ve done shoots just like the one she describes and they turn out great. I do agree, if I want to shoot bottom of the sea photos, then this article isn’t for me, but deep sea photography isn’t the point of the article.