Whenever we can find ways to shorten the amount of time we spend editing in post-production, it equates to extra time we can spend in the field taking more photographs. As photographers, we should always be striving to take photographs that are as near to the finished product as possible. This means fine-tuning our knowledge of how photography works in the first place and pulling out all sorts of neat little tricks to get most of our “editing” done in camera.
One of those tricks that has been around for ages is the use of filters. With digital editing software as advanced as it has become, it's easy to pass a filter off with a shrug of the shoulders and an “I'll-fix-it-in-Photoshop” attitude. But not so fast – a good filter is capable of giving your photos a truly professional feel without looking over-edited. Plus, they only take a few seconds to attach to your lens and you're ready to get shooting. Here's a list of some of the most common filters available on the market and ideas for when you should be using them.
Neutral Density Filter – A ND filter is designed to limit the amount of light that passes through your lens and onto your camera's sensor. They come in various strengths that will commonly block anywhere from 1 to 6 (and even up to 10) stops of light each and you can stack them to block just the right amount of light.
This is useful when you are trying to capture motion blur in bright conditions. Say, for instance, you are photographing a statue, but want the passing traffic in the background to be less visible. Slap on a ND filter and let your shutter remain open a bit longer so the moving traffic blurs itself out.
A common variation of the ND filter is called a graduated natural density filter. Its design gives a strong ND effect on one portion of the filter and gradually fades out. This type of ND filter is typically used to photograph landscapes as it will stop down the brightness of the sky, allowing the landscape to be fully exposed.
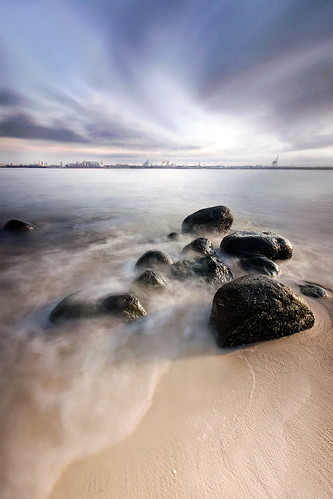
Neutral density filters are so helpful when shooting outdoors, that many of us neglect to realize the value they have have in the studio. If you your studio lights are powered down to their minimum and are still too bright, most will remedy this by simply moving the lights away from the subject. While this will decrease the harshness of the light, you will also be sacrificing light fall off, which can be crucial to some photographs. A simple way around this is to leave your lights put and just use a neutral density filter to bring down their intensity. The photograph below is a long exposure (notice the motion blur of the water!) taken during daylight hours using a neutral density filter.
Polarizing Filter – There are two types of polarizing filters: linear and circular. Both are great ways to eliminate glare from reflective surfaces such as water, making it appear more transparent, and to boost the colors and contrast of a photograph in ways similar to the neutral density filter. For most photographers, however, a circular polarizing filter (CPL) is the way to go. In fact, if your camera utilizes through the lens metering (TTL) or autofocus, you will have to use a circular polarizer as a linear variety will produce undesirable effects.
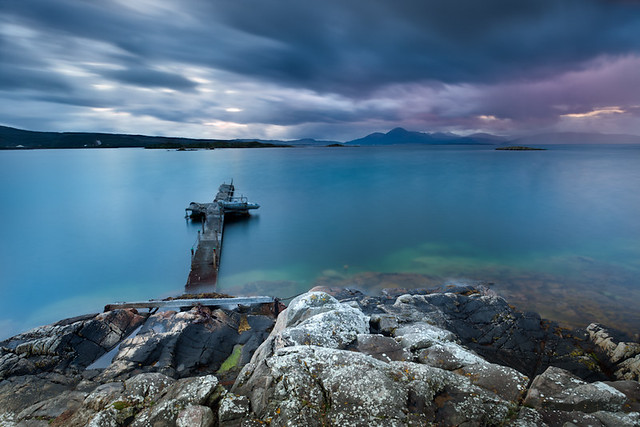
A linear polarizer is only capable of polarizing the light passing through the lens at single orientation (i.e. 90 or 45 degrees); whereas, a circular polarizer will polarize the light passing through at specific angles AND circularly. When using a circular polarizing filter, screw it onto the end of your lens and rotate it while looking through your viewfinder. You will notice the color saturation change as the filter rotates, giving you a live preview of what the filter is doing. In the photo below, the use of a polarizer minimized the reflections on the ocean and allowed the photograph as a whole to retain more of it's natural color.
UV Filter – This simple filter is probably the least likely of this list to give you immediate results. Yes, it can reduce haze when used with some types of cameras, but the real usefulness behind this guy is the way it acts as a bodyguard to your expensive lenses. You can keep one of these on your lens at all times without affecting your photographs and it will help seal your lens off from dust and moisture in addition to giving your lens an extra layer of cushion to protect it from scratches and breaking. Because they are very inexpensive, they're a great way to protect your investments.
Infrared Filter – An infrared filter is less useful in everyday photography than it is in producing awesomely unrealistic images. The digital revolution has made using infrared technology a breeze and it has been enjoying a rather cult-like following. The filter, so red it appears to be almost black, works by blocking all light except infrared light from passing through the lens. Because they block so much light, it goes without saying that you will need to use a tripod and long exposure times. The results are dream like images with interesting color shifts and a very snowy appearance. These are really fun filters to keep in your bag.
When buying a lens filter, there are a few things to keep in mind. First of all, always try to buy the best quality filter you can afford. You are essentially layering an additional piece of glass onto your lens. If you are shooting through a very expensive lens, why would you want to degrade its quality by using a cheap filter?
Finally, rather than buying a different sizes of the same filter for each of your lenses, purchase a filter sized to your largest lens and use a step down ring to make it work on your smaller lenses.


15 Comments
I have yet to use the neutral density filters correctly. Have planned to head out this weekend to capture some better shots and try out some new water features…
I’ve really enjoyed my 10-stop ND filter. It was a hundred dollars (USD) but well worth it. A 2 minute exposure on a busy highway overpass made the traffic all but disappear and left me with an eerie image that was absolutely awesome.
Can IR filters be used without a modified IR sensor?
So, how do I find the “best quality filter you can afford”? I’ve never seen any guidance on this, even from articles, like this one, that are about filters specifically. What should we be looking for?
The basic “rule” is to go with the same grade of glass you’re shooting. If you’re shooting a Nikon lens, then get a Nikon filter. You also won’t go too wrong with Hoya filters.
Read review on the filters you have in mind, and see if they are reported to produce a colourshift. That should many times be an indicater that you should be looking for an alternative, since a colourshift most likely will give you problems in post production.
In regards to U/V filters, this is double edge sword, it’s not that you get rid of the dust problem that easy. With layers of glass in the front, there is three surfaces that catch dust. Two on the filter and the front of the lens. So the need for then should be looked at, and review up against where you’re shooting. If your main body of landscapes is shot inland and in dry enviorment, then you can mostly skip them, but if you’re often in contact with water, either by rivers or the coast, use them to protect the lens, the same goes for the desert.
It depends on the camera. An easy way to test your cameras sensitivity to IR light is to aim your camera at the sensor of a television remote control and look through the LCD viewfinder (if yours doesnt have one, you’ll need to take a picture to test). If the sensor on the remote control glows white, then your camera is already sensitive to IR light. Grab an IR filter and get shooting! Wratten 89B is an excellent filter for this.
The second important setting is the differential between how much light is let in at one side of the blend versus the other (the top versus bottom in the examples directly above). This differential is expressed using the same terminology as used for ND filters in the previous section. A “0.6 ND grad” therefore refers to a graduated neutral density filter which lets in 2 f-stops less light (1/4th) at one side of the blend versus the other. Similarly, a 0.9 ND grad lets in 3 f-stops less light (1/8th) at one side. Most landscape photos need no more than a 1-3 f-stop blend.
I think using lenses to improve photography is a good advantage. But there are also other cameras that has good capture without using lens. So it also depends on the camera and how the photographer presents the subject.
Thanks this was very helpful..now I’ve made up my mind to invest into the filters.
I am shooting a friends wedding this weekend mid day sun – beach setting. Should I use a Neutral Density Filter or not…
A Neutral Density filter would be the pick of the day together with a sober use of polarizer.
Thanks Tiffany, simply and informative. My housemate bought me an ND Filter recently and it’s great. Not a lover of spending hours on my computer post processing so I’m going to definitely purchase a few more.
In what ways does a ND filter “boost the colors and contrast of a photograph in ways similar to the neutral density filter”. Isn’t an ND filter by it’s very nature supposed to cut the amount of light coming in, but do so neutrally without affecting colour and contrast?
Hi im pretty new to photography and just wandering about filters, I have took some outdoor shots with the sun in the back ground but when viewing the shots on the computer I noticed some small green coloured circles what is the best way to prevent this from happening again.
Thanks Graham