How many of you spend many hours and much creativity getting the image as perfect as possible in camera, then return to Photoshop or similar and use the brightness, contrast and color controls for your post production. If this sounds like you, then maybe you should have a look at the levels control in your editing program. Whilst this is not intended to be a tutorial on the levels controls, I will explain briefly how to use them before explaining why you should use them

The Histogram is Your Friend
If you have seen the levels controls before and been daunted by it, don’t be. Perhaps the scariest element of levels is that strange looking graph called the histogram. In fact this is your best friend and like all best friends it takes a little time for your relationship to develop but in the end it will be rewarding and long lived.
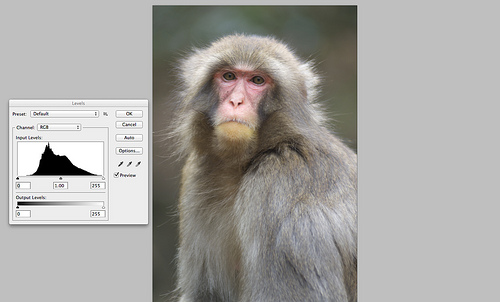
The histogram is basically a graph that shows your exposure. Think of it as a bucket full of light. At the left end you have the darkest parts of the image, and the right the lightest. Your goal is to have the bucket full but not overflowing.
At the left end of the histogram you will see a small triangle moving this to the right will increase your black levels. You aim is to bring it as close to the beginning of the graph as possible. Similarly at the right end is another triangle by moving this to the left you reduce the density only for the highlights. The middle triangle represents the mid tones of the image, drag that left to lighten the mid tones and right to darken them.
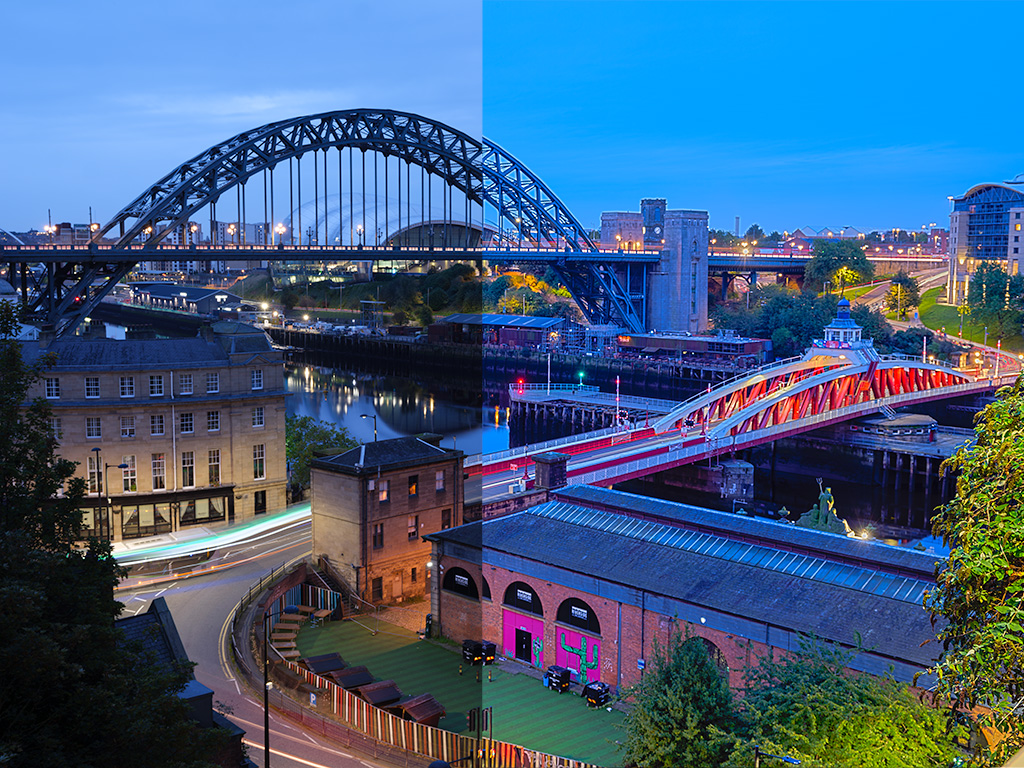
So why should you use the levels rather than the brightness/contrast and color controls? Well put simply it gives you a huge amount of control over your image, much more than you may think at first glance. When you use brightness and contrast your editing program is controlling an image using a fixed inflexible algorithm. It simultaneously changes dark mid and light tones in all three colors with little or no control.
By using levels you can control exactly how you want the dark, light and mid tones to look. By compressing your bucket of light, you can infinitely tweak the contrast. Using the included eye dropper tools you can define your black point, white point. Between the white and black point droppers you have the grey eye dropper. By clicking this on a neutral grey tone in your image, you can quickly correct a colourfast.
Boosting the Contrast
Controlling the grey point brings us onto the next advantage of levels and often under estimated tool, color control. When you first open the levels palette you will find the histogram shows the overall RGB levels. Look closely at above the histogram and you will see a drop down box. This allows you to individually see the red/green/blue histograms and adjust them individually.
Why is this important, well let’s say you have a blue cast in a shadow that is spoiling your image. By selecting the blue only histogram, you can move the black point a little to the right, this would add yellow to the blue shadows only, and neutralize the cast.
The levels tool become even more powerful when you combine it with the selection tools. For instance if you wanted to warm the tones of a grey building but keep the rest of the image the same color, you could select just the building, open the levels dialogue, use the mid tones blue or red slider and warm up the greys. The rest of the image will remain exactly as it was.
Using a selection to enhance the red face by Jason Row Photography, on Flickr
In some imaging programs such as Photoshop CS5, the levels control has a series of presets to base as a starting point, for instance, increase contrast or lighten the midtones.
There are a multitude of things you can do with the levels controls, so why not take a look and see what you can do. Remember to work on a copy of your original, just in case you get a little carried away and end up with a Hockney rather than an Adams.
Jason Row is a British born travel photographer now living in Ukraine. You can follow him on Facebook or visit his site, The Odessa Files. He also maintains a blog chronicling his exploits as an Expat in the former Soviet Union


20 Comments
Hands down, the most important tool for digital photographers. In fact, my only complaint about Lightroom is that they didn’t port over the exact “levels” user interface from Photoshop.
I’m new to LR. Are the LR levels controls not as powerful as PS, or is it just a different UI? Thanks!
Lightroom does not have the full functionality of the PS “levels” adjustment in my opinion, which is both confusing and disappointing. I miss the droppers that allowed you to set your white and black points. I miss adjusting the black and white sliders and using the clipping preview (Alt key while using the sliders).
In my opinion, the two most important tools for photographers in PS are Levels and Curves, and Lightroom has not implemented either of them properly. Having said that, I have been using Lightroom exclusively for years now and I think it’s a fantastic tool for photographers–especially high-volume photographers.
Hi Evan, I`m also disappointed that Lightroom doesnt give us the full control of RGB curves and Levels. Couple of years ago, I switched to Aperture, just because of these 2 features. I especially love RGB Curves in Aperture, and I love the fact that I can apply as many adjustment as I want, one of top of another.
Hope Lightroom will get us these controls soon, so I can go back to it (usually I prefer Adobe than Apple software)
This falls a bit short. Any command such as this should be done on an adjustment layer, NOT the base/opened file. Unless, of course, you’d like to keep reopening the original file for various jobs.
Doing it on a layer allows you to NOT crush any of your ranges or degrade the image. It does allow you to continually go back and make changes. You know, like how offset printing, online/digital display and photo printing ALL require different white and black points. All of which could have their own levels layer so that each one could be set, turned on/off and output as required. Instead of having a half dozen of the the same file for various outputs.
But, of course, this will be covered in another article.
You’re absolutely right, adjustment levels should be used, but I was aiming this at people that are daunted by the levels control. Introducing the adjustments levels would take this article a “level” too far, if you would pardon the pun.
Then you should start with explaining layers. That is perhaps as indispensable a tool as photoshop can offer. Teaching someone the wrong way first is not the wisest way in which to learn
Maybe next you should chastise him for not first teaching how to install Photoshop or open an image file. Maybe this entire thing should be prefaced with an explanation of camera RAW. Maybe first he should tell people how to shop for and buy digital cameras.
Or maybe you should let him give a good tutorial on how to use the levels function.
You’re so correct Evan. This should start of with the basics. It’s good that you agree with that. Thank you.
great article! i’ve just started using levels instead of just adjusting colour and contrast. Also my most recent pictures are of monkeys like the one in these pictures!
I do mostly content creation and film and video post an I have to add that in those areas it’s just as good a friend as to photographers. Whether in photoshop or AE, over time the tool has proven indispensable. This is a very appropriate and poignant description and intRodiction to these tools that many should find very useful! I’m still admittedly daunted when I open the levels Panel even after 12 years of photoshop experience, but as stated Above its a great friend to have!
Clear, concise, helpful. Thank you.
I like where you’re going. I’d agree that layers would be a better starting point and that adjustment layers are the way forward, to the point where it almost seems silly that you can even apply adjustments without an adjustment layer at all. Similarly, now that the curves dialogue shows the histogram (as of what? CS3 or so) it makes the levels adjustment obsolete. I guess levels is maybe simpler to understand and more universal, though.
Re: lightroom, it’s only a hassle if you’re stuck in habits from PS. If you approach it freshly it makes sense, especially in light of the fact that you’re manipulating raw data, so it’s really fundamentally different and levels like PS wouldn’t actually make sense. In that way, it’s really better. In addition, LR doesn’t accrue the saturation build-up you get with multiple adjustments (or adjustment layers) in PS. Win-win.
A good start to explain levels whether you use an adjustment layer or not. One point that is not clear is that you can do the same things in Curves except it is a different interface. Some like curves, some like levels. Just a choice. Kind of a shame to go this far and not discuss the output sliders as they can be useful sometimes.
Brilliant as always. Many thanks
I have to use “levels” in Photoshop for most of my photos edited in Lightroom. Most of the times, when I use levels, I get a boost in contrast and color for photos already edited in Lightroom. I miss “levels” interface in Lightroom too.
I, too, agree with the adjustment layer. It’s really simple and infintely better but this is useful information none-the-less. Thanks.
Also, hold the Option key on a mac or the Alt key on a PC while dragging your black or white level adjustment to get a much better idea of where each eat in to the image.
Thanks for bringing this article up again (but it’s new for me as a new member). I discovered something new to me in Aperture as a result.
You are exactly half right in this post. Yes, you should move beyond using brightness and contrast – they are very limited controls. No, “levels” are no longer the answer. They were a number of years ago, but curves are far more powerful and can do everything levels do and much more – and curves are as easy to use at the basic level as levels. Virtually every photographer I know stays away from the levels control (and the brightness and contrast controls) and goes straight to curves.
i agree with G Dan Mitchell. Levels is an outdated feature is Photoshop, mainly there for compatibility reasons. Curves is the way to go. Anything you can do with Levels, you can also do wirh Curves, but Curves gives you additional options that Levels simply doesn’t have.