1) Swap the color of any object
Swapping the color of an object, within Photoshop, is so ridiculously easy,when using masks, that you will probably go crazy and start swapping the colors of everything in your photos.
Here we go.
Step One
Open your photograph, into Photoshop, and decide what color you want to swap.
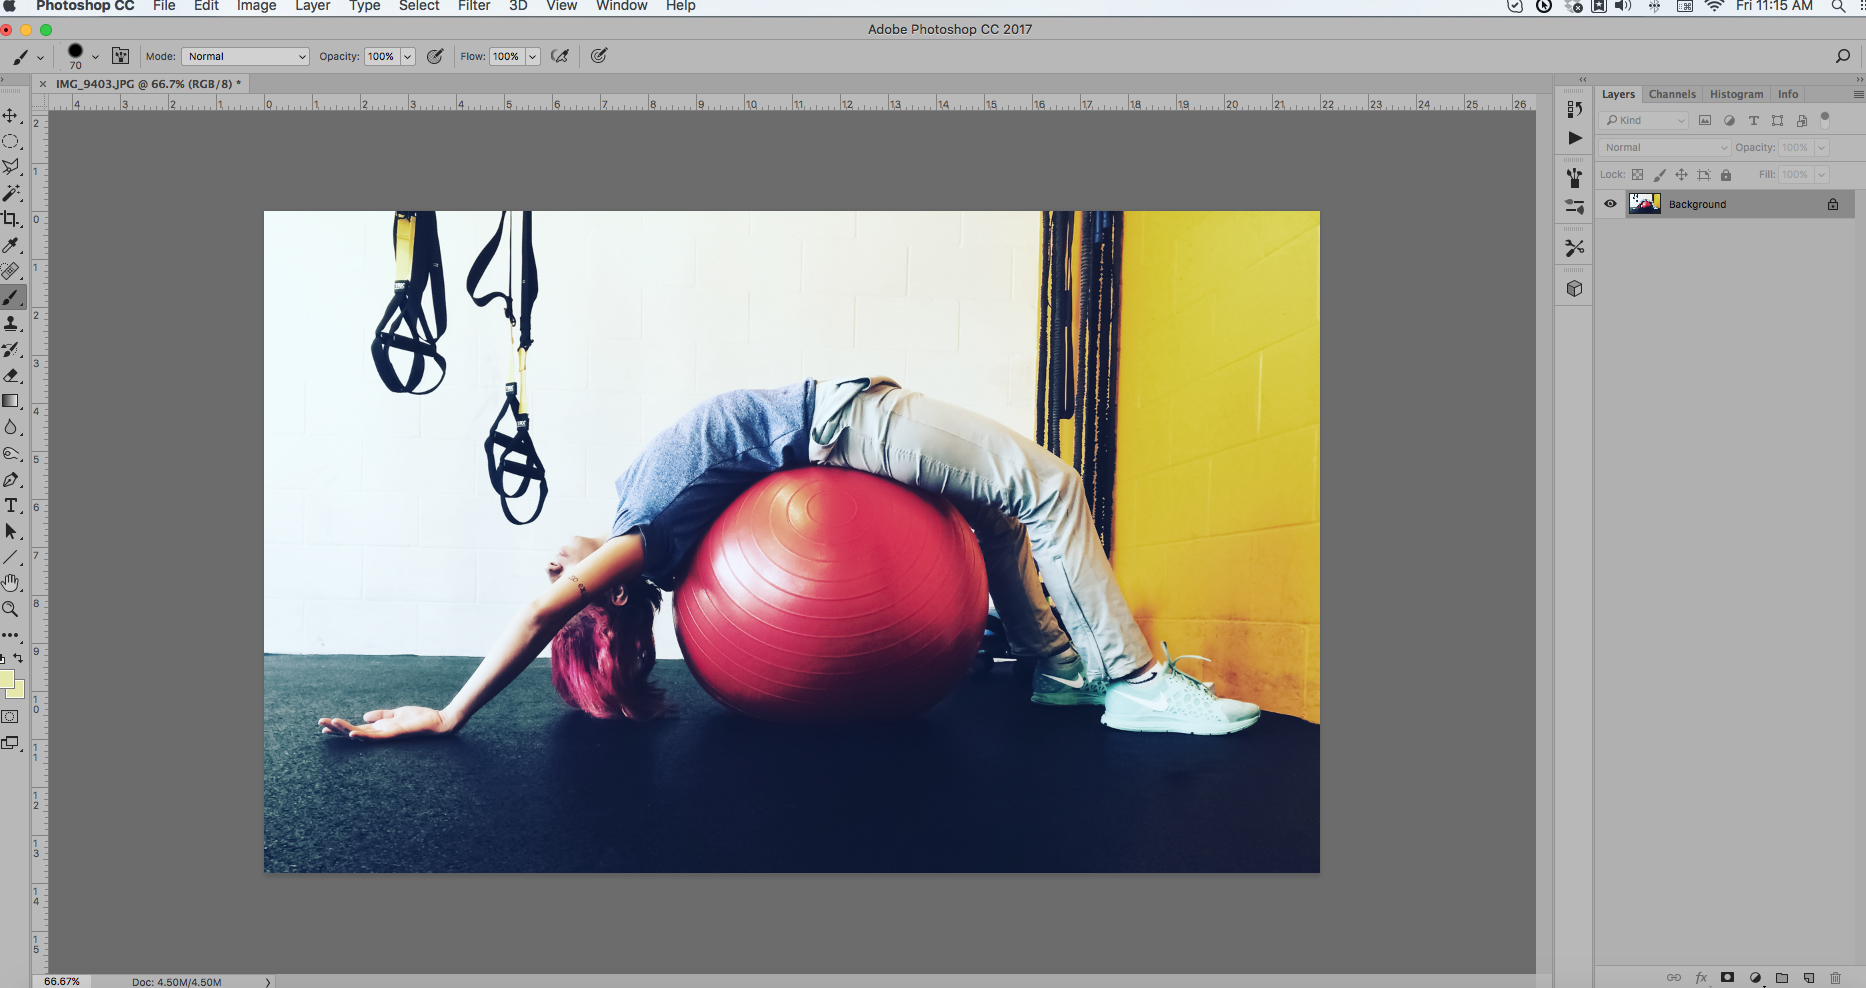
I really like this photograph of a woman stretching her back at the gym. I particularly like the unusual color scheme.
However, I’m interested in the changing the color of the model’s hair to a different hue, so that it stands out a little better from the color of the ball.
Step Two
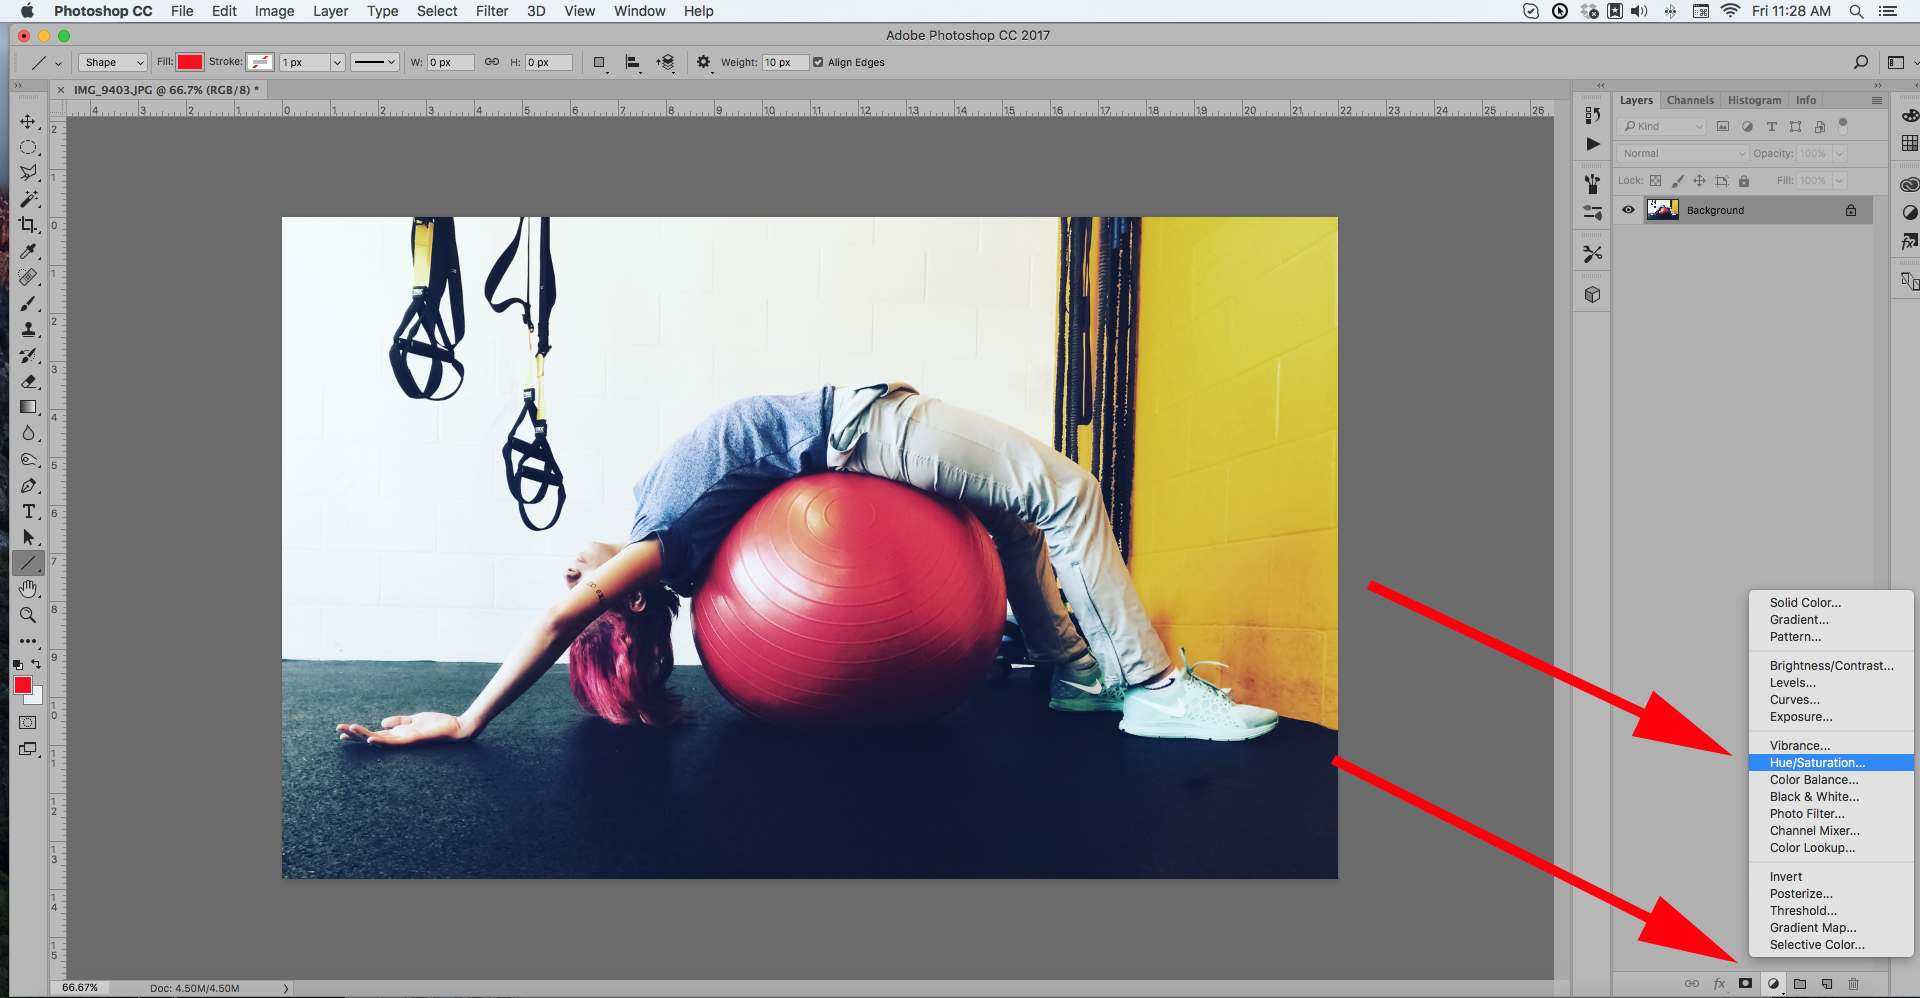
- Have the “Layers” palette visible.
- At the bottom of the Layers palette select the “Adjustment Layer” icon.
- Select “Hue/Saturation
Step Three

- Click on the “Hand Icon” next to the “Master” dropdown menu.
- Click on the Preview Image where you want to change the color.
The hand icon can accomplish three things.
If you click on an area of the picture, that you wish to change the color, it will automatically select the correct color channel from the “Master” dropdown menu. This is my preferred method, and then I go to Step Four.
You can also place the cursor over the area that you want to change. Left click the mouse button and hold it down. Dragging left, or right, will change the saturation levels of that particular color channel. You can also “command” (“control”) left click, and then drag left, or right, to alter the Hue. I don’t like using this method because I prefer having a little tighter control to the final result.
For this exercise, I simply clicked on the model’s hair, which selected the “Reds” color channel.
Step Four
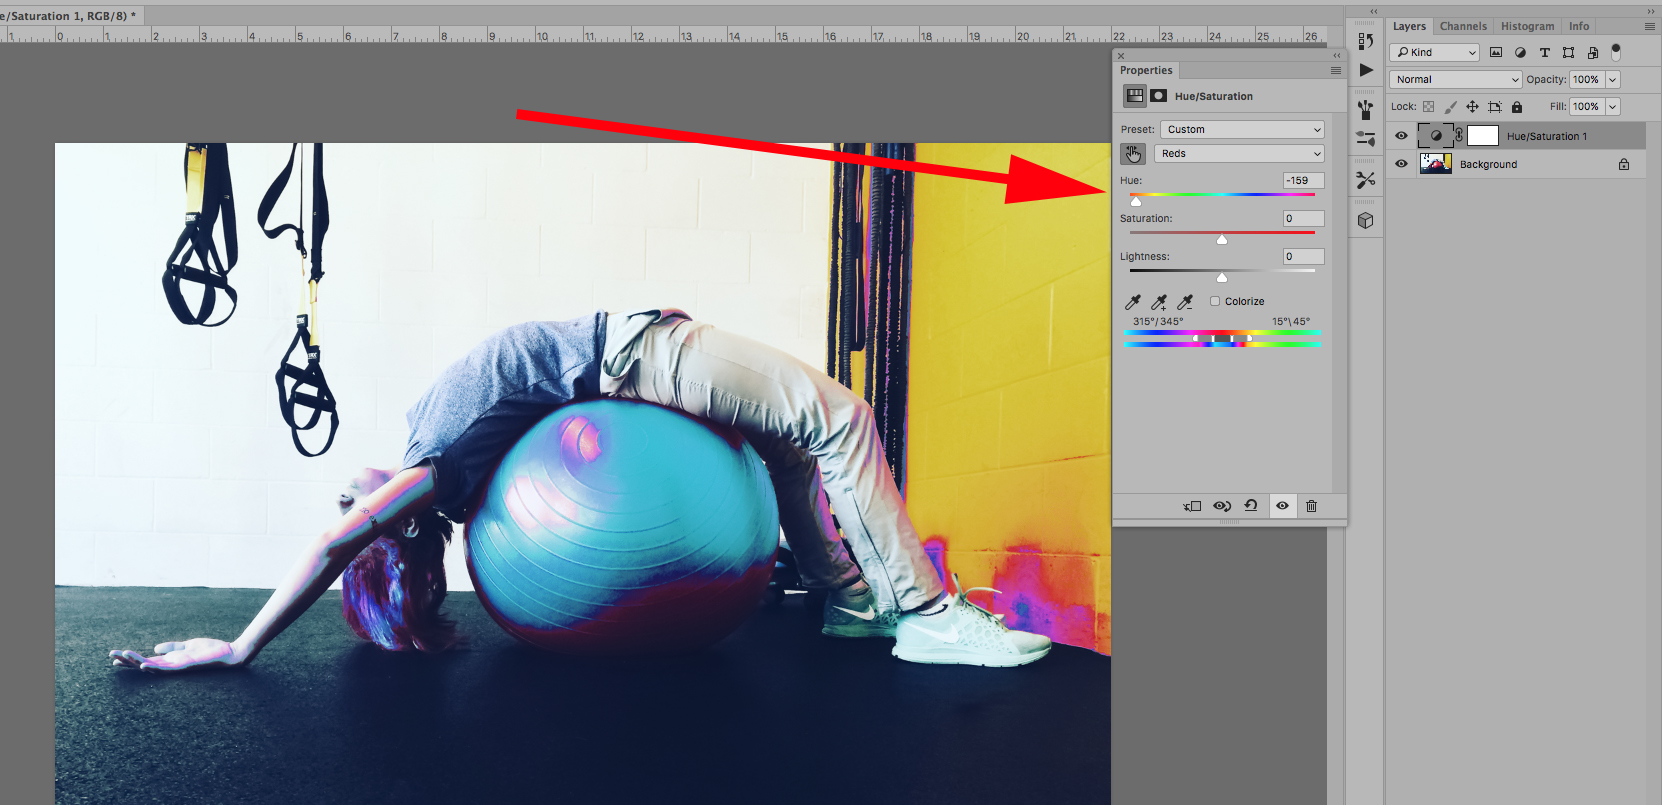
- Select the Hue slider and throw the color way out of whack.
- At this point, the entire image is affected by the change.
Now, we are going to create a mask.
Step Five
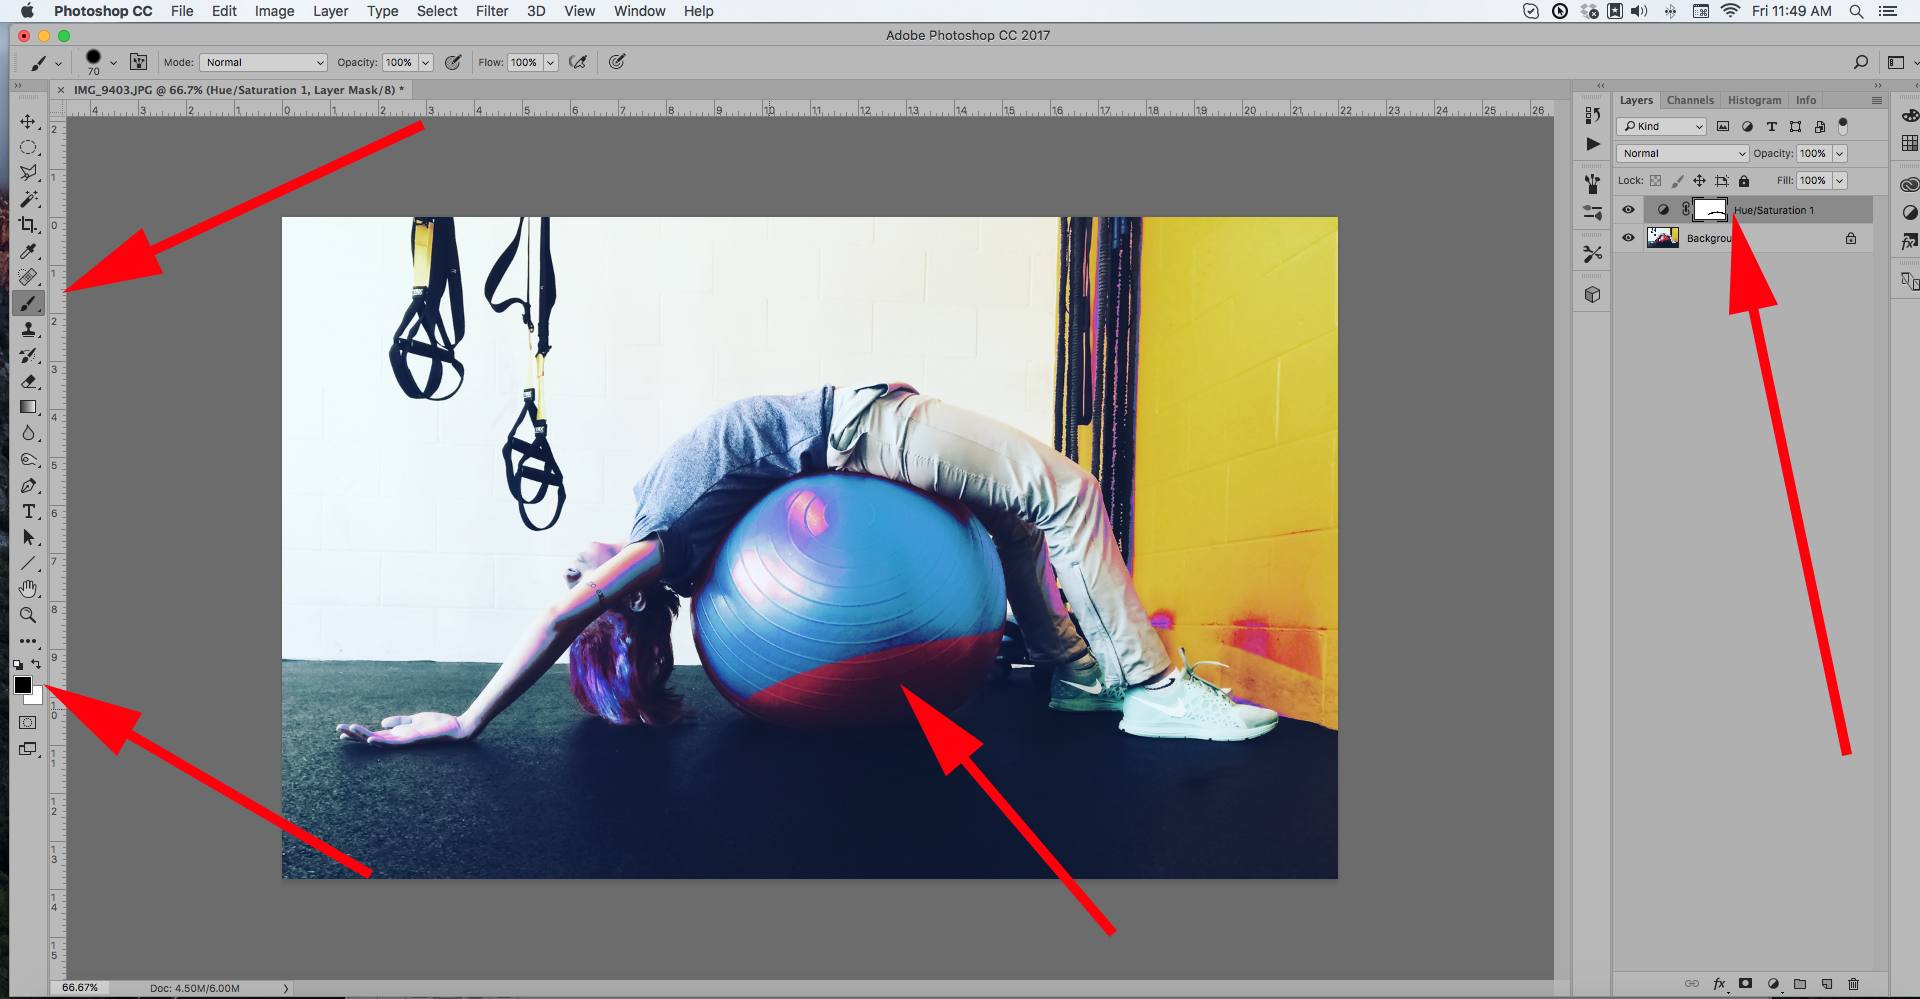
- Select the “Mask” icon in the “Hue/Saturation” adjustment layer.
- Make sure the color “Black” is the front color.
- Select the Paintbrush.
- Paint over the entire image where you do not want the color to change.
Step Six
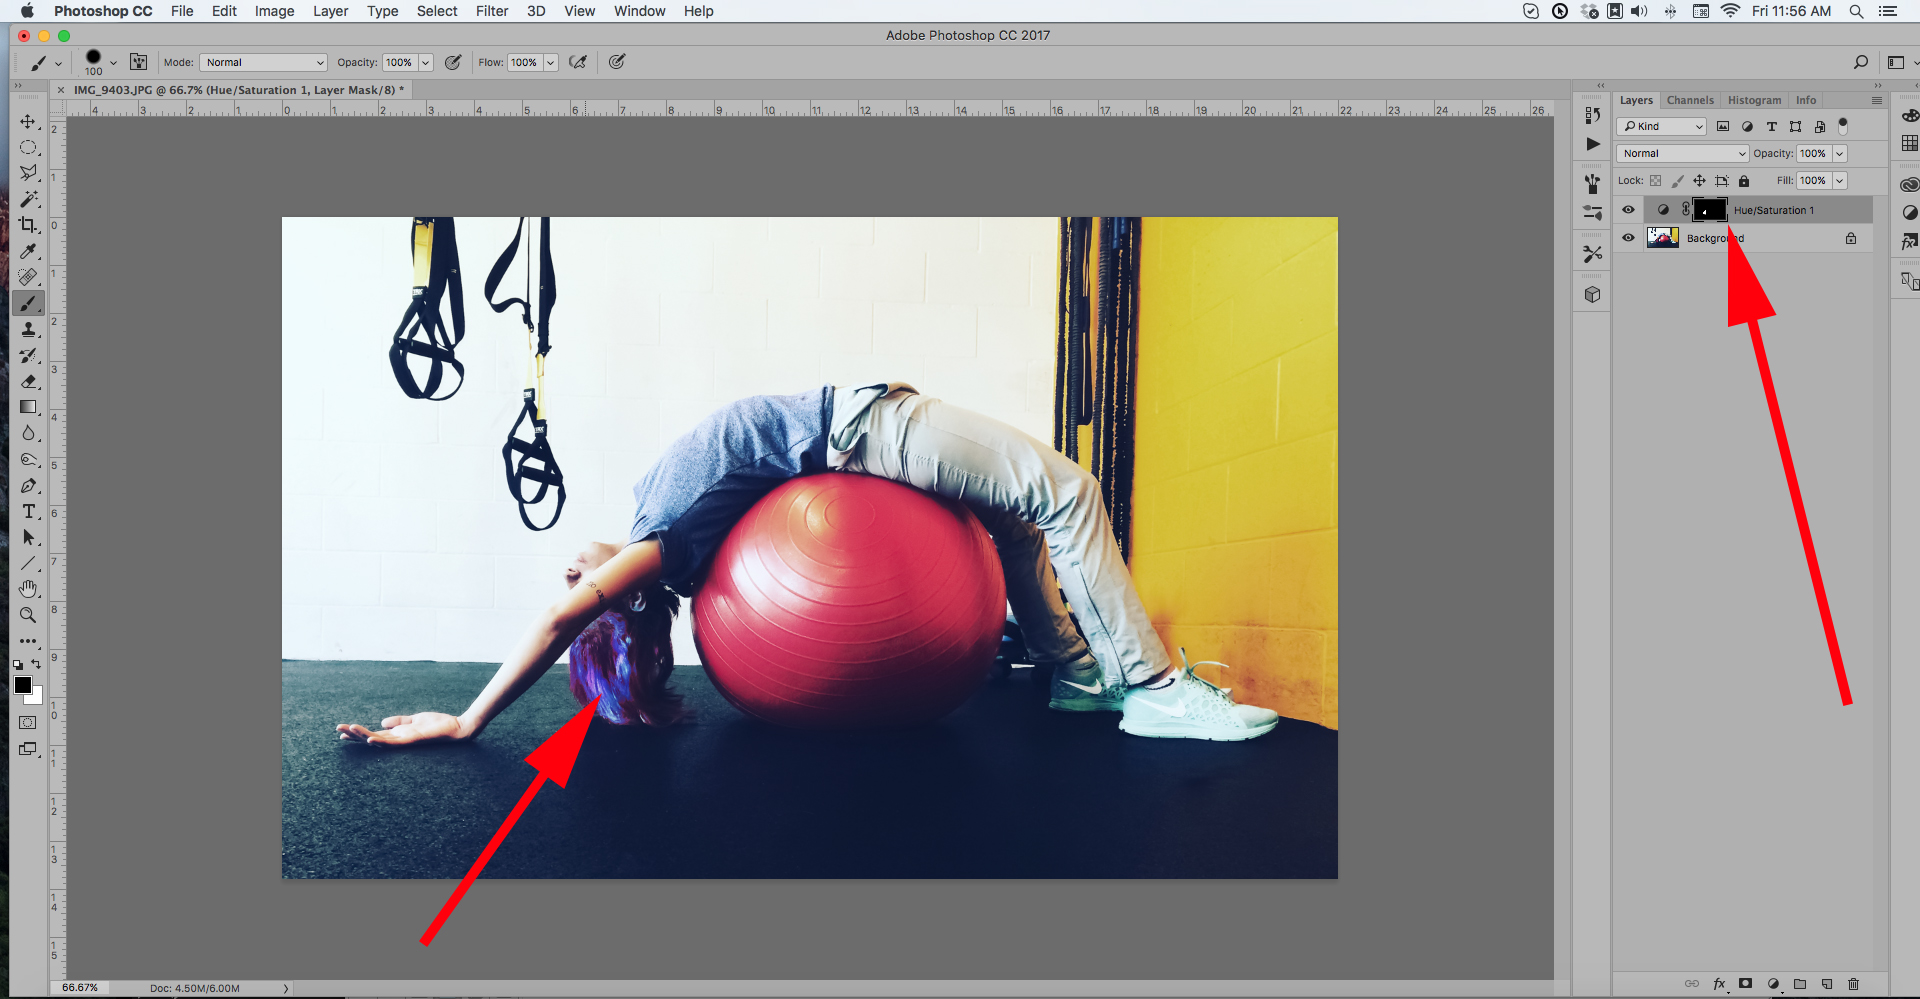
- I painted my mask over the entire picture, with the exception of the hair, which still has the whacky color.
- You can see how the mask icon, in the layers palette, has turned mostly black. The adjustment layer does not affect the black areas. However, you want to check to make sure that your mask is accurate.
Step Seven
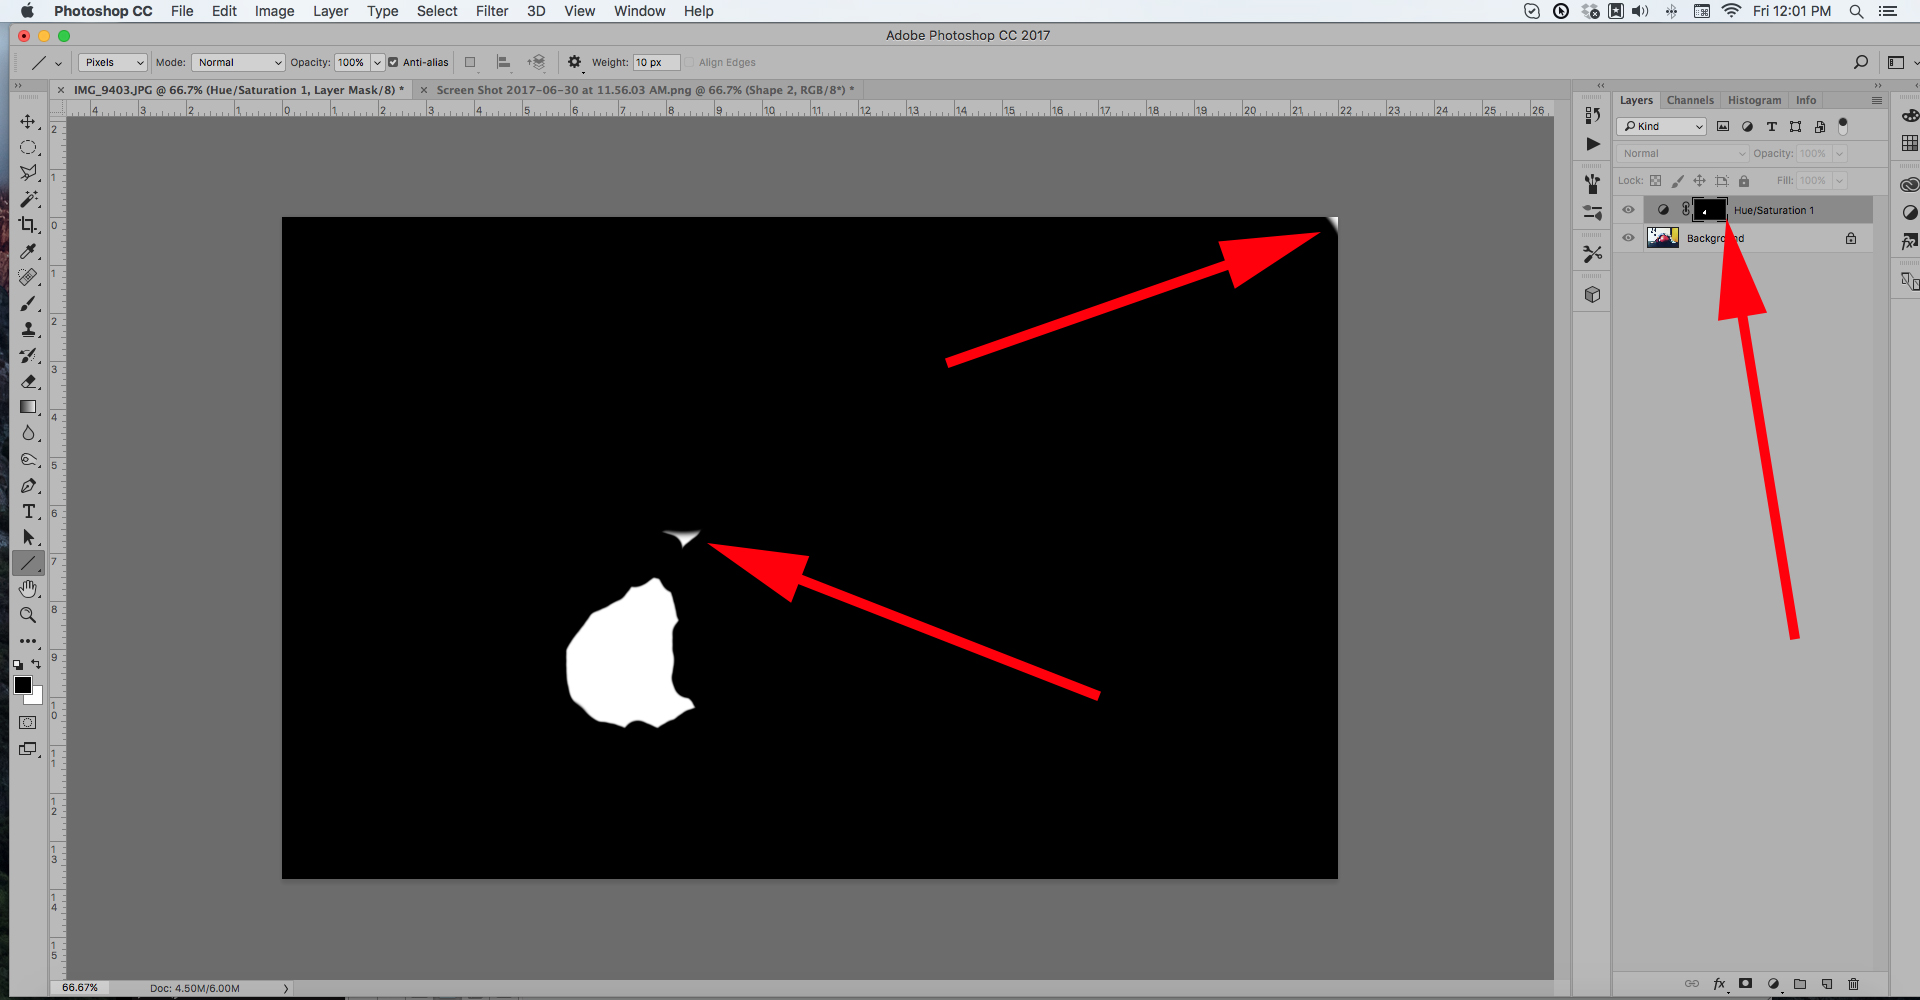
- Place your cursor over the mask icon in the layers palette.
- Press the “option” (alt) key and left click.
- The preview image will now turn into a mask view. As you can see, I missed two spots. To go back to the image preview simply repeat the process (option/cursor over mask icon/left click). In the mask view, you can touch up the mask with the paintbrush.
- To further fine-tune your mask, you can turn it into a “marching ants selection” by holding down the “command” (control) key and left clicking on the mask icon in the layers palette. This allows you to use the selection tools to alter the mask. To go back to the mask, use “deselect” to close the marching ants.
- If you over-paint your mask into areas that you don’t want masked out- simply reverse the paint color to “white” and paint that area back in.
Step Seven
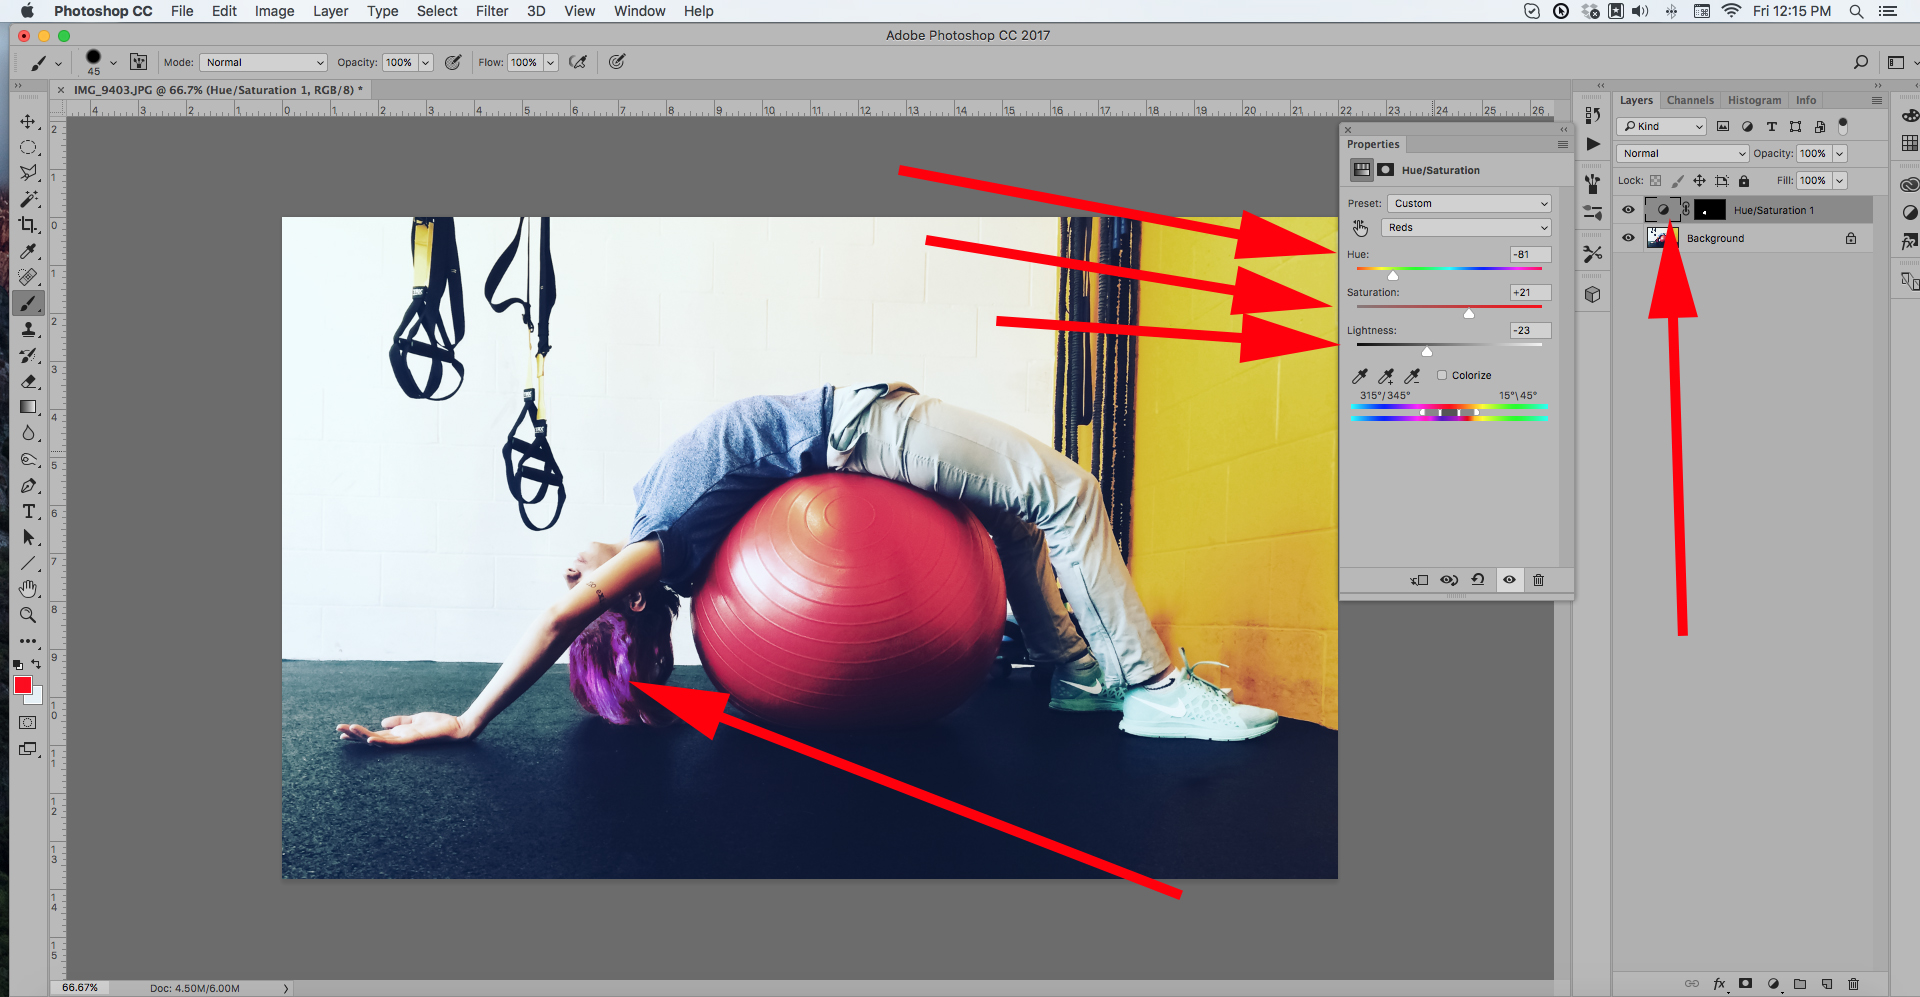
- Double click on the left icon in the Hue/Saturation adjustment layer in the layers palette. This will bring up the control panel.
- Open the “Master” dropdown menu and select reds.
- I can now adjust the Hue, Saturation, and Lightness until I get a color that I like for the model’s hair. I gave my model purple hair.
Final Photograph


(Note: If you want to to experiment with masking in your photography, take a look at my eBook, “Understanding Masking”.)
2) Creating a minimal depth of field effect
A super cool trick, using masking, is to focus viewer attention to a certain part of your image- by creating a minimal depth of field effect. This is awesome for those of us that can’t afford those fast, expensive, lenses.

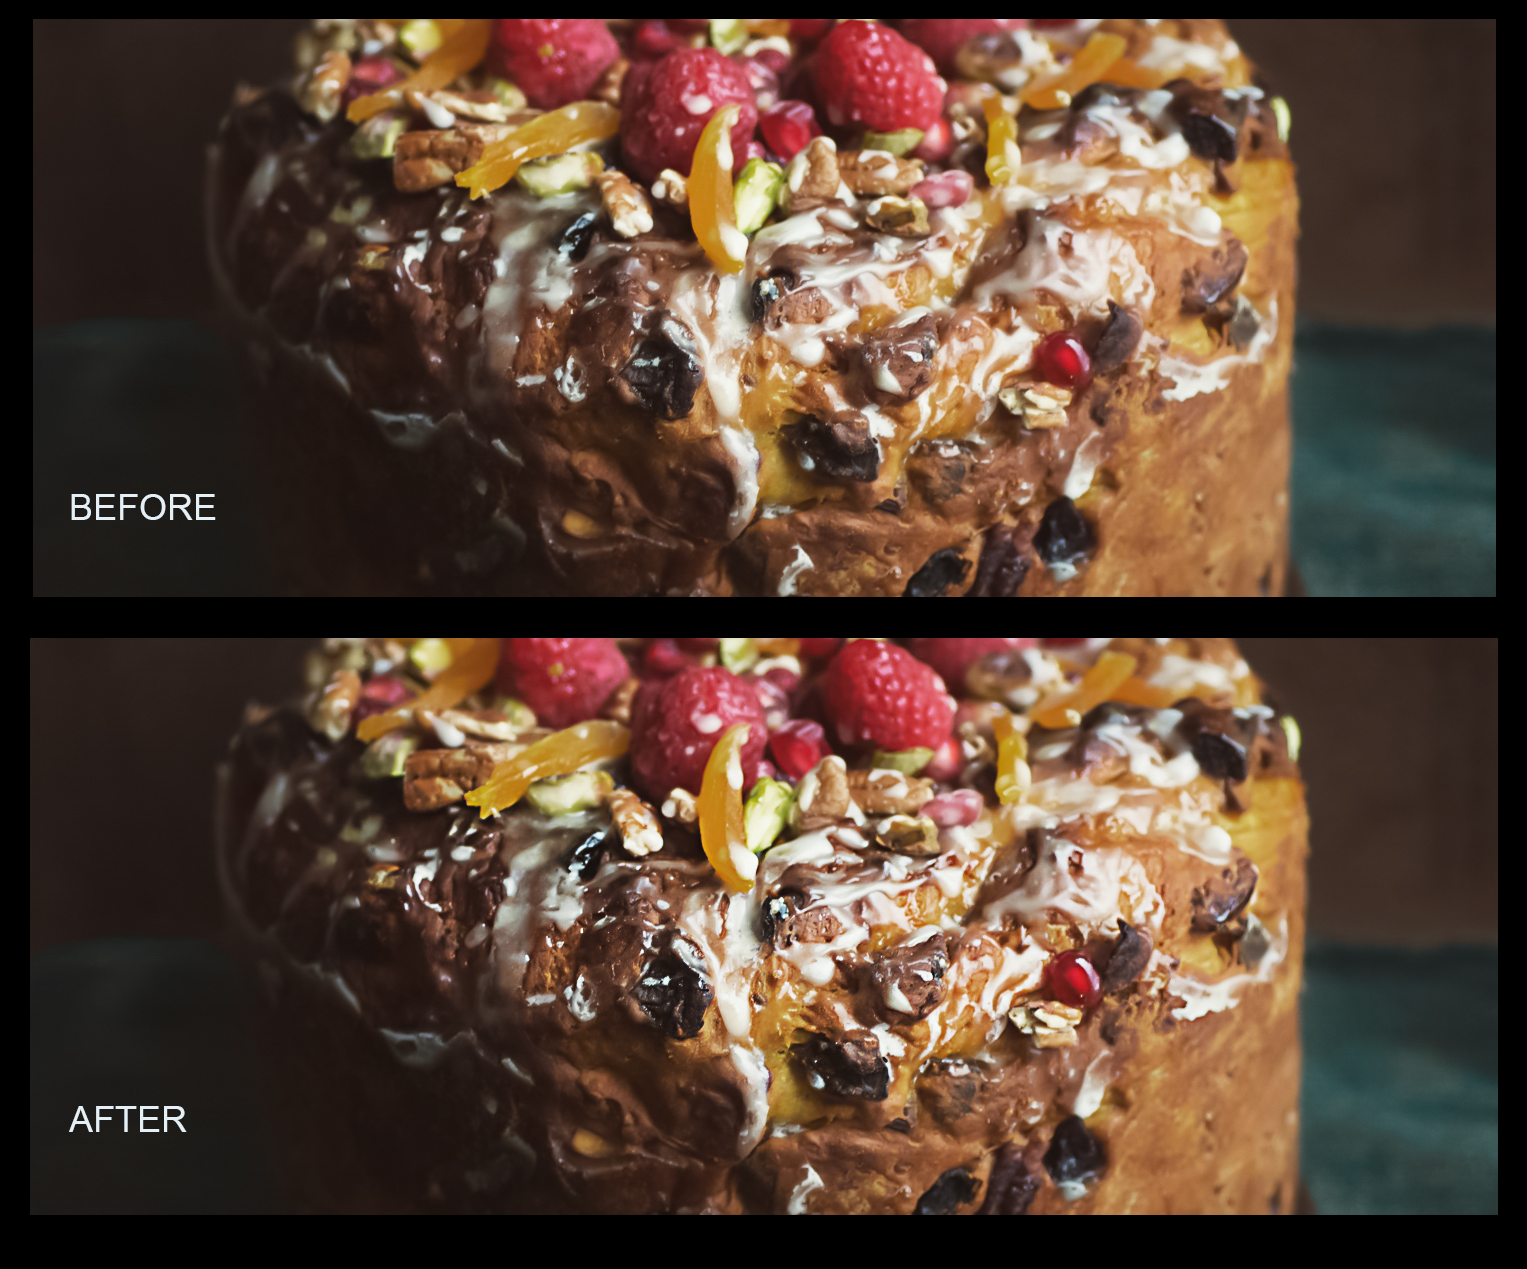
I created this photograph, of a fruitcake, for a client who has a very successful food blog.
I was very happy with the food styling, the lighting, and the end product looks delicious and enticing.
However, there was one issue. At the time, I did not own a high-quality, close-focusing, wide aperture (fast) lens, and she wanted a minimal depth of field with the focus placed right onto the front edge of the cake. (This look was very hot with the food blogs at the time.)
I did what I could to set that up in-camera. However, the end result needed a little help.
No problem. We can achieve this effect easily using a mask.
Step One
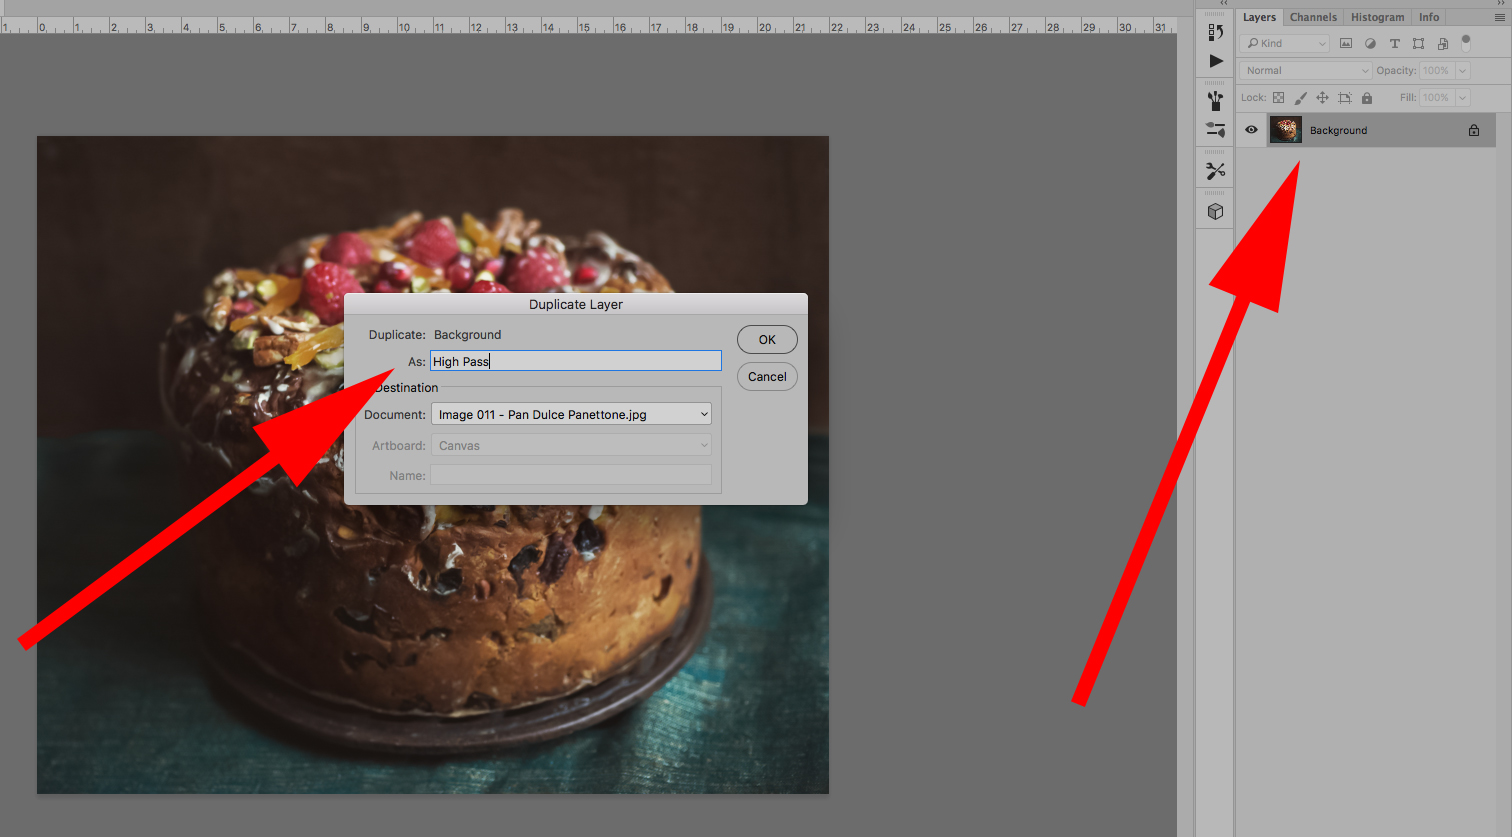
- Open the photograph into Photoshop, and have the “Layers” palette open- within the workspace.
- Right click on the “Background” layer and select “Duplicate Layer”.
- Name the new layer “High Pass”.
Step Two
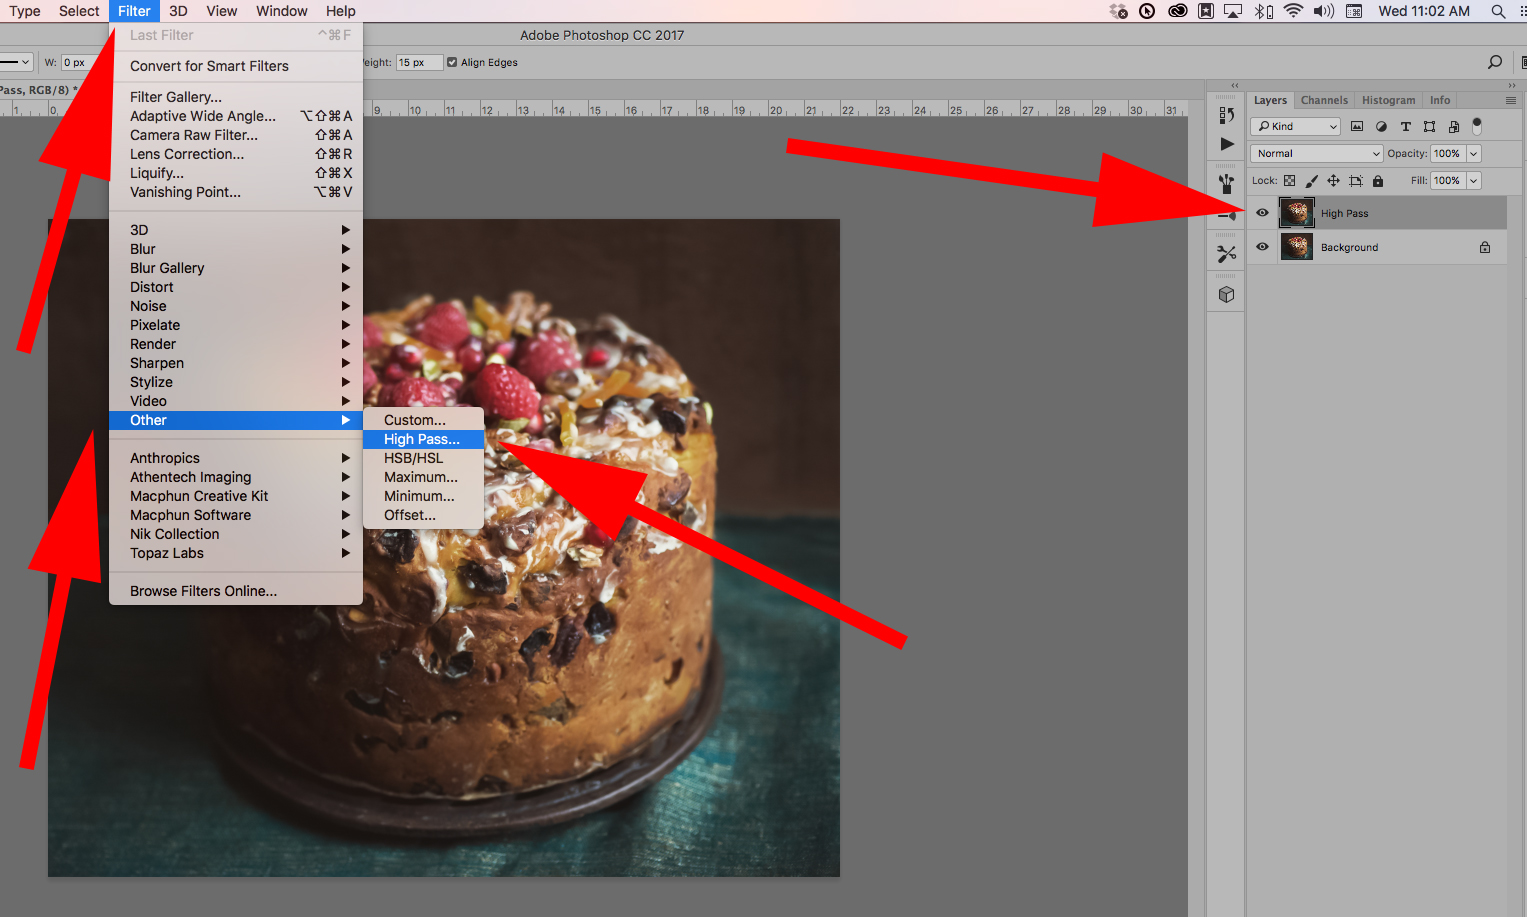
- Make sure that the “High Pass” layer is selected.
- Select the “Filter” dropdown menu.
- Select the “Other” pop-up menu.
- Select “High Pass”.
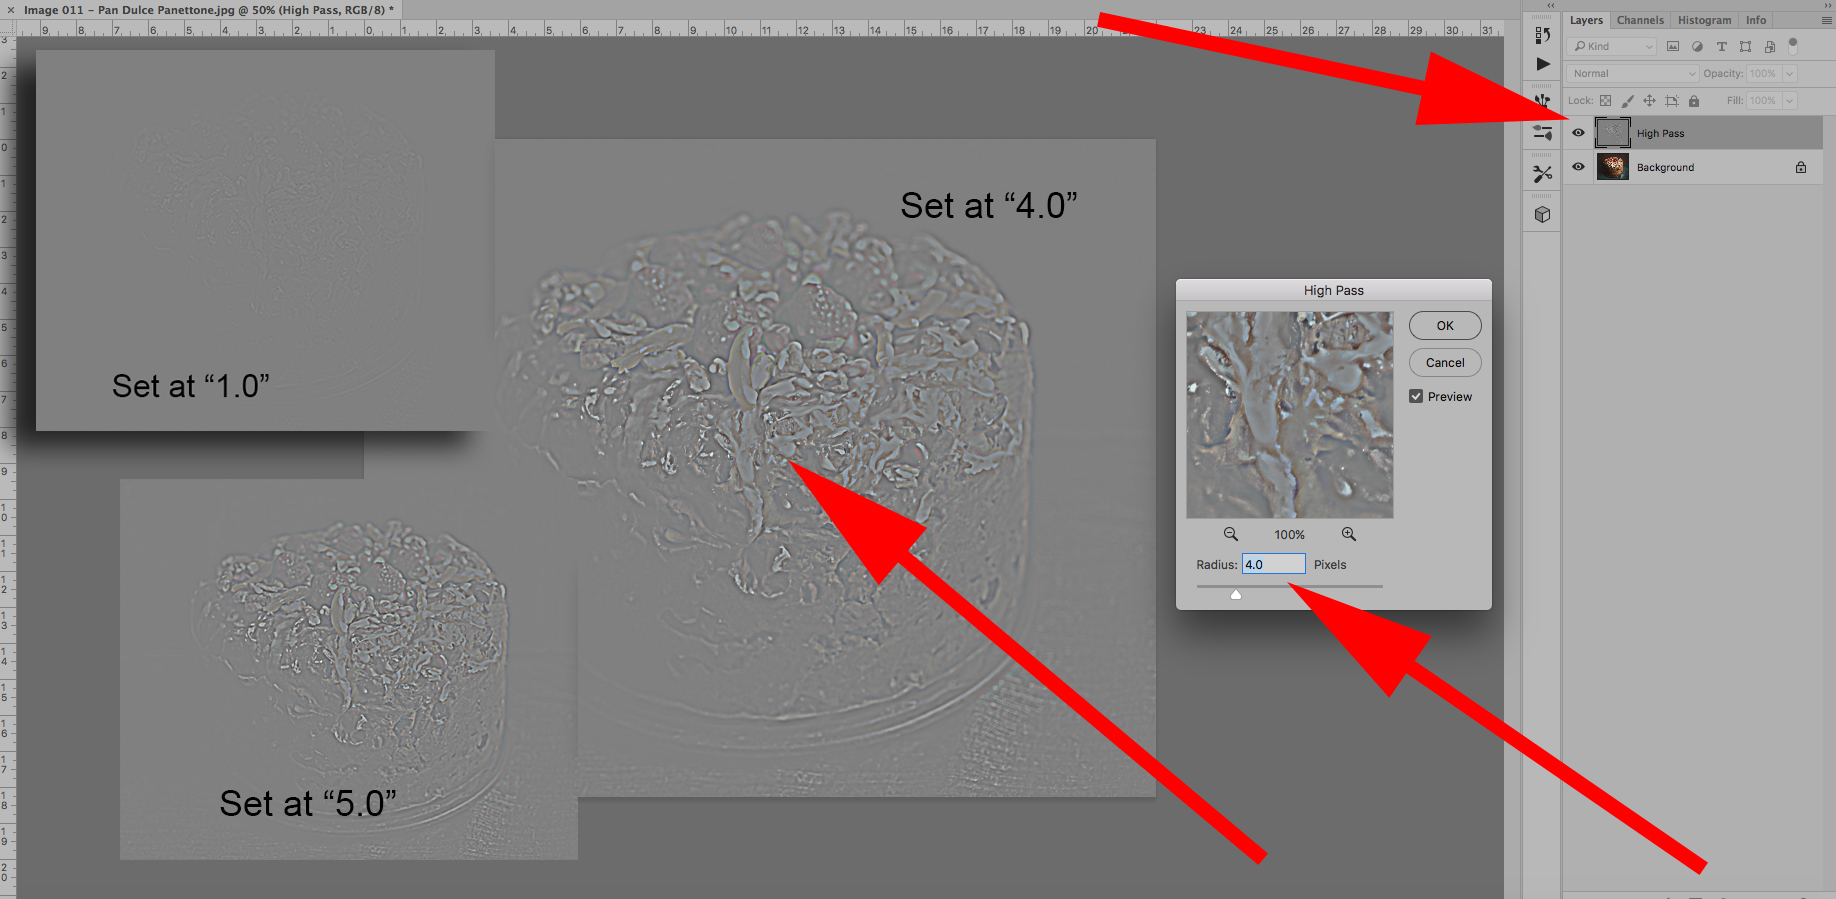
- For the “Depth of Field” effect- the useful settings for the High Pass filter are between “1” and “5”. What number you use depends on the original photograph, and your expected results.
- For this exercise, I have chosen a setting of “4.0”
- When we click okay, we will no longer see the “Preview Image”. We will now see the “Grey Scale Mask” of the High Pass filter.
Step Three
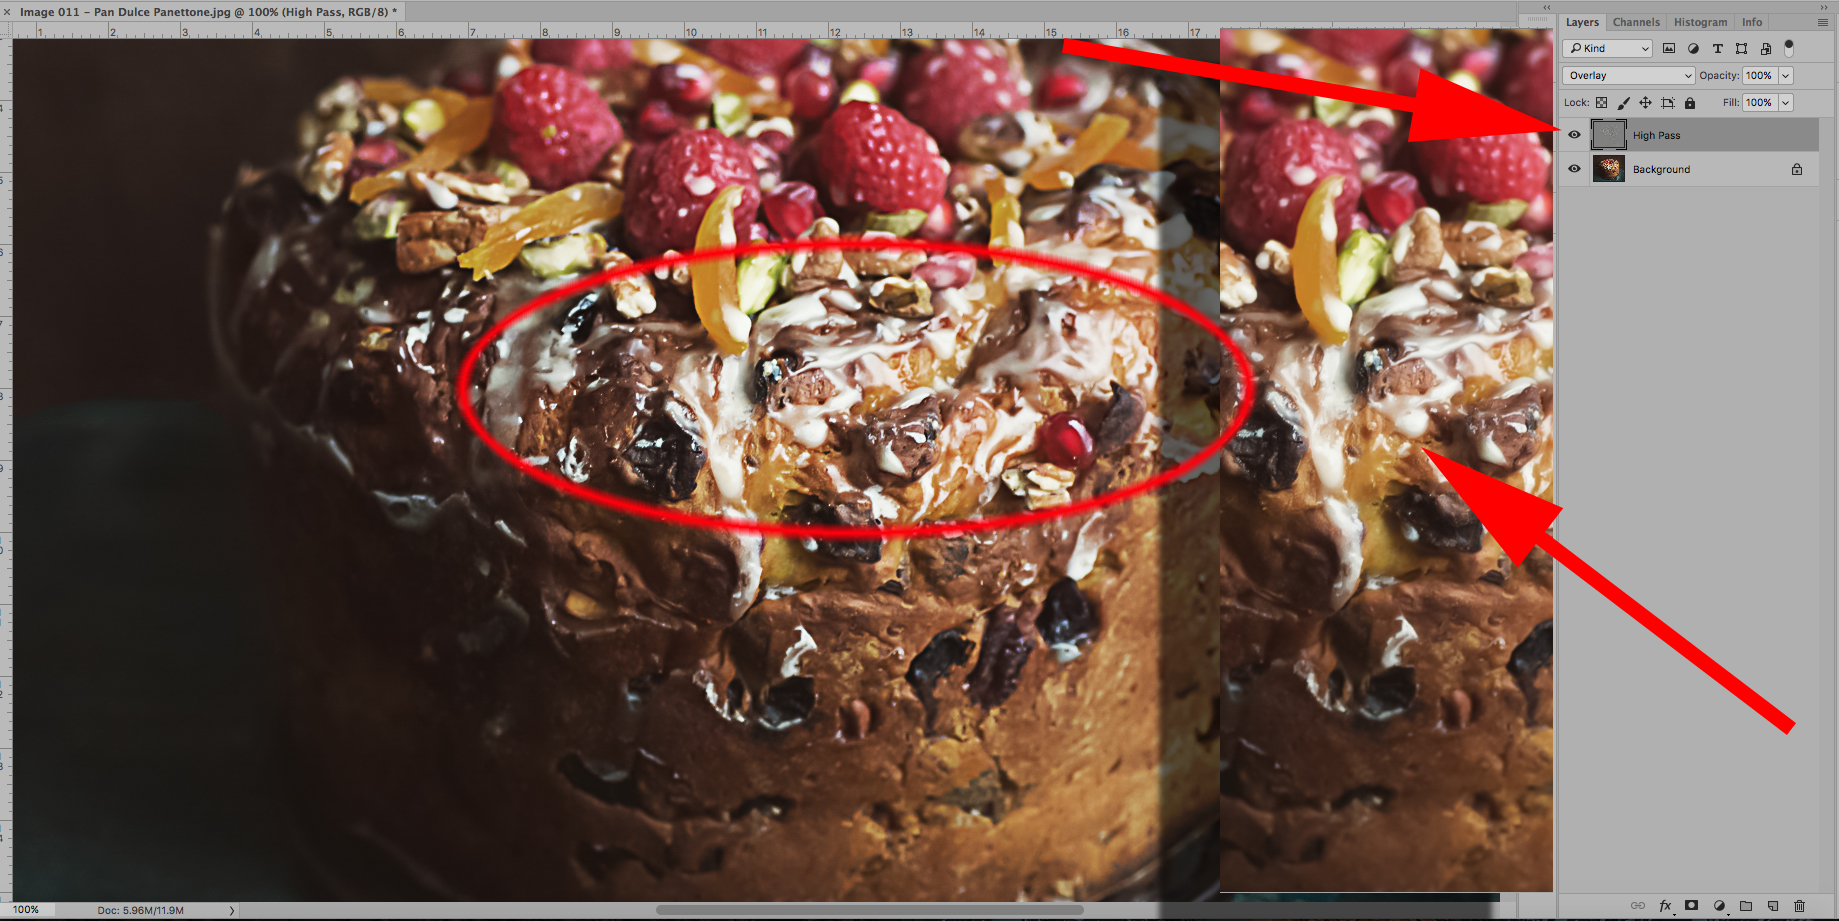
- Set your Preview size to 100%
- From the “Blending Mode” dropdown menu, select “Overlay”, “Soft Light” or “Hard Light”. The Overlay mode will give a “middle of the road” sharpening effect. The Soft Light mode will sharpen a little less, and the Hard Light mode will sharpen more. Resist the temptation to go too far.
- For this exercise, I have chosen the Overlay blending mode
- You can see the sharpening effect go “on and off” by clicking the “Layer Visibility” icon within the High Pass layer.
- In Image 015, the oval indicates the area where I want maximum sharpness. The inset shows what the image looks like when I turned the High Pass layer visibility off. The results are strong but not overwhelming.
We’ve sharpened up the image nicely. Now we must create the depth of field effect.
We will accomplish that with a mask.
Step Four
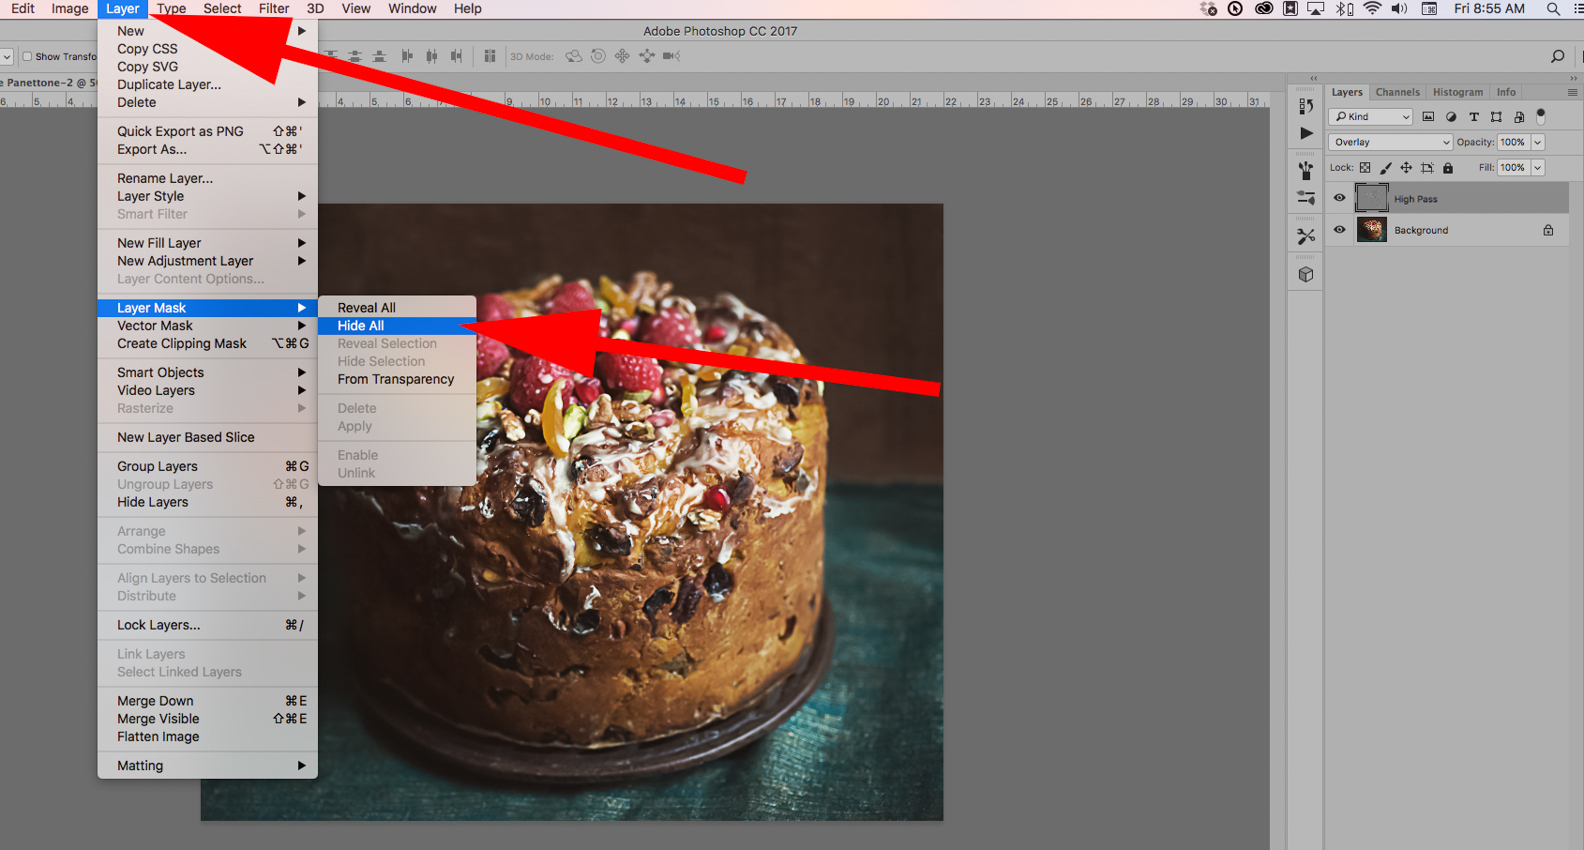
- Make sure the “High Pass” layer is selected.
- Select the “Layer” dropdown menu.
- Select “Layer Mask”.
- Select “Hide All”
The effect of the High Pass filter layer is now hidden from view.
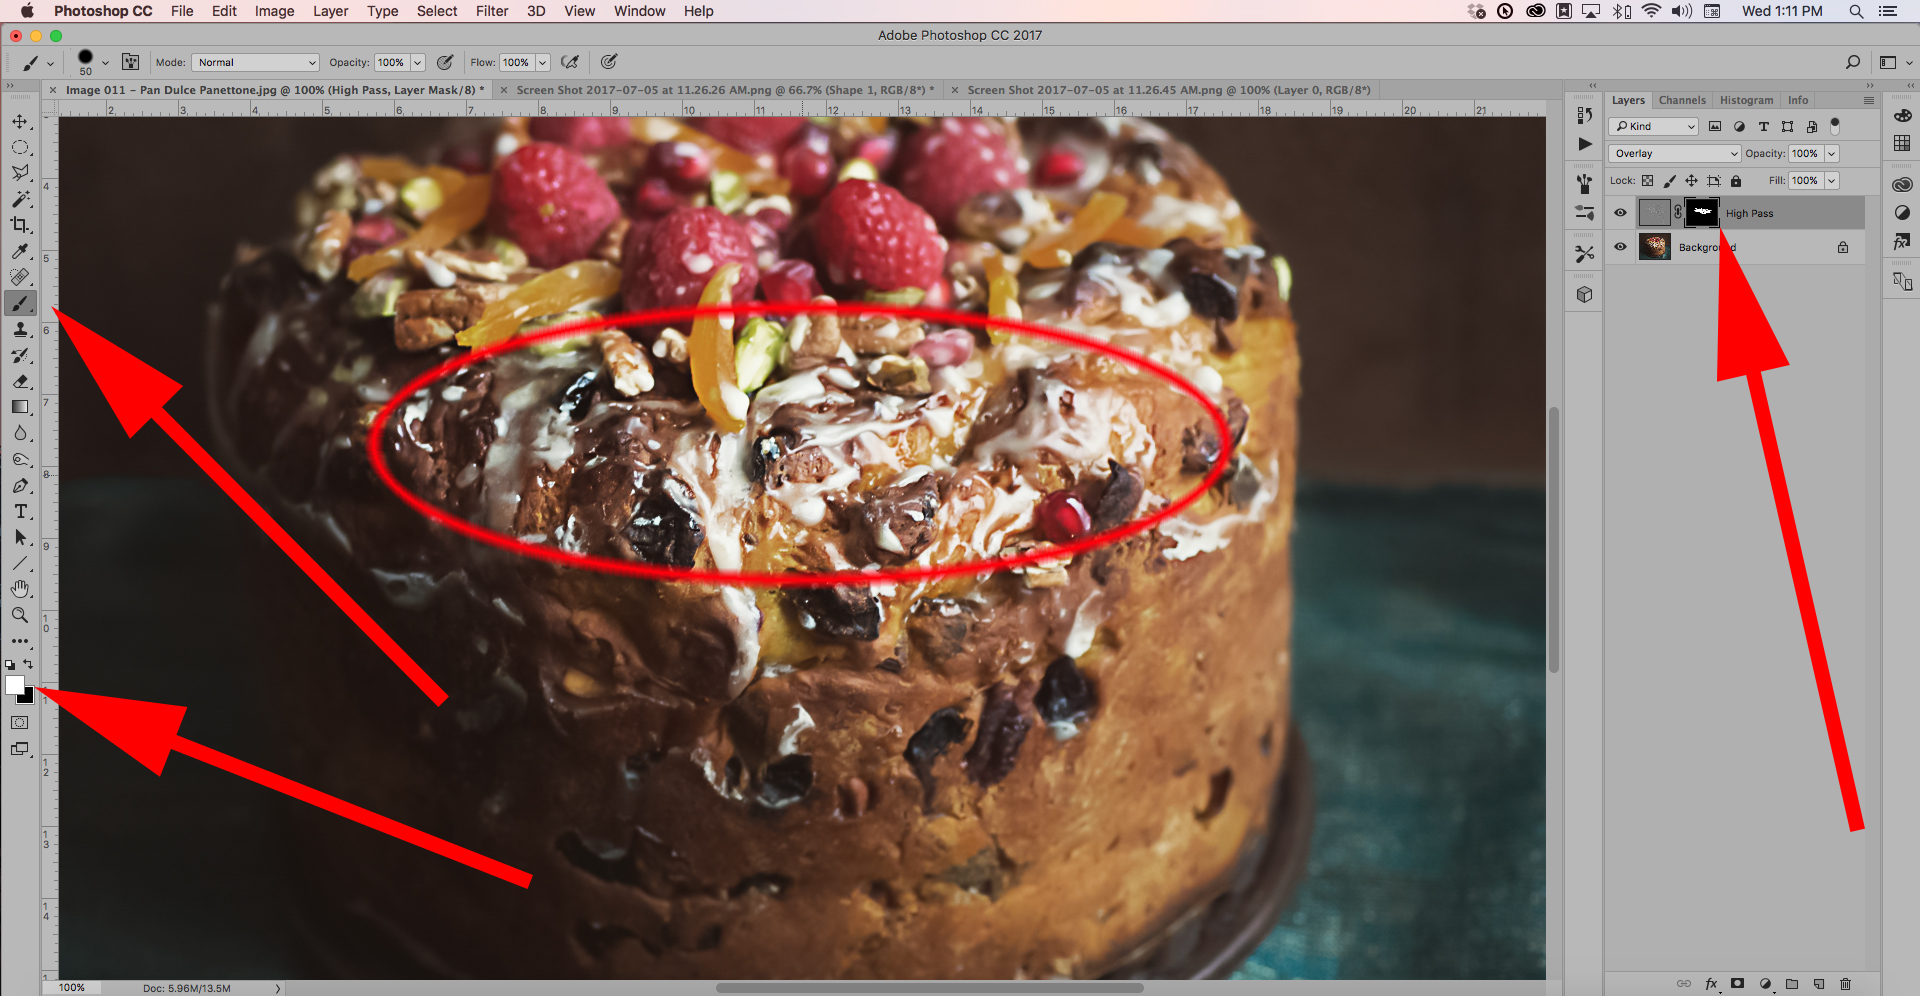
- Make sure that the High Pass layer is selected, and that the mask icon (on the right side) is also selected.
- Make sure the color “white” is in the front (on the lower left of the workspace).
- Select the paintbrush.
- Paint on the Preview Window where you wish the sharp, minimum depth of field window to appear. In Image 016, the red oval indicates the area where I painted in my area of critical sharp focus.
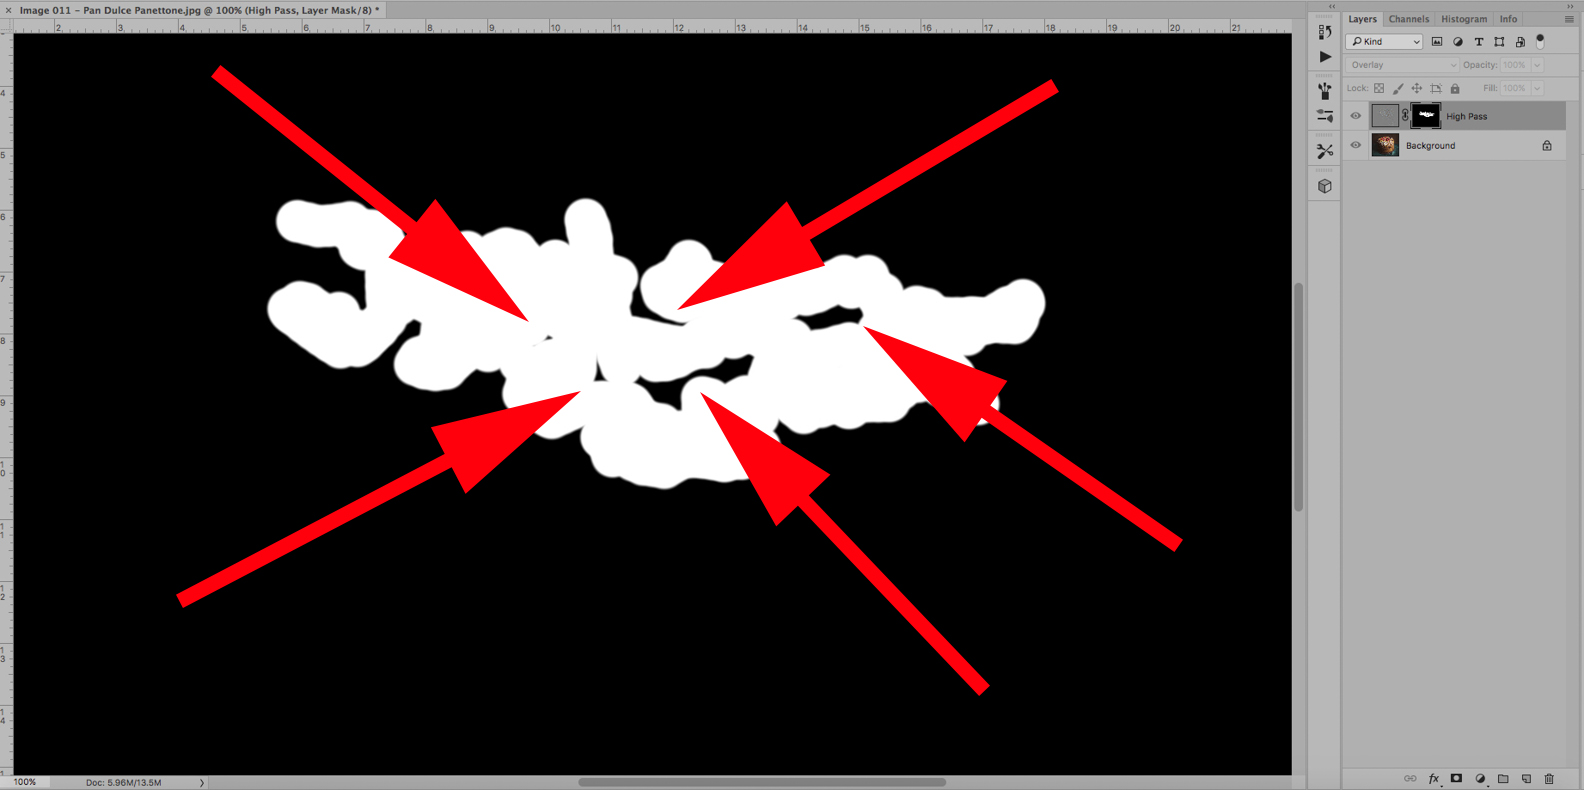
- I performed the same keystrokes as described earlier, so that you can see what the mask looks like.
Key Lesson- When mimicking shallow DOF (similar to what you would achieve from a fast lens) try to picture in your mind what that DOF window might look like. For example, the transition from sharp to un-sharp would be quick. It would not be a gradual transition. If the object that you are applying the effect to, is 3-dimensional, such as this cake, there could be areas within -what appears to be the DOF window- that will still be out of focus. Take notice that there is areas that I left masked out of the DOF window-even though they are within overall DOF focused area.
Final Photograph

3) How you can use masking (for special effects) – even if you don’t own Photoshop.
So, you haven’t invested in Photoshop. You like editing in Lightroom, or Adobe Elements, or some other program. However, you really wish that you could do some special effects using masking.
I have great news for you. If you have $1.99 and a smartphone, (and who doesn’t these days), the power of editing your photos with masks is right at your fingertips.
I’m talking about an app called, “TouchRetouch”. This app rivals many of the masking options available within Photoshop- plus it’s super easy to use.
You might be thinking, “I only shoot camera raw using my DSLR. What good is an app on my smartphone going to do for me?”
It’s simple. Transfer the image file to your phone. Use the app to accomplish the masked editing, and then transfer it back to your computer.
However, keep this in mind. TouchRetouch will accept your raw file into the program. However, it can only save a file into the .jpeg, .png, or .tiff formats.
Let’s take a look at an example.
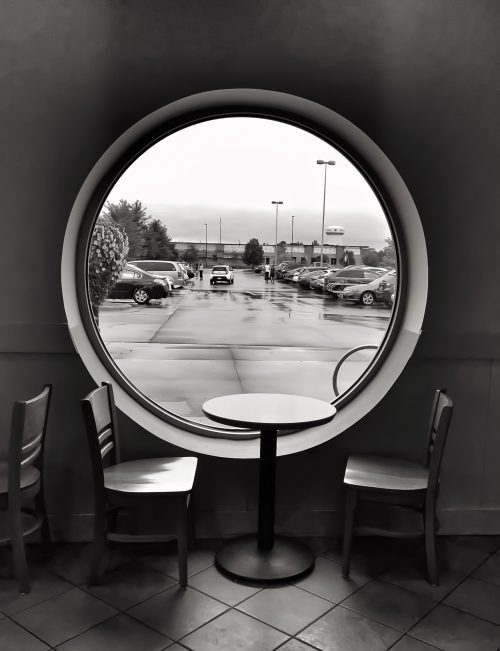
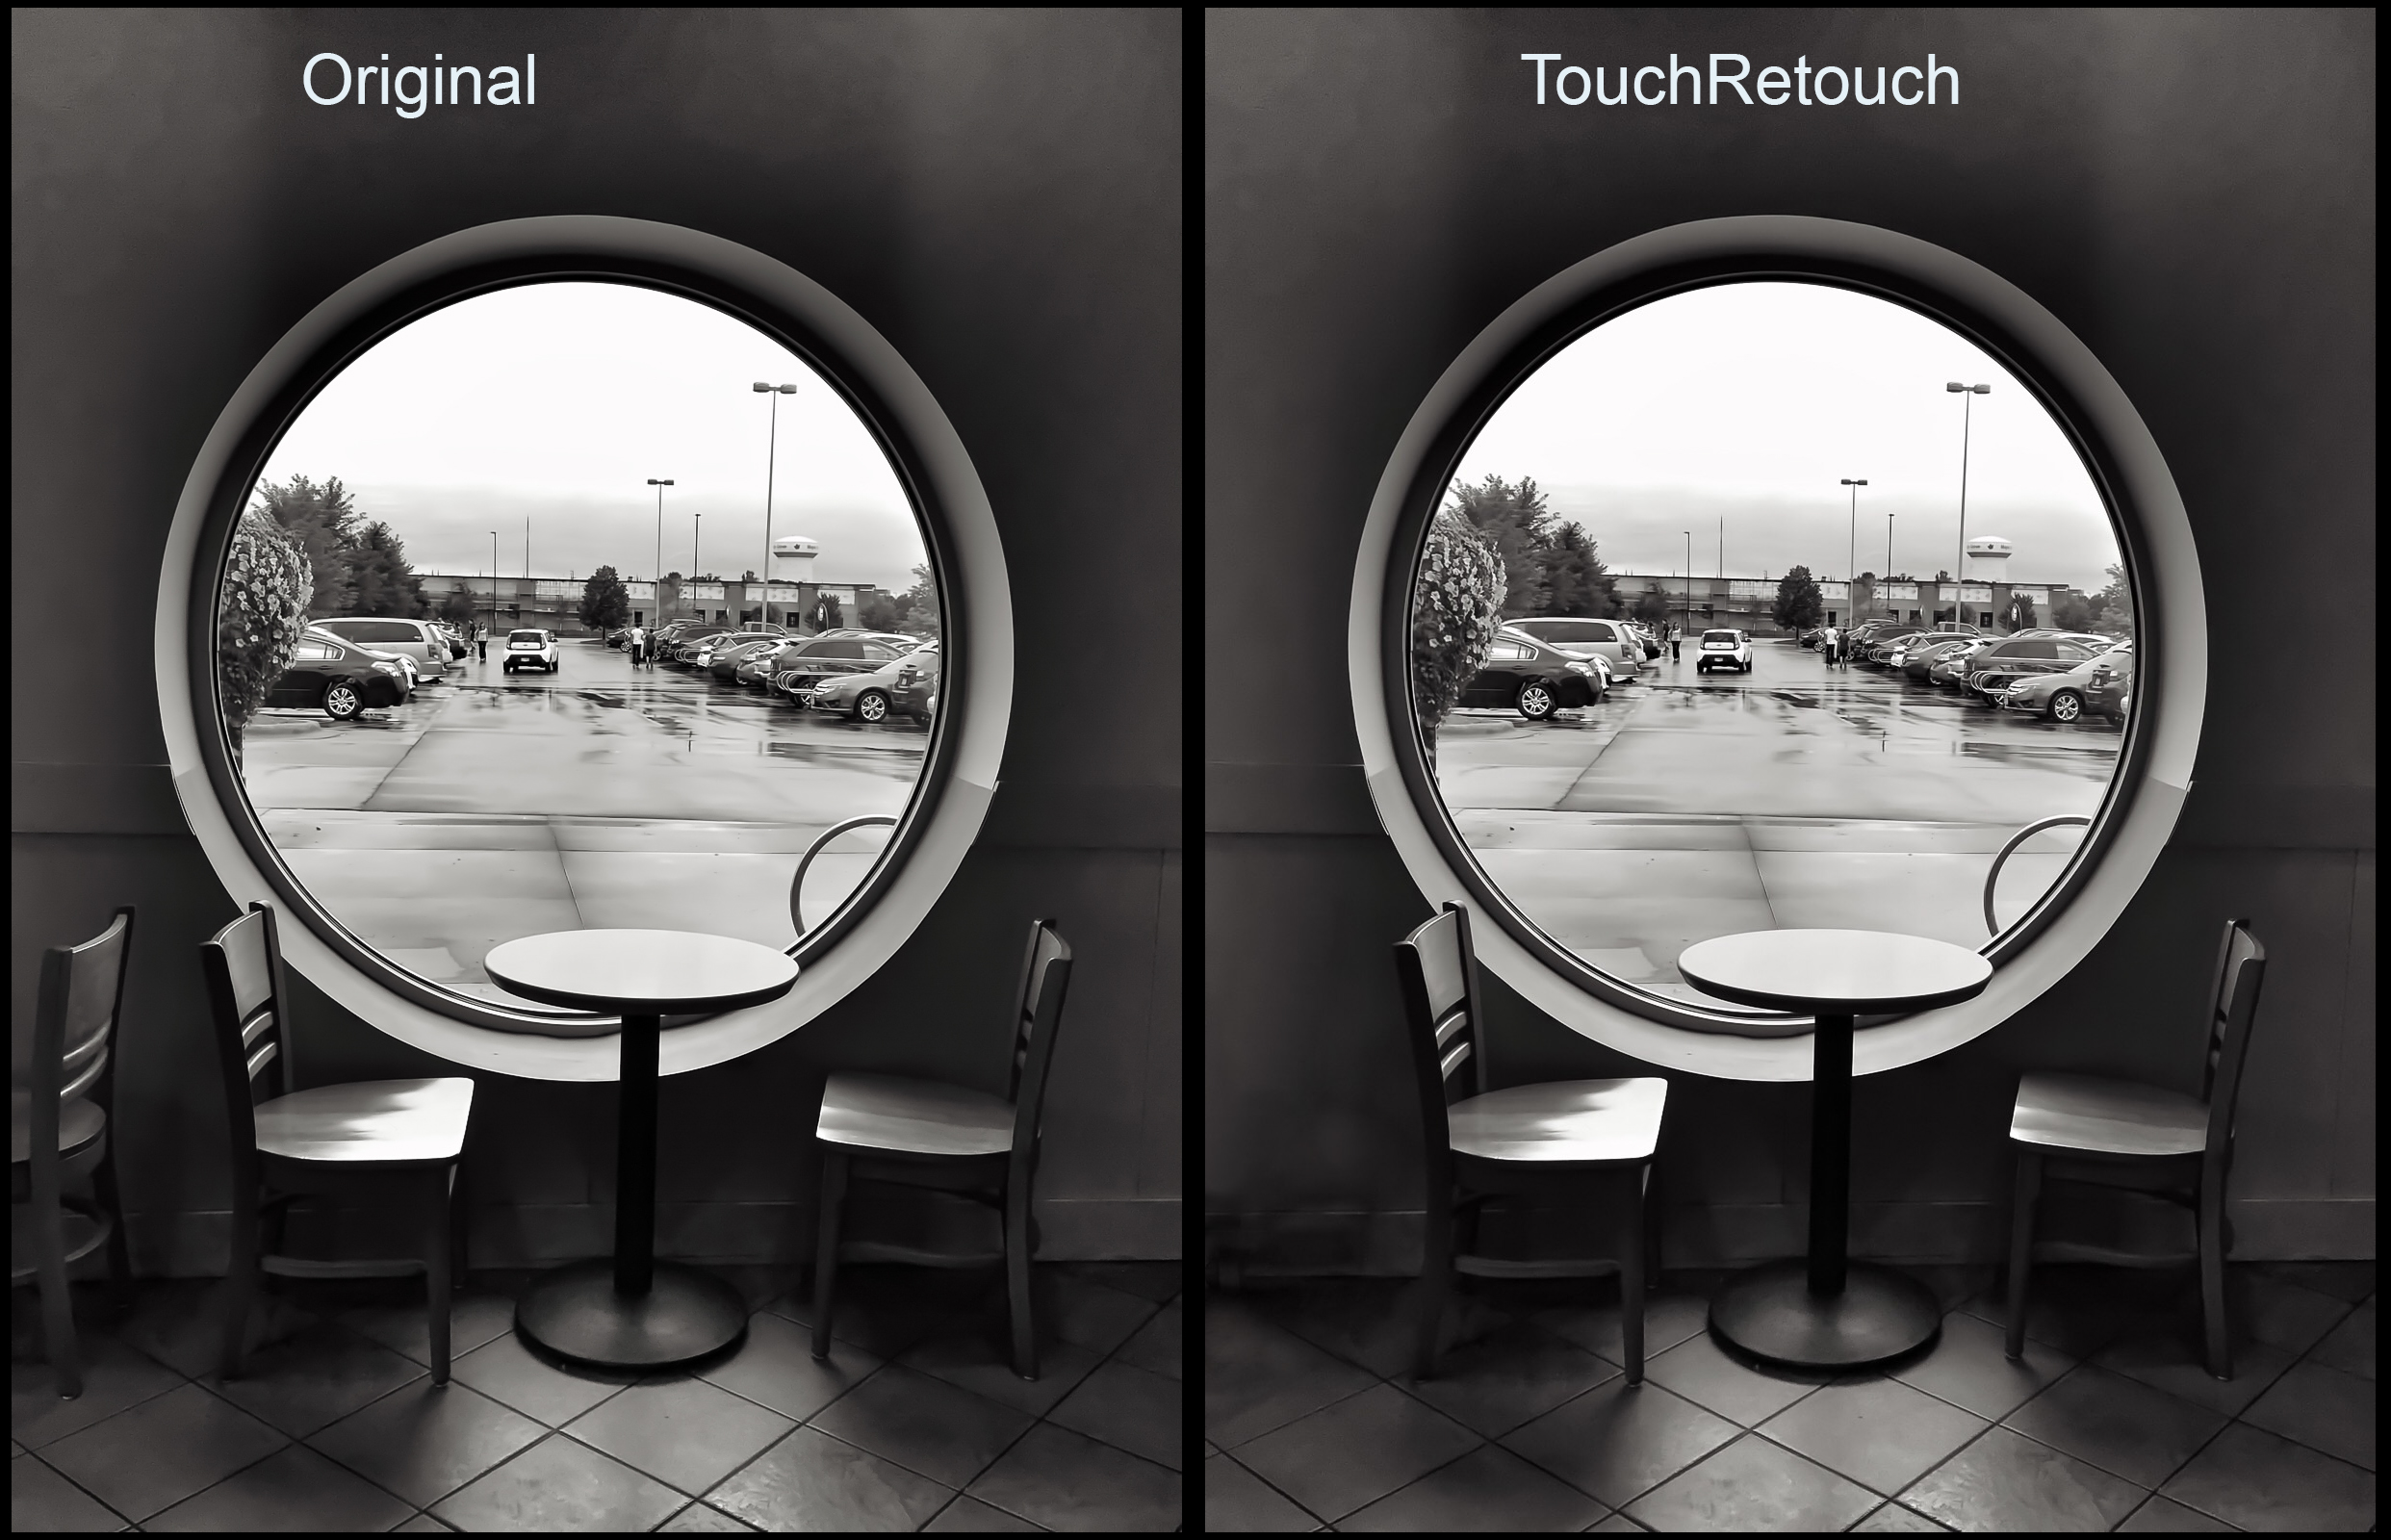
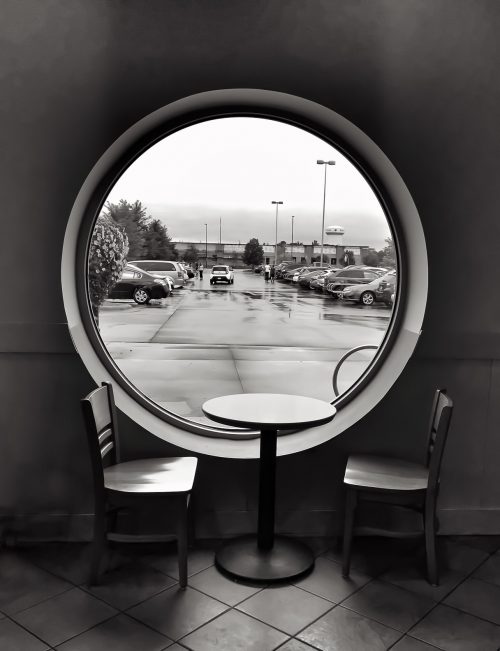
I took this photograph from inside a store near my home. I was really excited about the symmetry, and the repetition of the circles, and the activity in the background, which anchored the central part of the shot.
It wasn’t until after I got home, that I realized there something horribly wrong with the shot.
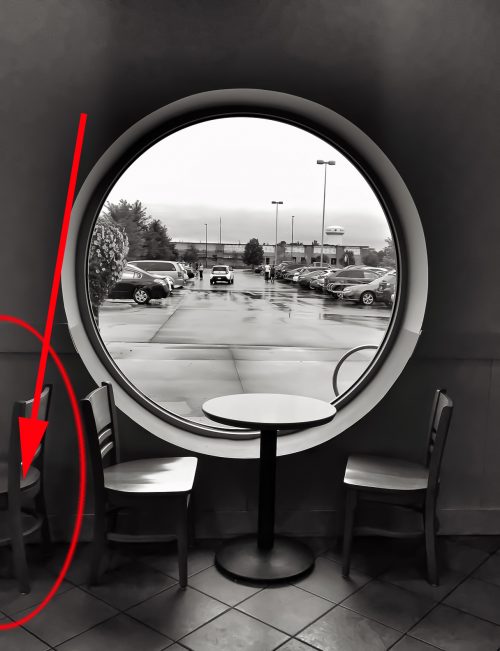
That pesky chair on the left totally threw off my symmetry!
There was only one thing to do… take this shot into TouchRetouch, and with the use of masking, that chair went bye-bye in a matter of seconds.
Step One

- If your image isn’t already on your phone- you can get it there by emailing it to yourself as an attachment. Then, from your email download the attachment onto your phone. If you’re an Apple user- you can use Airdrop to move files around. That’s what I use.
- Open the “TouchRetouch” app and select “Albums”.
- Navigate to your photograph and select it.
Step Two
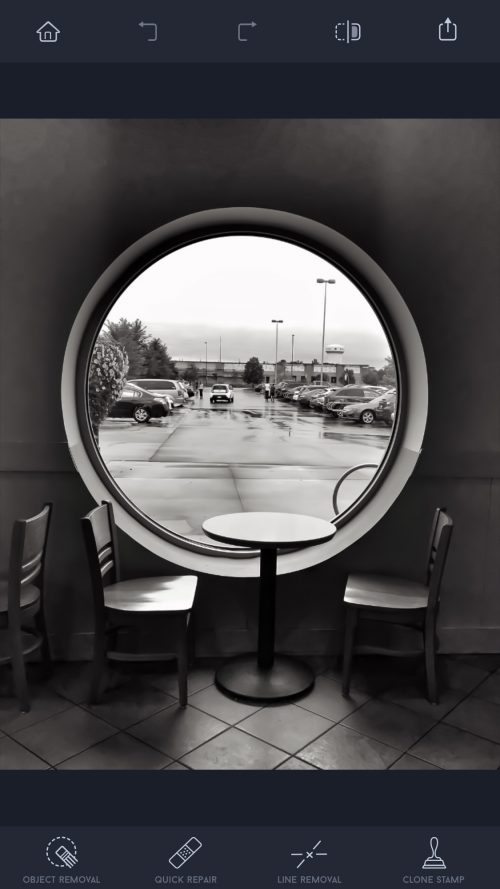
The photograph will open in the main interface of the TouchRetouch app.
Here is what you are looking at…
- The upper left icon of the “house” brings you back to the home page where you opened your picture.
- The left facing arrow returns you back one step at a time through your edits.
- The right facing arrow does the opposite of the left arrow- moving you forward through your edits.
- The icon that looks like an open book gives you a before and after view of your edits.
- The far right icon at the top is the “save” function.
- The “Object Removal” tool, on the bottom left, allows you to carefully create a mask to remove an object.
- The “Quick Repair” tool removes an object automatically after you’ve painted a mask. It’s especially useful when the object you’re removing doesn’t have a lot of complicated stuff around it.
- The “Line Removal” tool is nothing short of awesome and amazing. It can remove power lines through trees in seconds. Even Photoshop, doesn’t have a tool that rivals this one. This tool alone is worth the $1.99 fee to purchase the app.
- The “Clone” tool works similarly to the one in Photoshop. It is a bit clunky in how you use it, and it takes some time to get used to it. However, once you are used to it, you can do anything that you could do with the Photoshop cloning tool.
For this exercise, we will be using the Object Removal tool and the Clone tool.
Whenever you are using a tool, within TouchRetouch, a reticle appears to help you “see” what your doing with the tool. This is a significant feature, as your finger will block any view of what’s happening beneath it.
- Select the “Object Removal Tool”.
Step Three
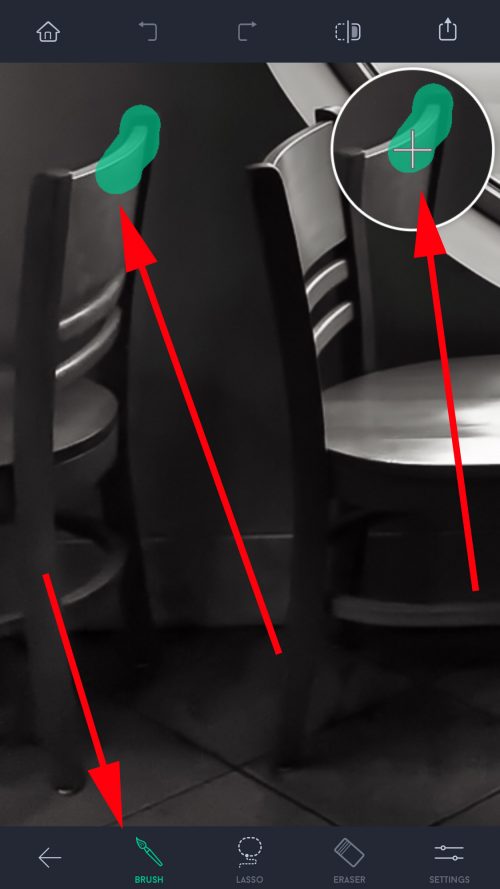
After selecting the Object Removal Tool, your photograph will open up with five icons at the bottom of the screen
- The left facing arrow takes you back to the previous screen.
- The “BRUSH” tool allows you to paint in a mask, over an object, that you wish to remove from the photograph.
- The “LASSO” tool allows you to select an object by simply dragging around it. This option works better when the object that you’re removing does not have a lot of complicated structure around it. I prefer the BRUSH tool.
- The “ERASER” tool allows you to remove part of a mask before engaging the removal action.
- The “SETTINGS” option allows you to set the size of the BRUSH or the ERASER.
- Make the object, that you wish to remove, as large as possible on the screen.
- Press your finger onto the screen, and you will begin to paint a mask.
- A reticle appears that helps you to see where you are painting, as smartphone screens are small.
- I always begin by painting an outline around the object that I wish to remove, and then I fill in the middle areas.
Step Four
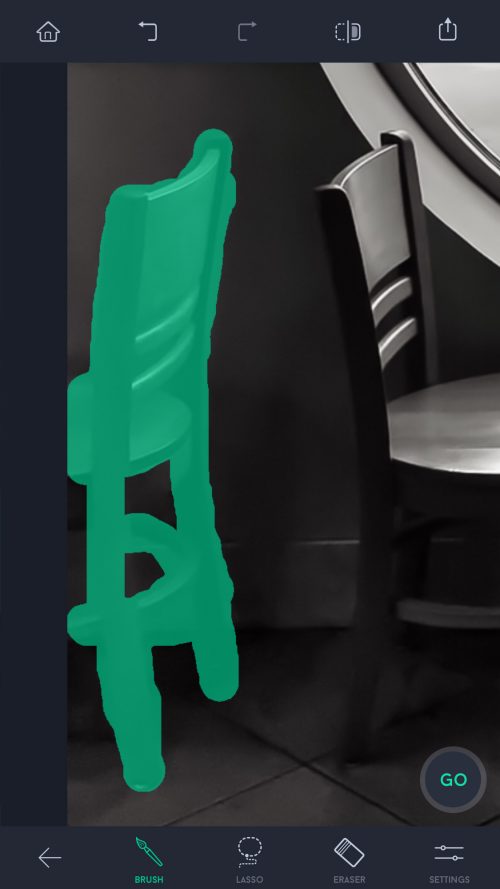
Your mask doesn’t have to be perfect along the edges. The more complicated the structure is around the object that you’re trying to remove- the more precise your mask will need to be. Sometimes, it’s helpful to work in steps; removing part of the object, and then move onto another part- cleaning up any artifacts as you go.
- Once you’ve drawn your completed mask, click the “GO” button.
Key Lesson- This is the difference between “Object Removal” and “Quick Repair”, in Quick Repair, the minute you stop making the mask, and remove your finger from the glass, the software immediately attempts to remove the object. Sometimes this works great. With Object Removal, you can take your time with the mask, and if you hit “GO”, and you don’t like the result, you can hit the “Back Arrow” and it will go back one step and reproduce your mask for further editing.
Step Five
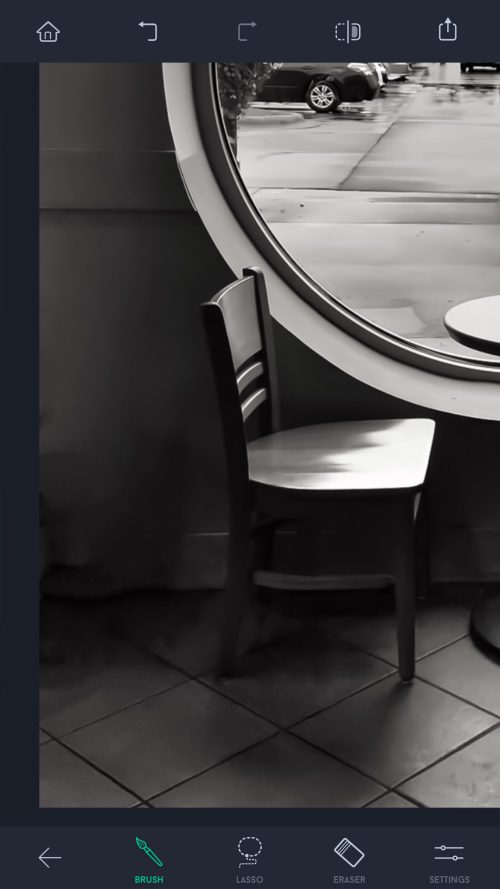
On the first go around- the software did a superb job of removing the chair. In fact, most people, if you didn’t tell them, would not suspect anything had been done.
However, to a trained eye, there are some telltale artifacts. We are going to fix those up using the Clone tool.
Step Six
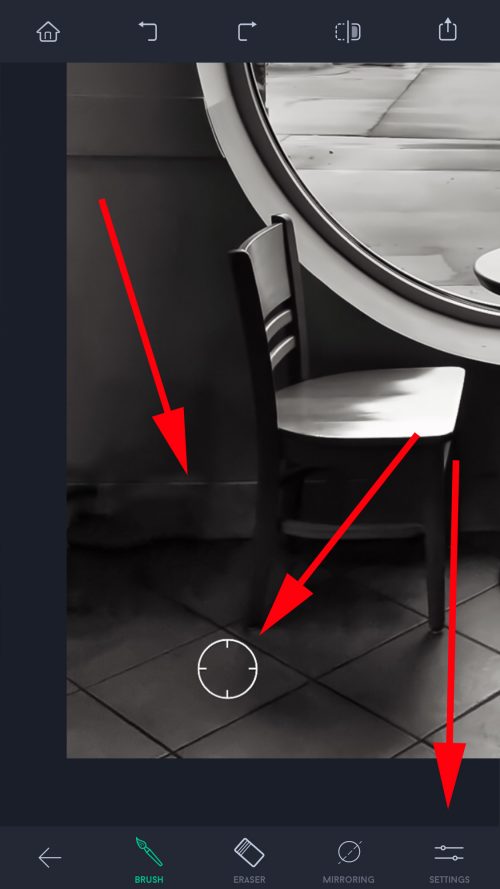
- When selecting the BRUSH (at the bottom of the interface) within the “Clone” tool – a reticle appears. This is a different reticle than the one described earlier. The reticle indicates the “selection area” for cloning. When you press your finger to the glass that becomes the cloning area. Move the reticle around by tapping the glass- don’t drag it. The size, softness, and opacity of both the selection area, and the cloning area, are changed using the “SETTINGS”.
- The “ERASER” brush simply erases what you have cloned.
- “MIRRORING” is an option that I’ve never used. If you find a good use for it- make a comment at the end of this post.
There are two elements within the photograph that I want to clean up.
- The first is to continue the baseboard line to the left edge of the photo.
- The second is to adjust the shadows so that they appear more natural to the remaining chair.
- To fix the baseboard I placed the Clone tool reticle along other areas of the baseboard and made the brush very small. Getting the exact placement for the cloned line was tricky, and it took me several attempts to get it lined up.
- To adjust the shadow on the wall, I selected areas of neutral wall color above the shadows, made my brush a medium size with a wide feather, and set the opacity to about 65%
- To clean up the shadowing on the tiles, I used the same brush and moved the sampling reticle to the tiles.
Final Photograph
Remember! You can use TouchRetouch for any photograph. It doesn’t have to originate from your mobile phone.
These three examples are just the tip of iceberg- when discussing what “masking” can do for your photography.
It’s not that hard once you know how.
If you would like some deeper insight into masking, and what it can do for you…
I would like to invite you to take a look at my eBook, “The Next Step To Perfect Photography: Understanding Masking In Post-Production”.
Everything that you need to know, to begin your journey toward becoming a master of post-production trickery, is in this eBook.

