Adobe’s Lightroom has become one of the best editing and image management options for enthusiast and professional photographers alike. In its most recent incarnation, the editing tools that it provides mean that for many images, there is no need to work in Photoshop. Today we are going to take a look at five advanced Lightroom techniques.
1. Get a Deep Blue Sky
Sometimes the weather does not play ball and although our sky is blue, it's that wishy-washy light blue that does nothing for our shots. Fortunately in Lightroom there is an excellent tool not only for punching the sky out but also for changing the color of the sky- the HSL tool. Found about halfway down the right-hand window in the Develop Module, HSL stands for Hue, Saturation and Lightness. On initial glance, you will see a lot of color sliders under each of the tabs but our secret weapon is the tiny circle icon just below the Hue Tab.
First select the Hue tab then click on the circle icon. Take your cursor to an area of blue sky and click and drag up or down. You will see that the hue, or color, of the sky changes. Change the color of the sky to something more desirable then click the Saturation tab. Repeat the adjustment using the same area of sky, to increase the saturation of the sky. The end result will be a deep blue, almost polarized looking sky.
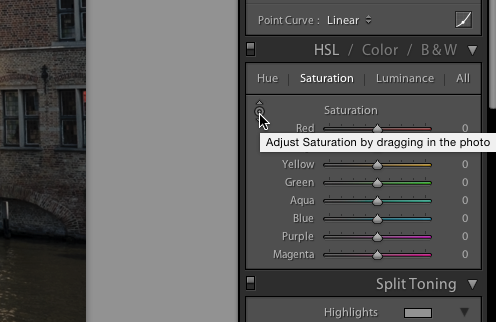
A hidden but useful tool

Simply click and drag
2. Keep Your Histogram Under Control
There is a simple but effective tool that allows you to see clipping in your images in both the shadow and highlights area. At the top right and left of the histogram, you will see a small triangle. Clicking on the one on the top left will reveal all the shadow areas that are now too black, in other words areas with no shadow detail. These areas will be shown in blue on your main image. You can now use the shadow or blacks sliders to recover these areas. Clicking the triangle on top right will reveal the clipped highlight areas and shown them as red on the main image.
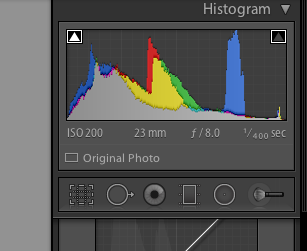
Click on the triangles top left and right to reveal clipping

Red area are clipped highlights, blue are shadows
3. The Healing Brush
This is a very useful tool found in the Develop Module just under the Histogram. It is simply called the spot removal tool but like its Photoshop equivalent, it is more advanced that its name suggests. The tool can be used to remove simple spots such as sensor dust or a mole on a model’s face. This is done by selecting the tool, making sure it is set to Heal and making the brush radius about 50% bigger than the blemish. Then simply click on the blemish. However the tool is more powerful than that as it uses Photoshop’s content aware algorithms. This means you can remove large blemishes by clicking and dragging the brush over the offending area and the tool will work out what needs to be removed and intelligently replace it with the background.

Click and drag the healing tool to clean larger areas
4. Cropping to a Compositional Rule
Another fairly hidden but extremely useful tool in Lightroom is the Crop Overlay tool. To activate it, select the Crop Tool in the Develop module then go to the menu and select Tool – Crop Guide Overlay. There you will see a number of different overlays based around common compositional rules such as thirds, golden ratio and golden spiral. Selecting one will display the overlay on the picture allowing you to crop to that compositorial rule.
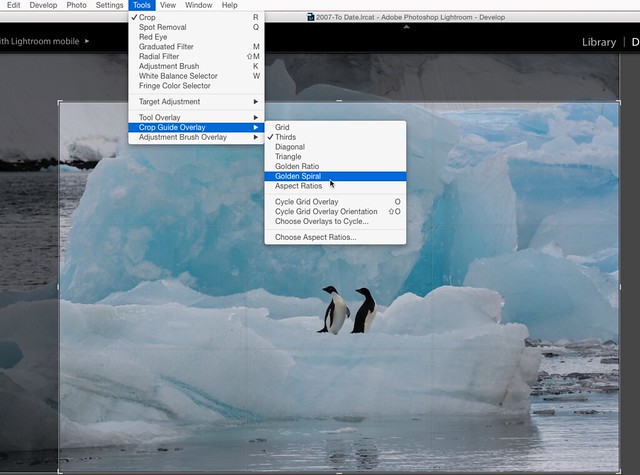
Cropping to a compositional rule
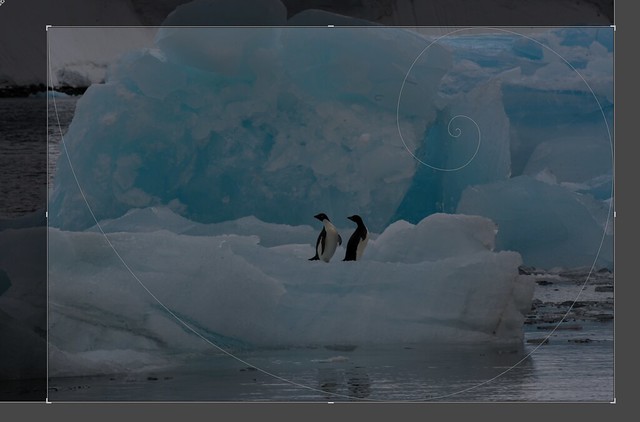
This is the Golden Spiral crop overlay
5. Virtual Cloning
Lastly, another often underused feature in Lightroom is Create Virtual Copy. This can be done in the Library module by right clicking on the selected image and selecting Create Virtual Copy. This will create an exact copy of the selected image with all the corrections and adjustments intact, or if you have not made adjustments, an identical copy of the original. This is extremely useful for trying out multiple different variations on the same image, but the real power is in the fact that because the image is just a virtual copy, it takes up virtually no space on your hard drive. A good way to work is to put the original in a new Collection then make multiple virtual copies inside the collection, allowing you to try different looks to a single shot.

Virtual clone creates an exact copy of your image, corrections included

A cloned image ready for adjustment
Lightroom has a wealth of hidden or obscure features that can be extremely useful. Hopefully these five, along with the many others will help you improve your workflow and creativity.


13 Comments
Ah. I did not know #4. That’s handy.
I didn’t know about #4, either. I’ll be playing with that soon!
Thanks for the tips!
I’ve seen the ‘Virtual Copy’ option, but haven’t tried it because it didn’t seem especially useful. How wrong was I?! I’ll definitely be trying that out soon. Thanks again!
often, all of them ^_^
I never explored the Virtual Cloning option. Looks like a great tool to work in LR. Thanks for all these great tips. I will diffidently try this option.
Wouldn’t it be nice if Adobe made the features in Lightroom and Photoshop more apparent/intuitive? An old developer rule is that good software does not require a manual. Adobe studiously itnores this.
What do you mean it takes up virtually no space on your hard drive? I assume that’s a joke because if it’s a bit-by-bit copy of the original image it will take up the same number of bits on disk as the original…what am I missing here?
David, no joke. In Lightroom, when you make an adjustment, it does not actually do anything to the image, the adjustments are saved to a small file that is linked to the image. This file tells Lightroom how the image should look on screen and what adjustments to apply if exported. The same happens in a virtual copy. A small file is created referencing the original image, hence very little space used.
And when it comes to the cropping tool tip, don’t forget that in cropping mode, you can use letter “o” to circle over all the different overlays.
And also, when you have chosen a specific one you can use Shift+ “o” to circle through the different options for that overlay.
I tried number one, but found that the sky had to have some blue in it for this to work. If the sky was barely blue, or more gray, there was nothing to hue or saturate…..just an FYI. Is there a way around this….maybe I am doing something wrong. The only way around this I have found is to use the neutral density function to drag some blue tones in the image.
I’ve been using full versions of Photoshop for years, and more recently, PS Elements, as well. I also have Lightroom, but as yet I don’t know what is it about Lightroom that makes it unique to PS and Elements. What can I do with Lightroom that I can’t with Photoshop? I don’t mean to be rhetorical. I REALLY don’t know why I even bothered to purchase Lightroom. Can someone fill me in on its advantages?
Since Lightroom is completely non-changing of the image, it can be safetly used. Whereas, if you make changes to an image in PS or PS Elements and accidentally Save the image (thus replacing the old image), the original image is gone! Lightroom only makes a new image when you print your changes (but still does not change the original), or when you Export your image with the changes made (then it creates a new image with a new file name to whereever you tell it to).
I am firstly a Photographer who likes to play with things. I therefore know about some of the features, but we are constantly learning more on that never ending journey
For that purpose, I actually stumbled upon the Original Lightroom some time ago (thanks, in part, to the nagging of a geeky associate who I have since thanked for his nagging). Photoshop was too complicated for me as a “New User” at the time.
Lightroom has been on my computer ever since………..each new version and I am strangely looking forward to Lightroom 6 (when it arrives)
Lightroom has many advantages (Non-Destructive Editing, Asset Management, Collections/Smart Collections, Virtual Copies (An Exclusive Lightroom Feature….and a lot more). I have found it good for “Global Adjustments”, but I have found some of the “Local Adjustments Tools” to be somewhat questionable in comparison with Photoshop.
I tend to use “Lightroom” in combination with “Photoshop” and “Illustrator” and “InDesign” and “Acrobat” as an “Integrated Workflow”……….the video elements are yet to be explored!
Making Mistakes & Learning From Them:
One of my very early and subsequently regrettable mistakes was not taking Lightroom seriously……..I bought it but rarely used it …………we do that sometimes……….but if only I knew then what I know now!!
I started to get more into Lightroom in LR3 for “Asset Management”…..but again I made some silly mistakes by not using it properly (mostly because I did not know how)……….I saw loads of “Error Messages” and partially gave up
I started over with LR 4 and learned how to use it properly and effectively as my “Primary Asset management Tool” At first, it seemed to be Complicated and Intimidating, but that is the nature of “Adobe Products”……and they make no apologies for that!!………If we really want to learn it, we will!!
The Question:
Will Lightroom ever become an “Entirely Stand-Alone Application” without the need for “Photoshop”?
I suspect that such a state is highly unlikely (in my own workflow at least)
Lightroom is good and it can do many things, but there is still a question mark over it s ability to be entirely independent of Photoshop……….they do, however, work very well together!!……..for me the question is not one or the other……… but both…….they are both good at what they do with individual advantages, but together they are unquestionable!
Thank you for the Blog Post……………it has undoubtedly inspired many to consider the many benefits Lightroom