Getting your first serious camera is an exciting moment. So much to learn, so many buttons and dials to understand, complex menu systems to decipher, it's no wonder many leave their cameras on auto modes. Slowly we begin to understand the relationships between all the settings but perhaps one of the last things we tend to look at is white balance. Although our eyes do not notice it, light has many different colors depending on what the source of the light is, and in the case of the sun, what the time of day is.
Color of Light
Unlike our eyes camera sensors do not adapt to changes in the color of light, they need the help of the camera’s built in color metering. Under most lighting conditions, this is fine. However, sometimes it can get confused by different conditions and give you a wrong reading. A typical example of this is getting very blue images on an overcast day. To counter this, modern digital cameras allow you to set a white balance preset or indeed to create your own white balance suited to the ambient light that you are working in.
Before we look at the typical white balance presets, lets quickly look at how we determine the color of light. We use a temperature scale called degrees Kelvin (K) and our typical reference point is daylight at noon in sunny conditions. This is considered to be 5500K. If our light is more reddish, for example at sunset or using a tungsten light, this is lower on the Kelvin scale, from around 2000K to 5000K. If our light is more blue, this is higher on the Kelvin scale. A typical example of this is light from a flash gun which can reach 10,000K.
White Balance Settings
The white balance settings on our cameras are found either through a combination of button and dial presses, or via the camera’s menu system. Refer to your camera’s manual to find out exactly where to set it. So, lets have a look at the typical in camera white balance settings.
AWB or Auto White Balance. The camera’s sensor will make an estimation of what the color balance should be and set it automatically. This works well in average situations but can be fooled by a large block of color in an image or where the overall light is a predominant color. Sunsets are a typical example of where the AWB can go wrong, the overall redness of the light fools the sensor and it over corrects and neutralizes the beautiful red tones of your scene.
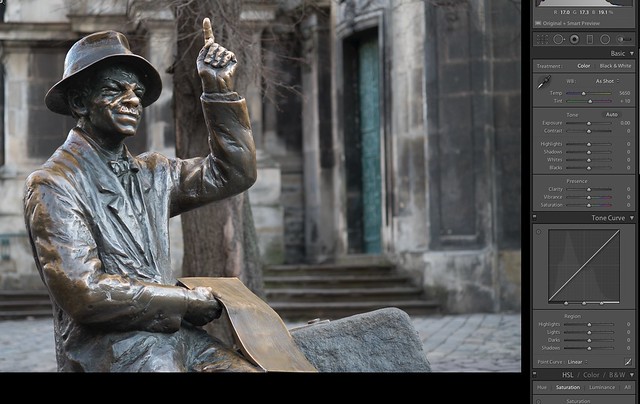
AWB has given a neutral looking shot at 5600k, very close to daylight
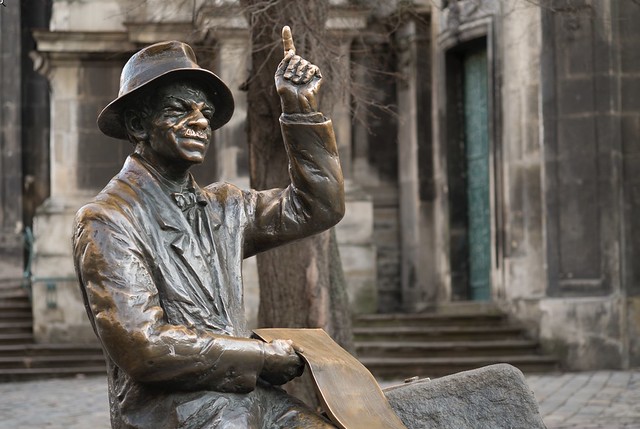
By switching to the Cloudy White Balance, we get a warmer image.
Daylight or Sunny. This is designed for use in the middle of the day under sunny conditions. Although AWB copes well in this type of light, if you are shooting, for example a model wearing a red dress, you might find the color shifting as the AWB over compensates. Setting the Daylight preset will give you consistent color.
Cloudy. As we previously mentioned, overcast conditions can cause AWB to make an image bluer in tone. To counter this we can use the Cloudy preset. It works best in overcast conditions, adding some warmth to the image.
Shade or Shadow. Similar to overcasts, if we are shooting a subject that is in the shade we often find that we will get a blueness to the shadow areas, setting the Shade white balance will compensate for this but at the cost of making any sunlight areas look warmer.
Incandescent. You might also know this as tungsten. It is the typical light for domestic residences and is a very red light, as low as 2200K. AWB can really struggle with this, throwing colors off by a big margin, so setting the Incandescent preset will give you a much more natural looking shot.

Fluorescent. Typically these lights can be a number of different degrees Kelvin depending on their age and make. They are perhaps the most difficult to lights for cameras to work to. If the fluorescent lights are all emitting the same color, the Fluorescent preset can work well, however often you can have several different fluorescent tubes each emitting a different color.

Flash. As we have mentioned, flash is a very blue light and although AWB can deal with it, again if we have large blocks of one color in the scene, it can get confused. The Flash setting will give us consistent color in all our flash based shots.
K. K is for Kelvin and if you understand the Kelvin scale in relationship to the color of light, you can set your own color balance.
Pre. If you are working under a consistent light source, maybe in a studio or under an unchanging overcast sky, you can manually set your white balance. Typically this is done by placing a piece of white card in front of the camera, under the lighting conditions you expect to work in. Using the camera’s menu system, you can then read the color from the white card and get an accurate measurement that will give you a consistent color so long as the lighting conditions do not change
Understanding white balance is an important part of digital photography. It is highly relevant when shooting JPEG files because the white balance is embedded into the final image making it very difficult to correct any color casts in post production. Even if you shoot RAW, where you can change white balance in post production, having a good knowledge of the color of light can help you get the best out of your final image.


3 Comments
Very helpful for someone like me that has until now used only AWB, thanks!
What about night photography? As well, I understand that you should set to manual for doing a series or pano (I usually forget). Is a stand alone light meter good for setting this or is there a way to use the cameras internal meters then set it manually?
Since I shoot primarily in RAW my photos have to be processed. In this case whenever possible I use a 18% gray card in the first photo, then I can just click the white balance tool in the editing software and click on the gray card for an instant WB fix, then I adjust from there. The 18% gray card was a cheap but valuable addition to my bag.