A common problem for landscape photographers is shooting during overcast conditions in which the cloud cover is effectively a light source. White or bright overcast cloud throws up the issue that the ground and the sky require two different settings in order to expose both properly. Expose for the ground and you get a washed out, highlighted sky. Expose for the sky and you get an under-exposed ground.
Assuming that you absolutely want to include the sky in your shot (not including the sky is sometimes the simplest solution), there are two main ways to attack this conundrum.

Get Your Filter On
Almost every landscape photographer worth their salt will have a set of graduated filters for these (and other) conditions. The Cokin filter holders are popular among many DSLR users and hold the various graduated filters that a perfect for this situation.

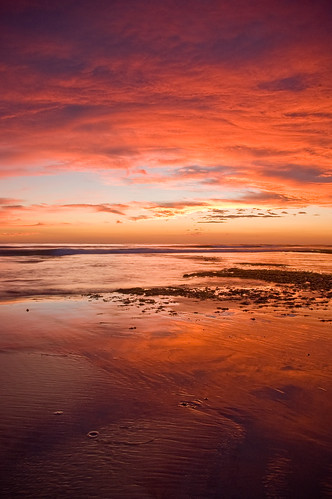
Photo of an ND Grad Filter by Scalespeeder
Which filters will you need though?
For bright overcast skies with the ground darker, the obvious filter to use is a Neutral Density Graduated Filter (ND Grad). As these filters are graduated from dark to light (see image above), the effect is to darken the sky while keeping the ground at the same exposure. There are several that you should consider carrying in your pack.
The ND Grad 1 (ND 0.3) will darken the sky by one stop. The ND Grad 2 (ND 0.6) will darken it by two stops. Combined, the ND0.3 and ND0.6 will darken the sky by three stops. You can also get an ND Grad 3 (ND 0.9) which is also quite common in ND Grad filter kits. On a Cokin filter holder which has three slots, you can stack these in front of each other or use only one or two.
You can also get ND 2 Grads filters which have two different levels of graduation as well as a clear area at the bottom of the filter.
And finally, if you would like to draw specific attention to the horizon, then you can invert two of your ND Grad filters (ie. put one upside down) so that the sky and the foreground are both stopped down to give an effect similar to the photograph below. (You can also buy a single filter that's graduated from both the top and the bottom to give the same effect). Notice how the top of the sky and the bottom of the foreground are darker and the horizon is brightest.
For a great primer on using strong ND Grad filters, check out this article by Chris Gin, a New Zealand landscape photographer and friend of Light Stalking.
What If I Don't Have a Filter?
If you don't yet have any ND Grad filters, then there is another option!
Hopefully you have a tripod (alternatively, you can make sure you stabilise your camera some other way) and some post-processing software.
With this second option, you will need to take two images using different shutter speeds.
The first one, you expose so that the sky is properly exposed (the ground will be terribly under-exposed in most cases).
The second shot, you expose so that the ground is properly exposed with a longer shutter speed (the sky will usually be blown out with highlights).
Note: Leave the aperture and ISO the same for both shots. You don't want different depth of field or noise for each shot. Change only shutter speed.
Next you will want to open both images in Photoshop and, after selecting one as your base, import the other so that you have two layers. (Simply open the second one, hit CTRL-A and CTRL-C, then open the base one and hit CTRL-V).
Use the eraser brush tool at a large size with a soft edge to simply erase the poorly exposed area of the top layer. This combines the well exposed ground with the well exposed sky.
Light Stalking's Chistopher O'Donnell also has a good tutorial on combining layers over at the Photo Argus that is worth a read for an alternate method.
These are the two most basic ways to deal with overexposed and cloudy skies for landscape photography. It's nothing particularly technical, but knowing these simple techniques can save you from the heartache of those blown out skies on overcast days.


11 Comments
Thanks for this tutorial. I’ve been wondering how to expose for light and dark for some time. I don’t have any filters yet, but I can do the photoshop method.
The right way to blend two layers is by masks, this way you don’t actually erase part of the image.
A third way to do so is by HDR photographing (my choice).
INtereseting article.. looks like i need MORE kit!!! don’t tell teh Mrs!
A very clear explanation. Many of the guests on our photography holidays struggle with this when they first arrive. Thankyou. John Brough
Great explanation!
Method without filters similar to HDR.
Most of DSLR cameras has exposition bracket mode for that purposes.
Another alternative is to use manual mode and use a light meter with the dome on to get the overall light – abit of a blast from the film past but still works. Failing that get meter readings from the camera by turning it away from the scene being careful not to shade the camera with your body – might take a bit of practice to get a method that works for you but requires no extra kit and no post processing.
Nice quick tips.
Just got a Lee big stopper.
Cant wait to go out and play with it.
Can anybody tell me how to properly expose the sky and how the ground? Are there any examples? Thank you!
If you don’t have a ND filter you could try the Black Card technique. Jon Chiang is a master at this.
With a training you can also use the magic chloth technic, and very small aperture.
https://icelandaurora.com/blog/2010/07/20/tonys-magic-cloth-technique/
https://www.alexwisephotography.net/blog/2012/02/02/the-magic-cloth-technique-diy-graduated-neutral-density-filter/
I think it’s a bit unfair to say any landscape photographer worth their salt will have a split grad. I am able to do it without one and I don’t think I’m too shabby of a landscape photographer.