var advanced_ads_pro_visitor_conditions = {"referrer_cookie_name":"advanced_ads_pro_visitor_referrer","referrer_exdays":"365","page_impr_cookie_name":"advanced_ads_page_impressions","page_impr_exdays":"3650"};
var essb_settings = {"ajax_url":"https:\/\/www.lightstalking.com\/wp-admin\/admin-ajax.php","essb3_nonce":"ec75c0e582","essb3_plugin_url":"https:\/\/www.lightstalking.com\/wp-content\/plugins\/easy-social-share-buttons3","essb3_stats":true,"essb3_ga":false,"essb3_ga_ntg":false,"blog_url":"https:\/\/www.lightstalking.com\/","post_id":"129178","internal_stats":true};
Portrait photography has and always will be a huge source of fascination for photographers, but there are quite a few tricks to getting a great portrait. In this article, we are going to have a look at some of the major considerations that portrait photographers take into account when they are shooting.
The Eyes Have It
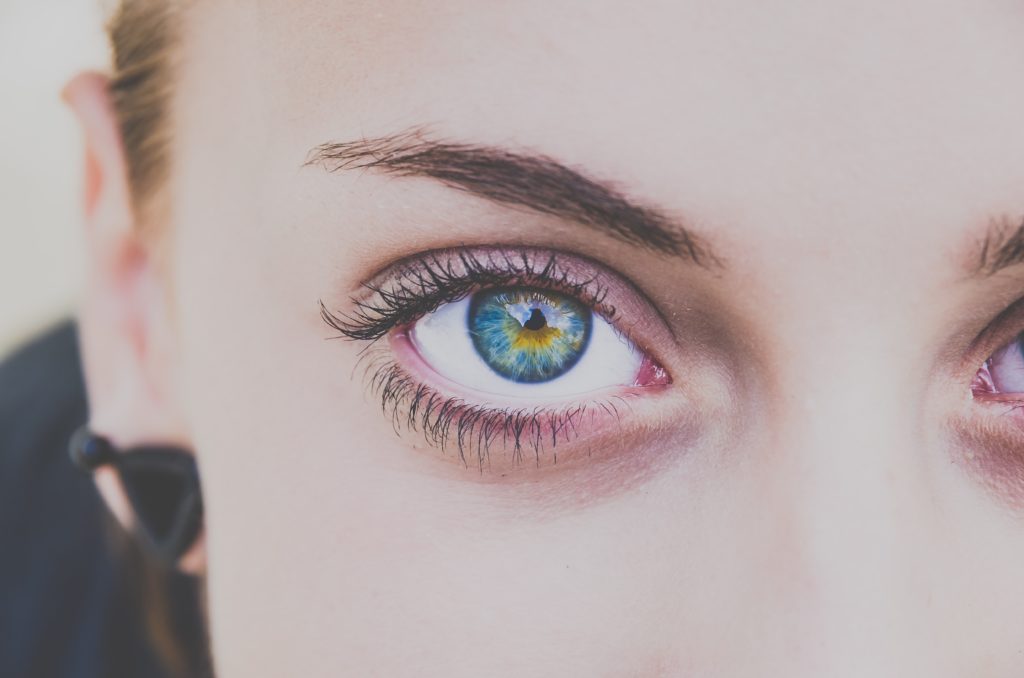
Getting the eyes of your main subject in focus is practically essential in most traditional portraiture (see our guide here on a few exceptions to this). You can get away with having a lot of the rest of the image out of focus, but if the eyes are blurry, you are usually going to have a hard time.
In addition to focus, this means you need to actively consider your depth of field (which is controlled with your aperture and distance to subject). Many portrait photographers prefer to blur their backgrounds (especially when shooting outdoor portraits) so that means shooting at relatively wide apertures from 3.5 through to 5.6. You can also experiment with apertures wider than 3.5, but often it will narrow the depth of field too much and lead to some elements of the photograph being out of focus that you might want to keep sharp).
Nail Your Backgrounds
Even in portrait photography, backgrounds are of huge importance. Sometimes you might be forced to use a plain background (head shots for an actor for example), but if you have any leeway, then get creative. Indoor, that might mean getting your subject in front of something interesting (curtains, material, textured walls or a contextual background for environmental portraits for example) and outdoors it can be anything from a brick wall to a stunning sunset.
Now, you are not necessarily going to want the background in focus, so again, be aware of the blurring effect that a wide aperture and distance between yourself and your subject can have on it. Playing with your aperture to produce softer and sharper backgrounds to your portrait or moving your shooting position towards or away from the subject are some of the main controls the photographer has on DOF, so whatever you choose, make sure it's deliberate.
Photo by Vincent van der Pas This shot was taken at f2.0 – notice the perfectly sharp eyes, but blurred background and even blurred hair and cheeks.
Be Very Aware of the Effects of Focal Length on Your Subject
Traditionally, photographers use prime lenses between 50mm and 85mm (on full frame cameras) to shoot portraits. The 85mm primes by both Canon and Nikon are considered by many to be the most popular portrait lenses. Many photographers also carry a 24-70mm zoom as a backup for shooting portraits (or even as their primary shooting lens).
The main reason is that these focal lengths don't produce much distortion. Distortion can be a bit of a problem with wider angle lenses. They also don't compress the foreground and background to look close like longer focal length lenses can do.
Photo by Geraint Rowland Wide angle lenses can be fun for portraits, but also produce quite a bit of distortion.
It should also be noted that some portrait photographers prefer longer telephoto lenses which afford them the ability to reframe their shots easily and without moving their shooting position. It's something to consider (and to do if it fits your personal style).
Soft Light and Soft Shadows Rule in Portrait Photography
One of the most common issues with portrait photographs is that there are harsh shadows across the face of the subject. This can be caused by harsh sunlight or harsh artificial light (often from a built-in-flash) among other sources (and if that was the intention of the photographer, then that is fine). Luckily, if it isn't something you intended, there are a few ways to get more agreeable and softer lighting.
The common ways to address the lighting issues are to shoot in softer lighting conditions. Outdoors, this means choosing times of the day with softer lighting (shooting portraits at midday is usually a bad idea) towards the morning or the afternoon. It is also possible to get great portrait lighting on overcast days.
Photo by Jonathon Kos-Read Notice the softer outdoor lighting produces softer shadows across the face of the subject.
Indoors, using natural window lighting can be very effective. If lack of light is a problem, then newer DSLRs can be very good when you increase the ISO (ie. high ISOs don't introduce as much noise into photos on newer DSLRs as they did on older models).
The other option (for both indoor and outdoor portrait photography) when you want to reduce harsh shadows is to use a reflector. You can buy a good reflector for quite cheap. You can also use other natural reflectors that you have on hand such as a piece of cardboard, a light coloured wall etc etc (anything light can really be used as a reflector in a pinch).
Using Your On-Camera Flash for Portraits
The final consideration in lighting is to introduce artificial light to the shot. This is a huge topic in itself so we will just cover the fundamentals of using your on camera flash for this article. If you want to learn more about flash photography there are some good articles on Light Stalking and also the amazing site at Strobist.com
In general, photographers do not like on camera flash. It produces harsh shadows and light and undesirable outcomes. But what do you do if that's all you have?
The key point to remembers is that you will probably want to reduce the harsh shadows that an on-camera flash can produce. This should usually be diffused by bouncing it off a card onto a wall or ceiling (A white business card with a rubber band can be good enough to do this and produce softer lighting).
You can also use a small soft box or diffuser. These often aren't great but can be ok in pinch.
The main thing that any of these options for diffusing on camera flash do is to diffuse the small, harsh light source. Making the light source that hits your subject as large as possible will lead to more diffused light.
Know the Portrait Conventions Then Ignore Them
We tend to get a little hung up on “how things should be done” in photography. At the end of the day, you only have to please yourself so shoot how you feel. Knowing the rules and conventions of how certain things can be achieved can be very useful. However it should never be constricting.
Rob is the founder of Light Stalking. His love for photography started as a child with a Kodak Instamatic and pushed him into building this fantastic place all these years later, and you can get to know him better here. Rob's Gear Camera: Nikon D810 Lenses: Nikkor 14-24 f/2.8, Nikkor 50mm f/1.8
var advanced_ads_cookies = {"cookie_path":"\/","cookie_domain":""};
var advadsCfpInfo = {"cfpExpHours":"3","cfpClickLimit":"3","cfpBan":"7","cfpPath":"","cfpDomain":"www.lightstalking.com"};
var beloadmore = {"url":"https:\/\/www.lightstalking.com\/wp-admin\/admin-ajax.php","query":{"post__not_in":[129178],"category_name":"portrait","posts_per_page":3}};
var tve_dash_front = {"ajaxurl":"https:\/\/www.lightstalking.com\/wp-admin\/admin-ajax.php","force_ajax_send":"1","is_crawler":"","recaptcha":[],"post_id":"129178"};
var TVE_Ult_Data = {"ajaxurl":"https:\/\/www.lightstalking.com\/wp-admin\/admin-ajax.php","ajax_load_action":"tve_ult_ajax_load","conversion_events_action":"tve_ult_conversion_event","shortcode_campaign_ids":[],"matched_display_settings":[],"campaign_ids":[],"post_id":129178,"is_singular":true,"tu_em":"","evergreen_redirects":[]};
(function() { var po = document.createElement('script'); po.type = 'text/javascript'; po.async=true;; po.src = 'https://www.lightstalking.com/wp-content/plugins/easy-social-share-buttons3/lib/modules/conversions-pro/assets/share-conversions-tracker.js'; var s = document.getElementsByTagName('script')[0]; s.parentNode.insertBefore(po, s); })();(function() { var po = document.createElement('script'); po.type = 'text/javascript'; po.async=true;; po.src = 'https://www.lightstalking.com/wp-content/plugins/easy-social-share-buttons3/assets/modules/pinterest-pro.min.js'; var s = document.getElementsByTagName('script')[0]; s.parentNode.insertBefore(po, s); })();(function() { var po = document.createElement('script'); po.type = 'text/javascript'; po.async=true;; po.src = 'https://www.lightstalking.com/wp-content/plugins/easy-social-share-buttons3/assets/modules/subscribe-forms.min.js'; var s = document.getElementsByTagName('script')[0]; s.parentNode.insertBefore(po, s); })();(function() { var po = document.createElement('script'); po.type = 'text/javascript'; po.async=true;; po.src = 'https://www.lightstalking.com/wp-content/plugins/easy-social-share-buttons3/assets/js/essb-core.min.js'; var s = document.getElementsByTagName('script')[0]; s.parentNode.insertBefore(po, s); })();
let ccwpDOMLoaded=!1;
let ccwp_loaded = false;
let resources_length=0;
let resources =undefined;
let is_last_resource = 0;
ccwpUserInteractions=["keydown","mousemove","wheel","touchmove","touchstart","touchend","touchcancel","touchforcechange"];
ccwpUserInteractions.forEach(function(e){
window.addEventListener(e,calculate_load_times);
});
function calculate_load_times() {
// Check performance support
if (performance === undefined) {
console.log("Performance NOT supported");
return;
}
// Get a list of "resource" performance entries
resources = performance.getEntriesByType("resource");
if (resources === undefined || resources.length <= 0) {
console.log("NO Resource performance records");
}
if(resources.length){
resources_length=resources.length;
}
for(let i=0; i < resources.length; i++) {
if(resources[i].responseEnd>0){
is_last_resource = is_last_resource + 1;
}
}
let uag = navigator.userAgent;
let gpat = /Google Page Speed Insights/gm;
let gres = uag.match(gpat);
let cpat = /Chrome-Lighthouse/gm;
let cres = uag.match(cpat);
let wait_till=300;
let new_ua = "Mozilla/5.0 (Linux; Android 11; moto g power (2022)) AppleWebKit/537.36 (KHTML, like Gecko) Chrome/109.0.0.0 Mobile Safari/537.36";
let new_ua2 = "Mozilla/5.0 (Macintosh; Intel Mac OS X 10_15_7) AppleWebKit/537.36 (KHTML, like Gecko) Chrome/109.0.0.0 Safari/537.36";
if(gres || cres || uag==new_ua || uag==new_ua2){
wait_till = 3000;
}
if(is_last_resource==resources.length){
setTimeout(function(){
console.log("ccwpTriggerDelayedScripts timeout : "+wait_till);
ccwpTriggerDelayedScripts();
},wait_till);
}
}
window.addEventListener("load", function(e) {
console.log("load complete");
setTimeout(function(){
calculate_load_times();
},100);
});async function ccwpTriggerDelayedScripts() {
if(ccwp_loaded){ return ;}
ccwpPreloadStyles();
ccwpPreloadDelayedScripts();
ccwpLoadCss();
ccwpScriptLoading();
ccwp_loaded=true;
}
function ccwpPreloadStyles() {
let e = document.createDocumentFragment();
var cssEle = document.querySelectorAll("link[rel=ccwpdelayedstyle]");
for(let i=0; i <= cssEle.length;i++){
if(cssEle[i]){
cssEle[i].href = removeVersionFromLink(cssEle[i].href);
let r = document.createElement("link");
r.href = cssEle[i].href;
r.rel = "preload";
r.as = "style";
e.appendChild(r);
}
}
document.head.appendChild(e);
}
function ccwpPreloadDelayedScripts() {
var e = document.createDocumentFragment();
document.querySelectorAll("script[type=ccwpdelayedscript]").forEach(function(t) {
var n = removeVersionFromLink(t.getAttribute("src"));
if (n) {
t.setAttribute("src", n);
var r = document.createElement("link");
r.href = n, r.rel = "preload", r.as = "script", e.appendChild(r)
}
}), document.head.appendChild(e)
}
function ccwpScriptLoading(){
var jsEle = document.querySelectorAll("script[type=ccwpdelayedscript]");
jsEle.forEach(function(t) {
t.type = "text/javascript";
if(t.src)
{
t.src = removeVersionFromLink(t.src);
}
});
}function ccwpLoadCss(){
var cssEle = document.querySelectorAll("link[rel=ccwpdelayedstyle]");
for(let i=0; i <= cssEle.length;i++){
if(cssEle[i]){
cssEle[i].href = removeVersionFromLink(cssEle[i].href);
cssEle[i].rel = "stylesheet";
cssEle[i].type = "text/css";
}
}var cssEle = document.querySelectorAll("style[type=ccwpdelayedstyle]");
for(let i=0; i <= cssEle.length;i++){
if(cssEle[i]){
cssEle[i].type = "text/css";
}
}
}
function removeVersionFromLink(link)
{
if(ccwpIsValidUrl(link))
{
const url = new URL(ccwpFormatLink(link));
url.searchParams.delete("ver");
url.searchParams.delete("time");
return url.href;
}
else{
return link;
}
}
function ccwpIsValidUrl(urlString)
{
if(urlString){
var expression =/[-a-zA-Z0-9@:%_\+.~#?&//=]{2,256}\.[a-z]{2,4}\b(\/[-a-zA-Z0-9@:%_\+.~#?&//=]*)?/gi;
var regex = new RegExp(expression);
return urlString.match(regex);
}
return false;
}
function ccwpFormatLink(link)
{
let http_check=link.match("http:");
let https_check=link.match("https:");
if(!http_check && !https_check)
{
return location.protocol+link;
}
return link;
}


1 Comment
There’s also flash compensation. It might not be considered ‘professional,’ but it’s OK for emergencies. It certainly has helped me out of some jams.