If there is one piece of equipment often overlooked by many photographers, it is the monitor. Whilst we may spend thousands on cameras, lenses and upgraded computers, we often “make do” with our computer’s screen or buy a cheap one to get a larger size.
For anyone that is serious about their images, and let’s face it, if you are here on Lightstalking, you are, buying a monitor should be given as much consideration as buying a new camera or lens. After all, why invest all those thousands of dollars in top photographic equipment, if in the end you are viewing the images on a poor, low contrast and limited gamut monitor?
What Type of Screen Should You Get?
Perhaps we are blinded by acronyms when buying our screens, after all there are so many, LCD, LED, TN, IPS, the list goes on. So what should we buy to suit our needs. Well let start with screen type. The cheapest monitors are based on twisted nematic (TN). Whilst having a fast response time, they have limited color reproduction, poor black levels and narrow viewing angles. They are fine for word processing but not for serious photographic work.
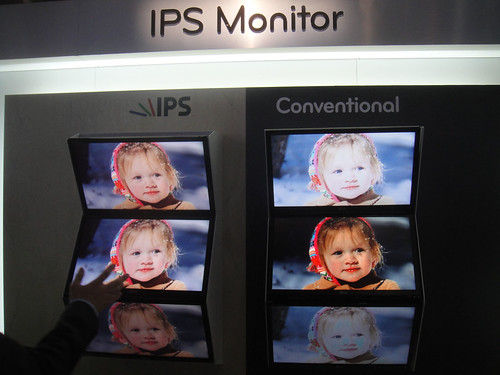
For photography, the minimum level you should be looking for is an IPS screen. These used to be the most expensive of monitors but prices in the last few years have dropped considerably and are now well within the range of an enthusiast photographer. Whilst response times are slower, you get much deeper blacks, better contrast and viewing angles.
One thing to consider, when looking at all monitors is bit depth. IPS screens can be 6 bit or 8 bit, those extra two bits, adding to the price. Consider how you intend to work with your images. If you plan to print large, high quality images then opt for the 8 bit screens, there are even 10 bits available.
The bit depth is linked in to the screen gamut. The gamut is a graph that describes how many colors a device can “see”. For photographers, the wider the gamut range, the better. Many IPS screens run to 80-90% of the sRGB gamut, the most commonly used color space in photographic printing. More expensive models will see 100%+ of the sRGB gamut and getting close to Adobe RGB.
Some monitors come with glossy screens, Apple’s 27” Cinema Display is an example. There are lots of arguments as to whether glossy monitors are suitable for photography, this is something you will need to look at yourself.
What Size Monitor Do You Need?
Another consideration includes your monitor size. This can be broken down into two areas, the screen size, as measured across the diagonal and the screen ratio, which is the width divided by the height. Think carefully about your screen size, bigger is not always best. Look at your working area and see what would be the optimum screen size for your desk. If you are sitting close to the monitor, then there is no point in having a big 27 inch screen.
There has been a trend in recent years to produce screens in the ration 16:9. This is the standard HD television format, great for watching films but not necessarily good for photographers. In my opinion, 16:10 is a better option, it fits the image ratio of most cameras much better meaning you have more screen real estate to work with.
Also look for the resolution of the screen, some manufacturers, will try to reduce the cost of, for example, a 27 inch screen by building it as 1920×1080 rather than the much better 2560×1440. Although both are 16:9, the latter packs in a lot more resolution.
Is Your Monitor Getting All of the Image Information?
Another often underestimated issue with monitors, is how you connect it to your computer. Some people are still using the VGA cable, often supplied with cheaper monitors. This is an analogue cable that does not do your screen justice. Nearly all monitors these days have DVI, and more often than not HDMI and Display Port, all of which are significantly better than VGA. Depending on your manufacturer, at least one of these cables should be provided.
Don't Forget to Calibrate Your Monitor!
Lastly, once you have brought your new monitor home, think about where you place it and also make sure you calibrate it. There is no point in spending all your hard earned cash buying a nice monitor only to place it under harsh lights. Calibration is a must. If you do not want to spend out on a hardware calibrator, at least look at software versions – whilst not as accurate, they will make a considerable difference. Mac users have the Color Profile app built in, which can do a pretty good of getting your screen close, if used in expert mode.
As you can see, there are so many choices out there. Looking at screens in your local store, will give you a good indication of size but next to no idea of the quality. Do your research online, look at reviews, TFT Central is a good resource and use a supplier that accepts returns in case the monitor does not suit your needs.


5 Comments
I’m partial to Asus’s ProArt series. They have a 10 bit table for a claimed full sRGB gamut coverage an excellent feature set and a very good, solid, almost industrial build while being pretty sensibly priced.
The video card has to be up to par as well and I agree with the cable choice. If one sees banding in gradients it could be caused by a poor cable choice. Most hi gamut monitor need an appropriate cable capable of carrying the full bandwidth needed. I tend to favour Display Port, but that’s just me.
Cheers!
Bogdan
Pretty happy with my Dell Ultrasharp U2713
I’m not a photographer but I use EIZO, it’s a damn good machine for me.
How about the new IMac, particularly the 24″? Thanks, John
Do you have any recommendation for a bigger size monitor (32′ to 40′) ?
I am considering some high end TVs, but maybe they are not the best choice…!
Thanks,