Just like with any area of photography, you cannot create a stunning photo in Photoshop – you can only improve upon the content that you have. Since you still need the best possible foundation for editing (your original image), competence with your camera is the most important step in black and white landscapes. This means that the basic principles of landscape photography apply to both black and white and color images – such as composition, rule-of-thirds, using a tripod for long exposures, etc.
However, there are some things to keep in mind specifically for black and white images to get that Ansel Adams quality to your work. Below are a few tips to for working in black and white, and also the most ideal landscape situations that work especially well in this format.
The Importance of Contrast
Since you’re now working in black and white, it’s time to view the world in terms of tones rather than colors. Digital SLR cameras generally don’t capture images in black and white. Even if your camera offers this option, I don’t recommend using it as you can transform your image to black and white more accurately in post processing. With that being said, black and white images will have no color interest whatsoever – their effectiveness will be based on the tones that your colors create. For example, reds will be darker than yellows, so look at your scene in varying scales of lights and darks. The more contrasting tones you have, the greater the interest.

Photo by Christopher O'Donnell
In my image here, you can see that there is a wide tonal range. The lights of the sky contrast with the mediums and darks of the ground, and the slight back-lighting adds texture and interest throughout the entire image as highlights and shadows. I added a touch of sepia to take out the coldness of the black and white.
Overcast and cloudy days create the perfect backdrop to a black and white landscape. Not only do they provide interest in the sky, but they will create an entirely different environment than if you shot on a clear, blue day. Overcast days will give you varying degrees of grey, while cloudy days will provide you with a high-contrast sky that really stands out. Let’s look at how the cloudy sky below impacts the image:
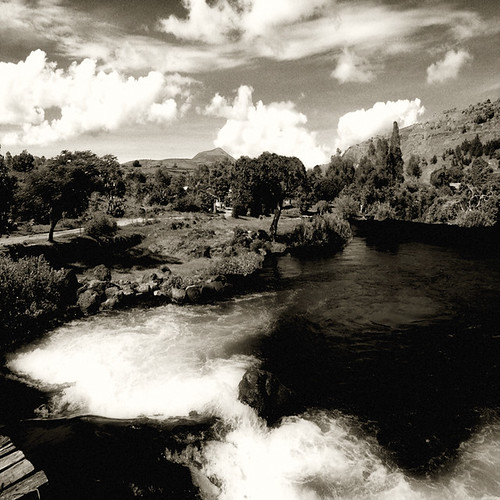
As a color image, I’m sure this would be quite beautiful – however, it’s very successful as a black and white. Why? Look at the tonal range of the water – you have a full spectrum of white to black just in the river alone. The sky is both cloudy and clear, providing the medium grey backdrop of the blue broken up by white clouds. The natural sun provides great highlights and shadows along the landscape, which creates some great texture as well. If this image was taken when the sky was clear and blue, you'd lose all the stunning contrast that the clouds provide.
Snow also gives you the perfect setting for a high-contrast image, as seen in the image below:

Photo by Christopher O'Donnell
The bright white of snow can really increase your tonal range of an otherwise flat, uninteresting scene – perfect for black and white images.
Fog and Other Gradual Transitions
Not only do high-contrast settings provide the perfect environment for a black and white image, but smooth, gradient tones work especially well in this format. When working with landscapes, fog can create a surreal atmosphere that is simply not as effective in color.
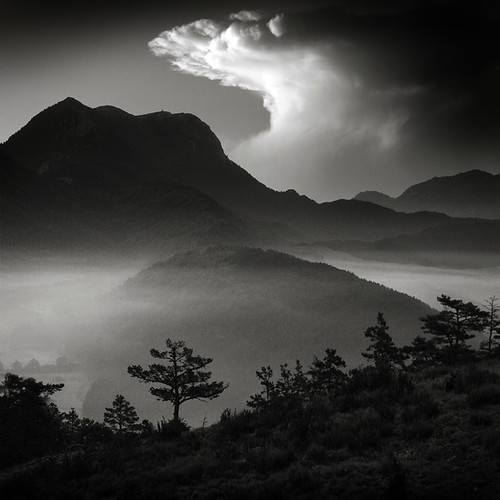
As you can see, the fog here creates a mysterious feeling to this image that is only amplified by the black and white. If this was in color, with greens and blues prominent throughout, you would lose the effectiveness of the fog and how it gradually changes from light to dark – black and white strips any distracting color from an image and allows you to focus solely on the tones. If you’re working in foggy conditions, try to exploit that in post process by editing your image as a black and white.
Long exposure landscapes are often done in black and white – especially those that involve water – as they have gradual transitions of tones much like those found in foggy conditions. The glass-like appearance of otherwise choppy waters can create a moody and surreal environment.
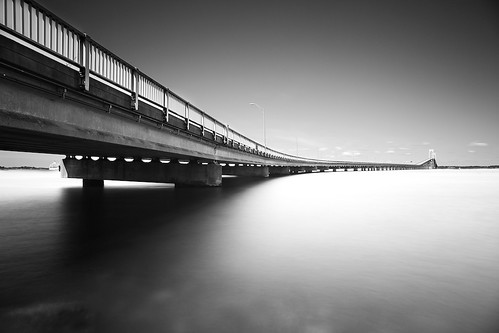
This long exposure created stunning gradual tones in the water, broken up nicely by the strong shadows of the bridge. If you enjoy long exposure images, I’d suggest exploring the coastline for your black and white photography.
Know Your Histogram
When working outdoors, your LCD screen can mislead you depending on your lighting. What looks perfectly exposed outside can be over or underexposed once you import it onto your computer. Properly exposing your photos becomes especially important with black and white images as blown highlights are distracting areas of white. When shooting outdoors, check your histogram now and then to make sure your tonal range stays away from the edges, ensuring that you don't lose any unrecoverable data. If you don’t know how to read your histogram yet, here’s our thorough, yet simple explanation.
Filters Need Not Apply
Since you’re working in digital, filters are most definitely not needed in black and white photography unless they’re used to adjust your exposure (like an ND filter). For example, I’ve heard many photographers speak of using a green filter to increase the contrast of leaves and other foliage to make it a more interesting black and white photo, but you can easily do this in post process – and much more accurately. You’re shooting on a color sensor so you’re still going to end up with a color image – any tonal adjustments to specific colors should be done in the editing phase.
For some really inspiring images, I’d like you to look at one of my favorite black and white landscape photographers: Alain Etchepare. His flawless execution of long exposures combined with a keen eye for compositions (which work especially well in black and white) make him a modern day photographer to aspire to.
Read more great articles by Christopher O’Donnell at his blog or follow him on Facebook.


11 Comments
Landscapes in black&white are so dramatic and expressive (as proved by Ansel Adams), but I still consider that colour photography is the best way of approaching the nature.
Great general article, lots of good tips. My advice would be to take it to the next level. I have discovered that some specialized labs are now making real silver gelatin prints directly from digital files! Yeah! The lab I use is “Digital Silver Imaging.”
An article on printing in B/W would also be helpful.
nice introduction .. I love BW and really should do more 🙂
Great article, Christopher. I like your explanation of how the photographer needs to see in tones instead of seeing in colors. I would argue, though, that graduated nd filters still have a place in the toolbox of the black and white landscape photographer.
It’s here, can see the beautiful behind black and white photography.
One of the best tips I came across when getting into B&W photos was to shoot in RAW, but set your display to monochrome. This way you still have all of the colour data, but you get a sense of the monochromatic photo. It has really helped me to better “see” in B&W.
A technique I do is to set the camera to capture RAW with JPEG. Then set a Picture Style of monochrome. This will result with a full color RAW file AND A B&W image that appears on the back LCD screen. This way you can check in the field what the B&W image looks like and still have a RAW color file.
I actually use the filters on the camera. Simulating them in Photoshop is far from more accurate and can never give the same feel as a real filter. I also edit for old film looks to go along with it.
I LOVE B&W and have been trying to create one B&W photo for every day this year! I use lightroom for my editing.Thanks for the article and a glimpse of your work!
Stunning images … “Shine & shadow” is one of my favorite. Really a piece of Art. Thanks for sharing.