Infrared photography is done on an image sensor that os sensitive to infrared light. There are specialised cameras or a camera that you have can be modified with filters in front of the sensor to capture the infrared spectrum and block the visible light spectrum.
Infrared images have a dreamy mood with false colours. They could be bright colours or captured in black and white, but both produce a dreamy pr surreal look to landscapes. If you are looking to do something different in photography, then you should try checking out infrared photography.
The infrared (IR) spectrum lies beyond the visible red (about 700 nanometers) that humans can see with their eyes. Beyond this range at 700 to 1200 nanometers, we have the infrared light, that cannot be seen and is called the near infrared region. In order to capture this light, the sensor used in the camera needs to be sensitive to the infrared light and this can be achieved in a few ways.
In this article, we will discuss a bit about the history of IR photography and how to shoot and process photos captured using the process of infrared photography. IR photography can also be easily captured by attaching an IR filter in front of the lens if you wish to go for an easier and cheaper way to capture IR photographs.
A Brief History Of Infrared Photography
Infrared photography dates back to the early 20th century and played an important role during world war I. They helped to distinguish between buildings, vegetation and water and were capable of capturing images even when there was thick layers of gas in the environment. This helped recognise enemy targets during that time.
The first IR images were published first in 1910 by Robert Wood and the surreal effect in IR images were called the Wood effect, named after Robert Wood. The images were shot on film using long exposure technique and Kodak later manufacture IR films as well.
Later when digital photography became popular, infrared photography became easily accessible to all photographers and it was also used in various departments for scientific and investigative purposes. IR photography as a creative form works great for landscape and architectural photography because of the surreal colours and the high contrast in black and white IR photography.

How To Use Your Camera For Infrared Photography
IR photography may be possible with the camera that you have in hand. So read below to check the options available for you to capture infrared photos with the camera you have in hand.
Test Your Camera
The first step before you can go and buy a filter or think about converting your camera to capture infrared images is to check that your camera's sensor is sensitive to infrared light.
Most modern digital cameras have sensors that are sensitive to wavelengths well below and above the visible spectrum which is about 300 to 1200 nanometers. Manufacturers place a filter in front of the sensor to block the infrared and ultra violet light, so only the visible spectrum is captured by the sensor.
Sometimes these filters allow the near infrared spectrum that is around 720 nanometers and hence by placing a filter of this wavelength, you may be able to capture infrared images. So here are some options that you can try, if your cameras sensor is capable of capturing IR wavelengths.
Camera Conversion To Infrared
Modern digital cameras can capture the spectrum range of about 300 to 1200 nanometers as discussed above and come fitted with IR cut filters on the sensor. As a result, these filters block out IR wavelengths and allow the camera to capture only the visible spectrum.
If you have decided to shoot infrared photos with your digital camera, you can remove this filter and use your camera to capture IR images, bit remember that doing this will not allow you to capture visible spectrum images. So only go for this option if you have a spare camera body and you want to convert it for IR photography.
In order to convert your camera to capture IR photographs, you will need to send it to specialists who are experts in this field. One of the ost famous if Kolarivision and they have a list of cameras that can converted for IR photography along with the service fees here.

Using An Infrared Filter
The cheapest way to capture infrared photographs is by using an IR filter over the lens. These filters come as screw on filters and in a few wavelengths beyond 700 nanometers. Most cameras that are capable of capturing IR wavelengths are sensitive to the 720 nanometer wavelength and you will need to check if your camera can be used to capture IR photos using a filter.
If your camera allows capturing IR photos, then you will need to buy a filter that will fit the lens you will be using. Infrared photos are captured using long exposure techniques as only long exposure will allow the sensor to capture the IR wavelengths and hence you will need to use a tripod with a remote or cable release for this purpose.
The IR filter blocks the visible spectrum and lets in IR wavelengths to reach the sensor. The most commonly used standard IR filter is the 720nm filter that allows for some surreal colours and contrast in IR images. There are black and white IR filters of about 850nm and other filters below 720nm that can capture some vibrant and deep colours in the photograph. If you are looking for the standard IR filter, the Hoya R72 is one that is most commonly used.

Choose The Right IR Filter
There are many options available when it comes to Infrared filters for IR photography. There are filters that allow different wavelengths to reach the sensor – from about 550nm to 850nm. Each filter allows the sensor to capture colours in various ways or in black and white.
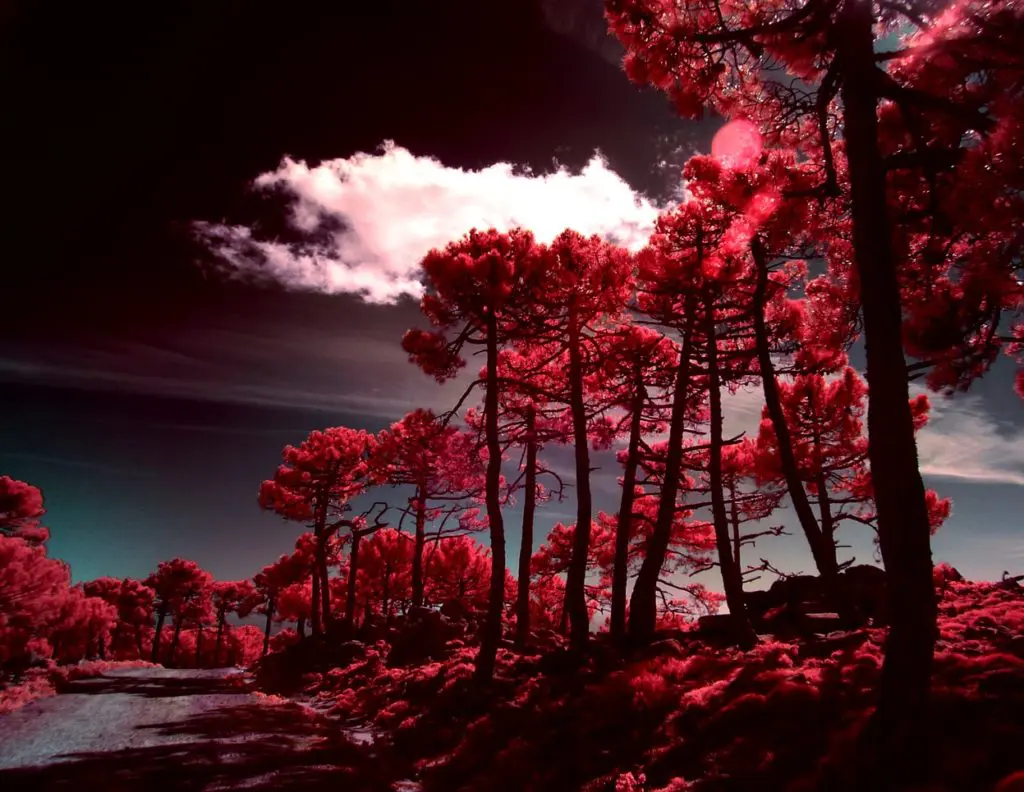
- The 550nm IR filter helps to capture deep blue skies and pink or red colours making the landscape look dreamy and vibrant. This filter can also be used to capture portraits as it keeps the skin tones natural. This filter is available for IR conversion or as a filter on the lens
- The 590nm IR filter can produce deep blue skies and golden yellow foliage.This effect will need to be achieved through post processing. This filter can also be bought as an IR filter or have the camera converted to IR with this filter.
- The 665nm IR filter produces vibrant colours and is also great for black and white IR photography. This filter can be bought as a filter over the lens, or can be done as a conversion in camera.
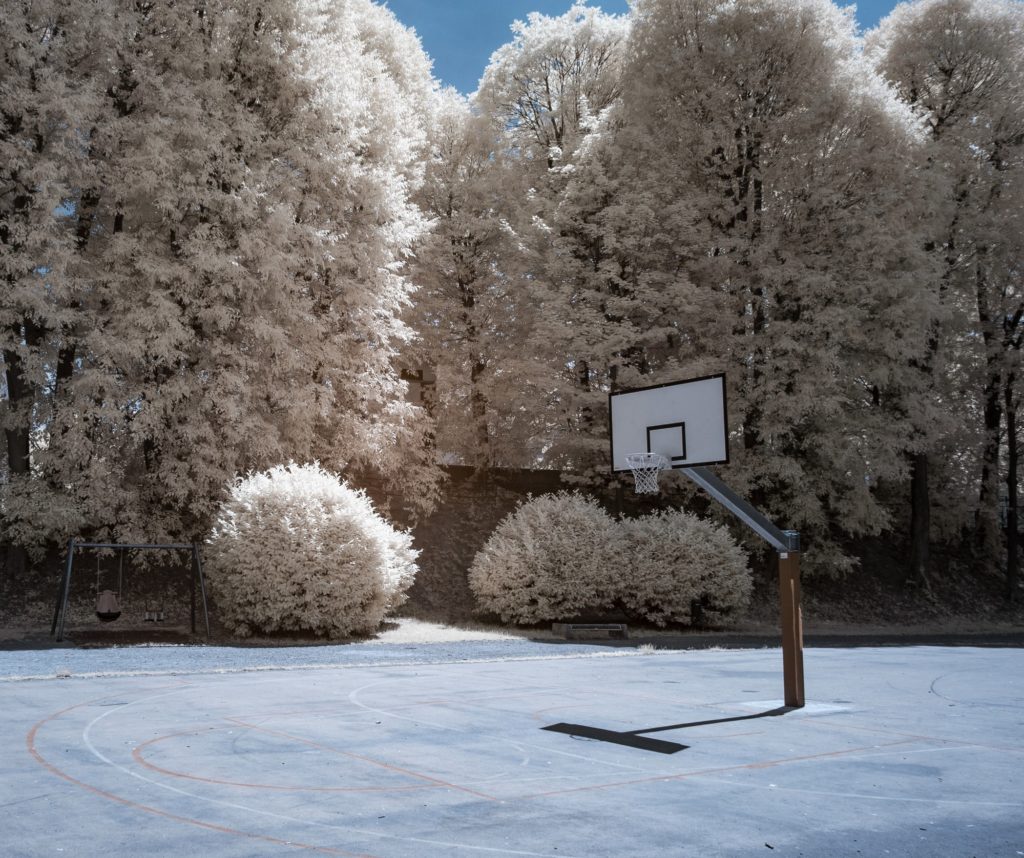
- The 720nm is the standard IR filter that is more commonly used. It allows to capture deep blue skies and great contrast in black and white IR images. The colours are less vibrant compared to the filters above and this filter can be used as a filter over the lens or have the camera converted to have this filter fit in.
- The 850nm IR filter produces black and white images with very high contrast and is mostly used for research, scientific and forensic purposes. Similar to the above filters, this filter can be used as a screw-on filter or can done when converting the camera for IR photography.

How To Capture Infrared Photographs
Infrared photography is not a complicated process and is very similar to traditional photography.
Process Involved For IR Photography
- It is good to have a camera that can shoot in manual mode.
- You will need to shoot raw because infrared images require extensive post processing and hence needs a lot of information to work with.
- Choose subjects that will bring in a surreal effect for your infrared images. Since blue turns really dark blue, it is good to choose landscapes with blue skies, or even seascapes as subjects for IR photography. If shooting architecture, make sure to include clear blue skies in the frame.
- Make sure there are not any light leaks through the viewfinder as it can ruin infrared images.
Some Camera Settings To Start With
Since you are only allowing IR light to reach the sensor, you will need longer exposure times to capture the image if you are using an IR filter over the lens. If you are using a converted camera, then you can use it like a normal camera with shorter exposures for IR photography. When using an IR filter over the lens:
- Set your camera on a tripod and use a cable or a remote shutter release.
- Set the white balance to auto
- Set the ISO to the lowest possible for longer exposures
- Set the aperture value to between f/8 and f/16 depending on the lens' sweet spot
- Turn off long exposure noise reduction.
- Set the shutter speed to about 30 seconds, take a test shot and make changes accordingly. Sometimes you may have to lengthen the exposure to about 1 or 2 minutes.

When capturing infrared images, there are some things to keep in mind for effective results. Here are some tips to follow.
- Capture IR photos on a sunny day because overcast days may lead to less vibrant shots.
- Always cover the viewfinder in order to avoid light leaks that may ruin the resulting images.
- Focus on the scene before attaching the filter over the lens as focusing can be a huge struggle after attaching the filter as it can make the scene look very dark. Make sure to not knock the focus ring when attaching the filter to the lens. This is not an issue with IR converted cameras.
- Take test shots at different times of the day under different lighting conditions. This will help you to get an understanding of how each light situation works for IR photography.
- Choose to shoot animate over inanimate objects as they reflect more IR light comparatively. For example, capture trees as they emit more IR light compared to mountains or rocks.

Post-Processing Infrared Photos
IR photography requires quite a bit of editing in order to get the best results. When you look at the image you have captured, it will look dull with just a pink tone. Here are some steps you can follow to get stunning IR photographs:
- Adjust the white balance for the image.
- You could also import the image to Photoshop or a similar application and use the Auto Tone feature (Image -> Auto Tone). This should remove the overall pink colour cast and bring in some details and colours to the image.
- Now you will need to swap the red and blue channels. To do this,
- Go to Image > Adjustments > Channel Mixer and swap the channels to get a blue, red, or purple sky and white or light pink foliage.
- In the red output channel, change the red slider from +100 to 0, and the blue slider from 0 to +100.
- After that, change the output channel drop-down to blue, and make the blue slider +100 and the red slider 0.
- During this process, you will see the surreal colours appear in your IR images.

Once you have made the above adjustments, make basic edits like contrast, highlights and shadows, and also increase vibrance a bit if necessary. You can also try converting the image to black and white and work with specific colours to get good results.
All digital IR images will need a little bit of editing to get an effective result. More information on editing IR images well can be found here. You can also capture IR photos using your smartphone. Check out this article!
Infrared photography is a process where you will need to practice and experiment with different settings and edits, till you find what suits your interests. The exposure time, white balance, type of filter used, post processing techniques, will all decide how the final image looks.


1 Comment
Hi Jasenka,
I just got a UV camera and am trying to show skin damage on my face and body.
Do you recommend a certain light?