var tve_frontend_options = {"is_editor_page":"","page_events":[],"is_single":"1","ajaxurl":"https:\/\/www.lightstalking.com\/wp-admin\/admin-ajax.php","social_fb_app_id":"234010690138279","dash_url":"https:\/\/www.lightstalking.com\/wp-content\/plugins\/thrive-visual-editor\/thrive-dashboard","translations":{"Copy":"Copy"},"post_id":"2565","user_profile_nonce":"04876fb9ff","ip":"64.227.14.160","current_user":[],"post_title":"How to Add Mist to Your Landscapes with Photoshop","post_type":"post","post_url":"https:\/\/www.lightstalking.com\/mist-with-photoshop\/","is_lp":"","post_request_data":[],"conditional_display":{"is_tooltip_dismissed":false}};
var advanced_ads_pro_visitor_conditions = {"referrer_cookie_name":"advanced_ads_pro_visitor_referrer","referrer_exdays":"365","page_impr_cookie_name":"advanced_ads_page_impressions","page_impr_exdays":"3650"};
var essb_settings = {"ajax_url":"https:\/\/www.lightstalking.com\/wp-admin\/admin-ajax.php","essb3_nonce":"f6325c5592","essb3_plugin_url":"https:\/\/www.lightstalking.com\/wp-content\/plugins\/easy-social-share-buttons3","essb3_stats":true,"essb3_ga":false,"essb3_ga_ntg":false,"blog_url":"https:\/\/www.lightstalking.com\/","post_id":"2565","internal_stats":true};
Adding a bit of mist to your landscapes is not only simple, but fully customizable in Photoshop. This is a great way to alter the entire mood of your image and make an otherwise boring landscape into something more powerful.
Before we get into the techniques, you should always consider the subject of your landscape before you add your mist – it won’t look right on every photograph. Choose an image taken either on an overcast day or during the golden hours – times where mist is most plausible. A photo of the local park at noon time with the sun directly overhead will not exactly come across as a convincing misty situation.
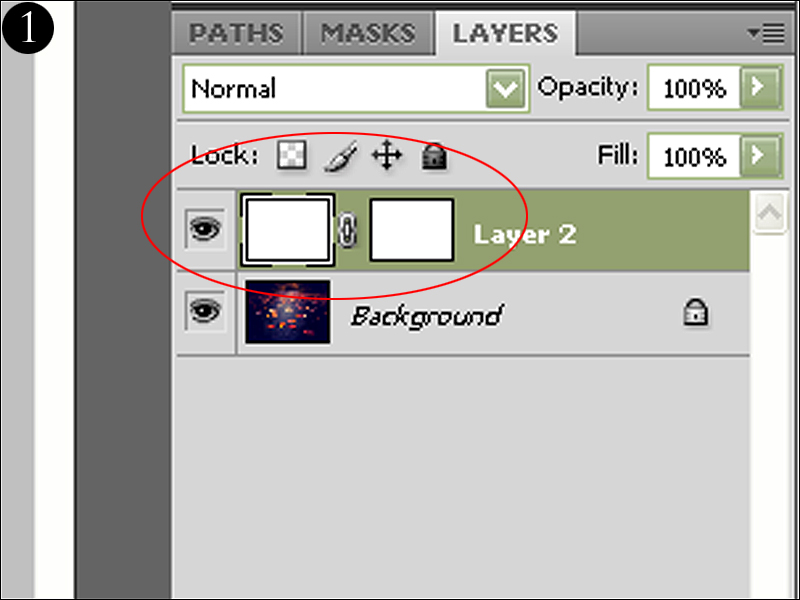
1. Open your image in Photoshop and create a new layer (the folded paper icon in your layers palette).
2. Using your paint bucket tool, fill your new layer with white and add a layer mask (Figure 1).
3. Select your Gradient tool and make sure your settings look similar to the menu below.
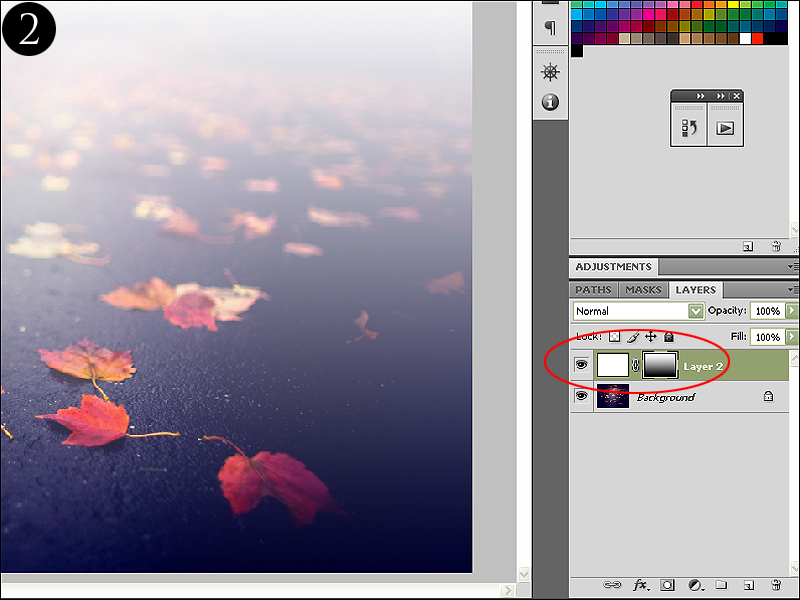
4. With your layer mask selected, click the point closest to your camera (for this photo, it would be the bottom) and drag your mouse to the opposite end of your photo. This will create a gradual mask, giving you a smooth transition in tones – your layer mask should look something similar to Figure 2.
You can also do this with your brush tool set at 0% hardness and a low opacity level, but I find using the gradient tool to be much quicker and accurate – you can always go back with your brush and work the layer mask later for more detailed editing.
Note: Always remember that mist and fog will be more transparent the closer you get to the camera, so keep that in mind when adding your layer mask and blending in the white fill layer.
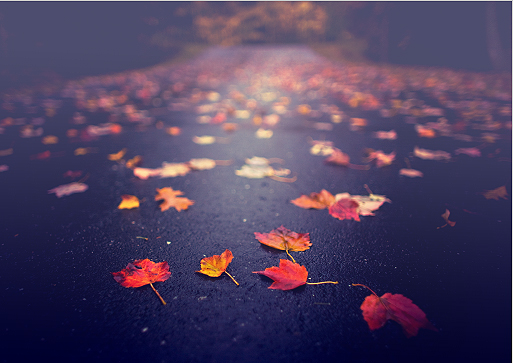
5. We’re getting there, but not quite yet. Adjust the layer opacity level until you get a pleasing transparency. For my image, I set it to 30% to get the result shown below.
6. Now I'm going to add a bit more mist to specific spots in my photo. This works great when you want to make your mist more authentic by adding density to confined areas – such as in an alley between two buildings, or along the road, like in my image.
Duplicate your mist layer (with the mask) and reselect your gradient tool. We’re going to reverse the effect of the gradient so that the areas we click + drag on our image will be saturated with mist. Make sure your gradient tool has the settings below selected.
7. Select your layer mask and click and drag your gradient around the area you want to increase with mist – don’t worry, the copied layer mask will be replaced with your new gradient selection. For my image here, I selected the area around the road for a more authentic look, and also increased the layer opacity to 60%. You can repeat these steps as many times as you want throughout your image depending on its complexity.
One final tip: The paint bucket in step 2 was used for this photo because I wanted a gradual mist across the entire image. If you have a more complicated landscape (such as a river flowing through your photo) and you want the mist to go along a certain path, do the following:
Instead of creating an entire fill layer, take a large soft white brush on a fresh layer and paint around the area you want your mist to appear. You can then continue with the rest of Step 2 and the tutorial, or use a combination of your layer opacity and a layer mask to make your mist appear more gradual.
Be sure to browse through our misty landscape collection for some inspiration and to also see how real mist moves throughout an image – they're great guides for your Photoshopping.
Read more great articles by Christopher O’Donnell at his blog or follow him on Facebook.
About Author
I'm a professional landscape photographer living on the coast of Maine. Through my work, I like to show a vantage point that is rarely seen in reality; a show of beauty, emotion, and serenity. Feel free to visit my website.
Hi, This was as normal a very interresting article, but there is one thing I think is wrong with the picture ( and where I live it is a lot of mist);
It seems like the picture is lightened up with a spotlight or the sun, (in the middle of the picture). I think the light int the front of the picture is to bright comparing to the “misty weather” and the leaves in the front of the picture is also to bright in their colours if this was a real misty/sun-picture.
I thought the point was that the picture should look natural after you have fixed them? 🙂
Hi, It is as always interesting to read your articles. This one puzzles me a bit. Where I live we have a lot of sun or mist. I think that if this as been a real misty-sun weather picture, the lightbeam (in the middle of your picture) and the colour of the leaves in the front of your picture are to bright. Is it not the point that the picture should look natural after it has been fixed in PS? 🙂
thanks so much for this… I love shooting when it’s foggy but unfortunately we don’t have many foggy days. so now I can cheat a bit… 🙂
Hi Antoinette –
Actually this is a cloud mist – the photo has overcast lighting so it wouldn’t make sense to make a sun mist. Perhaps it is a bit too bright though…the nice part about this tutorial is that everything is on layers and you can adjust and readjust the opacity at any time.
Hi Christopher-
Please, don’t misunderstand me. It is a nice picture and I am facinated over how much you can do to a picture in photoshop and other programms. I have also seen the pictures in your album and they are beautiful. All your articles are very interesting and I learn a lot, even if I never practice it. Nothing in the world is perfect, so I will not make a perfect picture through faking it, but that is my choice and I respect everybody who fix their pictures i Photoshop. I am glad I “read” the light in the picture correctly. Continue to play and have fun in Photoshop.
Cheers!
The technique is great, because foggy photos are not very easy to handle, so cheating a bit seems to be the right solution for a perfect effect. However, I always considered that better less original photos than a lot of Photoshop manufactured images.
cool effect thanks
Thanks for a truly useful little tutorial. Much appreciated. I have a tree pic I’ve wanted to add mist to for quite some time!
Fascinating the effects one can use. I do not have Photoshop and so have not tried this. I also have the opportunity to photograph actual mist scenes. I did enjoy learning about this effect.
I find your tutorials really interesting and I am glad I visited your site. Can you please tell me whether we can get some of these effects on Picasa? I do not know how to use Photoshop so I have to rely on Picasa.
Maybe I can jump in here, Picasa 3.8 does not offer any way that I can detect as a gradient tool, under any of their tabs, and if you use their Picnik online tools, by lowering Contrast it only fogs the entire photo, thereby reducing the effect described above. Picasa is not an appropriate editing app for this technique.
Hi there! Great Tut!
I followed the link to “21 Smart Uses of Fog to Create Atmospheric Photos” and here comes my doubt. The steps here are easy to carry out but… what happen when we have trees?
A- Would you just erase the mist over the tree… B- Would you select trees using channels, for instance, and then aply the mis on the inverted selection?
In both cases I use to aply some gausian blur. Do you agree?
On the other hand, I prefer, rather than using pure white, use #797771 or #D0D0CD combinig dark and light.
Finally; any other idea referring how to place mist right behind trees?
var advanced_ads_cookies = {"cookie_path":"\/","cookie_domain":""};
var advadsCfpInfo = {"cfpExpHours":"3","cfpClickLimit":"3","cfpBan":"7","cfpPath":"","cfpDomain":"www.lightstalking.com"};
var beloadmore = {"url":"https:\/\/www.lightstalking.com\/wp-admin\/admin-ajax.php","query":{"post__not_in":[2565],"category_name":"photoshop","posts_per_page":3}};
var tve_dash_front = {"ajaxurl":"https:\/\/www.lightstalking.com\/wp-admin\/admin-ajax.php","force_ajax_send":"1","is_crawler":"","recaptcha":[],"post_id":"2565"};
var TVE_Ult_Data = {"ajaxurl":"https:\/\/www.lightstalking.com\/wp-admin\/admin-ajax.php","ajax_load_action":"tve_ult_ajax_load","conversion_events_action":"tve_ult_conversion_event","shortcode_campaign_ids":[],"matched_display_settings":[],"campaign_ids":[],"post_id":2565,"is_singular":true,"tu_em":"","evergreen_redirects":[]};
(function() { var po = document.createElement('script'); po.type = 'text/javascript'; po.async=true;; po.src = 'https://www.lightstalking.com/wp-content/plugins/easy-social-share-buttons3/lib/modules/conversions-pro/assets/share-conversions-tracker.js'; var s = document.getElementsByTagName('script')[0]; s.parentNode.insertBefore(po, s); })();(function() { var po = document.createElement('script'); po.type = 'text/javascript'; po.async=true;; po.src = 'https://www.lightstalking.com/wp-content/plugins/easy-social-share-buttons3/assets/modules/pinterest-pro.min.js'; var s = document.getElementsByTagName('script')[0]; s.parentNode.insertBefore(po, s); })();(function() { var po = document.createElement('script'); po.type = 'text/javascript'; po.async=true;; po.src = 'https://www.lightstalking.com/wp-content/plugins/easy-social-share-buttons3/assets/modules/subscribe-forms.min.js'; var s = document.getElementsByTagName('script')[0]; s.parentNode.insertBefore(po, s); })();(function() { var po = document.createElement('script'); po.type = 'text/javascript'; po.async=true;; po.src = 'https://www.lightstalking.com/wp-content/plugins/easy-social-share-buttons3/assets/js/essb-core.min.js'; var s = document.getElementsByTagName('script')[0]; s.parentNode.insertBefore(po, s); })();
let ccwpDOMLoaded=!1;
let ccwp_loaded = false;
let resources_length=0;
let resources =undefined;
let is_last_resource = 0;
ccwpUserInteractions=["keydown","mousemove","wheel","touchmove","touchstart","touchend","touchcancel","touchforcechange"];
ccwpUserInteractions.forEach(function(e){
window.addEventListener(e,calculate_load_times);
});
function calculate_load_times() {
// Check performance support
if (performance === undefined) {
console.log("Performance NOT supported");
return;
}
// Get a list of "resource" performance entries
resources = performance.getEntriesByType("resource");
if (resources === undefined || resources.length <= 0) {
console.log("NO Resource performance records");
}
if(resources.length){
resources_length=resources.length;
}
for(let i=0; i < resources.length; i++) {
if(resources[i].responseEnd>0){
is_last_resource = is_last_resource + 1;
}
}
let uag = navigator.userAgent;
let gpat = /Google Page Speed Insights/gm;
let gres = uag.match(gpat);
let cpat = /Chrome-Lighthouse/gm;
let cres = uag.match(cpat);
let wait_till=300;
let new_ua = "Mozilla/5.0 (Linux; Android 11; moto g power (2022)) AppleWebKit/537.36 (KHTML, like Gecko) Chrome/109.0.0.0 Mobile Safari/537.36";
let new_ua2 = "Mozilla/5.0 (Macintosh; Intel Mac OS X 10_15_7) AppleWebKit/537.36 (KHTML, like Gecko) Chrome/109.0.0.0 Safari/537.36";
if(gres || cres || uag==new_ua || uag==new_ua2){
wait_till = 3000;
}
if(is_last_resource==resources.length){
setTimeout(function(){
console.log("ccwpTriggerDelayedScripts timeout : "+wait_till);
ccwpTriggerDelayedScripts();
},wait_till);
}
}
window.addEventListener("load", function(e) {
console.log("load complete");
setTimeout(function(){
calculate_load_times();
},100);
});async function ccwpTriggerDelayedScripts() {
if(ccwp_loaded){ return ;}
ccwpPreloadStyles();
ccwpPreloadDelayedScripts();
ccwpLoadCss();
ccwpScriptLoading();
ccwp_loaded=true;
}
function ccwpPreloadStyles() {
let e = document.createDocumentFragment();
var cssEle = document.querySelectorAll("link[rel=ccwpdelayedstyle]");
for(let i=0; i <= cssEle.length;i++){
if(cssEle[i]){
cssEle[i].href = removeVersionFromLink(cssEle[i].href);
let r = document.createElement("link");
r.href = cssEle[i].href;
r.rel = "preload";
r.as = "style";
e.appendChild(r);
}
}
document.head.appendChild(e);
}
function ccwpPreloadDelayedScripts() {
var e = document.createDocumentFragment();
document.querySelectorAll("script[type=ccwpdelayedscript]").forEach(function(t) {
var n = removeVersionFromLink(t.getAttribute("src"));
if (n) {
t.setAttribute("src", n);
var r = document.createElement("link");
r.href = n, r.rel = "preload", r.as = "script", e.appendChild(r)
}
}), document.head.appendChild(e)
}
function ccwpScriptLoading(){
var jsEle = document.querySelectorAll("script[type=ccwpdelayedscript]");
jsEle.forEach(function(t) {
t.type = "text/javascript";
if(t.src)
{
t.src = removeVersionFromLink(t.src);
}
});
}function ccwpLoadCss(){
var cssEle = document.querySelectorAll("link[rel=ccwpdelayedstyle]");
for(let i=0; i <= cssEle.length;i++){
if(cssEle[i]){
cssEle[i].href = removeVersionFromLink(cssEle[i].href);
cssEle[i].rel = "stylesheet";
cssEle[i].type = "text/css";
}
}var cssEle = document.querySelectorAll("style[type=ccwpdelayedstyle]");
for(let i=0; i <= cssEle.length;i++){
if(cssEle[i]){
cssEle[i].type = "text/css";
}
}
}
function removeVersionFromLink(link)
{
if(ccwpIsValidUrl(link))
{
const url = new URL(ccwpFormatLink(link));
url.searchParams.delete("ver");
url.searchParams.delete("time");
return url.href;
}
else{
return link;
}
}
function ccwpIsValidUrl(urlString)
{
if(urlString){
var expression =/[-a-zA-Z0-9@:%_\+.~#?&//=]{2,256}\.[a-z]{2,4}\b(\/[-a-zA-Z0-9@:%_\+.~#?&//=]*)?/gi;
var regex = new RegExp(expression);
return urlString.match(regex);
}
return false;
}
function ccwpFormatLink(link)
{
let http_check=link.match("http:");
let https_check=link.match("https:");
if(!http_check && !https_check)
{
return location.protocol+link;
}
return link;
}


12 Comments
Hi,
This was as normal a very interresting article, but there is one thing I think is wrong with the picture ( and where I live it is a lot of mist);
It seems like the picture is lightened up with a spotlight or the sun, (in the middle of the picture). I think the light int the front of the picture is to bright comparing to the “misty weather” and the leaves in the front of the picture is also to bright in their colours if this was a real misty/sun-picture.
I thought the point was that the picture should look natural after you have fixed them? 🙂
Hi,
It is as always interesting to read your articles. This one puzzles me a bit.
Where I live we have a lot of sun or mist.
I think that if this as been a real misty-sun weather picture, the lightbeam (in the middle of your picture) and the colour of the leaves in the front of your picture are to bright.
Is it not the point that the picture should look natural after it has been fixed in PS? 🙂
thanks so much for this… I love shooting when it’s foggy but unfortunately we don’t have many foggy days. so now I can cheat a bit… 🙂
Hi Antoinette –
Actually this is a cloud mist – the photo has overcast lighting so it wouldn’t make sense to make a sun mist. Perhaps it is a bit too bright though…the nice part about this tutorial is that everything is on layers and you can adjust and readjust the opacity at any time.
Hi Christopher-
Please, don’t misunderstand me. It is a nice picture and I am facinated over how much you can do to a picture in photoshop and other programms. I have also seen the pictures in your album and they are beautiful. All your articles are very interesting and I learn a lot, even if I never practice it. Nothing in the world is perfect, so I will not make a perfect picture through faking it, but that is my choice and I respect everybody who fix their pictures i Photoshop.
I am glad I “read” the light in the picture correctly.
Continue to play and have fun in Photoshop.
Cheers!
The technique is great, because foggy photos are not very easy to handle, so cheating a bit seems to be the right solution for a perfect effect. However, I always considered that better less original photos than a lot of Photoshop manufactured images.
cool effect thanks
Thanks for a truly useful little tutorial. Much appreciated. I have a tree pic I’ve wanted to add mist to for quite some time!
Fascinating the effects one can use. I do not have Photoshop and so have not tried this. I also have the opportunity to photograph actual mist scenes. I did enjoy learning about this effect.
I find your tutorials really interesting and I am glad I visited your site. Can you please tell me whether we can get some of these effects on Picasa? I do not know how to use Photoshop so I have to rely on Picasa.
Maybe I can jump in here, Picasa 3.8 does not offer any way that I can detect as a gradient tool, under any of their tabs, and if you use their Picnik online tools, by lowering Contrast it only fogs the entire photo, thereby reducing the effect described above. Picasa is not an appropriate editing app for this technique.
Hi there!
Great Tut!
I followed the link to “21 Smart Uses of Fog to Create Atmospheric Photos” and here comes my doubt. The steps here are easy to carry out but… what happen when we have trees?
A- Would you just erase the mist over the tree…
B- Would you select trees using channels, for instance, and then aply the mis on the inverted selection?
In both cases I use to aply some gausian blur. Do you agree?
On the other hand, I prefer, rather than using pure white, use #797771 or #D0D0CD combinig dark and light.
Finally; any other idea referring how to place mist right behind trees?