Photography can be a pretty expensive hobby. There are legends about folks who have maxed their credit and minimized their bank accounts because of all the expense of building their gear inventory, all in the hope that the next purchase will transform their portraiture to awesome sauce. Every few months or so, there seems to be a new gadget or lens that makes taking portraits almost automatic. The ads all scream, Buy Buy Buy!
Ignore the ads. You don’t have to break the bank if you’re going to invest in things that help you make beautiful portraits. Here are some basic things that you can invest in if you’re serious about portraiture, but don’t want to spend too much money.
1. Buy a reflector.
A reflector is a good investment. Sunlight is free, so making portraits with natural light is extremely affordable. A reflector is a cheap way of lighting your portraits. A good reflector to start with is one that has some flexibility. There are reflectors that come with two sides, one silver side and one gold side. Other reflectors are “five-in-one,” like the Photoflex MultiDisc 5’n1 that I use. This reflector, which comes in a medium size, has a gold side, a silver side, a white side, a mixed gold and silver, and if you take out the zippered cover, it becomes a diffuser. This is a great reflector for its value, and if you take good care of it, it will help you make great portraits for a long, long time.
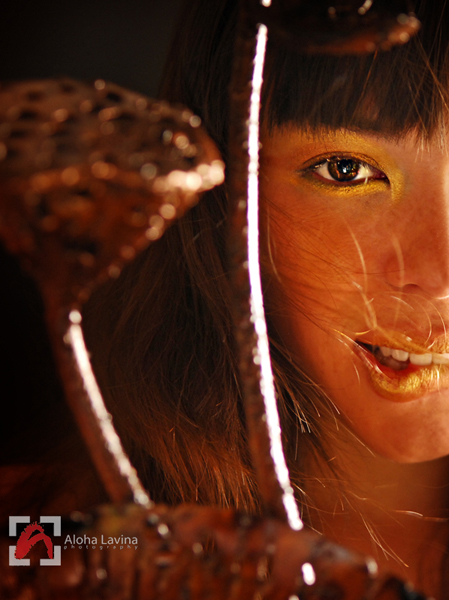
A portrait lit with a window and a gold reflector. Copyright Aloha Lavina.
2. Use a window.
A cost effective way of controlling the light that is hitting your subject is a window. Placing the subject perpendicular to the window will create side lighting, where one side of the subject’s face is lit, and one side has shadow. The great thing about using a window is that you can make beautiful portraits right in your own home. No transportation expense, no studio rental, and no extra equipment necessary. Just your camera and sunlight streaming through a window.
3. Need a fill light? Buy white cardboard.
With your window, at certain times of day, you might notice that your subject’s shadowed side has too dark of a shadow, and you need a fill light. This is the light that us used to bring out details in the shadow side of the portrait.
A cheap, easy way to create a fill light for your window portrait is a large piece of white cardboard. Placing the cardboard parallel to the window, on the other side of the subject will create a fill light from the light that is hitting the cardboard and is bounced back to the subject’s shadowed side.

Portrait lit with a window and using cardboard for fill. Copyright Aloha Lavina.
4. Need a bigger fill light? Invest in a white shower curtain.
If you are making a full body length portrait, you might need a bigger fill light. A white shower curtain or white bed sheet is an affordable full-length ‘fill light.' Hanging the bedsheet in the same position relative to your subject as the white cardboard gives you a ‘bigger’ light to fill those shadows for your portrait.
5. Get one off-camera flash unit.
If you are really serious about making portraits, you can buy a flash unit. Check that your on-camera flash can trigger your flash unit. This way, you don’t need to buy a trigger/receiver system, which is extra expense. Setting your camera to Manual, and the flash to Commander Mode, while setting your flash unit to Remote and the Group and Channel to the same Group and Channel as your camera sets up your off camera flash. When your on-camera flash emits light, that flash of light will trigger the flash unit, and you have a ready made strobe. You can make pretty good portraits with just one light, even a small light like an off-camera flash unit.
6. Make a snoot out of an empty cereal box.
Now that you have a flash unit, you can control lighting even more using a snoot. A snoot is a light shaper that focuses light in a tight area. It is usually an elongated tube, one end of which is attached to the flash unit, and the other end open, pointed at the subject.
You can make a snoot. One way is to get an old cereal box, cut it open so it’s one piece of cardboard, and then wrap it around the light-emitting end of your flash unit. Cut according to the size of the flash unit’s dimensions, then take some black electric tape and tape over both sides of the cardboard. After covering the cardboard in black tape, wrap your new creation around the flash unit again, and then tape together so it becomes a tube that fits around the flash.
Now you have a snoot to focus light on the face of the subject. Any time you want to avoid spreading the light too much, you can use your homemade snoot to focus it. And it only cost you a few cents. Another advantage of my cereal box snoot is that I can fold it and store it easily in a pocket of the camera bag.

Lit with cereal box snoot and one flash unit. Copyright Aloha Lavina.
7. Make a softbox out of a normal cardboard box and a piece of white paper.
Another portrait basic you can make now that you have off-camera lighting is a softbox. Softboxes are light shapers that are–no surprise here–shaped like boxes. The sides encasing the flash unit are usually designed to prevent light from ‘spilling’ out so it only comes through a the white front of the softbox. The purpose of the softbox is to soften the light, diffusing it as it passes through the white front of the box, and making the light and shadow soft on the subject.
You can get yourself a softbox by making it out of white paper and a normal cardboard box. Cut a hole in the bottom of the box where you can insert the head of your flash unit. Make sure you don’t cover the sensor of the flash unit, as you need the flash to respond to your on-camera flash on Commander Mode. Then, take the white paper and tape it over the open, front end of the box. You’ve got yourself a softbox!
If you’re serious about portraits but also serious about saving money, you might want to try these tips. All you need is a couple of basic purchases, and some sessions of arts and craft.

15 Comments
Sound so familiar to me. ;P
hahaha Yes.
Very impressive photography as usual, Aloha. I was even shocked that those photographs were taken with inexpensive equipment!
Hi Chase,
Often I have to really do a good job making inexpensive stuff, like the cereal box snoot, so the cheap stuff doesn’t shock clients. But the stuff works, so why not?
You can even make a reflector. Crush up some tin foil, flatten it and fix it to a piece of cardboard. Nice write up!
Hi Brian, I’m gonna have to try that. I am a sucker for cheap DIY equipment. 🙂 Thanks!
This is great info Aloha. Thanks much from someone with NO money!! 🙂
That’s no longer a valid hindrance to good photos. All the best.
Great advice, and wonderful shots! Thanks!
Thank you. Glad you liked it, let us know if you try any of this.
Thanks for great advices. To inform more photos from behind the shoots would be great…
Hi kolstrup, head on over to my blog for some behind the scenes information in the next few days…
Thanks!
Aloha
i love diy stuff thanks
It’s refreshing to read a post like this because it’s getting so crazy with the marketing on what you need to make an image and this just shows that it can be done on the cheap. Taking the essence of the feelings and creativity of photography back to where it should be. On passion to learn and DO! LOVE it!
That’s why DIYPhotography.net is a great blog to follow – lots of ideas on the cheap. https://www.diyphotography.net/