If you’ve taken a few high ISO images and you’ve got some noticeable noise in the background, here’s an easy way to reduce it without blurring your image too drastically using Photoshop.
The best way to avoid noise in the first place is to shoot with a low ISO. The less adjustments you have to make in post process, the better quality photo you’ll have (not to mention a lot less editing time). However, if you do long exposures or have a large amount of black in your image, noise can be hard to avoid. Low-light situations that call for a high shutter speed (especially those with moving objects where a tripod won’t help) will also limit your ISO options. So while it’s always the best idea to have your ISO around 100-400, this isn’t always possible.
Before I get into the step-by-step, I’d like to say that while the Reduce Noise filter has seen some improvements, you’re still essentially blurring your image to reduce the amount of noise in your photo – which compromises image sharpness. So while there are several variances for reducing noise (using the Gaussian blur, for example), I haven’t encountered any process that allows for full image clarity/sharpness AND noise removal without adding a layer of sharpening when you're finished – if you have, please feel free to share your methods in the comment section below.
1.Open your image up in PS and duplicate your top photo layer: Layer > Duplicate Layer. Click OK. This way you can easily revert back to your original if necessary. Also set your viewing scale to 100% so that you can accurately gauge the changes (Figure 1).
Note: Please click on all images to see at full resolution.

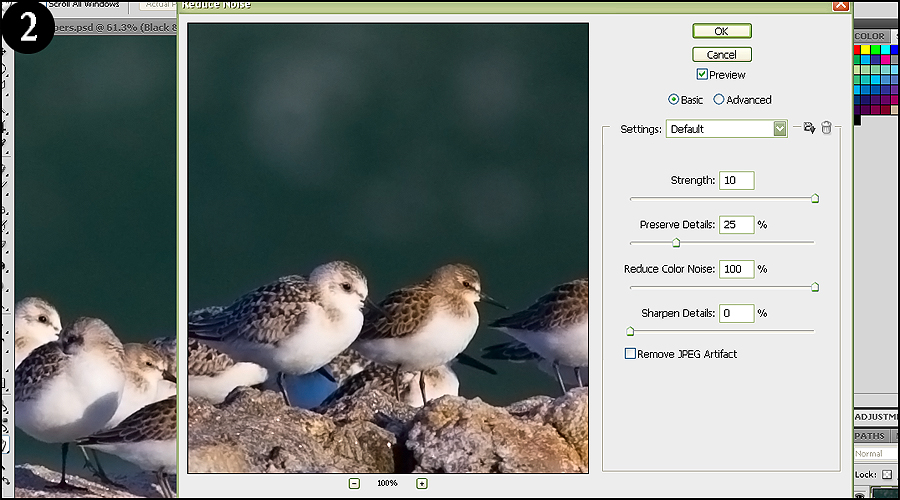
2.With your top layer selected, click Filter > Noise > Reduce Noise. Make sure you’re viewing at 100% here as well.
3.Here you’ll see all sort of options. I always do a default strength of 10 because I can adjust it down later if I want (I’ll explain that part). Preserve Details is a funny thing since the more you increase it, less noise is removed – it’s almost like an opacity adjustment for your noise removal. Push it up to 100% and you'll see barely any difference. So adjust this if you’d like, but I keep mine at the default level of 25% to avoid too much blurring where the edges start to fuzz.
4.JPG Artifact removal is also tricky – sometimes it helps and sometimes it doesn’t. Make sure your Preview box is ticked and switch back and forth to see if there’s an improvement. For this image, it seemed to take away too much detail in the sandpipers so I left it unchecked (Figure 2).
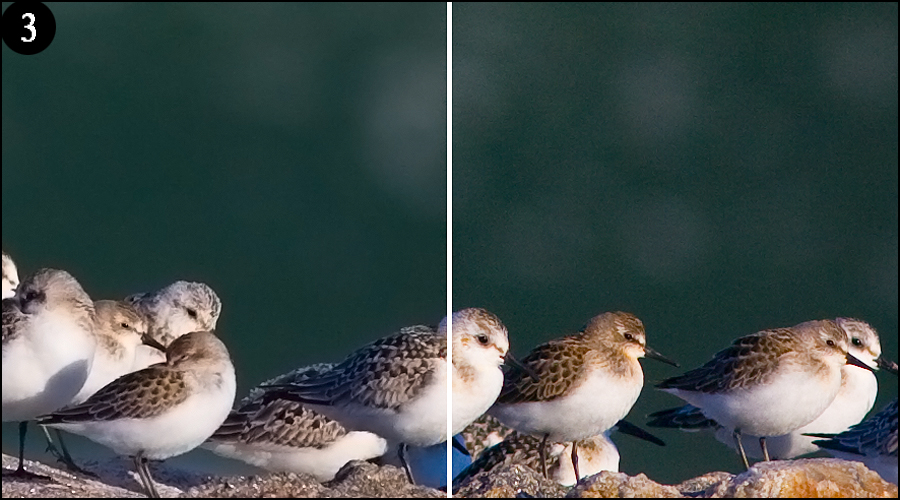
5.As you can see in the side-by-side comparison (Figure 3), the noise is greatly reduced in the background. The varied detail of the sandpipers/rock in the foreground hid the noise well so you don’t really see a difference. However, there is some noticeable blurring on the sandpipers when you compare it to the original – it also muted the saturation a bit. We’re going to fix this up by adding a layer mask.
6.Go back to your layers palette and add a mask to the top layer. Using your brush set at 100% opacity and a strength suitable for your subject (for example, a hard strength for sharp edges, like the sandpipers’ heads compared to the background), mask out the noise removal layer so that only the background is affected.
7.Here’s the finished result (Figure 4) – the new version is on the left (with the mask) and the original is on the right.

This way, you can easily remove noise from your image, but only from the areas that are affected. While this method will need to be tweaked for your individual photo (for example, some crafty layer masking for smooth foreground subjects, like a tight portrait crop), it’s a nice way to selectively remove noise without too much blur. Generally, the worst color noise will be on a smooth background – like in this image – so blurring that with noise removal won’t be a problem since you won't lose much detail.
As I mentioned above, I always set the noise removal to 10 because I can adjust the opacity of my noise layer to reduce the effect if necessary – and bring it back up later if I want to. Also, some parts of my image may need a strength of 10 while others only need say 5 or 6 – with my layer mask, I can set my brush to a lower opacity and mask out some noise removal while keeping it at a full 10 on other sections. Since you’re working on an entire new layer and also using a mask, you can create a mosaic of noise removal strengths if need be.
Many people feel frustrated with filters, effects, and so on because they don’t see the results they want. What works for one part of your photo can look horrible on others – for example, increasing the saturation to bring out the background but your foreground subject looks horribly over processed. When you mask out your layer, you can easily apply the effect only on the areas you want and at varying strengths – that’s why adjustment layers automatically come with a layer mask. A filter isn’t meant to make your entire image look the way you want it to (especially color images), so use a mask to blend in the effects.
If you’re really stuck on noise and this method doesn’t work for you, another tip would be to process your image as a b/w instead of color – this way the noise won’t be distracting with varying colors of grain and it can actually compliment an image depending on the subject matter. Many film photographers used fast b/w film because they wanted grain and texture in their image, so you can use noise to your advantage rather than it being a drawback.
Everyone has a unique way to process their images, so please feel free to share your noise removal methods in the comment section below.
Read more great articles by Christopher O’Donnell at his blog or follow him on Facebook.


6 Comments
Hi Chris,
Why don’t you just open the image in ACR (Adobe Camera Raw) and do your noise reduction there? CS5 and LR3 both have an excellent noise reduction feature making all the fiddling unnecessary.
Hi Marianne – Well I like to customize the noise removal since I can apply a layer mask to it and remove it from parts that I don’t wish to affect, or at least lessen it – I am very picky with my editing. I haven’t tried the CS5 raw removal yet so I’ll have to see if there’s any difference between RAW noise removal and doing it in PS.
Alright Steve you’ve convinced me to upgrade to CS5 – can’t wait to try it out. Thanks for the comment.
Seriously, if you haven’t tried the noise reduction in the latest version of ACR, you are working way too hard for probably less than optimal results. If you want to fine tune, open once using no noise reduction, then with noise reduction, and shift+cmd+drag one onto the other and mask the noise-reduced version.
But… I think you will find few applications where you can match ACR with the noise filter and any amount of craftiness.
How does one “mask out” a layer?
good question Jason.
First make sure you got to layers in the layers palette. (layers palette pops up if you choose “layers! in the window menu.) Choose first layer and the Click on the symbol “square with circle inside” at the bottom of the layers palette
Then a white square pops up beside the first layer and when you click on this and then on the brush tool (having the colors to black and white) Then you can make a “hole” in the first layer so you can see the layer underneath.
You can change the opacity of the brush to make the top layer more or less see-through .