One of the most powerful tools for photographers that has come about with digital photography is the histogram – that little graph you see on the LCD screen of your camera after you shoot an image. Yet many people don't know anything about the histogram. This is a huge oversight, as a histogram can be massively helpful in enabling you to take better images in almost any shooting situation.
What is a Histogram?
A histogram is simply a visual representation in graph form of the tonal information that your camera records when shooting an image.
How Do I Read a Histogram?
Histograms are actually quite easy to read once you know what you are looking at. The left side of the histogram represents the shadows and the right side represents the highlights.
- Memory Tip: If you cannot remember that, just think “black and white” – black is first, therefore on the left and white is second, therefore on the right. Thanks to David duChemin for that memory tip.
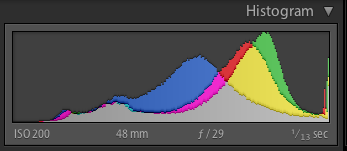
The different colours in the images in this article represent the different tonal values. Therefore a high peak of one colour means you have a lot of that tonal value.
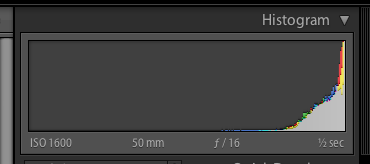
If a peak is jammed up hard against one side of the graph or the other then it means that the camera has rendered the shadows as pure black (left side) or highlights as pure white (right side) – this is sometimes known as clipping. This is to be avoided if possible as it means you are losing detail in those areas.
NOTE: The histogram on the back of your camera will be monochrome unlike the images below which are from post-processing software. Don't let that confuse you, as it's the shape we are trying to draw your attention to.
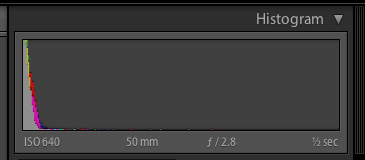
Note: Often, only a part of the histogram will be up against the edge while the rest is more centered. Any part of the graph up against the edge indicates that some of the detail has been lost.
When Are Histograms Important?
If you are planning on doing post-production on your images in a program like Photoshop or GIMP, then you want to capture as much information as possible. The histogram can tell you whether you have done this or not – oftentimes much better than the LCD image itself.
In general, it is better to “shoot to the right.” That means that you are ideally wanting to get a histogram that is predominantly on the right of the graph (without being pushed up against the edge). The image may even look overexposed on your camera LCD screen. The reason for this is that the highlights, which are represented on the right part of the histogram, capture a lot more information than shadows. If your histogram is to the right, then the image file is storing a much larger amount of information about that image than if the histogram is to the left. The right hand side of the histogram holds 90% of the raw data – the left side of the histogram only 10% – it is not an even spread.
That means, if you “shoot to the right,” you have more information to work with when you get to Photoshop. In turn that means you can do more work on the image before you start to get the negative effects of noise and other undesirable outcomes.
When are Histograms Less Important?
If you don't plan on doing any post-production, then you are most often looking for a classic “bell curve” shape for you histogram. This generally indicates a good exposure with an even spread of highlights and shadows that will probably stand ok on its own.
What Does This Mean for Shooting?
If you are “shooting to the right” then that means getting more light into the camera (assuming your histogram is too far left). The easy way to do this is to overexpose the image by a stop or two.

You might have a few problems when doing this when shooting very bright subjects. Use your judgment there, but remember that it can be easy to blow out too many pixels in such a situation, in which case you need to reign it in a little. If the histogram is crammed up against the right side, you're probably going too far.
If you are printing your photographs, the histogram is something you will definitely be wanting to become familiar with (see our article on the best photo printer for more on that topic).
All in all, using a histogram doesn't need to be rocket science. Once you are comfortable with it, you will probably use a histogram far more than the image on your LCD screen to judge the exposure of your images.


31 Comments
Thanks for the article. The tip from David about black on the left and white on the right is good.
Rob
Jeezopeezo.com
Hi, just wanted to thank you for this post… it’s the most simple explanation of the histogram that I’ve seen and it helped me a lot.
Now I really get what “exposing to the right” means, I’ll try to use that technique on my photos.
Thanks from Argentina.
Thank you for this easy to read and understand explanation of the histogram. I live with my histogram. To me it is the only way to go. In bright sunlight, I had a bit of a hard time reading my histogram on the LCD on the back of my camera. No problem now though. I wear a Hoodman around my neck.
Note that in JPEG, the “A Histogram to the Right Allows More Flexibility in Post Processing” example would have an area of pure, unrecoverable white. This can be a conscious decision when metering.
“Expose to the right” is really useful when shooting RAW. What the histogram shows as blown out can have some recovery applied. Try moving the exposure slider to the left.
“Expose for the shadows, develop for the highlights.” if you shoot in Film
“”Expose for the highlight, develop for the shadow.” if you shoot in RAW
Probably the simplest and the best guide to follow!!! ????????????
M. Cheung,
In black and white film “expose for your shadows and develop for your highlights” is correct, but black and white film is opposite for color film and digital.
In digital, meter on the mid tones and CHECK our highlights.
Histograms on cameras aren’t necessarily black and white. Most modern dSLR cameras can show RGB histograms as well. You usually have to change the setting via your camera’s options menu. My camera (Canon 400D) is 4 years old and it has an option for switching between luminosity-only and RGB histograms. I recommend the RGB version so you can tell when individual color channels are clipping.
Thanks for the this article. Crispy and to the point. One of the best explanation that I saw on histogram. Well done… and cheers!
Great tips. This really helps. I will be using it very often shoots.
Thanks! I found this article very helpful and very well written!
One of the best explanations on how to read the histogram I have seen in a long while thank-you.
Memory tip #2: white rhymes with right.
This really adds a lot of clarity to something I haven’t completely grasped… until today. Once again, thank you Light Stalking for a VERY well written and informative article! 🙂
Thanks for this. Very nice, helpful read.
An excellent article. Brief, to the point and very well explained. I’ll probably pay far more attention to histograms in the future for judging correct exposure
I definitely learned more info that I needed from this post.
thnks for the tips.. now i know what histrogram mean…
thanks for the article, i finally know the use of the histogram. love the ‘black and white’ tip. 🙂
Hi:
Everyone talks about the left and the right. What about the top? Some images have a peak in the middle area and that peak goes right to the top & appears cut off. Is this a version of clipping as well or does it matter at all?
How would you use the histogram if your shooting in low key where it needs to be predominantly dark/Black?
Although not an avid user of histograms as my first exposure check, I found your article useful for the times I do. I am one that chooses first to analyse the exposure in the LCD, but only when I have the proper aid to do so – a Hoodman. When the Hoodman is not available in an outdoor, bright light situation, I then find the histogram of use. My main concern is to keep the detail in the highlights. Hoodnan / histogram? Both are effective, but you need to use one or the other or disaster will eventually come your way.
As a novice I have at last understand histograms. Thank you very much for your easy to understand explanations. The only thing is I will have to look up what a hoodman is, but I assume it is something you put over your head or camera in order to view the histogram.
Thank you, found the artical very informative, spent the day shooting on the Oregon Coast, have alot of oops, and a couple of keepers, practice makes perfect.
How do u shoot to the right using a camera, what are the recommendable settings ( Nikon d90)
Thank a lot Rob for this information
As a new comer to photography, I would like to know as one should use the histogram before you set up the photo or once one’ve established the shot. (!Nikon D 7000)
Hi Michael, if you are shooting with a mirrorless camera then it may be possible to set up using the histogram before the shot. My camera allows me to review the shot before pressing the shutter. I shoot mainly in manual and therefore can adjust the aperture and shutter speeds to suit what I want from the photo.
Memory Tip #3
highLIGHT – white – right
Dandy explanation to teach Histogram how to read & use for the better shots. Thank you!
It might be useful to point out the different behaviour of mirror and mirrorless cameras in relation to histograms. One of the biggest plusses of most mirrorless is that you can choose to see a small histogram in the viewfinder and do this kind of adjustment before the shot is taken.