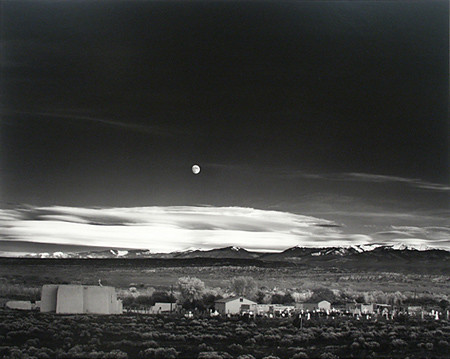
Ansel Adams and his work remain central to photography discussions; he’s been a source of inspiration and emulation for generations of photography enthusiasts and professionals, even now in the digital age. There are a number of elements that we closely associate with Adams’ style, including the way he used depth of field. His approach was to have everything from here to the moon in focus, regularly using extreme f-stops like f/64 and f/90. Just have a look at Adams’ famed “Moonrise” photo for evidence of this.
Of course, it is common practice for landscape photographers to use deep depth of field in their work; it’s a genre in which it is important to have both the foreground and the background in clear focus, though we hardly hear of anyone using an f-stop as high as f/64.
Not everyone is a landscape photographer, obviously. Not everyone needs or wants to shoot in a style that puts everything in focus. This is where something called selective focus photography comes into the picture.
What is Selective Focus?
Selective focus is a rather self-explanatory term: You focus on the specific part of a subject you want to highlight or emphasize, and you “ignore” the rest, letting it fall into the blur of the background (or the foreground — you can be as creative as you like with selective focus). Selective focus is often used for subject studies, to draw attention to a subject or part of a subject and evoke a meditative or contemplative mood when viewing the subject in context of its blurred but recognizable surroundings.

Selective Focus and Depth of Field
In order to successfully pull off this photographic feat of selective focus, there is one vital technical consideration to account for.
Selective focus requires shallow depth of field. Depth of field is, in short, the distance in front of a subject and behind (or beyond in any direction) a subject that is in clear focus. There are three main factors that impact depth of field.
- F-stop – As we talked about above in regard to Ansel Adams’ work, high f-stops (small apertures) create greater depth of field. In cases where focal length and shooting distance are constants, depth of field is far shallower at f/2.0 compared to f/11.
- Focal Length – A lens of a shorter focal length will create greater depth of field than longer focal lengths. For instance, a 28mm lens will generate more depth of field than an 85mm lens when shot at the same distance from the subject.
- Distance – The closer you are to your subject, the less depth of field will be generated.
Using Selective Focus for Better Images
In selective focus photography, the in focus parts and out of focus parts are equally important, but nothing about the technique is particularly difficult. Here are some tips that will guide you on your path to successfully implementing selective focus into your photography repertoire.
- Use a Large Aperture – Given that selective focus is about zoning in on a specific part of a scene and throwing the rest out of focus, you’ll want to use a large aperture — at least f/2.8. Be sure to check your focus, as accurate focussing becomes a bit more difficult when working with shallow depth of field.
- Identify Useful Out of Focus Areas – The out of focus areas of your photo should be recognizable, not just blurry blobs in the frame. If you’re shooting an insect, for example, it might be a good idea to include some surrounding leaves as the defocused elements of the shot. Just make sure that they are still recognizable as leaves and don’t appear random green spots.
- Assess the Angle – This will get easier over time, but you will find that getting just the right angle will be incredibly effective in adding punch to your selective focus images. The goal is to take an angle that causes the surrounding defocused elements to be farther away from the main subject. This further enhances the selective focus effect.
- Choose a Longer Focal Length – Use your longest lens or a zoom lens extended to the far end of its range. Longer focal lengths create a compression effect that throws the background out of focus.
- Keep Composition in Mind – Put the in focus subject in such a place that allows the viewer’s eye to wander off and still be able to enjoy the rest of the image.
When to Use Selective Focus
The selective focus technique can be used in nearly any genre of photography.
- Macro Photography – Due to the technical quirks associated with macro photography, attaining a lot of depth of field in small subjects can be pretty difficult. Thus, selective focussing is a means of making your work a little easier as well as serving as an aesthetically powerful way to draw the viewer’s attention to a very specific part of the subject.
- Portraiture – Using a long lens and a wide aperture you can put all the emphasis on your subject’s face (or eyes), yet still provide some mood and atmosphere with the defocused elements.
- Subjects with Repeating Patterns – Stadium seats, picket fences, wildflowers, rows of trees. Using a wide aperture and a moderate angle to the subjects, focus on the second or third or eighth object in the row and the rest will be rendered beautifully out of focus.
Two notable exceptions might be landscape and product/commercial photography where the success of the shot hinges on being able to clearly see all the elements in it.
Again, the selective focus technique is easily achieved and easily adapted to your own creative vision. Not only will you create images that strongly emphasize your subject, they will also be free of distractions and further augmented by gorgeous bokeh.


5 Comments
I agree with Jill Wilm: simple, informative, a good read.
Has the writer heard of Lensbaby? It’s a lens company devoted to selective focus lenses. See Lensbaby.com .
I think photographers should learn to use conventional lenses’ depth of field and selective focus techniques first, as described in Jason Little’s story. That will make you a better photographer, especially on the job.
But, I shoot Lensbaby images for ‘my self’, not for work or clients. I have taught several photography Lensbaby classes and a workshop as well.
I have a Lensbaby tab at my website’s Gallery, http://www.megmckinneyphotos.com .
Totally artsy fun!
I have heard of Lensbaby. Never tried one for myself, though. You’ve got some really cool images with it. I might have to kick that up a little higher on my to-buy list!
Great Article Jason as always, straight to the point in an easy to understand fashion.
Always good to read and recap, and most often I learn something new,I like the way you finished the article with suggested uses.
Thanks
Jerome
Thanks, Jerome!
As a newbie photographer I find your articles great and easy to understand. Thanks for the information you have given in simple straightforward talk.