In a previous article we covered what every beginner needs to know about product photography, a primer to this article. Photographing jewelry is perhaps one of the more advanced and frankly frustrating disciplines one can try to master. The practical uses can be applied to many aspects, both for fun and extra income. This article should help you grasp a better understanding of how to create inspiring photography.
Why photography jewelry? There's a list of reasons, some more obvious like setting up an Etsy or eBay shop to sell items or being hired by a local jewelry store to provide photos for their website. A less obvious reason would be to create a list of detailed photos for your home owners' insurance, something most people overlook. Another reason is for the sheer pleasure in taking on a challenge and successfully doing it.
What's needed? Like the primer, most of all the the equipment is the same. The one variable is the use of flags, in photography terminology is a piece of fabric or non-reflective board, using black, that is placed in a manner to block any unappealing reflections on the jewelry. If you look at the piece below, you can slightly make out what appears to be someone's hair in the lower left corner of the heart. Using a black flag would have eliminated that and made a much more appealing transition between the reflective silver and the black.
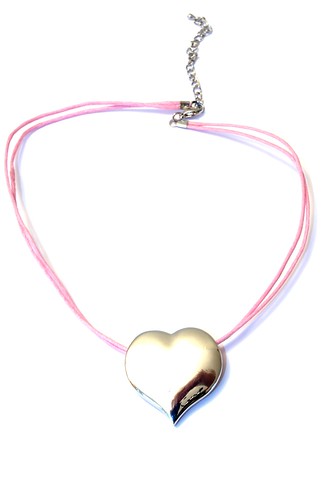
Jewellery 2 by Richard Stebbing, on Flickr
Actually putting these flags into place can be a bit of a challenge for even the most seasoned photographers. In a case where it's just one that's needed, setting your camera on a tripod and using a timer will suffice. Even if you're holding a 4×4′ piece of black foam core over the subject to block the reflection of your ceiling, it will only be for 10 seconds. The real challenge comes when you have something with facets or that's very angular and you have reflections from every different angle. A lightbox will help greatly eliminate odd reflections, like the one shown below:

My new lightbox by GuySie, on Flickr
But again, be aware that only white will be reflected and sometimes gold and silver items and especially clear stones like diamonds really benefit from black reflections.
Setting up the shot. Like the primer to product shots, a heavy tripod is your friend, a macro lens on a DSLR or mirrorless camera will also be your best bet, although some of the high end point and shoots that have hot-shoes (for triggering remote flashes or strobes) also work really well. A cable release or wireless remote also becomes really handy too. And preparation. I cannot stress enough the importance of preparation. Have several clean microfiber clothes with you to clean and buff the jewelry, careful to remove any oil from your fingers and small particles of dust. Some product photographers have been known to wear latex surgical style gloves during shoots.
Angles. Realize that laying an item directly down on a flat surface probably won't bring the best visual impact you can provide, so propping the jewelry up will be required. There are several ways to do this, from professional Lucite holders seen in high end jewelry stores to DIY methods, which most people end up doing. Some amount of experimenting will be required. Don't be afraid to grab some paper clips and bend them around to fit your needs, trim them with tin snips or even small amounts of children's play-doh.
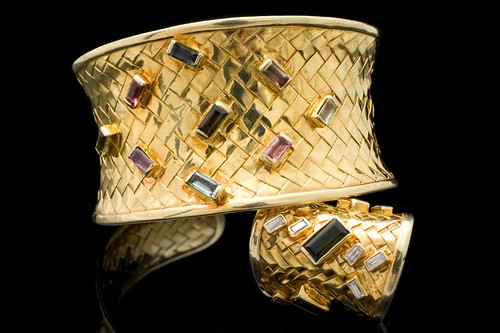
Radiant Jewelry by negative13, on Flickr
Shooting on white or black isn't the only acceptable way to shoot jewelry though!
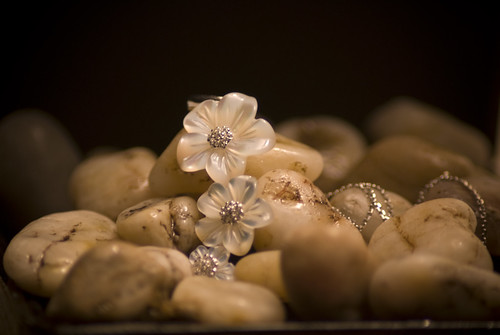
Jewellery by miandadr, on Flickr
Utilizing tumbled stone, like in the photograph above, is a beautiful way to showcase the jewelry, and there is no limit to what can be used. Sand, rocks, feathers and even a Christmas tree garland can be used to show off the jewelry.
Keep in mind that every new object you add may have reflections to manage along with the jewelry. The end results, like those above, showcase beautiful pieces where the photography skill is no longer as apparent as the jewelry, and that's when you know you've done a great job.


4 Comments
timely tips, need to do this for a customer
Thanks for the simple and straight ahead advice.
Excellent article on how to jewellery photography. Each and every point clearly depicts the set up and angles of the camera. This would definitely help beginners as well as professional. Thanks for the excellent share!!!
Being a jewelry photographer, I can relate to all of these. One of the ways to use a white or black card to avoid angular reflections is with a gooseneck clamp like the one below – you clamp one end to the table and clamp a white or black card on the other end. You can angle it any way you like so it removes the reflection on the right part of the piece.
https://www.amazon.com/dp/B00RYU3PHY