Adding texture to photographs is one of those things in photography that people seem to have strong opinions on. Some people love it, some people hate it and some people just think it's a bit of fun. Whichever camp you fall into, it's a post-production skill you should know about so you can approach the topic with all of the facts. Here we're going to have a bit of fun with applying a wild and metallic texture to a photograph of an elephant!
A displacement mask allows you to realistically combine flat graphics with a textured surface. While simply placing a texture on top of the photo and changing the layer blending mode can often give good results, using a displacement mask allows you to control the distortion of one layer with the depth of the other layer, often for a better effect.

Before we start the tutorial, here are the two images I'm going to use. You can download these from Flickr or use your own to follow along. The important thing is that you have a photo with a subject of some sort and a texture. Also, be sure that the texture is large enough to cover the area of the photo that you would like to apply it to.
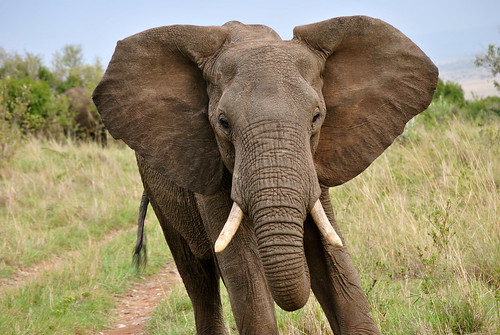
elephant ears. by brittanyhock, on Flickr

Create Your Displacement Mask
With your photo selected, in this case the elephant, switch from the Layers panel to the Channels panel.

Click on each channel, while observing the image, and decide which channel provides the most contrast without being overly bright or dark.
Typically red is not the best choice since it is a bit too bright. This is especially true if you are applying a displacement mask to skin, since skin tends to have a lot of red and will likely appear blown out.
Usually the green or blue channels are going to be the most striking for this purpose. Here are the three channel results for the photo of the elephant. In this case I'm going with the blue channel.

Select the channel you have chosen for your photo, right click on it and choose “Duplicate Channel”. Make sure that you choose “New” under destination so that the duplicate will open in a new window. Then choose a memorable name for the image so you will be able to find it easily. I'm keeping it simple and naming it “Displacement Map”. Click OK.

Now click over to the new image of the elephant that you just created. We are going to remove some of the detail since a lot of fine texture can be problematic later.
First, go to Noise>Median and then move the Radius slider until you have lost most of the small detail but can still make out the important shapes and contours. I chose a Radius of 4 for this image.

Next, go to Filter>Blur>Gaussian. Again, you will need to experiment a bit and choose the best Radius. For this image I chose 2, but some images will require a higher number. The important thing is that you can still make out the important larger shapes in the photo.

Now the Displacement Mask has smooth transitions between the light and dark areas.
The final step before saving is to convert the image to grayscale via Image>Mode>Grayscale. This will limit the image to only one channel.
Save the image as a .PSD since this is the only file type that can be used for creating displacement masks in Photoshop. You can actually just close the image now since we will be opening it later.
Select the Area on the Original Photo Where You Wish to Apply the Texture
To do this, you can use any selection to you would like such as the magnetic lasso or the pen tool. For the photo of the elephant, I chose to first outline the elephant. Then, since I don't want to apply the texture to the eyes or tusks, I used the lasso tool while holding down the Alt key for windows or the Option Key for Mac. You will know that the tool is in subtraction mode because there will be a small minus symbol visible under the tiny lasso image.
Now, save the selection since we will need to use it later via Select>Save Selection. Once you have clicked OK, deselect the selection via Select>Deselect.

Copy Your Texture to the Original
The easiest way to do this is to first make sure that you have the Texture image selected. Then, right-click on the Background Layer and choose “Duplicate Layer”. You can name it if you want but the important thing is that the destination image is your original. Choose it from the drop-down menu.

Once you click OK, the texture will appear as a layer over your original image.

Load the Saved Selection
To do this, switch from the Layers panel to the Channels panel. The selection will be visible at the bottom of the channels. To load it to your image, hold down CTRL for Windows or Command for Mac and click on the selection thumbnail. You will now see the shape of your selection as the dotted lines.

Add a Layer Mask and Blend

Click the layer mask button. You can then choose a blending style. Overlay will work well for most images, but sometimes experimenting a bit with different styles and opacity can bring a better result. I chose Overlay for this image. Here is the result so far, but we aren't quite done yet.

Add the Displacement Mask
First, you will need to select the texture layer. At this point the Mask will be selected so you will need to click on the texture icon. Also, make sure to click the little link between the texture and the mask. This will cause it to disappear and unlink the texture and mask. If this step is skipped the mask will be changed by the displacement map as well, which we don't want.

The displacement mask is the blurry, grayscale .PSD file we made at the beginning of the tutorial.
To apply it to the image go to Filter>Distort>Displace. The horizontal/vertical scales change the amount of impact that the displacement mask will have over the image. The default is 10 but I chose to bump it up to 15. Experiment a bit to see what works for your image.
Choose “Stretch to Fit” and “Repeat Edge Pixels

Here is the final result after applying the displacement mask and turning the texture layer opacity down to around 70%. Where you set the layer opacity to will depend on what your personal tastes are and what effect you are going for.
Rachael Towne is a professional photographer and editor of the Photoluminary photography blog.


