Any work that we process is completed following a particular methodology in order to achieve perfection. You actually follow a workflow from start to finish, completing various steps in between. In this article, we will look at the “Photoshop Workflow” for efficient post processing.

So, What Is A Workflow?
It is a sequence of processes through which a piece of work passes from initiation to completion. This applies to almost anything we do and the same applies to photography and post processing.
Not everyone sticks to a particular workflow when it comes to photography and there is no standard workflow. Each photographer develops their own depending on how they work and what works best for them.
When it comes to digital photography, the workflow is the process from creation of the image to the end product and it has many steps involved, such as:
- Communication with clients for professional photographers
- Location scouting
- Planning the shoot
- Camera settings and gear set up
- Capturing the image
- File transfer / backup and import to post processing software
- Culling and rating images
- Organising, tagging, key-wording, copyrighting
- Pre-visualisation
- Post processing
- Exporting
- Printing, publishing or delivering

Our main focus here is the post processing stage which also has its own workflow. Whatever is your workflow, consistency is an important factor that needs to be considered with regards to post processing.
Once you have created an effective workflow that works best for you, stick with it! This will ensure that you handle your images the same way each time.
A workflow that is convenient for another person or myself, might not work for you or another photographer. So create your own! But, you can pick up ideas from others.
One also needs to consider the fact that there are various types of software used by different photographers to post process images. The one that we will be focusing on today is Adobe Photoshop.
When it comes to post processing, you do not randomly drag sliders to achieve the effects that you need, but follow a neat workflow.
Also, when post processing, you do not randomly select images – you go through the process of backing up, culling, rating, tagging, keywording, copyrighting, then post processing and exporting. So all these come under the post processing workflow!

Here Is The General Photography Workflow
A general photography workflow that most photographers follow is similar to the one below. Depending on projects, tasks or client requests, the workflow may slightly vary for each photographer and genre.
You need to focus on the following:
- Camera settings
- Gear setup
- Capturing the images
- File transfer or backing up the images
Camera settings, gear setup and capturing the images
When shooting images, at least try to choose the right exposure settings, metering modes and temperature. You can otherwise get them right in post, if you shoot raw. Adobe has a powerful Camera Raw option that can be used to efficiently post process the images. So the best bet would be to shoot raw, to be on the safe side. Raw images have so much information in them that you can pull out many details.

File transfer / backing up
Once the photographing part is done you need to transfer your images and back them up. Transferring files to the computer can be done efficiently / easily with the use of a card reader. Some people may connect the camera directly to the computer, but this is a slow process and it can drain your camera’s battery.
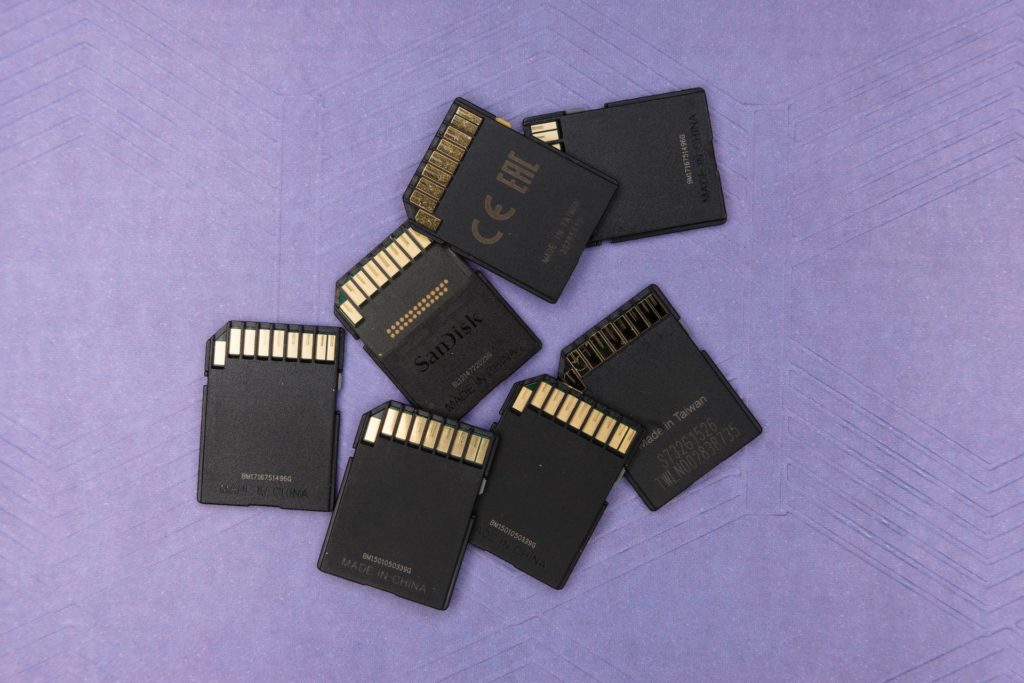
Quick tip: Always safely remove/eject the card to avoid errors or your card getting corrupted.
The next process after copying is backing up the images you have carefully composed and captured. Everyone has their own way of doing this. Some people have a back up on DVDs, some on external Hard Disks and some on cloud storage. Whatever be your method, just do it before you format your memory card.
Once all the above processes are complete, you can focus on the post processing part and here is where the actual workflow starts!
Photoshop Post Processing Workflow
For a photoshop post processing workflow, it is about how we go from a raw file to a final edited image. You need to have a clear structure in mind about how you want to go about the whole process, and this will allow you to be more creative. You need to think about what you need to do first, for example contrast adjustments or colour correction.
A complete workflow comprises of a few stages that involve a bunch of tasks to be performed at each stage.
Importing, culling and rating images
This is a very important step and crucial for an efficient workflow, especially if you shoot a bunch of images (few hundreds to thousands). Import your images into your post processing software to get them ready to be processed.
For Photoshop, import the images in Adobe Bridge. Delete the images that you think are not usable; for example out of focus, under or overexposed, badly composed, etc.
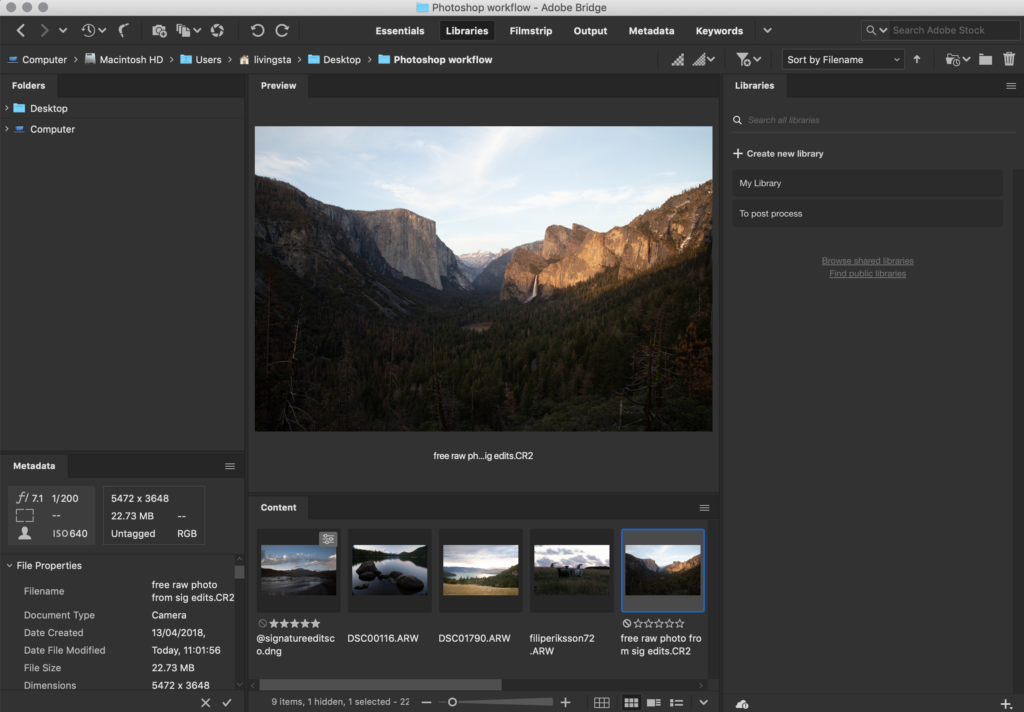
Now that you have a set of images that are useful you can rate them. You can either use star rating or use different colours to flag the images depending on purpose.
To rate the images: While you are in Adobe Bridge, in the folder which is ready for culling -> Hit Spacebar -> and tap any number between 1 to 5 for rating.
If you are ready to go straight to post processing from here, then hit spacebar -> Hit Enter to take these images to Photoshop or Camera Raw.
Tagging, keywording and copyrighting
Once you have culled and rated your images, the next step is to apply your copyright information and keyword search information to your images. Since the images are yours, just create a metadata template which has your copyright information.
To create a metadata template,
File -> File info -> Metadata dialogue box opens.
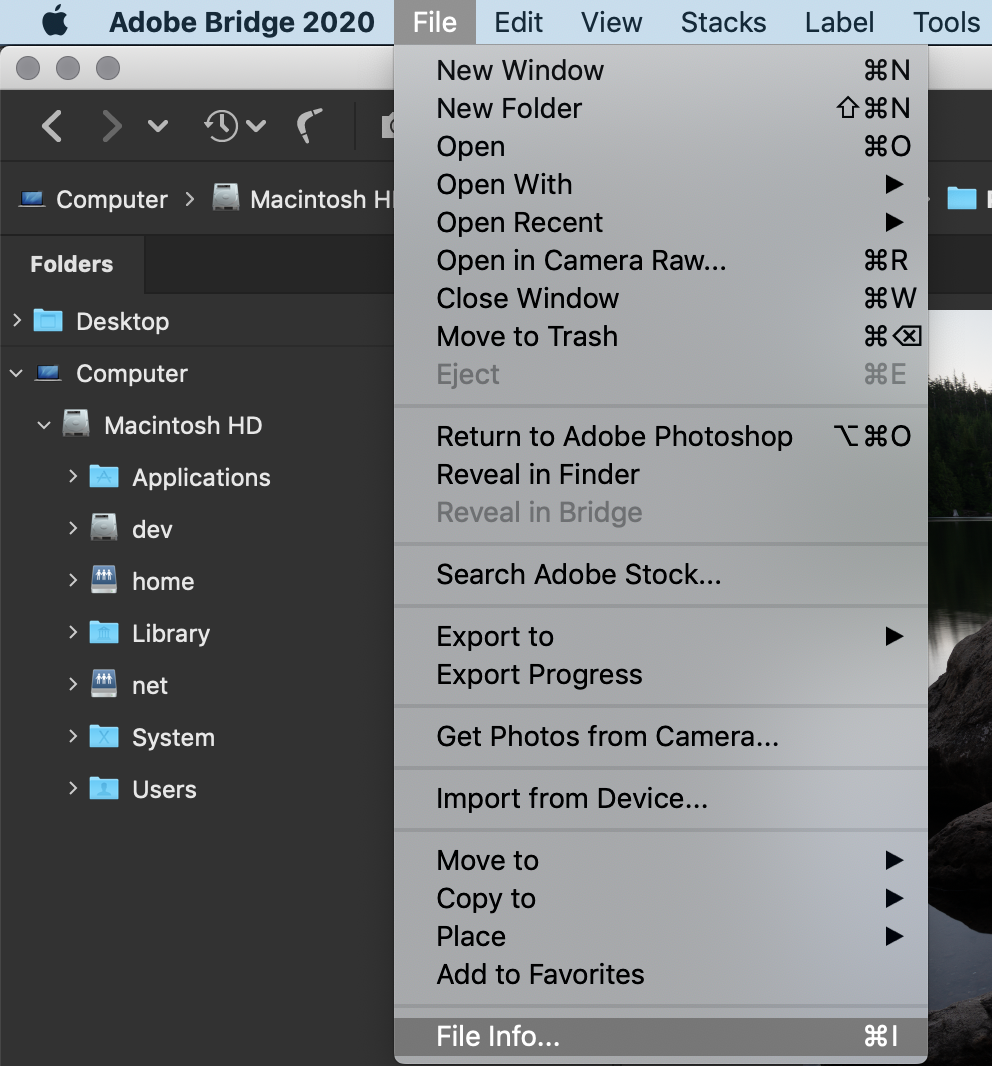
Add copyright information and any additional metadata information that you want to apply to the image and click “OK”.
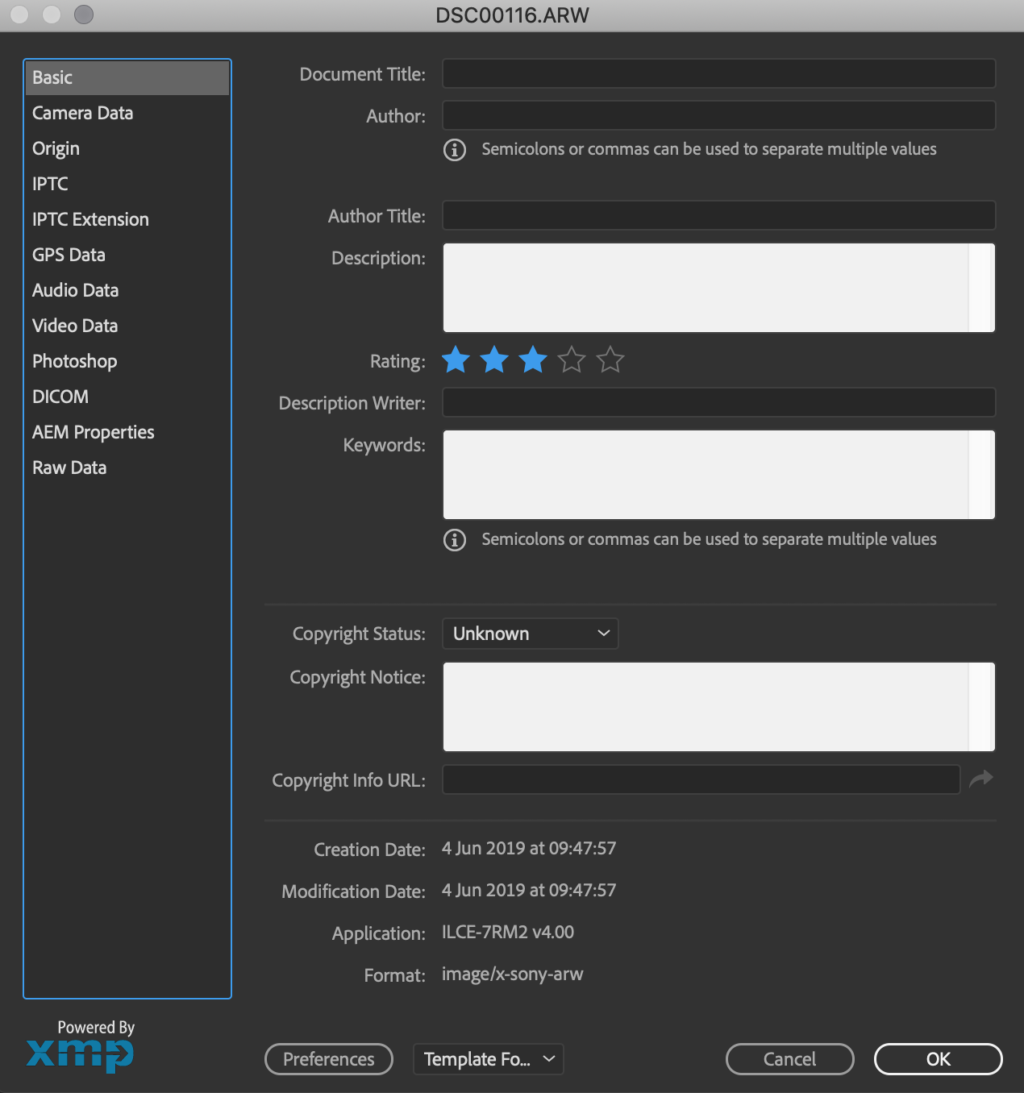
To apply your copyright information,
Select the images in Adobe Bridge -> Go to Tools -> Append Metadata. This will apply your copyright information to the image.
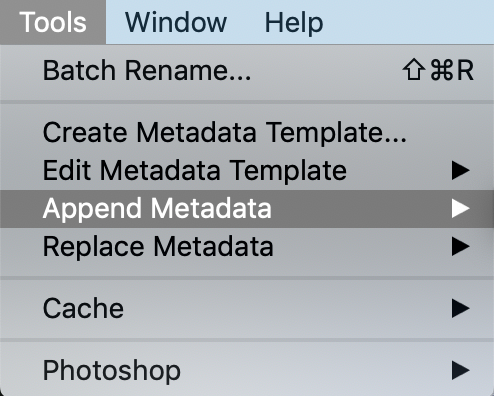
If you want to replace metadata, “Replace Metadata” option will help you accomplish that.
A quick Tip: Adobe Bridge can be very slow when loading thumbnails and metadata information from a folder that has many RAW files. Here is something that you can do during the first import, to save time. It is the “Export Cache” option.
Tools -> Cache -> Export Cache and save this information in the folder.
Next time you open up this folder in Adobe Bridge, it will be much quicker as it will collect information from the saved cache file.
Pre-visualisation
Do you wish to speed up your post processing and save time? Well, then pre-visualisation is something that will help you although not always possible.
If you have captured something on purpose, with an idea in mind and know what you want out of your images, then you can quickly make these adjustments while post processing. Pre-visualise the colours you wish to have, exposure, contrast, mood and sharpness settings and anything you wish to change in the image. Just work through them quickly when post processing.
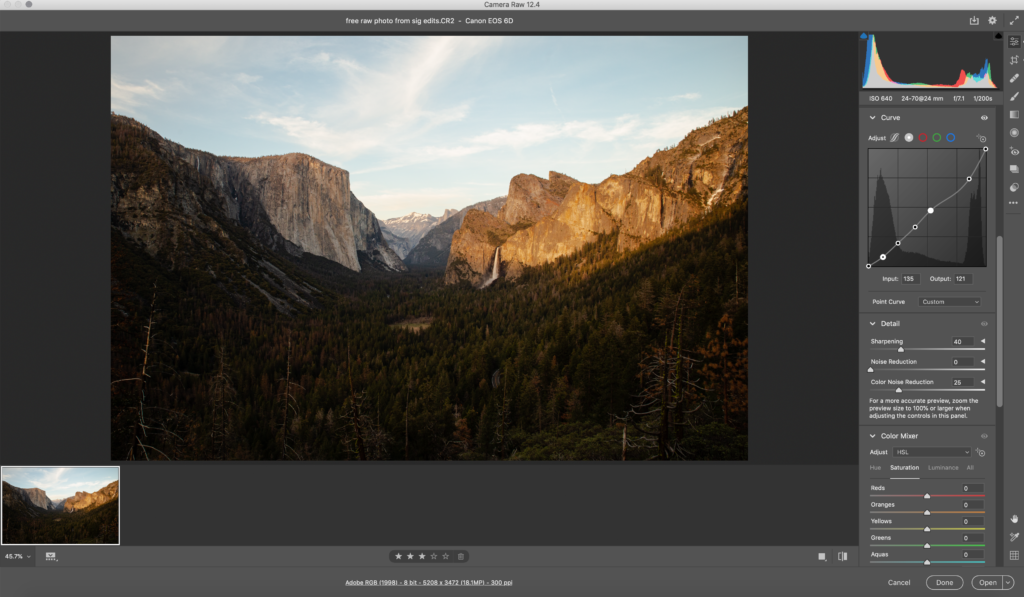
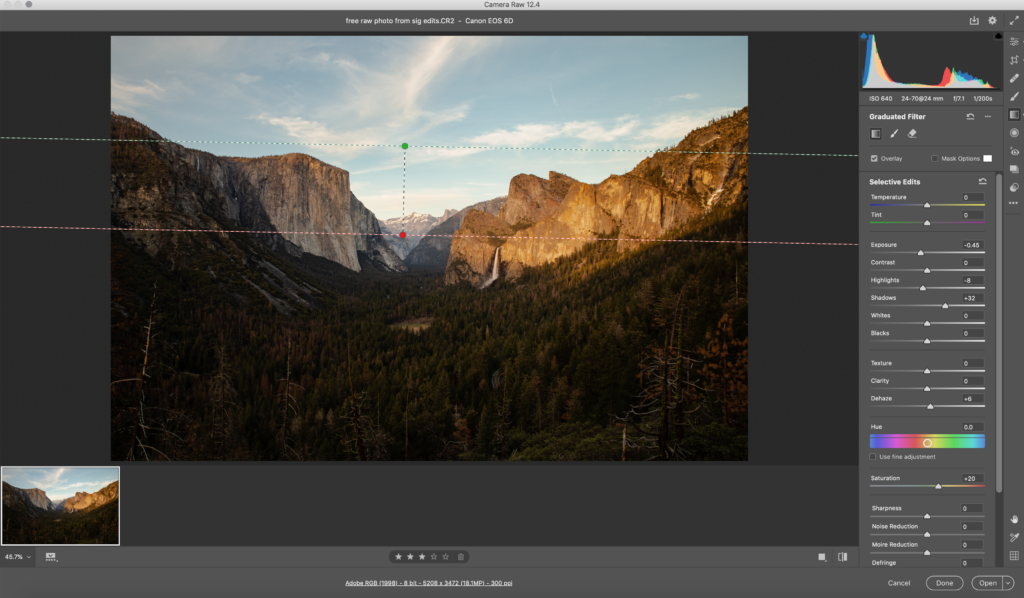
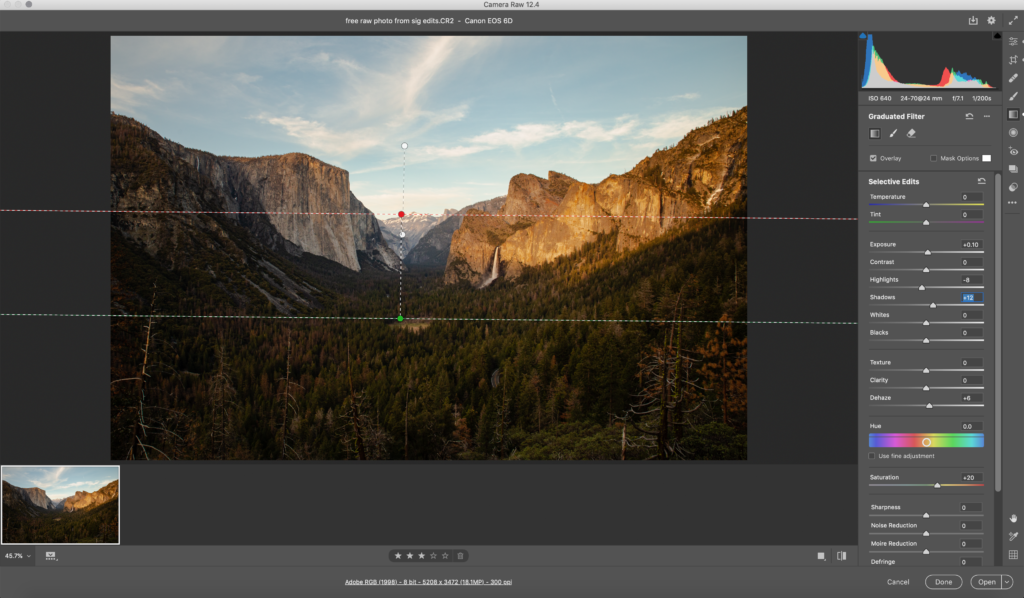
In the process below, you can see how an image can be improved with a few adjustments in Camera Raw within 5 minutes.
Post Processing
A normal post processing workflow should look something like below:
- Cleaning up
- White balance
- Exposure and contrast
- Colour corrections
- Blacks and whites
- Clarity (if required)
- Vibrance and saturation
- Sharpening
- Noise reduction
- Checking
The post processing part is the major step, where you will be fine tuning your images and getting them ready for export or to be printed. Open up or import the images based upon your rating into Adobe Camera RAW.
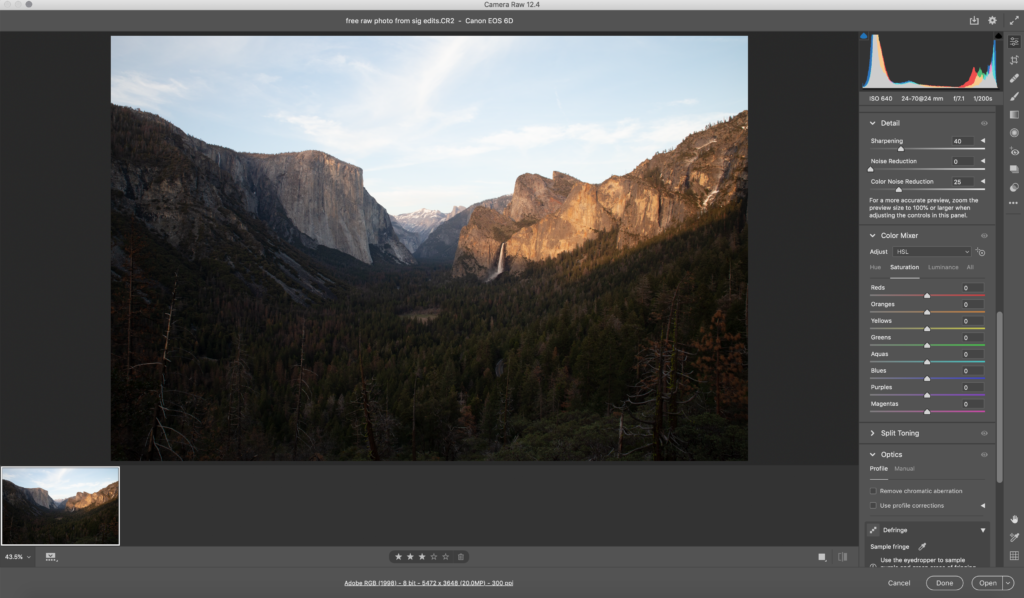
Note: If you are not shooting raw, then you should start doing it because raw files contain all the information you can work with so you can get the best output. Also, you need to make the basic adjustments in Camera Raw before importing the images into Photoshop because it gives you all the necessary sliders that you can easily work with!
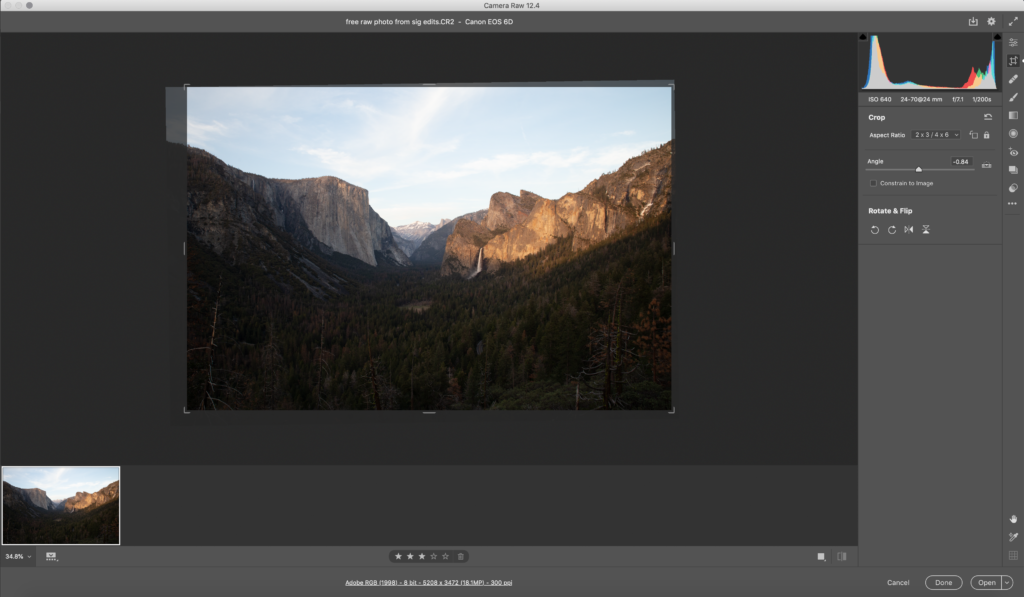
The first step would be to straighten the image if required and crop to get the right composition. Also clean up any distracting spots, elements, dust specks, etc. in the image.
Adjust the colour temperature and tint if they seem incorrect or awkward.
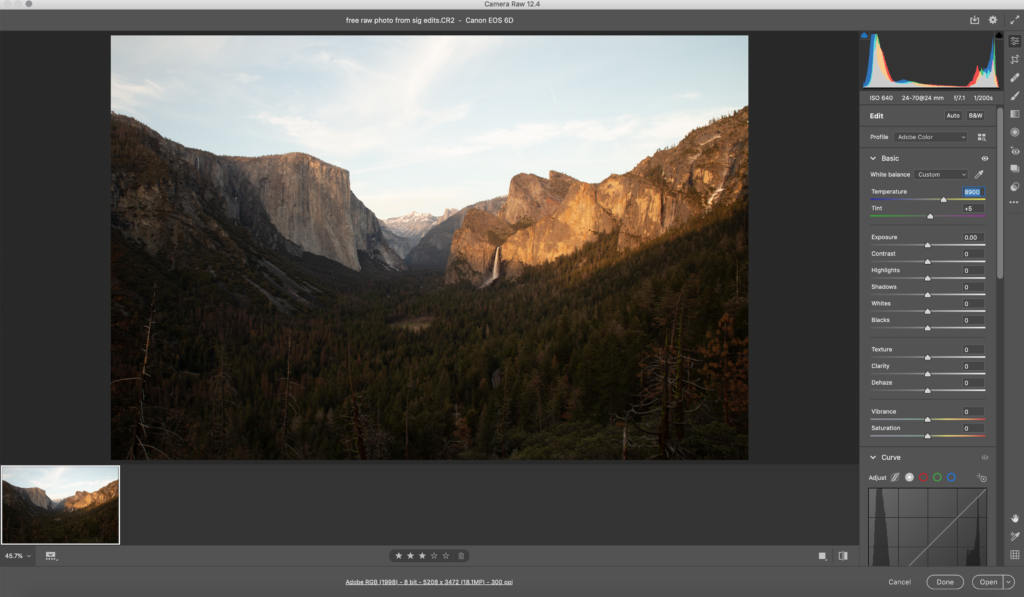
Next, adjust the exposure, highlights, shadows, whites and blacks. Adjust the clarity if required and then work with the vibrance and saturation sliders. Making these basic adjustments will itself bring a huge improvement to your images.
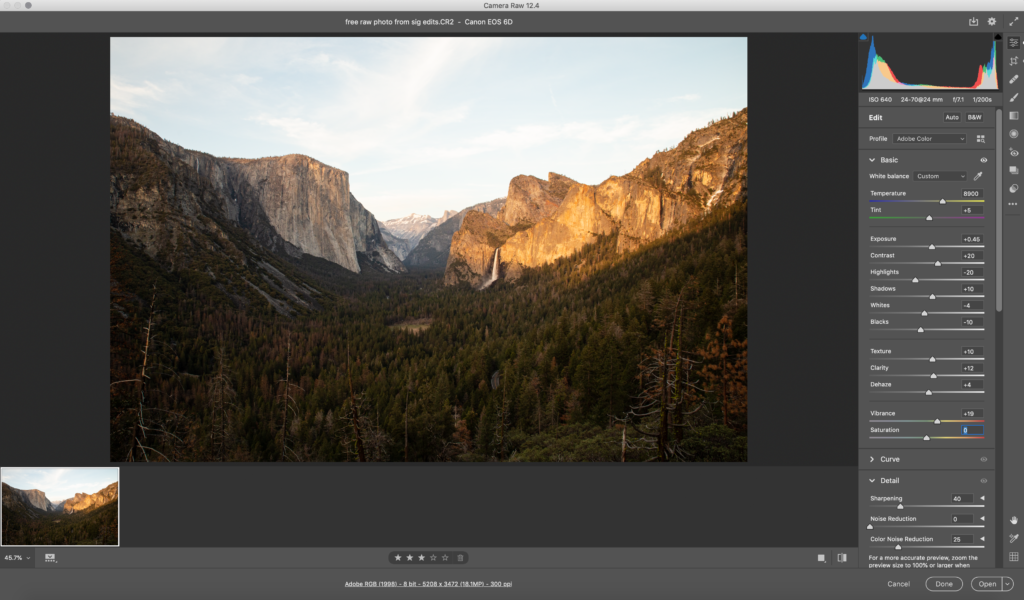
Next adjustment would be using the tone curve especially for landscapes, where you can adjust the highlights and shadows to bring some contrast and depth to the image.
Again, if you are working with landscape images, your next step should be using graduated filters so that you can bring out details and colours in the sky.
Or if the foreground looks dark and dull, you can bring out details in the foreground using this filter and then make changes to basic adjustments like exposure, shadows, highlights, vibrance, etc.
If there are specific areas that need local adjustments, use the brush tool.
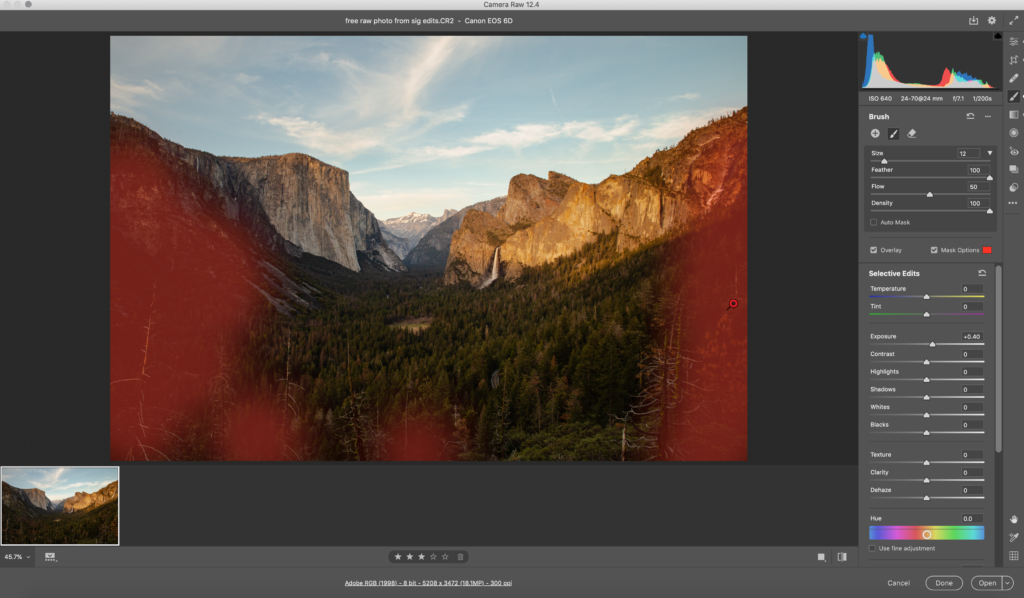
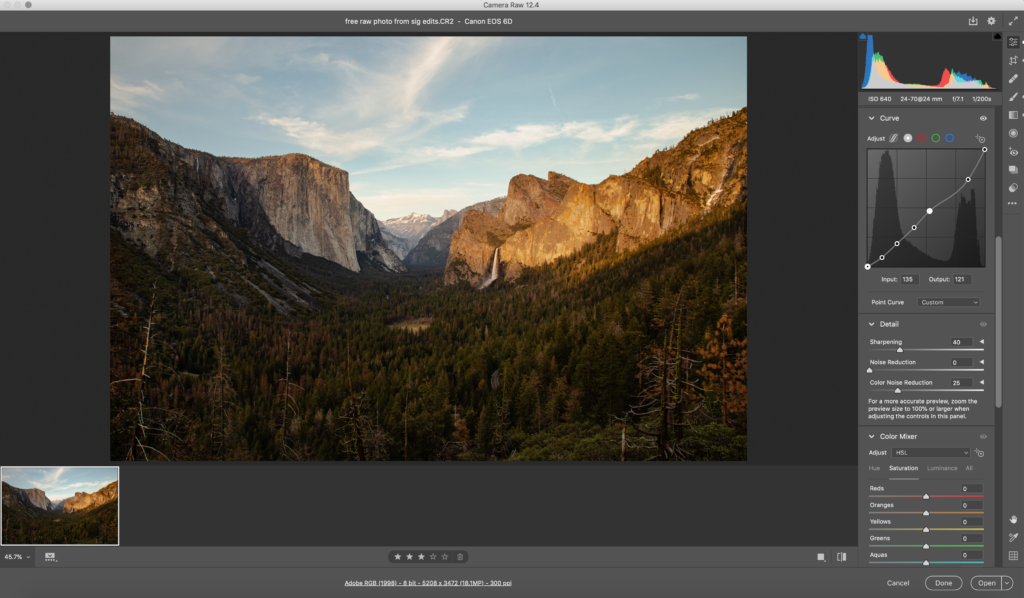
If you do not want to make these adjustments here, you can also do it after you open the image in Photoshop with the help of layer masks.
Use the HSL panel to fine tune colours in the image. Using the lens correction panel you can make adjustments to distortions and also remove or add vignetting. This depends on what you have visualised for your final image.
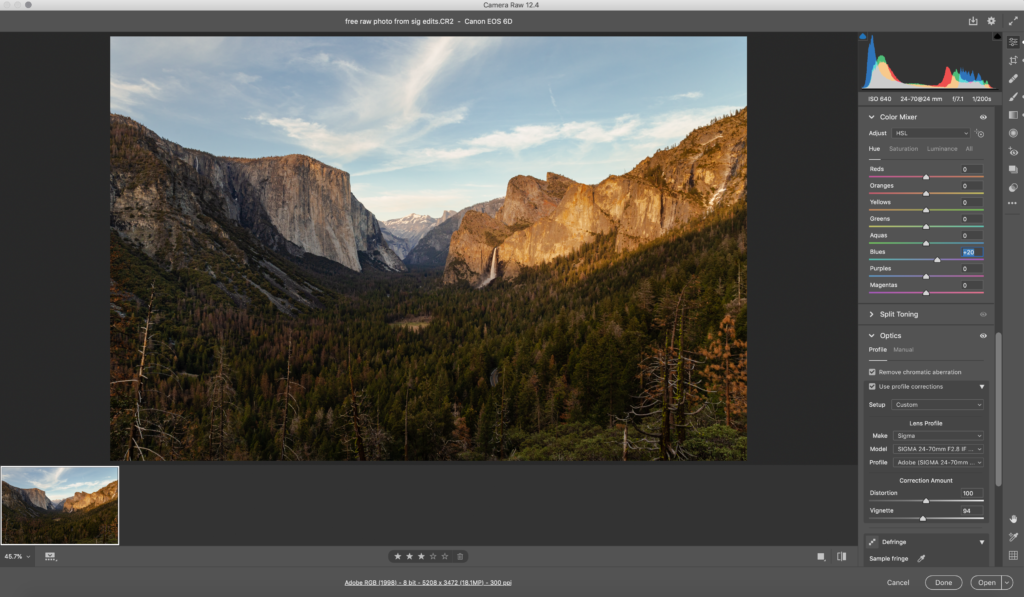
Note: Camera RAW has all these basic panels discussed above with sliders that can be applied to the image, but if you wish to make basic adjustments in Lightroom, do that and then import your images to Photoshop.
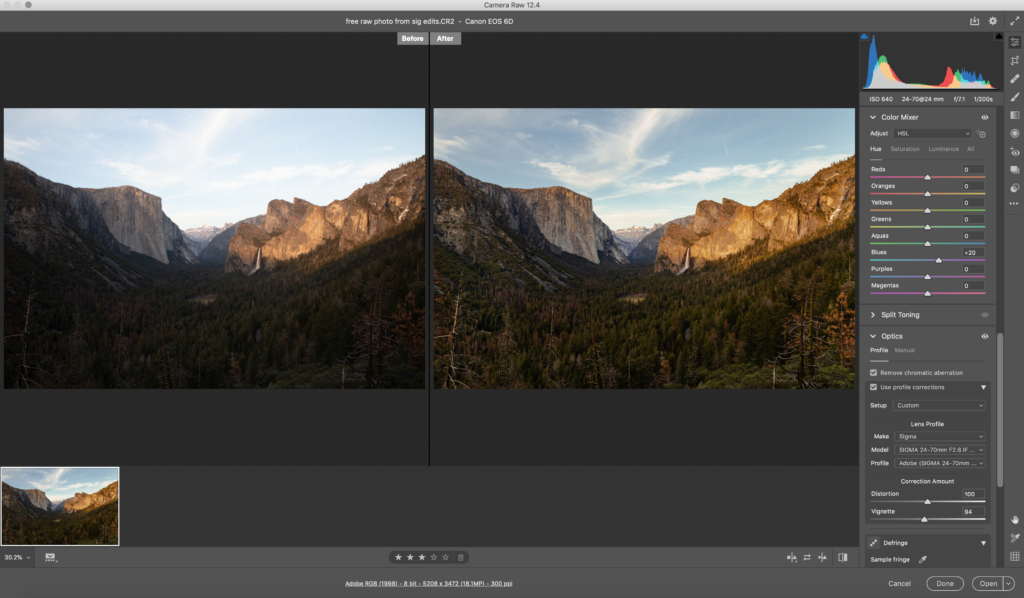
Once all the adjustments are made in Camera Raw, click on “Open Image” and it should open the image in Photoshop.
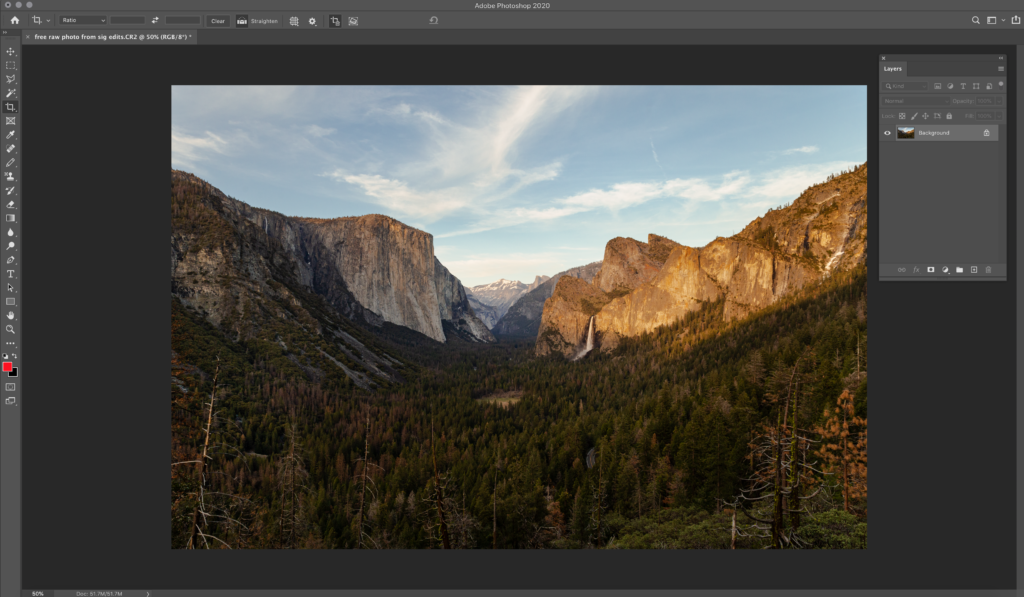
As much as possible, use layers and Adjustment Layers while working on Curves and HSL, dodging, burning, etc. There is a whole lot you can do with adjustment layers.
- Here is a guide on Adjustment layers – Photoshop Essentials: What is an Adjustment Layer and How to Use Them to Edit Your Images
- Dodging and Burning – Dodging and Burning in Photoshop and How It Can Enhance Your Photos
- 3 Easy Options For Using Dodge and Burn In Photoshop
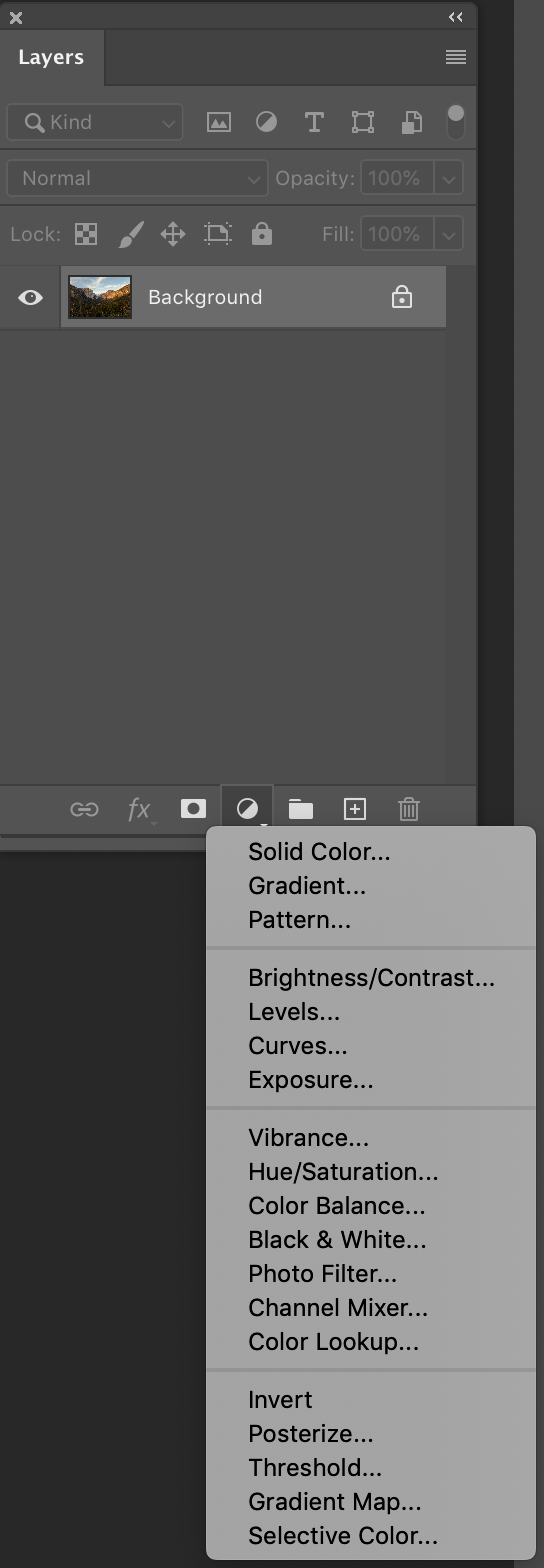
Curves are very important tool that can help get the correct tonal range in your images. You can also apply curve settings to specific areas of the image using layer masks. And of course you have the option to play around with individual colour channels here.
- Layer Masks – A Beginner’s Guide To Photoshop Layer Masks
- A guide on Curves in Photoshop – How Curves In Photoshop Can Make All Of Your Photos Better
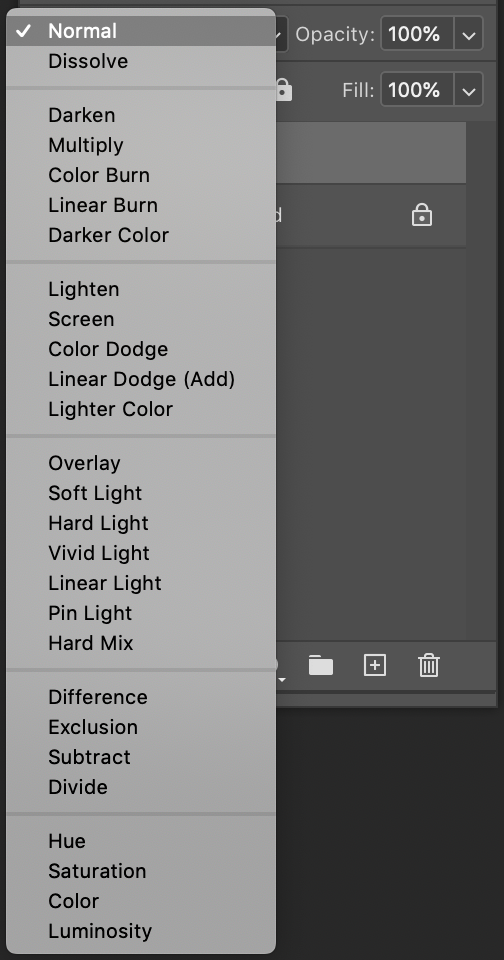
Experiment with different Blending Modes for different moods in the images. These modes have control over how the current layer blends with the layers beneath it.
- Blend Modes – Understanding Photoshop’s Blend Modes
Adjust the opacity of layers to fine tune the effects of layers and get the right look/feel in the images.
Once the adjustments are done, finishing touches like sharpening and removing noise can be applied. Also, crop the image to the desired composition if you haven't done it and remove unwanted distracting elements and dust specks. Photoshop has highly efficient tools that will help you remove unwanted elements from a scene.
Before exporting your image, zoom in to 100% and check every part of the image for any errors, distractions or other issues as these can show up and look awkward in the final image or print.
Exporting, printing and delivering
The images then need to be exported in the required size, ready for delivery to the clients or for printing purposes. You have to be careful with the colour profiles and formats when you export for various purposes like online sharing, printing, etc.
- Here is a very detailed guide to printing photos – Guide to Printing Photos
Also, do not forget to back up your exported files!
When you are a beginner in post processing, it can take a lot of time to fully understand the various steps involved in it and it can feel quite daunting. With experience, your focus should shift to creating your own workflow, saving time and enjoying more time behind the camera and not in front of the screen.
Do you have a particular post processing workflow that you follow and find it efficient? Share it with us in the comments section below!
Further Resources:
- Use These Basic Post Production Techniques to Speed up Your Workflow
- How to Have a Non-Destructive Workflow In Photoshop
- The Benefits of Optimizing Your Workflow Can Be Massive
- Case Study: An Example of One Photographer’s Workflow
- How To Photoshop Faster | Simple Tips To Speed Up Your Photoshop Workflow


