Waterfalls are a hugely popular subject among photographers and one that can produce some spectacular results. If the popularity of waterfall photographs on sites like Flickr and 500px are anything to go by, then the general public cannot get enough of them either. But how do you go about getting a great photograph of a waterfall? Let's take a good look at all of the things you should know to get the best photo!
Researching the Best Waterfalls for Photography
Forewarned is forearmed as the saying goes and knowing what you are in for before you get there allows you to plan your shot. Good research is NOT essential when choosing a place to photograph a waterfall, but it sure makes things a LOT easier if you are looking for that magical shot.
Where Should You Look?
- Flickr – one of the oldest and still best places to do photo research is Flickr. With a huge community and collection of photographs, you are going to find a heap of waterfalls among them and also probably one closer to where you live.
- 500px – this site is similar to Flickr, but it has a higher percentage of signal to noise. There are some remarkably talented photographers here the general standard of photographic submissions is among the highest on the internet.
- Google Image Search – good old Google image search can help you find great shots of waterfalls practically anywhere they exist. Just type in waterfall and the geographical area and you will have no shortage of inspiration and ideas. (Like New York Waterfall for example).

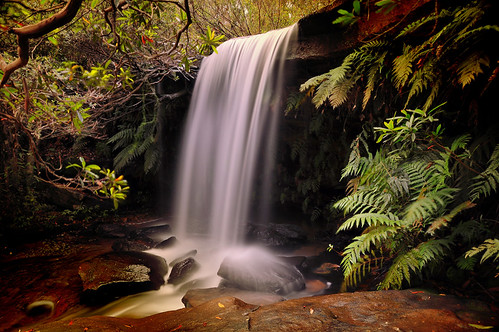
Image by Rudolf Kirchner
What Should You Look For?
The question of what you should be looking for in the images you research will have a different answer depending on your situation. For somebody living near Niagra Falls (for example), you might simply be looking for an original angle or vantage point from which to photograph one of the most photographed waterfalls in the world. In other instances, you might simply like to compare how the crowd reacts to certain types of waterfall photographs (we will discuss this more below).
Start with a general search for “waterfall” (on Flickr, sort them by “interesting” so that the community can find the best quality ones for you).
If you want to get waterfalls that are closer to your location, then just add in a geographical area (depending on how popular the location is, you might get from zero through to a few hundred or even thousand results). For example “Chicago Waterfall.”
In general, you will want to ask yourself a few questions about the images that you find and like:
- when was it shot? – You don't want to shot up at the wrong time of day
- what were the challenges? – Any obvious dangers? Was it easy to get to?
- what gear was used? – You can often find this in the exif data or comments on Flickr. If not, take a educated guess about lenses and filters
- where was the photographer situated? – This isn't always easy to spot, but it can enable you to make extra preparations if it is a difficult spot to get to
The answers to some basic questions like those will help your preparation substantially. You can plan your trip and gear a lot more easily armed with this information.
Packing Your Camera Bag – What Camera Gear Will You Need?
What photography gear you need will largely depends on what information you gleaned from the research stage, but a lot of gear will be suited to practically every situation when shooting waterfalls.
- Camera (duh!) – not much needs saying about this one!
- Wide Angle Lens (see note below) – usually you will want to shoot with a wide angle lens
- Tripod – you are almost always going to want to shoot on a tripod if you can help it
- Filters – while not strictly required, you will get good use out of a circular polarising filter (CPL) and possibly a Neutral Density filter (ND) and even possibly a Neutral Density Graduated filter (ND Grad) (see notes below)
- Bubble Level – sometimes it can be tricky in thick bush or forest where you cannot see a horizon to judge whether you camera is level
- Lens Cloth – mist and spray off the water can be a challenge
- Non-camera Gear – don't forget all of the other stuff to keep you comfortable – proper clothing, hats, jackets etc – nothing kills a photography expedition faster than being personally unprepared for the conditions
While sometimes you're going to have access to the gear you want, and other times you might be stuck with an iPhone or something similar. You obviously need to make do with what is available, but if you did your planning well, you should have the gear you need.

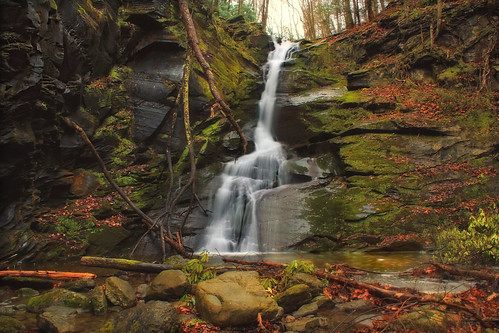
Image by Sachin C Nair
Notes on Choosing a Lens for Photographing Waterfalls
Your lens choice will largely depend on where you are shooting from in relation to the waterfall and also what you are trying to achieve. A lot of people shoot wide through to mid range zooms. There are benefits and draw backs to each.
- Wide Angle – Something in the 15mm to 25mm range would usually serve you well on most cropped sensor DSLRs if you are shooting from close to the base of the waterfall. Part of the reason is that waterfalls are often only able to be photographed from clearings close to their base. In that situation, a wide angle will let you get all of the waterfall and even some of the surroundings into your shot.
- Mid Range – If you're luck enough to be far enough away from the waterfall, you will probably be able to shoot with a mid range lens. The added bonus here, is that your final shots will have less distortion than shooting from close range with a wide-angle.
- Zoom – Some situations will allow you to shoot from a distance and shoot part or all of the waterfall on a zoom lens. This is often the least likely scenario in terms of lenses, but sometimes it is possible. It largely depends on the specific conditions and specific shooting location of the waterfall you are shooting.

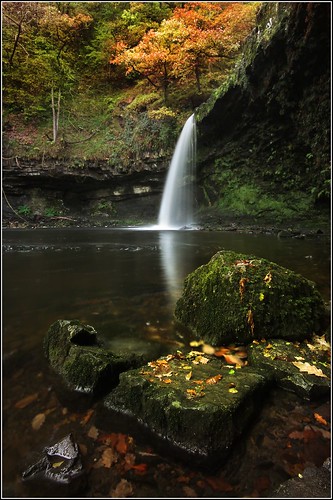
Image by Annca
Notes on Using Filters for Waterfall Photography
Waterfalls throw up a few challenges for the photographer related to light. For starters, shooting water anywhere will often involve problems with reflections and highlights (mainly from the water reflecting very bright light into the lens). The other problem you might come across, and one that is common to a lot of outdoor photography, is that the sky often throws out a lot more light than the scene you are trying to capture, effectively acting like a giant soft box.
The solutions for these lighting conditions can happily involve a couple of filters.
- Circular Polarising Filter (CPL) – A CPL will all you to adjust for those random highlights and reflections. Using a CPL will minimise highlight blowouts and will also bring the brightness from the sky down a stop or two. This can be especially welcome on bright days when you don't have too much control over what time of day you are shooting (we will talk about the best times of day to shoot waterfalls below).
- Neutral Density Filter – Another filter option for dealing with problems with brightness is an ND Filter. Basically, an ND modifies intensity of all wavelengths or colors of light equally, giving no changes in hue or color rendition. Great for shooting outdoor on sunny days.
- Graduated Neutral Density Filter – An ND Grad is a great filter for shooting outdoors. It is the same as an ND filter except half of the glass is clear. The ND part fades into the clear section meaning that you can place the darker section over your bright skies while still being able to expose your foregrounds properly. To be honest, the ND Grad is a bit of a secret weapon in the arsenals of many outdoor photographers and you will probably want to experiment with one at some stage. Whether it will be of use with your waterfall really depends on the specific conditions and how much sky is in your shots.
Some Notes on Time of Day and Lighting With Waterfalls
As with most outdoor shooting, the best times of day for photographing waterfalls will usually be towards the golden hours (and even arguably the blue hours). This gives that magic, golden hue that looks so great on so many outdoor scenes.
Also, overcast days are actually pretty good for photographing waterfalls – it means that the harsh light and resulting reflections in the water are far easier to deal with.
One big factor to consider when photographing waterfalls in low light is that it begins to necessitate a slower shutter speed. That in turn can begin to have implications for the water displaying motion blur. That isn't necessarily a bad thing, but it is something to be aware of. If you prefer a fast shutter speed to freeze to motion of the water, then it will probably be a good idea to get to your shooting location while the light is still bright.
Finally, you will also want to try to get to the waterfall at a time when it is all in shadow. It becomes extremely involved to compensate when half of your waterfall is in stark sunlight and the other half is in dark shadow. Even lighting will help your cause immensely.
Notes on Composing Waterfall Photographs
Composition is very much a personal thing for most photographers. Some choose to adhere to guidelines such as the rule of thirds, the golden section etc while other prefer to play it by ear.
A few keys to getting effective waterfalls can include experimenting with compositional elements such as including more foreground, shooting sections of the waterfall (rather than the whole thing) and shooting at different angles.
A large part of how you choose to compose your own images will come from the inspiration you take in others' photographs. The research stage of your project will help you a lot with your composition of your favourite waterfall. Look at how other people approached it and see how you can improve.
As with anything, make your own decisions, but make them educated decisions.

Image by Sean Johnston
Photographing Waterfalls With Motion Blur
As mentioned above, many people love the motion blur effect in water when shooting waterfalls. Some people don't care for it so much. But how do you get it? Here is a basic rundown:
- Equipment – You will almost certainly need to shoot with a tripod if you are hoping to capture the misty, motion blur effect of moving water in your photographs. Other than that, you will also want to bring along the other pieces of equipment mentioned above.
- Time of Day – As you are hoping to capture motion blur, the key is that you will need to leave your shutter open for a little longer than usual. That is often very difficult in the middle of the day without resulting in over-exposure. That means you will probably want to be shooting in late afternoon or early morning.
- Camera Settings – This is largely going to depend on the specific conditions of your shoot and waterfall as well as how much blur you actually want in your photograph. The blur will also be affected by the actual amount and speed of water rushing over the waterfall and distance and direction in relation to the camera lens. For strong, large waterfalls, start out at 1/100th second shutter speed and experiment from there. Smaller, slower waterfalls will require slower shutter speed again.
Generally speaking, you will want the ISO as low as possible – around 100 to 400. Aperture, you will want as closed as possible if you want to maximise your depth of field – usually in the range of f/16 to f/32. Now, obviously all of those interact in the exposure triangle so will vary depending on conditions and on each other. If you're not familiar with how they interact then do some research into the exposure triangle here. - Wind – When you are trying to get motion blur in your shots by leaving your shutter open for a little longer, then remember that everything else in your shot is subject to blur too – not only the water. If it is a windy day, then the leaves and branches will also turn out blurry. If that is not what you are aiming for, then try to pick a day when the weather is calm.
Photographing Waterfalls Without Motion Blur
Gorgeous images can be created by freezing the motion of the water in waterfalls too. Some traditionalists might even prefer the moment frozen in time. This is how to achieve this effect.
- Equipment – All of the standard equipment mentioned above will potentially come in handy depending on the conditions. But, as you are going to want to use a fast shutter speed to freeze the motion of the water, some of it may be obsolete. For example, you may not need a tripod (depending on the focal length of your lens and light conditions). Also, the effect of filters such as an ND or even a circular polariser can be to stop down the light. This might not be needed, also depending on what time of day you are shooting.
- Time of Day – As you want to use a fast shutter speed, you will probably want a reasonable solid amount of light. That means early afternoon or late morning could be more viable times for shooting. The light is brighter and harsher which will help you freeze the shot. You may or may not need filters to correct for over exposure and blow outs at this time of day, depending on conditions.
- Filters – If you are shooting in a lot of light, don't be afraid to experiment with a circular polariser (CPL) to try to eliminate the highlights and potential blowouts in your histogram. The reflections off the water can be particularly challenging in bright conditions, but again all of this will depend on those conditions. Refer to your histogram to see if you are getting those blow outs.
- Camera Settings – The key here to freezing the motion, as mentioned above is a fast shutter speed. Depending on conditions, you will probably want at least 1/100th of a second at the slowest for shutter speed and quite probably faster (again, this is strongly dependent on the factors mentioned above – size and speed of the waterfall, camera location in relation to water etc.). The other camera settings should be set around your shutter speed (again, know your exposure triangle to get this just right).
Common Problems With Waterfall Photos and How to Fix Them
Highlight Blowouts – If you are seeing your histogram up against the right of the screen, then you are getting blowouts. Don't panic, it happens a lot when photographing water. Try using a CPL filter to eliminate them. If that isn't enough, you might want to switch up to a ND filter. It is very difficult to fix blown out highlights in post-production so it really pays to get this right when you're shooting.
Another strategy to deal with that is to come back to your waterfall at a time when the lighting is more suitable – early morning, late afternoon or on an overcast day.
Post Production for Waterfall Photography
If you have done most of the research work and preparation above, then you should only need minor adjustments in post-production. As most photographers are Adobe Lightroom fans, we will stick with referring to possible adjustments in that, but other programs such as Photoshop or Apple Aperture offer similar abilities.
The suggestions below are exactly that. You may not even need some or all of them, but they are the likely places that you will want to turn in post-production if something didn't turn out quite as you would have liked with your waterfall photographs.
- Exposure – When you get the photos on a screen, you will get a real sense of how close your exposure is to reality. Programs like Adobe Lightroom allow you to play with the exposure slider to see how much detail you have captured in the shadows and in the highlights. If you are not already spot on (and you probably won't be) then adjust your exposure slider.
Next, try to recover any highlight blowouts with the recovery slider. The Fill light slider and the blacks slider can also lead to better images, but don't get too heavy-handed. - Luminance – Depending on your image, you will want to gently adjust the blue and yellow luminance (this holds true for a lot of outdoor photographs). Again, be gentle here – you're not trying to create an Andy Warhol piece.
- Adjust the Curves – Another way to gently massage the photograph.
- Look for Artifacts and Haloing – When you are done with your adjustments, look at the image at 100% size and carefully look for artifacts. Sometimes messing with the fill light and recovery slider together can introduce problems with this. If you have artifacts, back off your adjustments on those sliders.
As with most things, less is more when it comes to post-production on your waterfall photographs. Be gentle with the sliders!
Some Awesome Tutorials on Waterfall Photography Not to Be Missed
Now, this isn't the only waterfall photography tutorial online and you would be well advised to read some of the great ones here:
- 7 Tips for Photographing Waterfalls
- Waterfall Tutorial by Alex Wise
- Waterfall Photography Tips and Techniques
- How to Photograph Waterfalls by TutsPlus
Layers Magazine also has a brief, but very cool tutorial on using Lightroom to improve landscape photographs. It isn't specifically about waterfalls, but a lot of the tips do hold true for waterfall photographs.
Wrapping It Up
Waterfalls are one of the great joys of outdoor photography and often result in some of the most amazing results. While they require a lot of preparation and forethought to produce the exact image you have in your mind, the results make the effort well worthwhile. The most important thing is to get out there and shoot and experiment for what works for you in your unique shooting situation. Hopefully you have a few tips in your arsenal to test out from this lot.


2 Comments
Very well thought out article. The links to other sites was also well appreciated. I know what I’ll be doing this weekend!
Great tutorial with plenty of info.