When you hear the word “photography” it's usually associated with the process of taking a single picture. For most of the non-photographer world that is all they want to know about it, and that's completely fine.
Us photographers on the other hand, are a curious bunch (at least I hope you are as much as me) – when we find out about a new technique we probably want try it out, right?
NOTE: If you really want to get into trick photography, then you should take a look at Evan Sharbeneau's book on the topic. Every trick in the book!
There are several uses for photography which are far from the “regular” uses that we are accustomed to – especially when it comes to research and science. Let's explore these techniques in some detail:
Мonochrome to RGB
This is a technique which was first used in the days of film in order to produce color photo from black and white film. The technique is quite simple really: you use filters to block out a part of the light spectrum, you do 3 exposures, each exposure for each base color.
This means you use a filter that blocks out everything but the green light, then you do an exposure, you do the same with the filter that blocks out everything but the blue light, and the same with red light.
Then you artificially color all those exposures with the corresponding color and merge them in one photograph that is in full color.
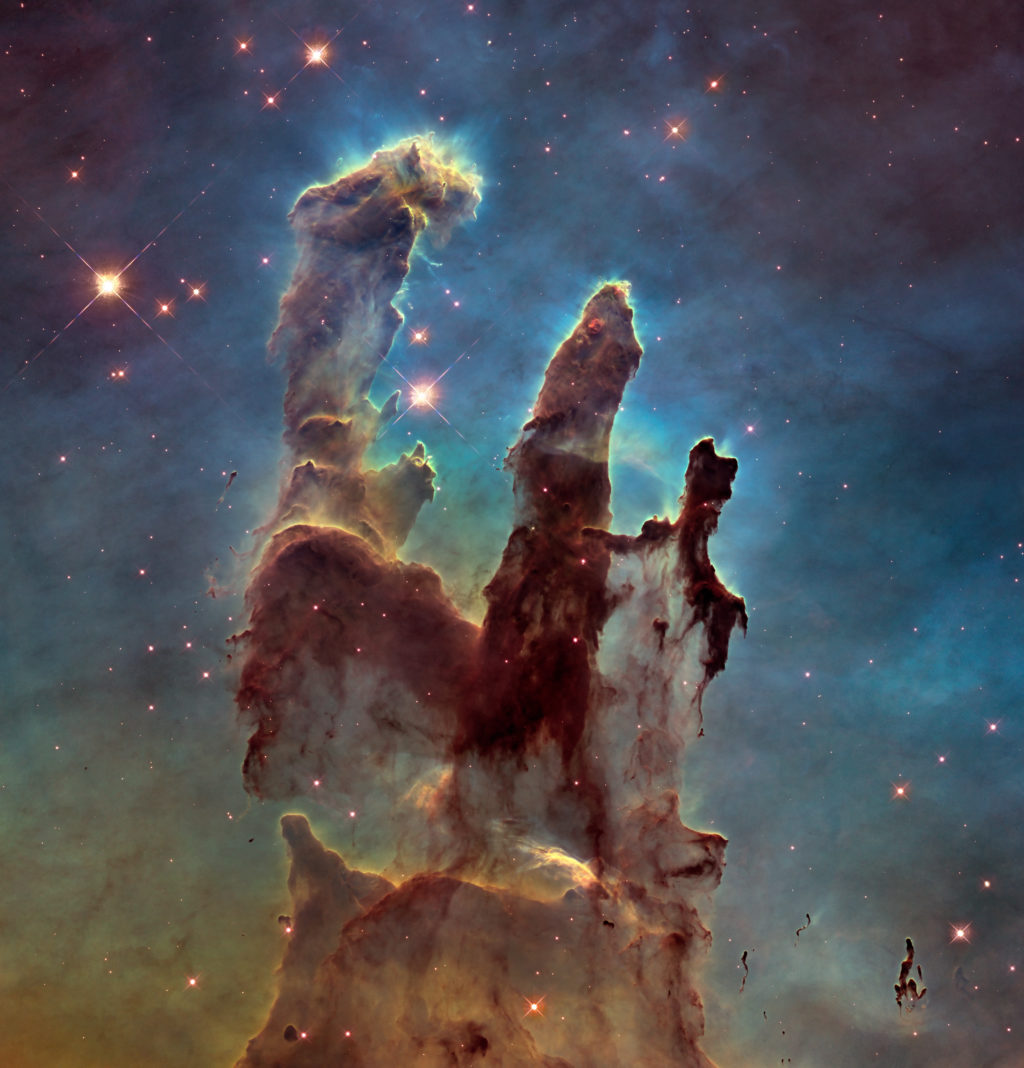
“Pillars of creation 2014 HST WFC3-UVIS full-res denoised” by NASA, ESA, and the Hubble Heritage Team (STScI/AURA) .
You might say this technique is obsolete nowadays since there is color film and every sensor is in full color thus there is no need for it. But you’d be wrong.
The Hubble Telescope is actually monochrome, and the color images you see from it are actually false color images, created by the same process but instead of just RGB, the Hubble uses infrared and ultraviolet channels as well, which are painted deep red and deep blue, respectively.
Photogrammetry
Photogrammetry by definition is the science of making measurements from photographs. The output of photogrammetry is typically a map, drawing, measurement, or a 3D model of some real-world object or scene.
Basically, this is the way maps are being made nowadays, by photographing the land from an aircraft and then using those photographs to chart the heights and the relief of the terrain.
However, today photogrammetry is so advanced that you can basically make a complete and accurate 3D model just by taking pictures with your smartphone.
For industrial purposes though, it is done with a rig that has several cameras mounted on it and flashes which fire light in several directions in order to have the depth information presented more accurately.
Spherical Panoramas
Panoramas aren’t new in the photography world, nor are spherical panoramas really. They have been around for quite a while. But with the increase of processing power per dollar, having computers powerful enough to process panoramas which are detailed and large enough for spherical panoramas, is something that almost every photographer can afford.
Not too long ago, that amount of processing power would have cost you a fortune.
With web standards evolving too, embedding and viewing spherical panoramas today is quite simple, all you need to do is download a plug-in for your website, and that would be it. Of course, the viewer would need a decent browser which supports either flash or HTML5, but that’s available to everybody too.
Ultraviolet, Infrared and X-Ray Photography
Under normal circumstances, cameras filter out the ultraviolet and infrared spectrum of the light. Meaning that every photo you take doesn’t contain infrared and ultraviolet light.
This is due to the fact that we can’t see those wavelengths of light and in order to be displayed and somewhat visible they need to be converted into the visible spectrum of light for our eyes.
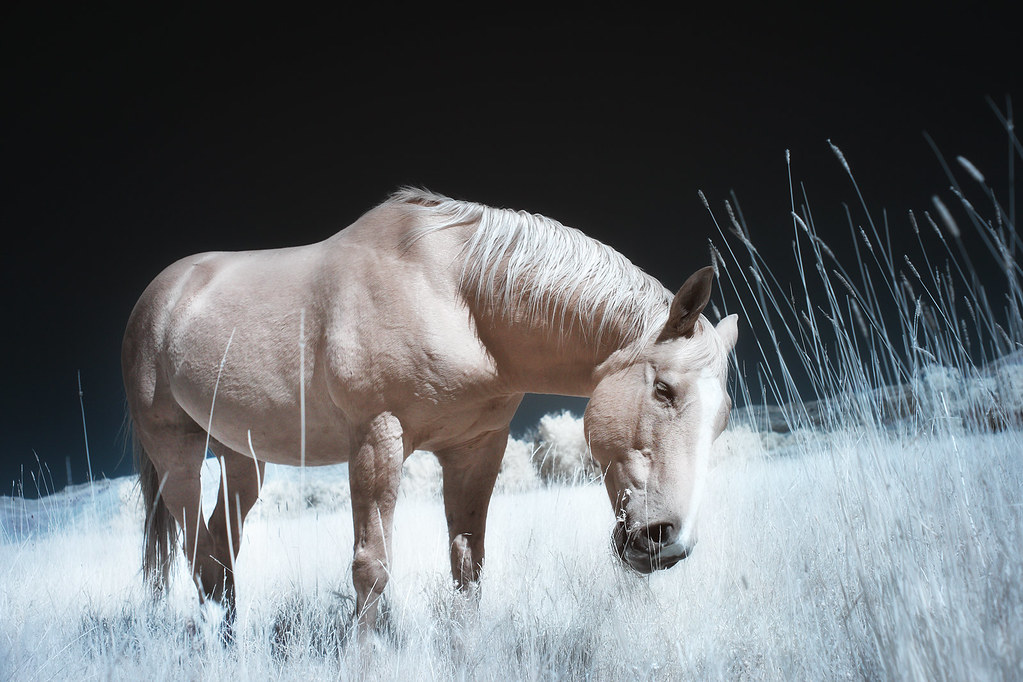 Photo by greg westfall
Now if you remove the high and low pass filters on the sensor of the camera, you’ll basically allow the camera to capture UV and IR light as well as the regular light in the visible spectrum.
Since the camera won’t be able to process that light accordingly, it will just affect the visible spectrum light in a freaky manner, thus changing the hue of the colors and adding some details which weren’t visible before.
More advanced UV and IR cameras are made to work specifically in those spectrums of light, meaning they block out the other spectrums and present a monochromatic image with UV or IR light only. This is mostly used for research, but is also often used by artists who try to achieve something radical.
X-Ray photography, luckily, isn’t available to everybody, and it is used strictly by professionals. I said luckily, since X-Ray uses X-Ray radiation in order to expose film to that sort of “light.” That radiation is dangerous and can be lethal if a human is exposed to it in large doses.
It's also why doctors don’t recommend doing more than a few X-Ray shots of injuries per year. However, this type of photography (if used on inanimate objects) is interesting since the rays pass through certain materials while they stop at others, thus creating interesting results.
If you're interested in really pushing the boundaries and being super creative, check out Evan Sharboneau's Trick Photography Special Effects eBook.


