What is a Reflector and Why Use One for Outdoor Portraits?
Simply put, a reflector is an object that reflects light onto a subject. In the absence of more expensive and professional equipment, portable reflectors allow any photographer to achieve a professional lighting effect in outdoor portraits.
Typically, a reflector is ideal in outdoor portraits when lighting conditions are harsh. Harsh midday sunlight is terrible for portraits since it causes strong, unflattering shadows such as “raccoon eyes”. Also, people can’t help but squint when in direct sunlight, which is definitely not a flattering look. Here is an example of a portrait shot at midday with no reflector:
Another lighting condition that can be fixed with the use of a portable reflector is uneven or dappled light on your subject, such as when standing under a tree that is allowing only bits of sunlight through. Other portrait shooting situations, such as a hat which is casting a harsh shadow over the eyes of your subject or a bright background with a shadowed face, can be dramatically improved with the use of a simple hand-held reflector.
Some photographers use reflectors as a make-shift backdrop for a portrait, such as when there are distracting elements in the background that simply can’t be removed. If you are using a reflector kit which comes in multiple colors, it can be fun to experiment with different colored backdrops behind your subject. Be sure to have an assistant hold the reflector at least three feet behind the subject to avoid showing the surface crinkles in the actual shot. If the crinkles still end up showing, they can easily be removed in Photoshop later.
Where Can I Get a Reflector?
Portable reflectors are very inexpensive and can be purchased online from a variety of sources. They usually come in kits which contain 5 different colors, although it is possible to purchase them in only one color. They come in a variety of sizes, but if you can only afford one set, it is best to buy big since the smaller sizes are often not sufficient for full-body portraits or multiple faces. Unless you have an assistant working for you, a 42 inch reflector size is plenty big enough for most situations yet still small enough to be portable and easily handled during a shoot.
It is also very easy to make your own reflectors using simple and inexpensive materials such as a large piece of cardboard covered in white paper, aluminum foil or even gold foil. If you decide to go with the home-made method using foil, be sure to crumple up the foil prior to covering the card-board so that the reflected light will be softer and less directional.
Reflector Colors
Reflector kits usually come with five different colors, which are each suited to different lighting conditions and desired results.
White creates a neutral color effect and is usually the best choice when there is a lot of very bright light, such as in the midday sun. When using the white side, it’s necessary to place it rather close to your subject for it to really work. If you are shooting in a low-light situation, the white side might not work at all. You can try placing it extremely close to your subject’s face to see if the effect is strong enough to fill the shadows.
Gold casts a strong warm glow on your subject and can be very flattering to the subject in the right lighting conditions, such as in the shade. Often models with tan skin on a beach look great with an added golden glow. African American skin usually looks great highlighted with the warm glow created by a gold reflector since they usually already have these tones in their skin. Also, gold is great for creating the look of sunrise or sunset light.
Black is actually not really a reflector. In fact, it is usually used to create shadow on your subject rather than take it away. For example, if you are shooting a face that is too evenly illuminated, you can use the black reflector to add a bit of shadow and dimension to your subject. Black is often used as a background as well.
Silver, like white, creates a neutral color effect. However, it is much brighter and more reflective and is therefore best used when the lighting is low or when there is no direct sunlight. Experiment with how far the reflector needs to be from the subject in order to not blow out the details in their face.
Translucent is not a reflector, but is instead held between the light source and the subject to soften and diffuse harsh light.
Tips for Using a Reflector
For most shooting situations, the main goal is to fill shadows without the effect actually being noticeable. One way to find correctly position the reflector and find the sweet spot is to slowly move the reflector toward your subject until you just start to see the effect. You can then back off slightly and the effect of the reflector shouldn't be noticeable.
If at all possible, get a friend or assistant to hold the reflector since it may need to be held very close to the subject. If you have to do the shoot alone, you can find creative ways of positioning the reflector such as attaching it to a tripod or other object. If you don't need the subject's lower body in the shot, you can even ask them to hold it in a certain position. If all else fails, you can simply lay the reflector down on the ground in front of your subject. This will improve the quality of the light.
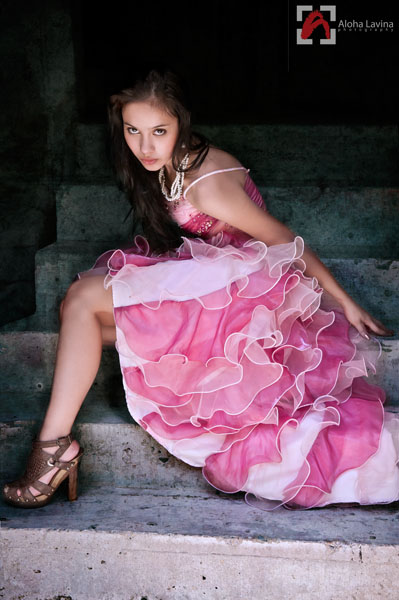
It's a good idea to position your subject with their back to the sun. You can then use your reflector to reflect the light coming from behind them onto their front. You can also hold the reflector at an equal angle between the light source and the subject. To lift the shadows under your subjects eyes when the sun is very high in the sky, position the reflector at chest height.



6 Comments
excellent tip…. I will definitely try this.
I really love these articles. Thank u.
Very good article, lots of good tips. thanks, please keep them coming ! :0
thanks , helps alot! beginner photgrapher, great tips
A reflector is an ultimate weapon when confronted with tricky lighting condition, especially outdoors. A must have item in my camera bag wherever I travel.
Thanks have always tried to smoth out the wrinkles now know they are needed.