The thing about camera bags is that there is rarely a one-size-fits-all solution for photographers. But getting the right bag for the right job means we usually have a few for each of the scenarios we usually find ourselves shooting.
Kata 3N1-10 Backpack
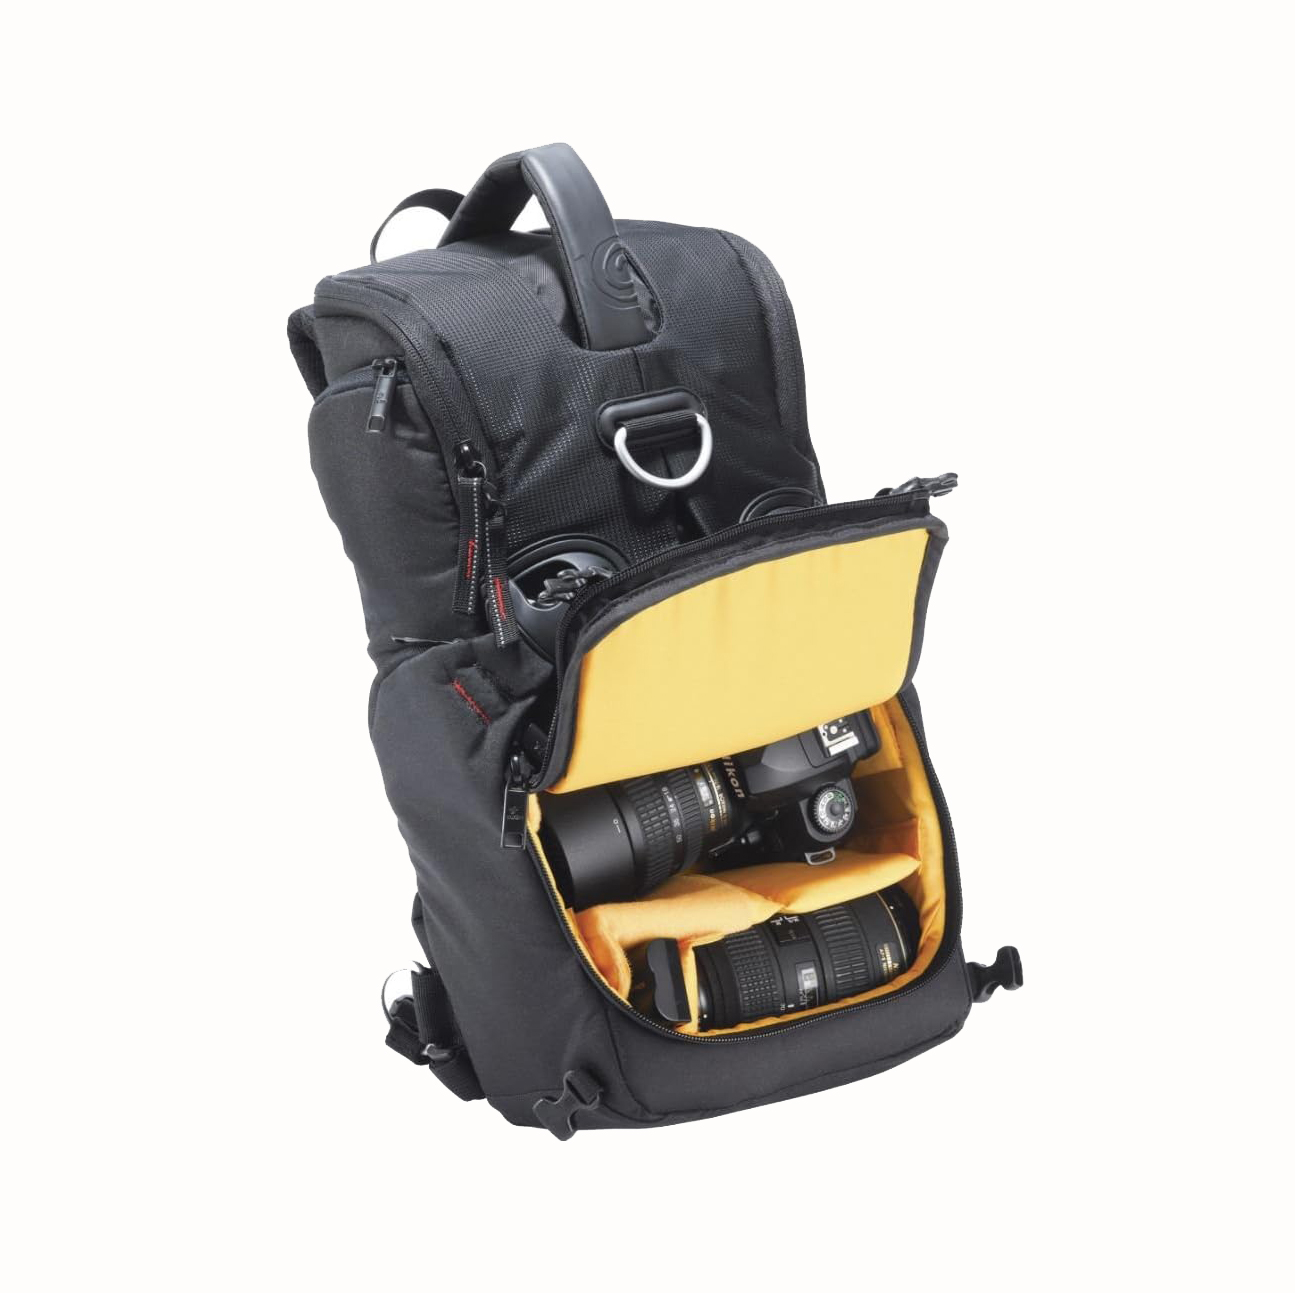
Features “Thermal Shield Technology” to ensure optimal camera protection
Because there is no Swiss army knives of the bag world, I have a rather large collection of bags. I have one that is good for transporting most every body, lens and flash from point A to point B, but it's terrible to work out of, so I bought a great working bag, which limits what I can carry and isn't as great for transport. I have another bag that isn't even meant to hold a camera body, just some accessory lenses and a larger compartment similar to a backpack, this one rarely gets used. Add a bag for studio strobes, another for light stands, one more for a background stand and some smaller niche bags for light meters, triggers and accessories and I'm still not happy all the time! My experience has also proven that the actual process of buying a perfect camera bag for any situation is often a total pain.
So with that disclaimer out of the way, the bag I was looking for to accomplish a specific task was, what I thought to be pretty simple. I've taken on hiking with friends as a new hobby on the weekends. We don't get crazy, but we generally do 6-15 miles and are out and about for anywhere from 4-8 hours. Living 20 minutes from the Appalachian trail in Pennsylvania and having access to some other amazing areas, there is a near endless supply of terrain to cover, at different difficulty levels. We all pack a bag with water, food and basic supplies like a knife and flashlight, along with a first aid kit, but after the first trip I knew I needed to bring more than my trust iPhone for a camera. The second trip I took a Canon G10 with me, my beloved workhorse of a point and shoot. This was great, but getting it in and out of a backpack to take a photo was terrible. The other problem was that I knew I'd want to do much wider shots atop some of the peaks we climb and the G10 just isn't wide enough for that. Packing my Canon 5d Mark II and Sigma 12-24mm non-fisheye lens was going to be interesting. My requirements for a bag would be as follows:
- Not bulky
- Wear it on my back, not messenger style
- Padded shoulder straps
- Padded back
- Hold DSLR with lens + 1 additional lens
- Easily accessibly to camera while wearing it
- Still pack food and water
- Durable
- Rain cover included
And with that, I headed over to the Kata Bags site for the most intuitive bag choosing process I've ever used. Rather than picking a bag that looks cool, I picked a bag with their Bag Chooser that asked a series of questions, what I'd carry, how I'd carry it and specific features. In about a minute my options were shown, and I near instantly found the one that would work. The bag is the 3N1-10, but this is where it starts to get interesting.
Anyone who has shopped online has probably experienced what I have, looking at a bag, seeing its dimensions then holding my hands apart trying to figure out exactly how big it really is. Would it really hold the gear I wanted to, how deep is the bag / how far would it sit off my back? In addition to a laundry list of specs, Kata took the time to create a tutorial video showing the bag in practical use and movie style trailer video. Sold! The time that they put into actually showing items that consumers care about means the world to me, and I knew this little bag would be for me.
The bag is convertible in the sense that it has 2 straps, but can be worn 3 different ways. The most effective way to use it, and the way shown in their videos and my photos, is as a sling bag with one single strap going cross body. Kata, being smart, built a way to tuck the other strap into the bag's padded back so it wouldn't flop around or feel uncomfortable. You can also wear the bag over your right or left shoulder, depending which hand is your dominant one. In this configuration, it allows the bag to easily be slid around to the front side of your body and access your gear via the quick release side buckles. Not putting a bag down to get gear out means you don't have to stop walking, don't have to get the bag dirty or muddy, which in turn keeps you clean and dry, and means you don't have to worry about the bag falling off the side of a cliff while you're taking photos. If you did want to use two straps, it can be worn as a traditional backpack or the straps can cross in the front to create an X.
A bonus feature to the bag, which I didn't list in the original requirements, because I didn't even think about it, was a brightly colored interior. The main advantage is that you can quickly and easily see in the bag, and accessory cables, batteries, memory cards and shutter release cables aren't hidden by a black liner.
The 3N1-10 camera bag was going to be my go-to, minimalistic bag for adventuring, and it fit all my requirements, and some I didn't even think about. When the bag showed up, I quickly read through the helpful guides that were with it, tore into the side and moved some of the velcro dividers around to fit my camera body and lens. There's enough room in there for me to pack another shorter lens, either a 50mm or 100mm prime I often shoot with, and even a flash.
The top of the bag features enough storage for some granola, an apple or two and other good trail food with small pockets for keys and other essentials. The bag also comes with a rain cover!
After I had the bag packed out I grabbed my friend Andy to do some product photos everyone could clearly see how to use the bag. Curious about how I shot these, read my article on what every beginner needs to know about product photography!
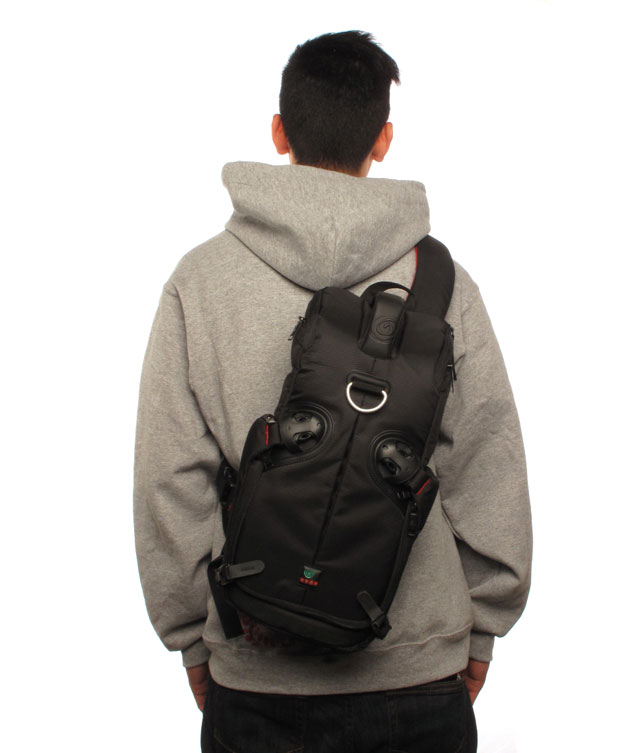
Wearing the bag, over the right shoulder, for a right handed person. The bag will easily slip under the right arm and around to the front of your body to access camera gear. Important to note here, one of my requirements was that I also wanted to carry water, this bag does not feature a typical hikers mesh pocket on the side, or a bladder system in it. The large silver D-ring in the top middle is designed to help hold a tripod with the purchase of a small accessory from Kata, I've been using it to secure a 32oz Nalgene bottle with the aid of a carabiner and it's worked flawlessly. You can also see the two large quick-release buckles that gain access to the bag. Only one is used when wearing the bag as a sling.
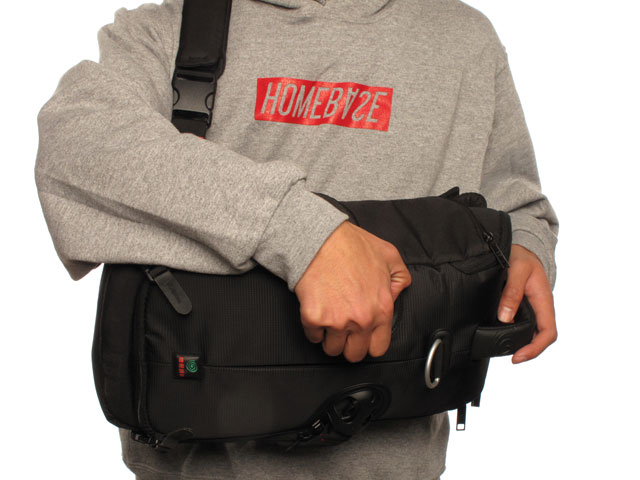
The bag slid around to the torso, hand is now on the quick release about to open.
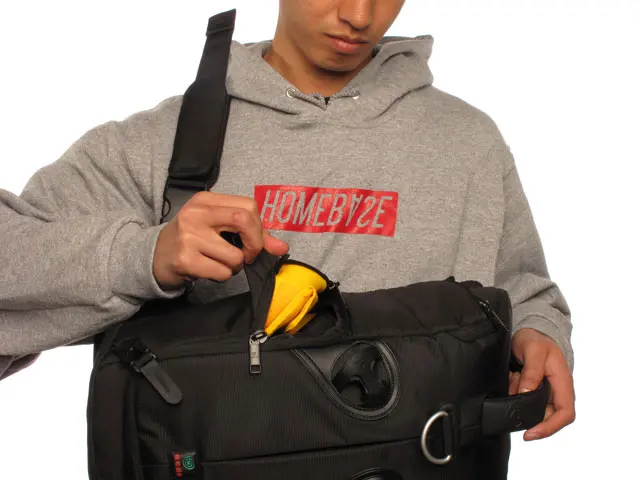
Pulling the side flap open, you can see one zipper, the other zipper is going towards his chest. Kata suggests closing the two zippers so they are under the buckle, in the corner if you will. There is also a small black tab that's hard to showcase, near Andy's middle finger. This nylon tab is left out between where the two zippers meet. Leaving the tab out, and grabbing it at the same time you undo the buckle while pulling will allow access to the side. It quickly tears open the bag.
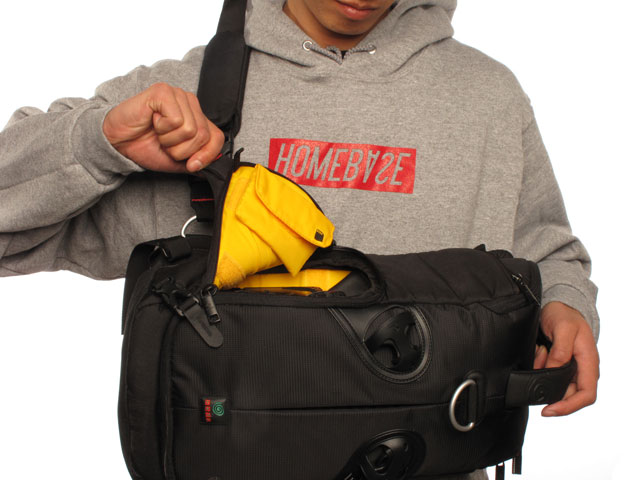
Continuing to pull, the small nylon piece is now more easily seen, as is the inside flap which has a built in pocket to hold memory cards.
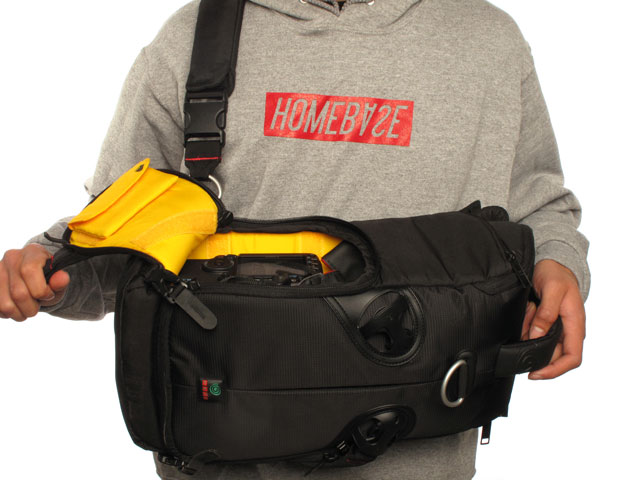
With one hand and in one swift motion Andy was able to open the bag quickly, without taking it off or putting it on the ground.
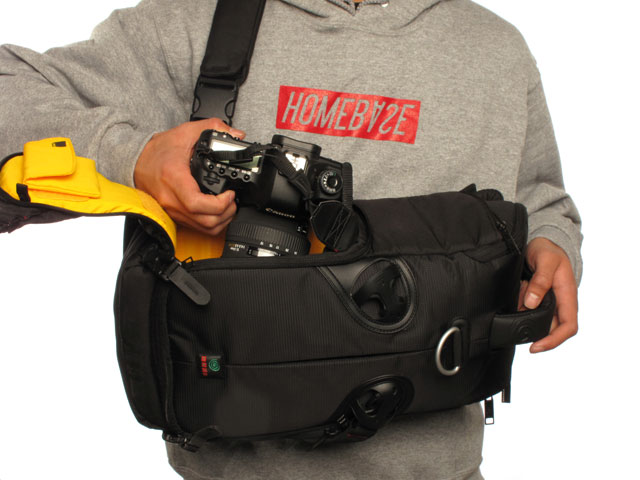
A quick reach inside and it's easy to pull the camera out.
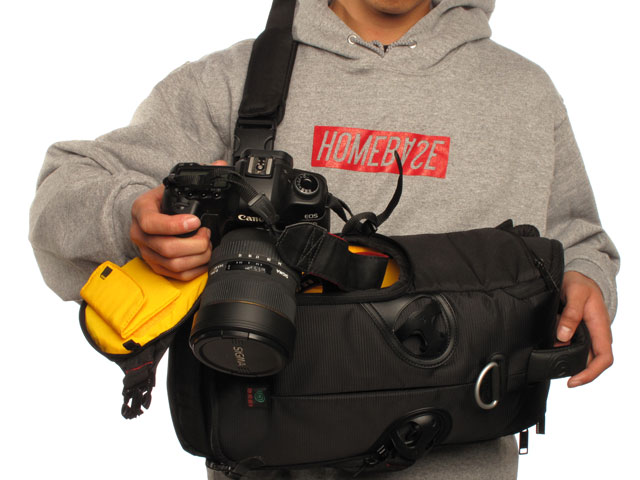
The Sigma 12-24 is a chubbier lens, it fit in the bag without any issues! At this point, it's nice to note that the bag creates a platform that makes it very easy to change lenses and put the other lens back in the bag. It's also easy to shoot with the bag in this position, or, to snap the flap back up and rotate it to your back again if you want to walk while holding the camera.
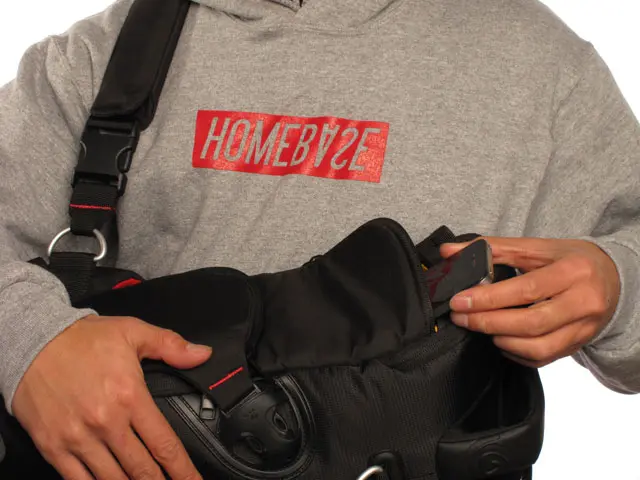
There is a small zip pocket above the access panel for the camera. Andy put his phone in there for safe keeping. It's also a great place to store filters. The camera works exactly the same if you wore it over your left shoulder, all the functions are on the other side too!
It's also worth noting that Andy is not a photographer, but once he put on the bag he instinctively knew how it would work and how to access the camera inside.
Having spent some time with the bag, other major selling factors for me include the lack of any rattling, sometimes common in bags with metal D-rings that will clang against zipper pulls. All the stitching is top notch, the bag has resisted much dust and dirt and above all, it's comfortable and I actually use it. This bag won't hold a DSLR with a 70-200 lens on it, but could if they were separated and there is no laptop slot, but again, that's not what I bought the bag for. If you enjoy casual photo walks, hiking, shooting events or even music festivals, this is a great bag. Like this style of bag but need to carry more gear, look into this model.
Kata 3N1-10 Backpack

Features “Thermal Shield Technology” to ensure optimal camera protection
Mike Panic is a professional photographer focusing with a passion for fashion, fine art, event and product photography. He also dabbles in web design, social media management and consulting, with a real passion for espresso, a love for his Italian Greyhound / Chihuahua mix & he and probably eats too much. Follow him on Twitter, see what photos of his dog, where he goes and what he eats here, and view his portfolio here.


3 Comments
Will it hold an iPad? Or would you need to get the laptop model for that?
This particular model, no, but like Frans pointed out there is a nearly identical one that will indeed hold an iPad.
There is a version of this bag that holds 10″ netbooks, as well as an iPad.