Once you’ve captured some stellar portraits either in studio or on-location, you’re probably going to want to process them in order to bring out the true beauty. Many elements beyond the control of the photographer can interfere with a portrait or distract a viewer unnecessarily, which is why Photoshop is used to salvage and improve many images. With this in mind, we’ve compiled a list of some of the most frequently used Photoshop techniques for portraits:
1. Set Your White Balance – Before you start any kind of editing, you need to adjust your white balance so that you have natural-looking skin tones in your portrait – this is especially important if you’ve shot indoors with incandescent lamps or other ambient lighting. Here’s a fantastic video showing you how to simply adjust your white balance in PS, or if you prefer, you can adjust it in Lightroom as well.
The most ideal way to adjust your white balance though would be in RAW before you import your photo into PS – if you have this option, definitely tweak your settings there as you have much more information to work with, which means less damage to your image.
2. Spot Healing Brush Tool – Using the spot healing brush tool, you can accurately and seamlessly remove any distracting blemishes, bruises, pockmarks, or other skin imperfections. It’s also great for removing shadow spots caused by debris or water stains on your lens. However, try not to go too crazy with this tool to the point where you’re severely altering the face – keep the freckles, but remove the acne.
Sometimes, the spot healing brush tool can act a little weird, especially when working along an edge (like the hairline). In this case, you can just use your clone tool. The clone tool is also great for when you just want to reduce the prominence of an imperfection rather than completely removing it. If that’s the case, you can adjust your clone tool opacity level so that your clone appears to be somewhat translucent – this works great for natural blending or if your source is drastically different from the area you want to clone stamp.
3. Edit the Eyes – In most cases, the eyes are the focal point of an image– it’s just human nature to look someone in the eyes, even if it’s a photograph. Whitening the area around the eyes and removing red veins is paramount to creating a clear and crisp image. Click here for my tutorial on eye editing.
4. Whitening the Teeth (mini-tutorial) – If you’ve taken a few portraits and the teeth came out not-so-bright, here’s a simple way to remove the yellow while also keeping the natural coloring and shading. I chose this sample image of a tiger from CC on Flickr in order to not insult anyone who may come across a yellow teeth tutorial with their photo as the before-and-after.
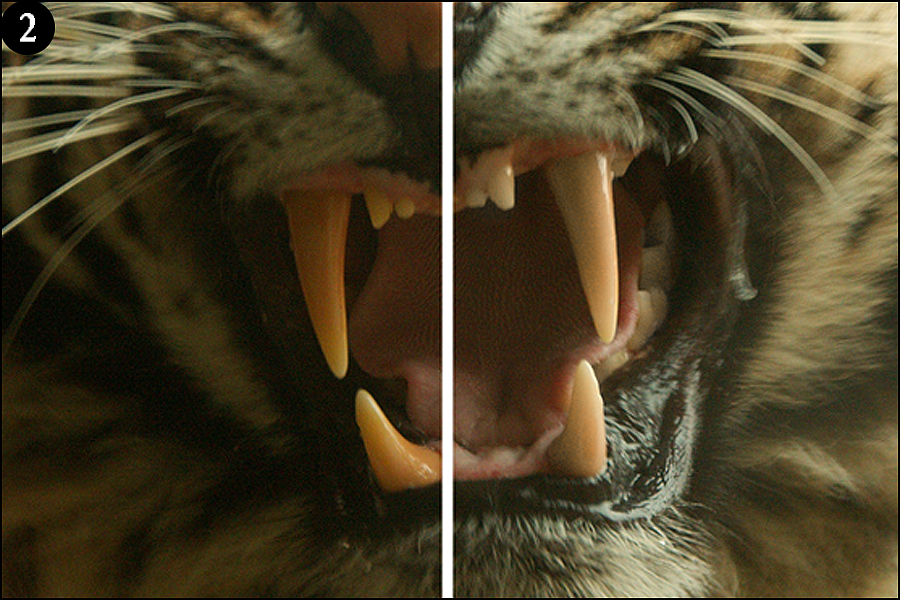
Select the area you want to effect with your elliptical marquee tool. You can refine the edge to soften the transition a little bit, but not too much otherwise the inside of the tooth won’t get the full effect (Figure 1). Also make sure not to select any of the surrounding lip/red area as it will turn it an unattractive grey.
Note: click on the images to view at full resolution.
Photo by bthomso
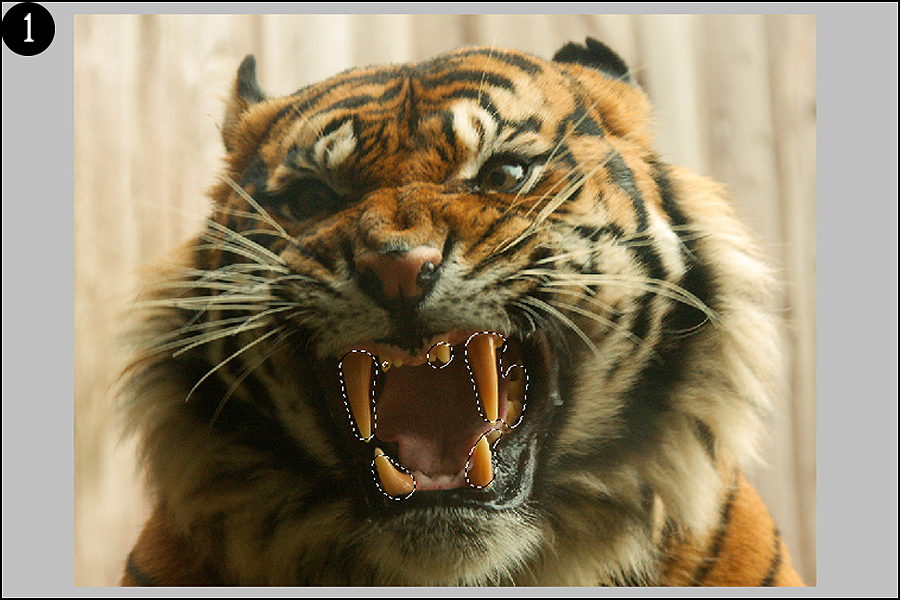
Add a Selective Color adjustment layer (make sure you do it as an adjustment layer so that you’re working on a mask), select Yellow as your color and reduce the amount of yellow in your image. In some instances, this may turn the teeth red/magenta – go to your Red tab and reduce the amount of magenta. In this extreme case of yellow teeth, I reduced my Yellow yellows to -69 and my Red magentas to -60. Below is a side-by-side comparison of the improvements (Figure 2):

You can then touch up your mask with your brush tool as necessary. As you can see, the teeth are not completely white because that just looks fake – there’s still a hint of yellow/cream color to it. There are several other ways to brighten your teeth – such as using the dodge tool or perhaps literally painting them white, but as you can probably imagine, these create unnatural softening and just looks like someone (poorly) whitened teeth in PS rather than looking normal.
5. Skin Softening – With the fantastic quality of high-end glass and state-of-the-art dSLRs, we can get superior detail and tack-sharp images. However, portrait clients may not always want to see every pore on their face. My skin-softening tutorial here goes over how to naturally soften the skin without going to extremes.
6. Custom Lens Vignette – Many images – especially portraits – can benefit from a vignette in order to redirect the attention from the background and onto your main subject: the model. I have a tutorial for that here which explains how to add a custom vignette in PS rather than those pre-cut oval actions that just look unnatural.
7. Work Your Patch Tool – The patch tool on portraits is a fantastic way to blend in areas where harsh shadows are strewn across skin tones, such as the shadow of a tree branch across a forehead. Simply select the area around the harsh line where shadow meets sunlit skin (just the general area around the line and NOT the entire shadow/sun area) and drag it over to a skin sample that is entirely lit by the sun. You may need to repeat this step several times to get a natural looking transition from shadow to sun, and you can touch it up by selecting smaller problem areas to patch rather than the entire initial selection again. When making your selection, try not to get any hair or other elements as that can make your patch look blurry and unnatural.
Read more great articles by Christopher O’Donnell at his blog or follow him on Facebook.


4 Comments
Brilliant points, I learned some new techniques here that will give me a lot more confidence going into photoshoots.
One problem I find you get when shooting models though, is their insistence on teeth whitening to the point where it looks unnatural. I have done shoots before where I did some mild whitening using the lighten tool, and they send the samples back complaining their teeth looked yellow and gross and could I make them bright white without a hint of yellow. It looked awful in the end but they were happy with them.
Using your technique I might be able to keep things reasonable 🙂
great tutorial, but slightly disturbing that you used a picture of a tiger rather than a person.
My technique is to use separation of frequencies, instead of using blur gaussian blur I use a low layer surface
My personal favorite is the spot healing tool. You have a great list here! Good reference.