Selfies are common in these days of advanced smartphones and their cameras, but capturing a striking selfie can be a task. If you are frustrated with the selfies that you capture, then the following tutorial will help you capture a stunning selfie and we guarantee you can capture a great selfie after this 10 minutes read.
You see, it's easy to take some very lifeless photos when you don't think about the scene, the light or even the best gear for the job.
This whole wrap-up was inspired by a video that I saw from iPhone Photography School who take their mobile photograph (and selfie game) very seriously. They are well worth a look if you want to go next level (and they have a discount for Light Stalking readers here right now).
So for the purposes of this experiment, let's use the most low-effort thing we can do.
This will cover taking a selfie right where you are sitting…
Want a free iPhone Selfie Blueprint? Click here!
Here’s the Selfie Photography Challenge
The near-instant challenge…
A phone selfie. Without moving from where I am right now. In my seat in front of a computer in my office.
Now when you learn this process, the whole thing should take you no longer than a minute or two (I mean, I know I said “near-instant” in the title, but a minute is not too bad for a good photo, right?)
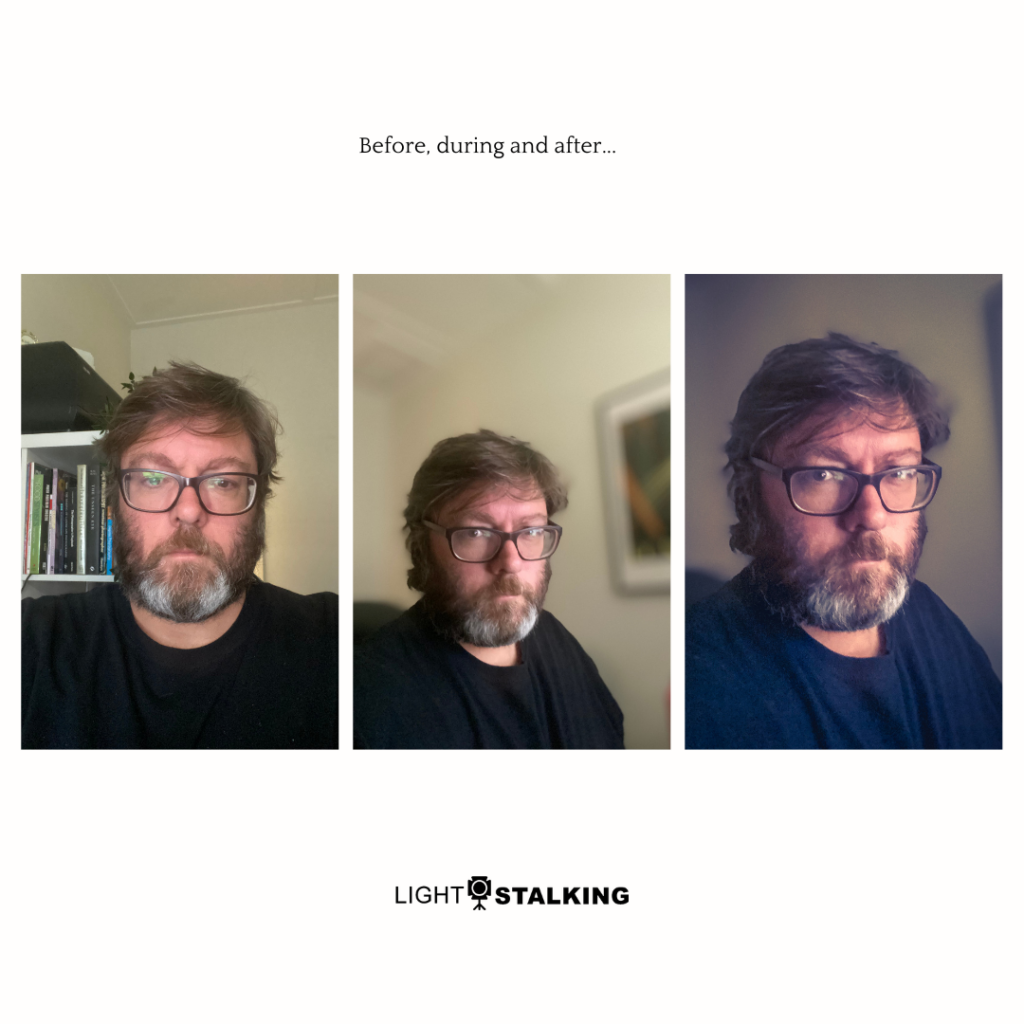
Here's my ugly mug with a simple selfie basically with no thought put in. It's what my humble iPhone 11 Pro comes up with on its reverse lens.

A pretty typical selfie taken from exactly where I am sitting as I write this, with my computer screen and some natural window light directly in front of me.
- No thought.
- A very plain photo.
- Cold.
- Lifeless.
- Massive room for improvement.
We can do a lot better.
Here's a quick reference guide to what problems we should be avoiding in taking a selfie and how we might address them:
| Problem | Solution |
| Boring light | Directional, but soft window light. Natural light is usually best. |
| Potato pose | Turn the subject slightly away from the light source and camera |
| Busy background | Choose a background before you pose the subject and throw it out of focus with portrait mode |
| More boring light | Open up an editing app |
Now the entire process I am about to do takes me a little less than 2 minutes from shot to finished product. So let's take a look at how to take a selfie that doesn't suck…
This is What We Need to Improve a Dull Shot
So let's think about a few things.
At this stage, for taking a selfie, it's the light and the composition that should be taking the bulk of your consideration.
Firstly, that light is fine (go for natural light if you can), but it could be a bit better to give more contrast simply if it came at an angle. That means I need to turn roughly 45 degrees to that light source.
I can also angle myself in relation to the lens so it's a hell of a lot more compelling composition. Don't ignore that composition or you are going to be trying to put lipstick on a pig when it comes to polishing up this photo later. We might also consider using a selfie stick if one's available.
Finally, you need to consider your gear. With a phone camera, you're usually going to have a way to control the depth of field as well as the exposure.
On my iPhone, I brought the (digitally generated) f-stop down to f/1.4 to throw the background out of focus. I did that by using “Portrait Mode” and then adjusting the f-stop control in the top right. This is probably different on every phone, but there will be a way so type your phone model into good with “f-stop” to figure out your specific controls. Most phone cameras have a portrait mode like the iPhone to take a selfie.
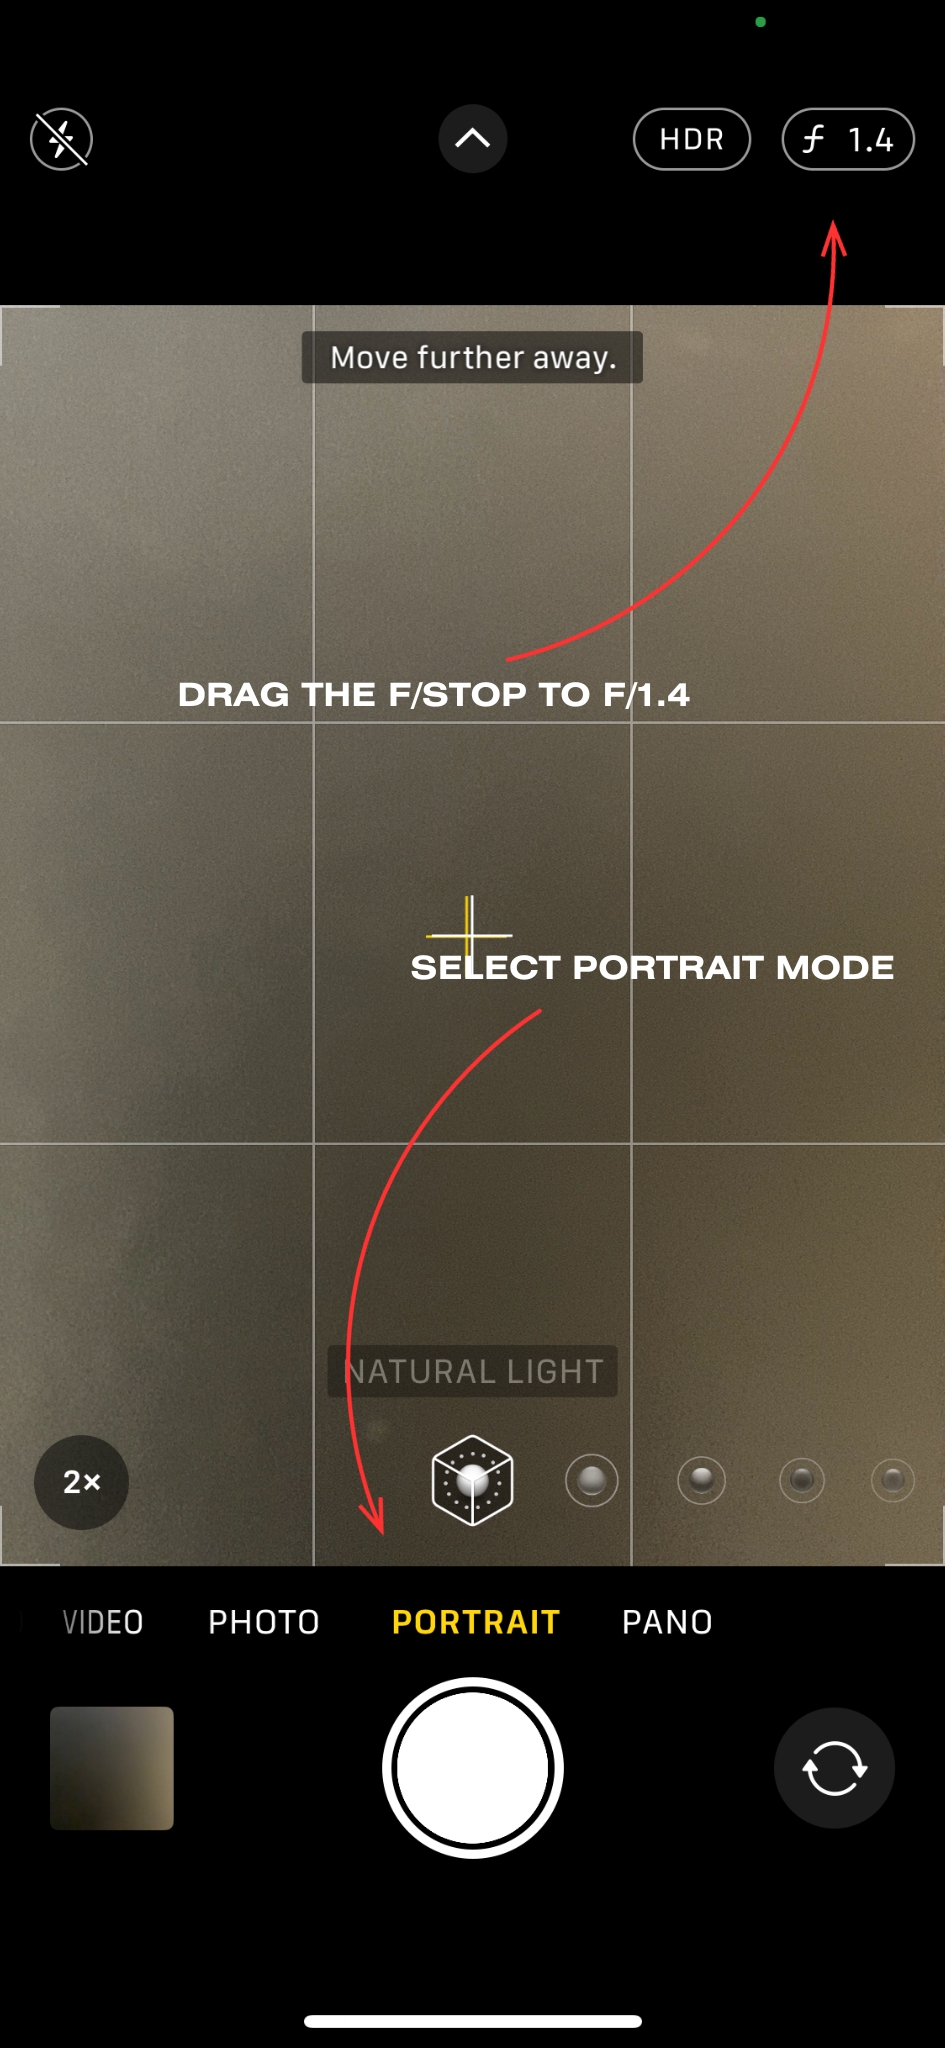
I also brought the exposure down to make the image a little more dramatic.
Click.

In retrospect, I probably needed a bit more light (it's quite dark in this room) as the iPhone is compensating and struggling a little with taking a sharp shot. iPhones generally struggle in lower lighting conditions.
But we only have 10 minutes for this challenge here, so let's move on.
Some people are content to crop the image and leave it there and you probably already have a much better image just from doing those few things when shooting.
So if you're happy with that improvement, you're already done!
But I like to take things further and add a style to my images and selfies, so let’s see what that looks like.
How to Add a Style to the Selfie
Next up, it's time for a bit of selfie post-production magic.
You have the score, now let’s look at the performance (tell me in the comments if you recognise that reference).
After taking a selfie, I open up the photo in the Adobe Lightroom mobile app which is what I do 99% of my editing in for my phone photography.
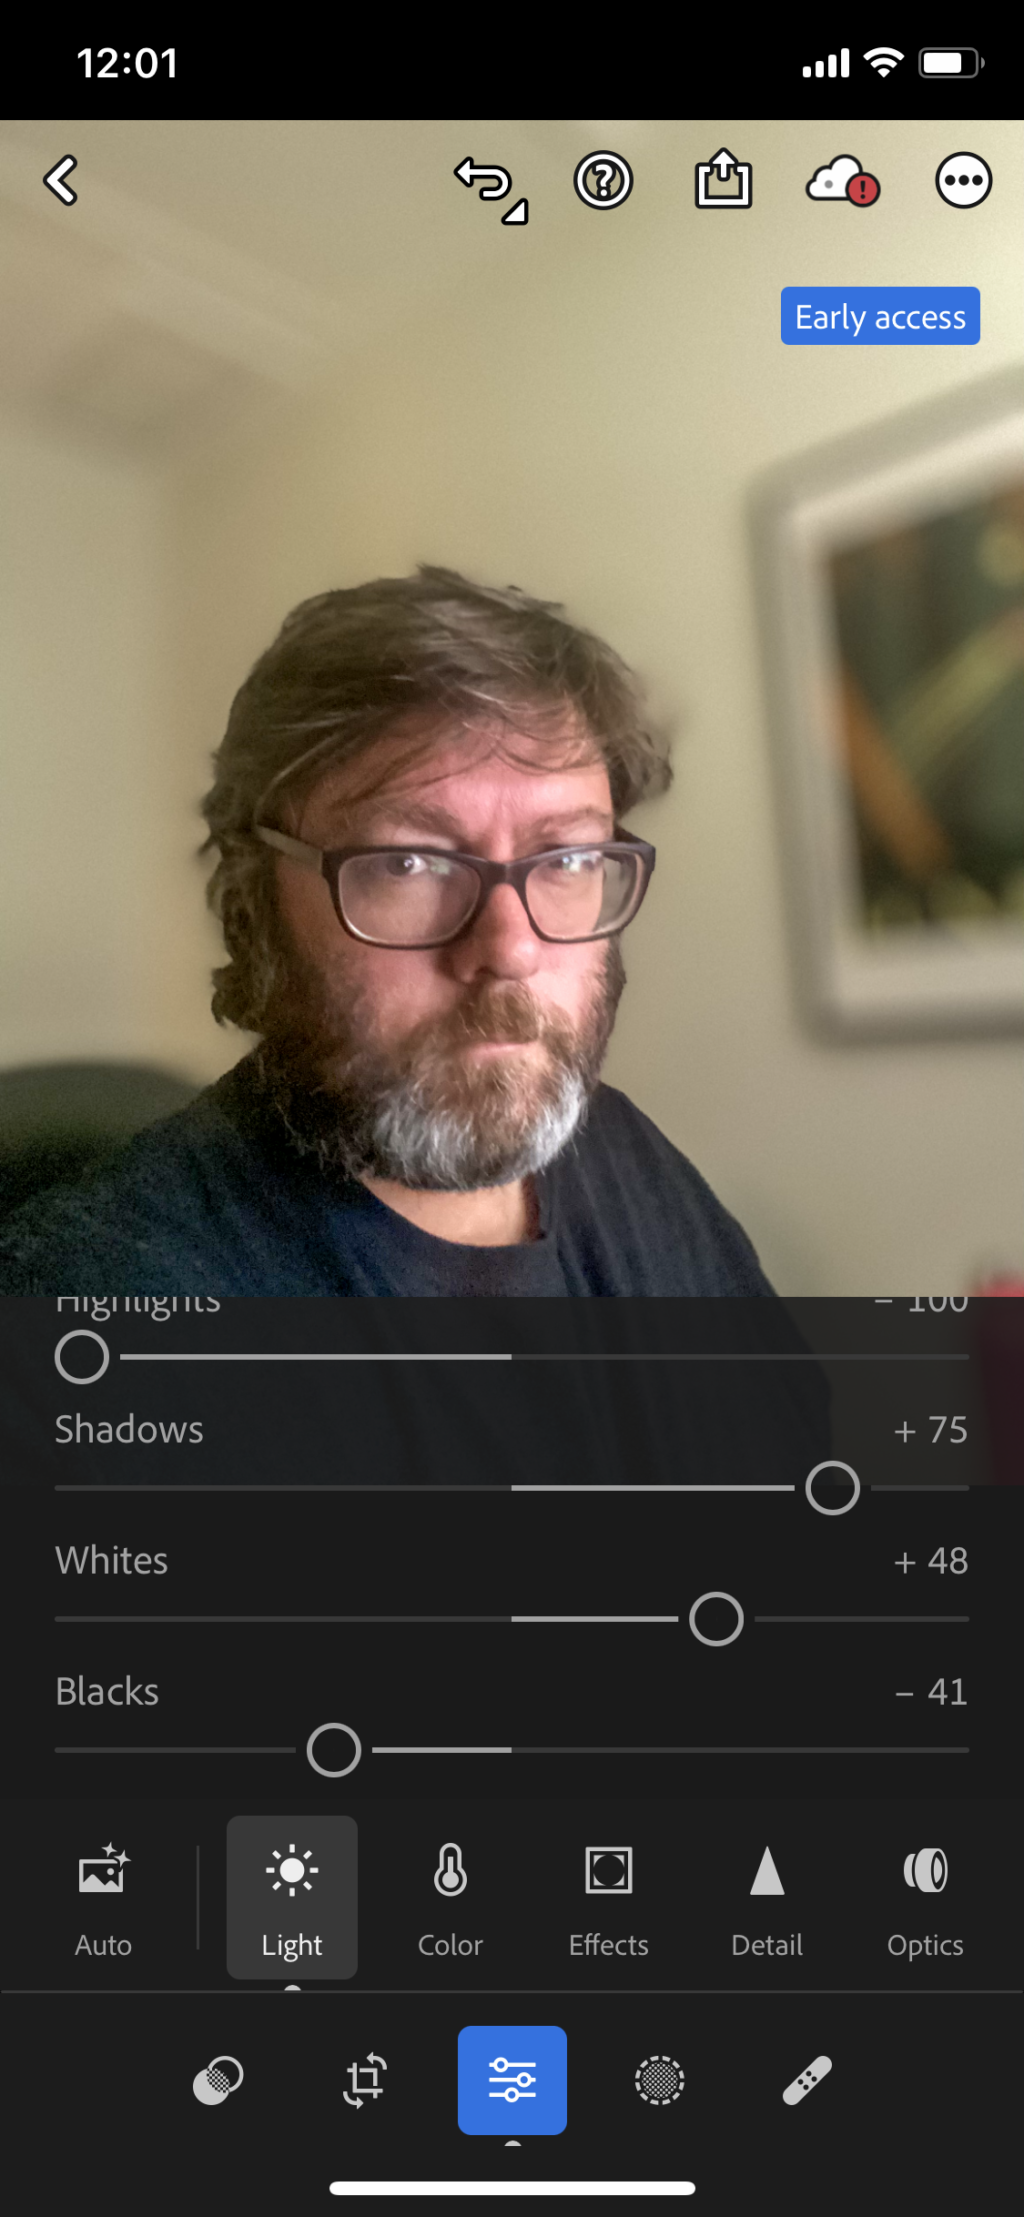
In the light adjustment settings, I usually take the highlights slider right down almost 100% and also increase the shadows almost 100%. I then use the white and black and get the rough exposure that I am looking for. This has the added advantage of increasing the contrast of the image without touching the contrast slider.
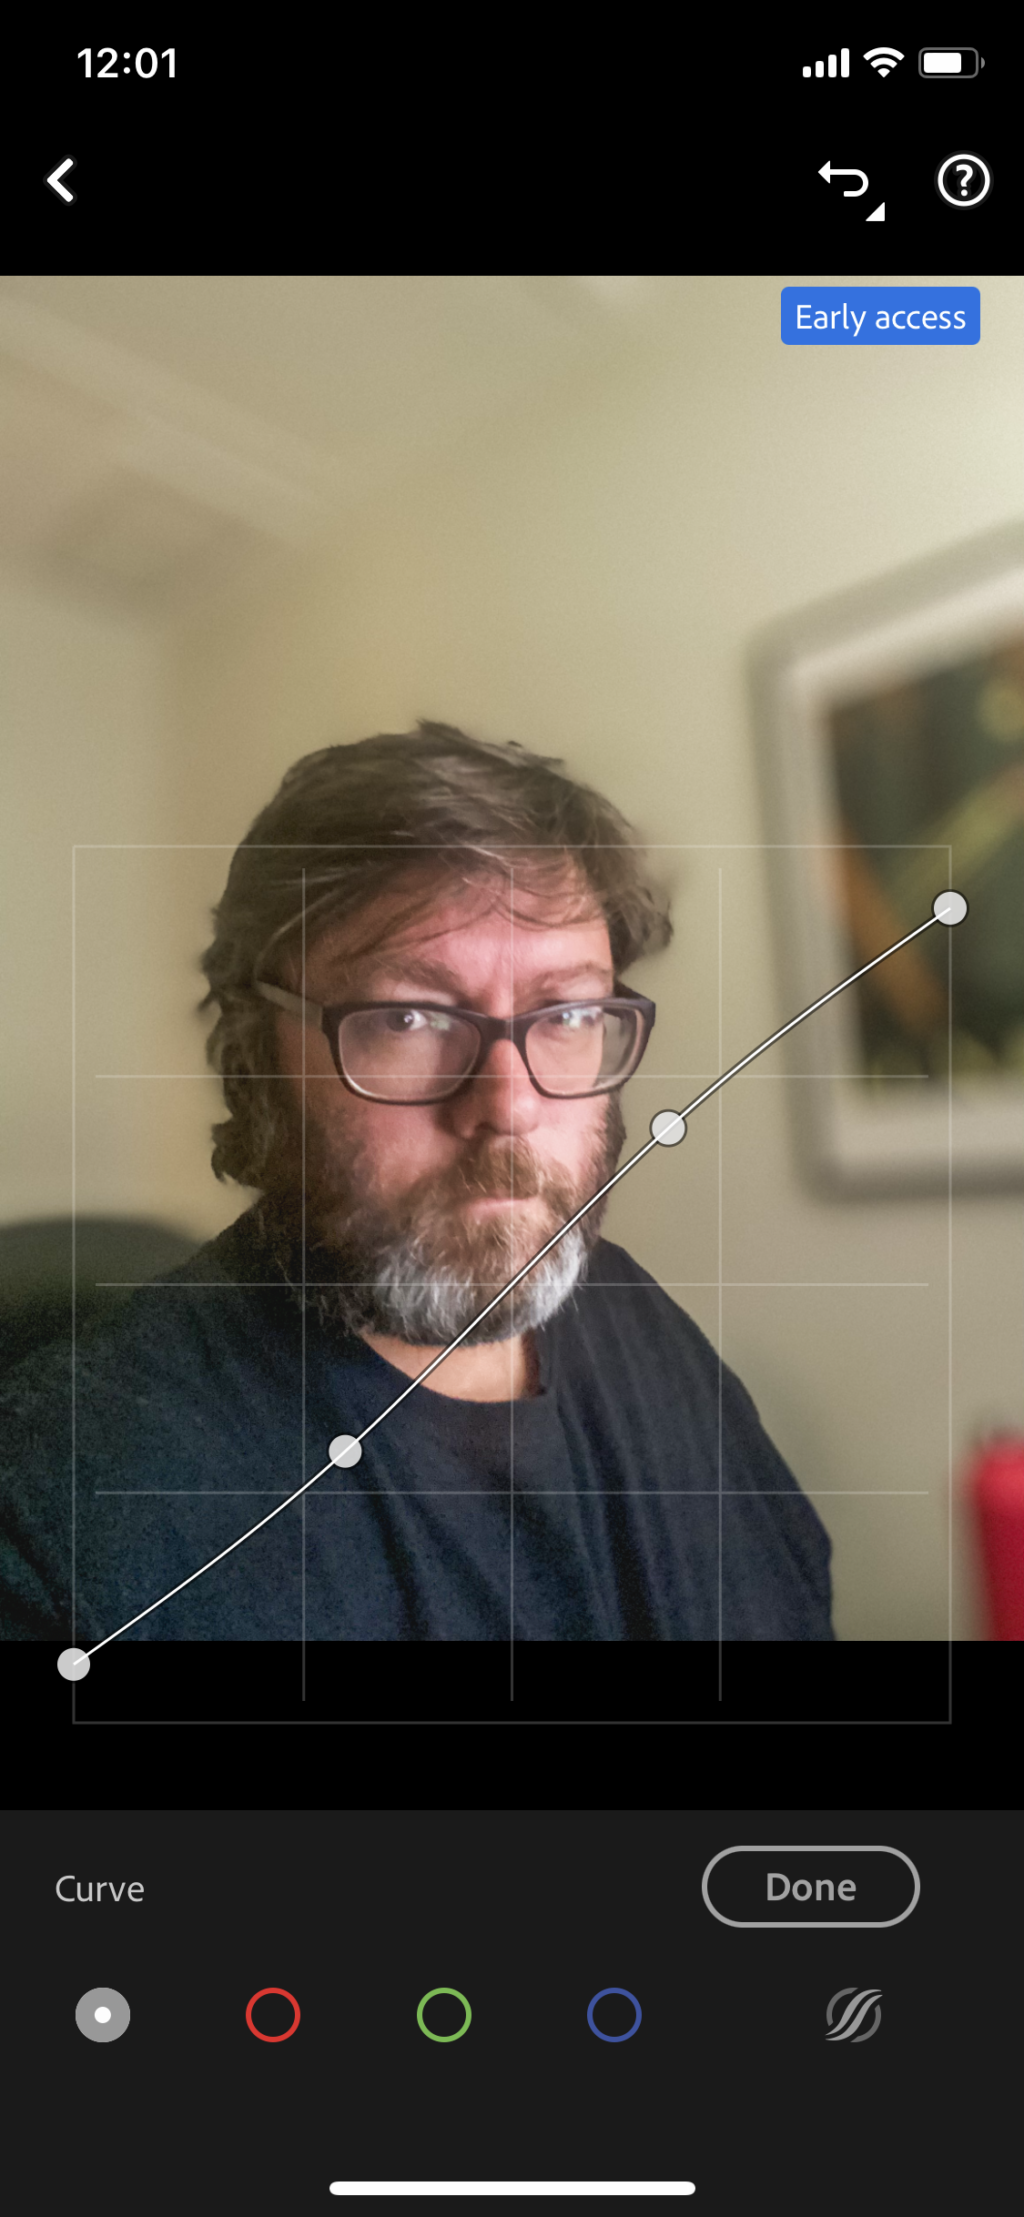
In the curves control, I make 2 points roughly equidistant apart and create a very slight s-curve to reduce the strength of both the whites and blacks.
In the color cotrols, I bring the vibrance and saturation sliders down roughly 10 points. This is where I usually also adjust the white balance if necessary (it's not for this particular photo).
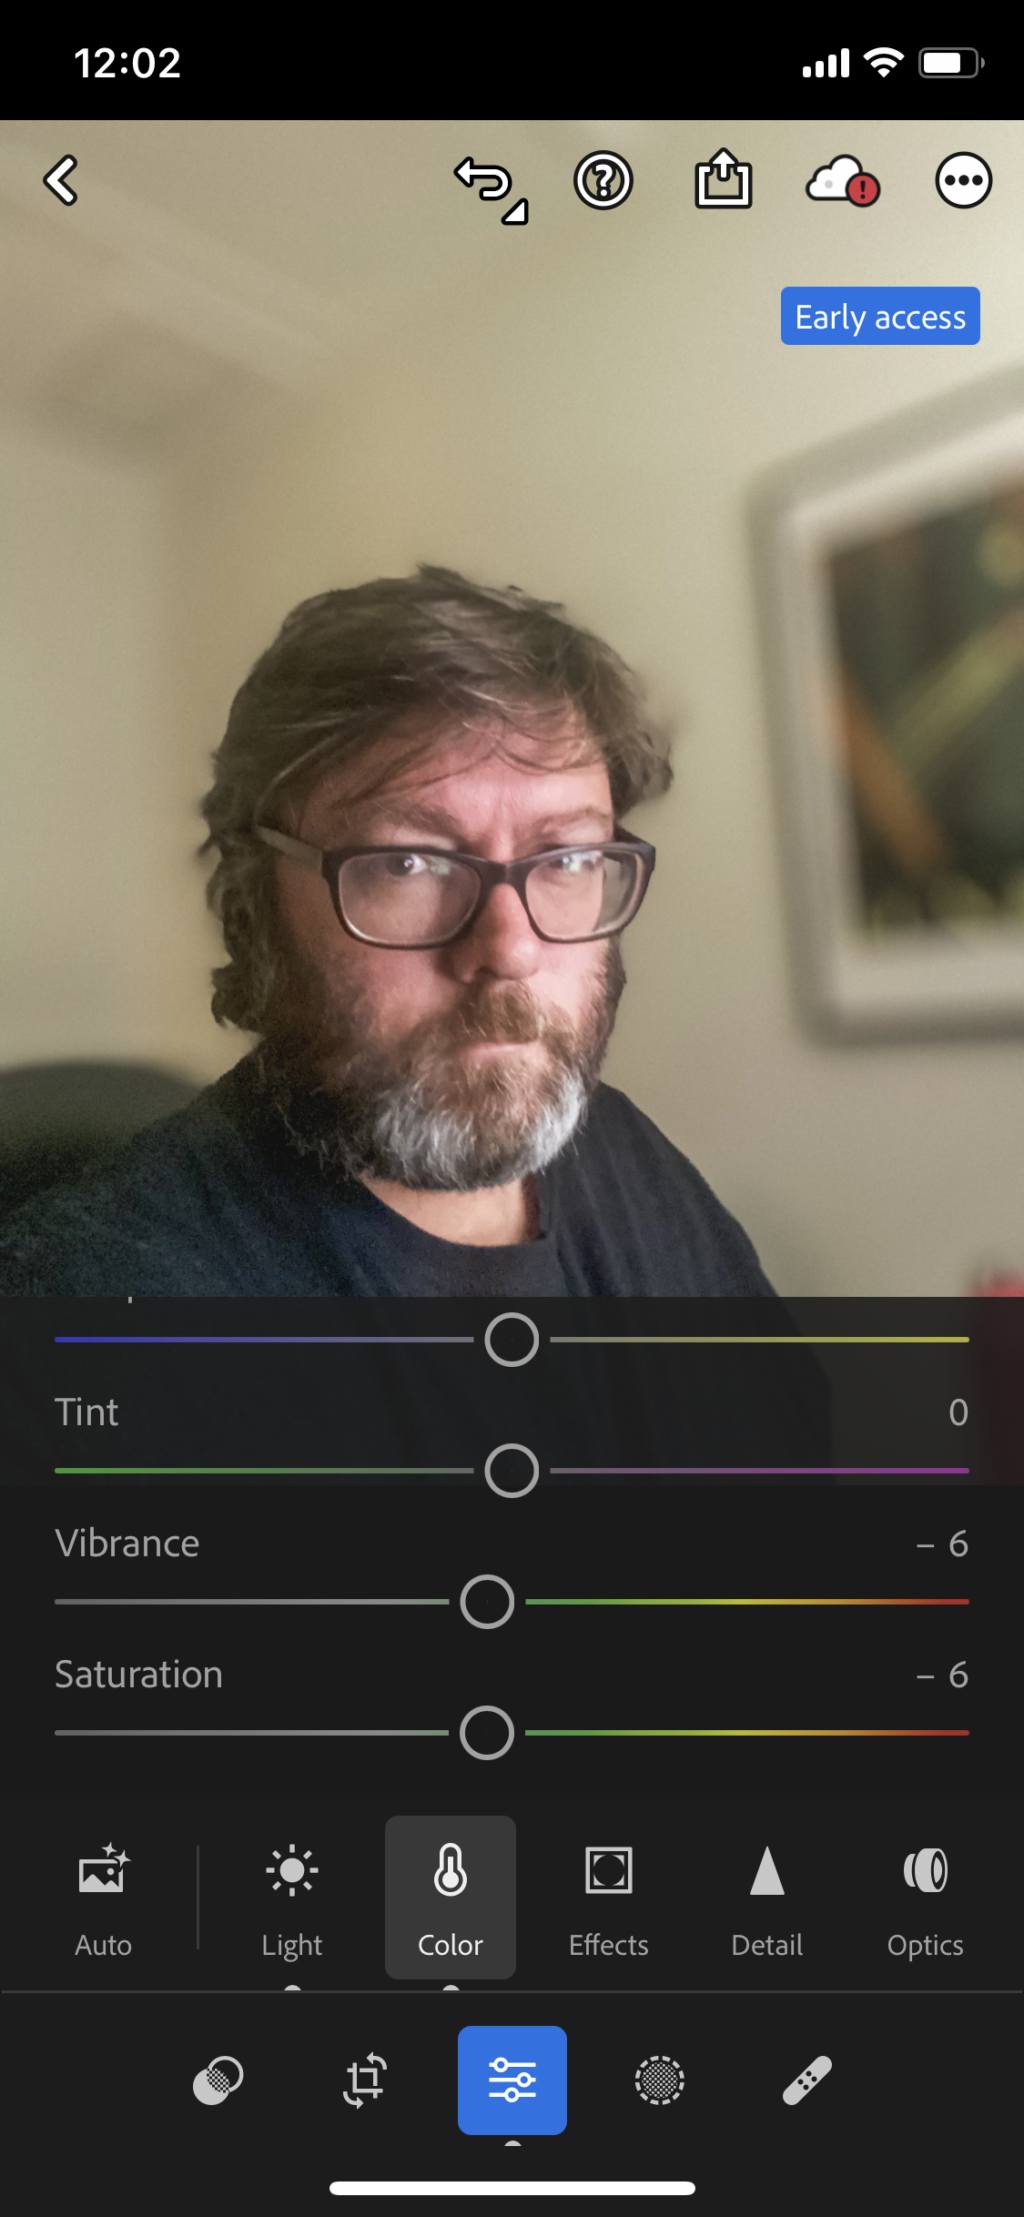
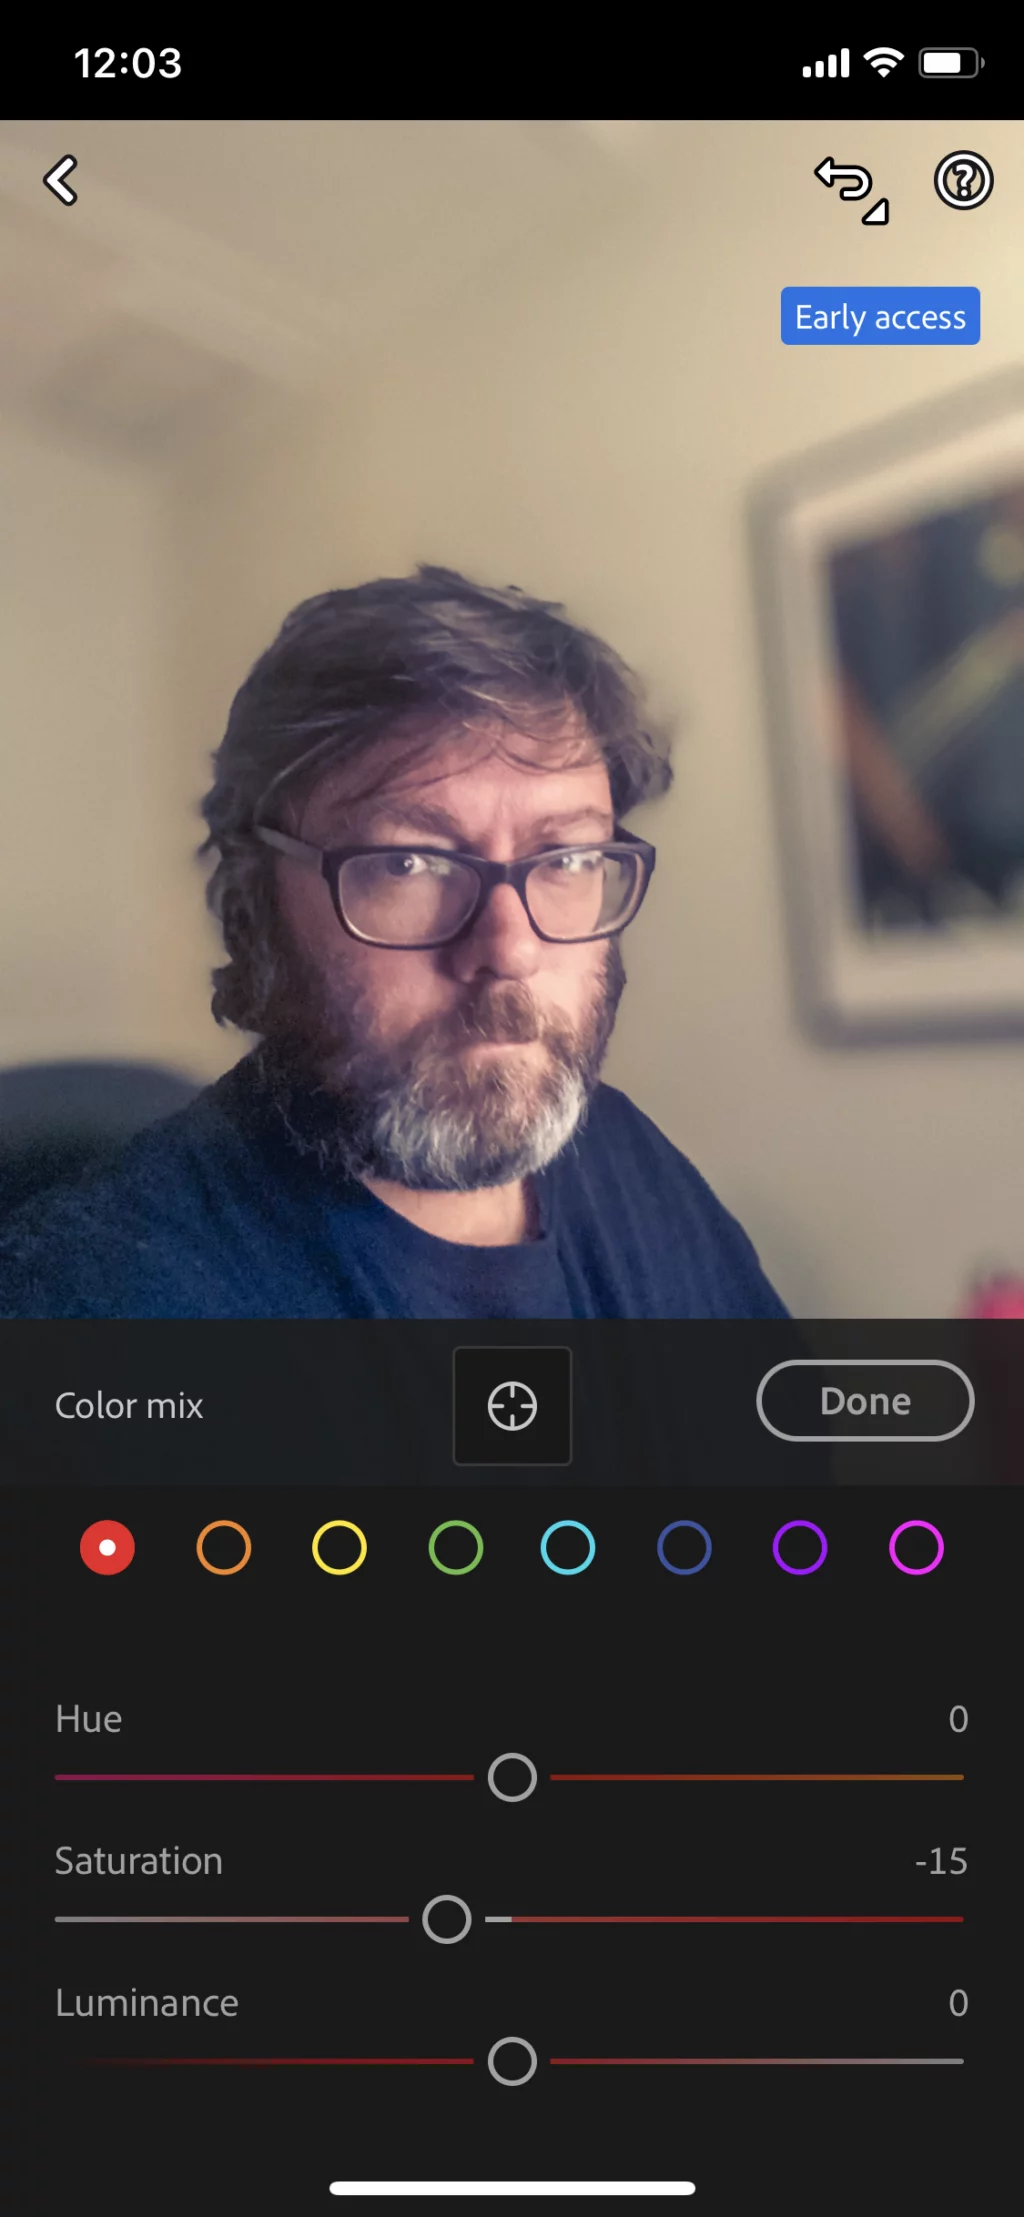
Sometimes I will also slightly adjust the saturation of the reds as people generally have a red tinge to their skin when you start playing with the colours.
Next up, I want to colour grade this photo to look a little like old school film images. (I love old school film, but it's definitely not a 10 minute exercise).
Pull the highlights towards the blue side of the colour circle and the highlights towards the yellow. Pay special attention to the skin tone as you don't want to make yourself look either like a corpse (blue) or like you have jaundice (yellow).
I usually test out different colours with the midtones but 90% of the time I don't move the midtones at all.
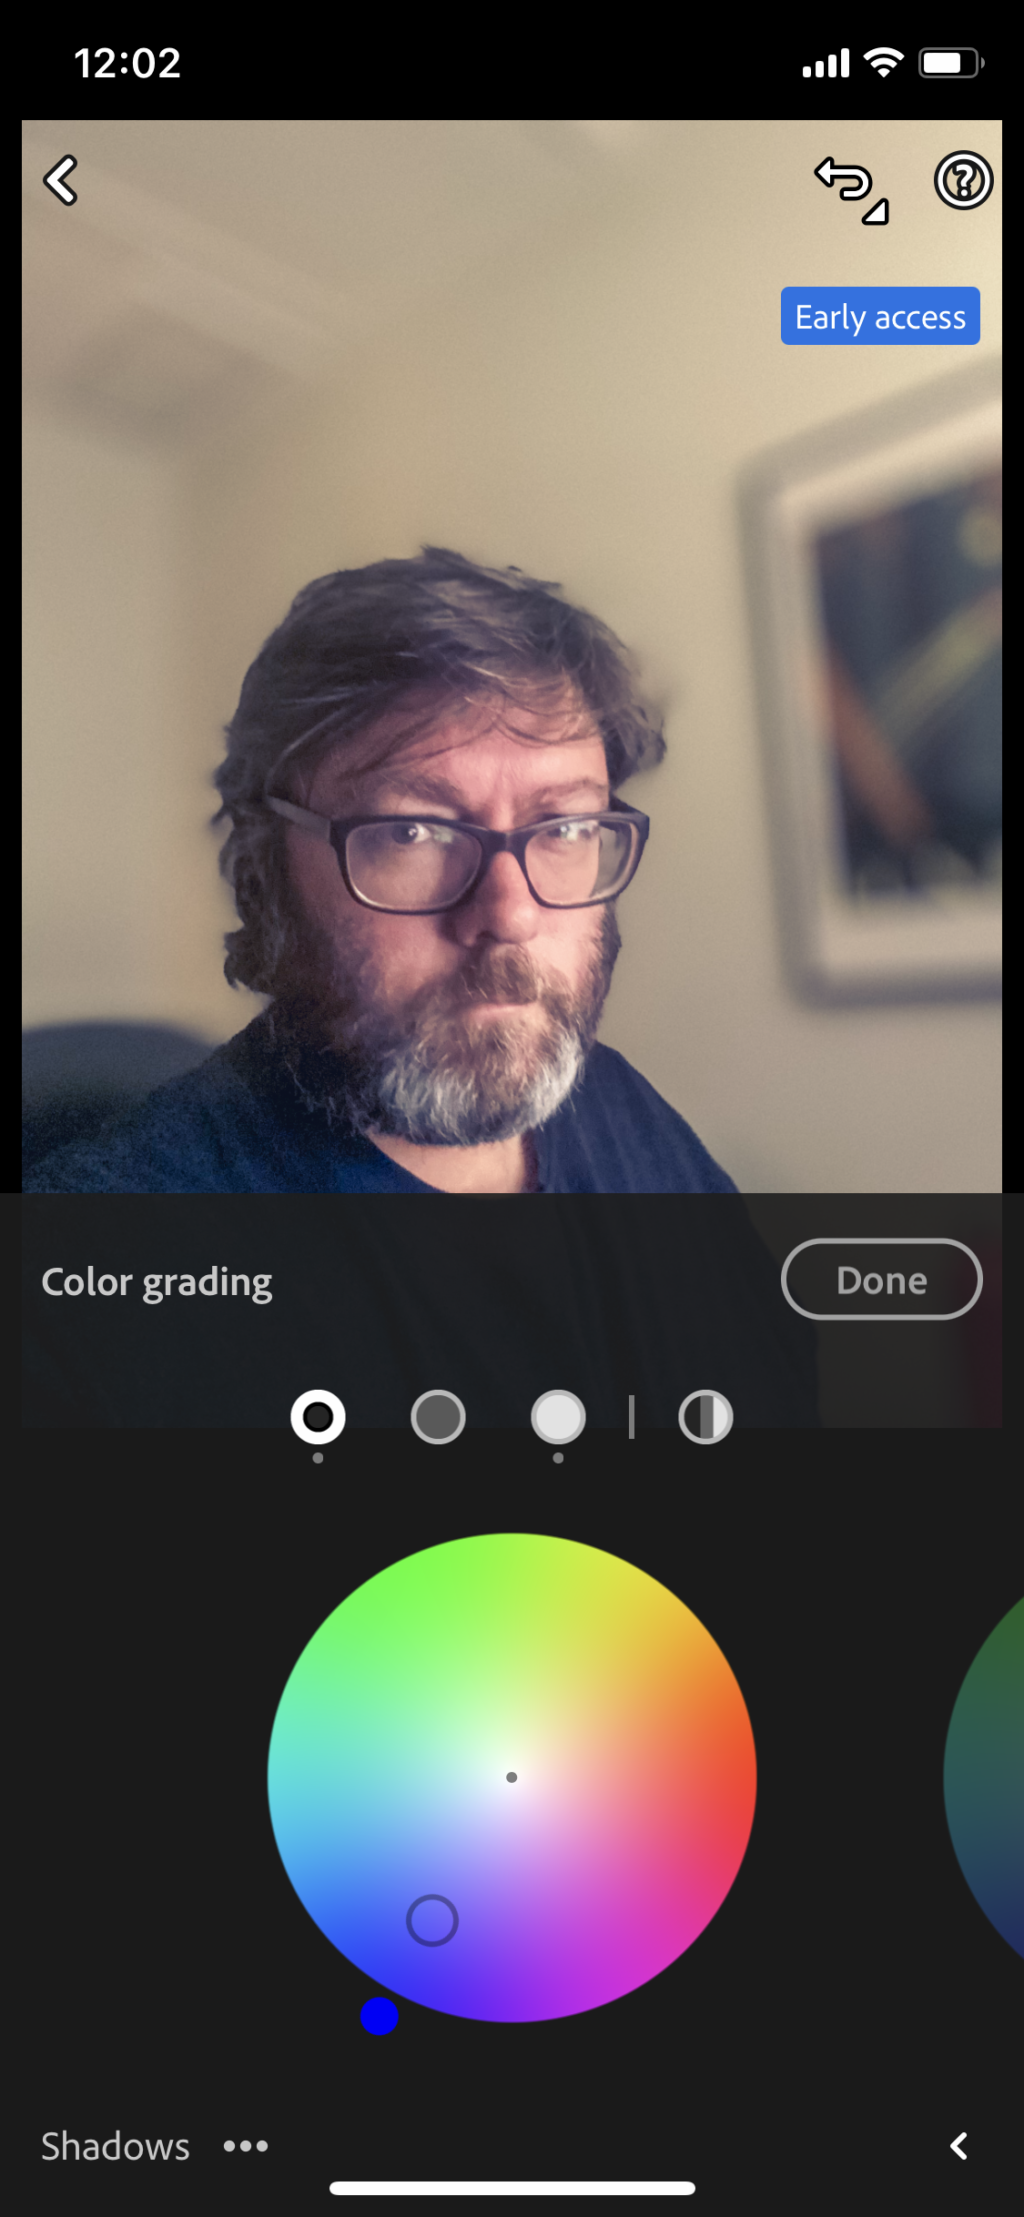
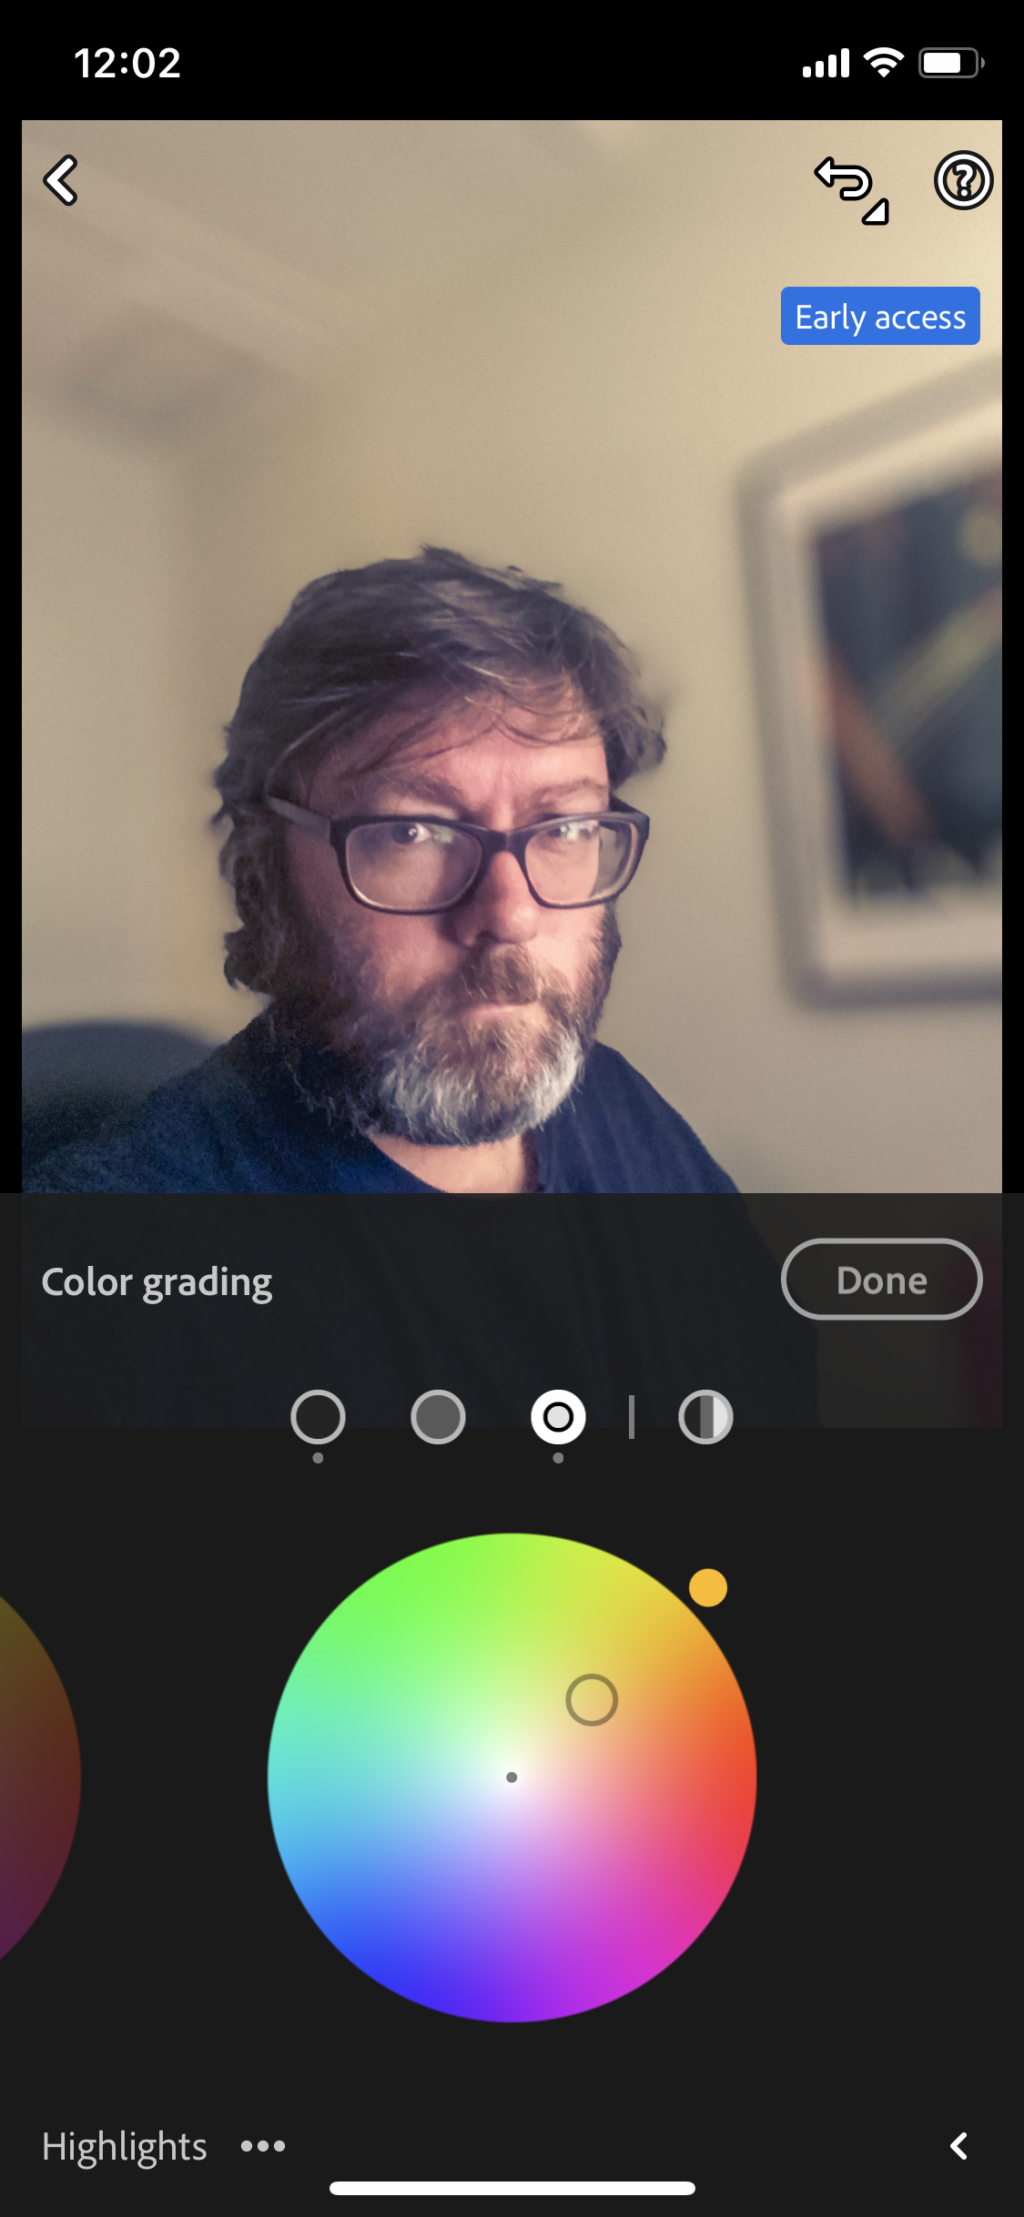
Sometimes it's also a good idea to bring down the saturation of the reds if they are a bit OTT on the skin.
Next in the “Effects” module, I will usually give a little bit of “dehaze” and I will add a vignette.
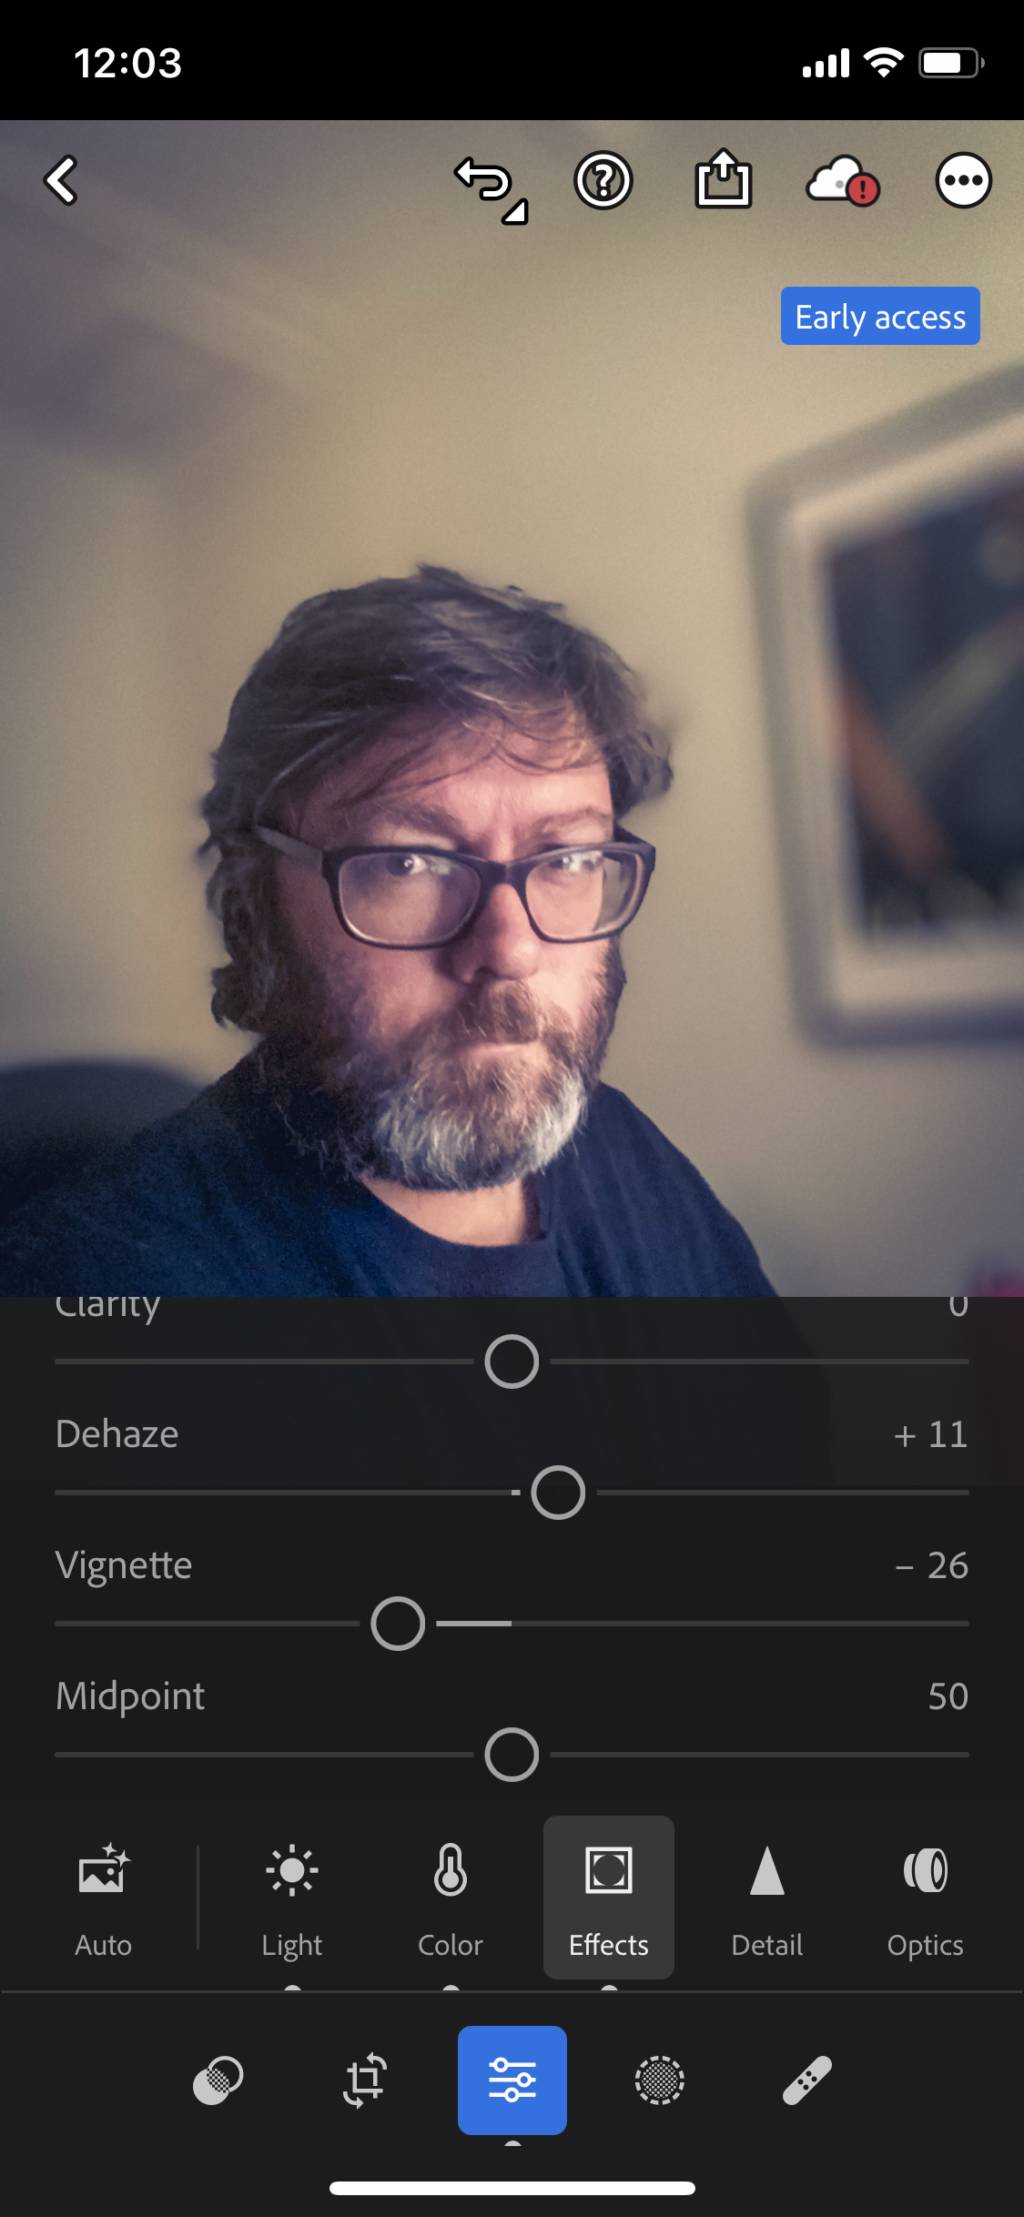
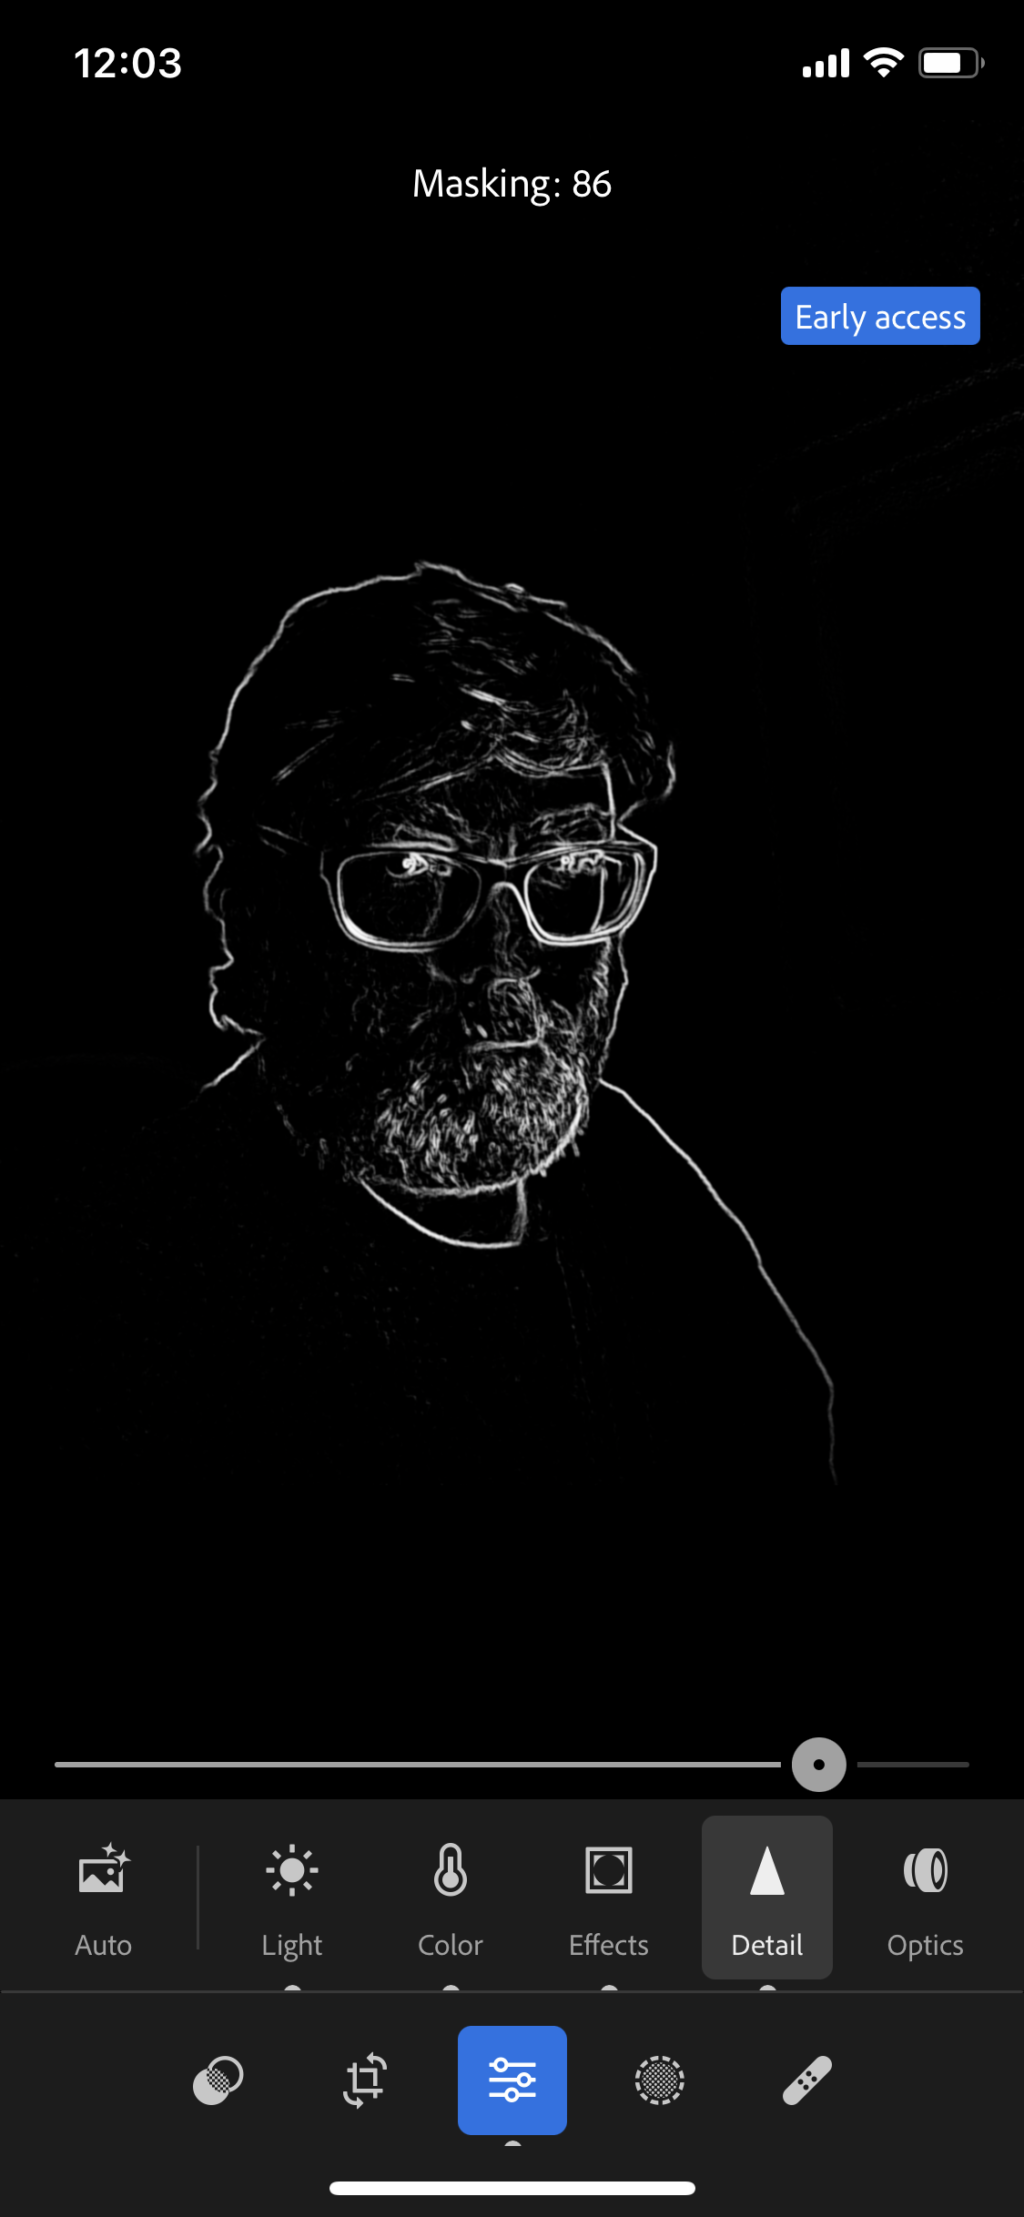
In the detail module, I will bring the sharpening right up, but also the masking so that my sharpened areas are sharp but small. (Hold your finger on the screen and drag the masking slider to see where on the image you are applying the sharpening.
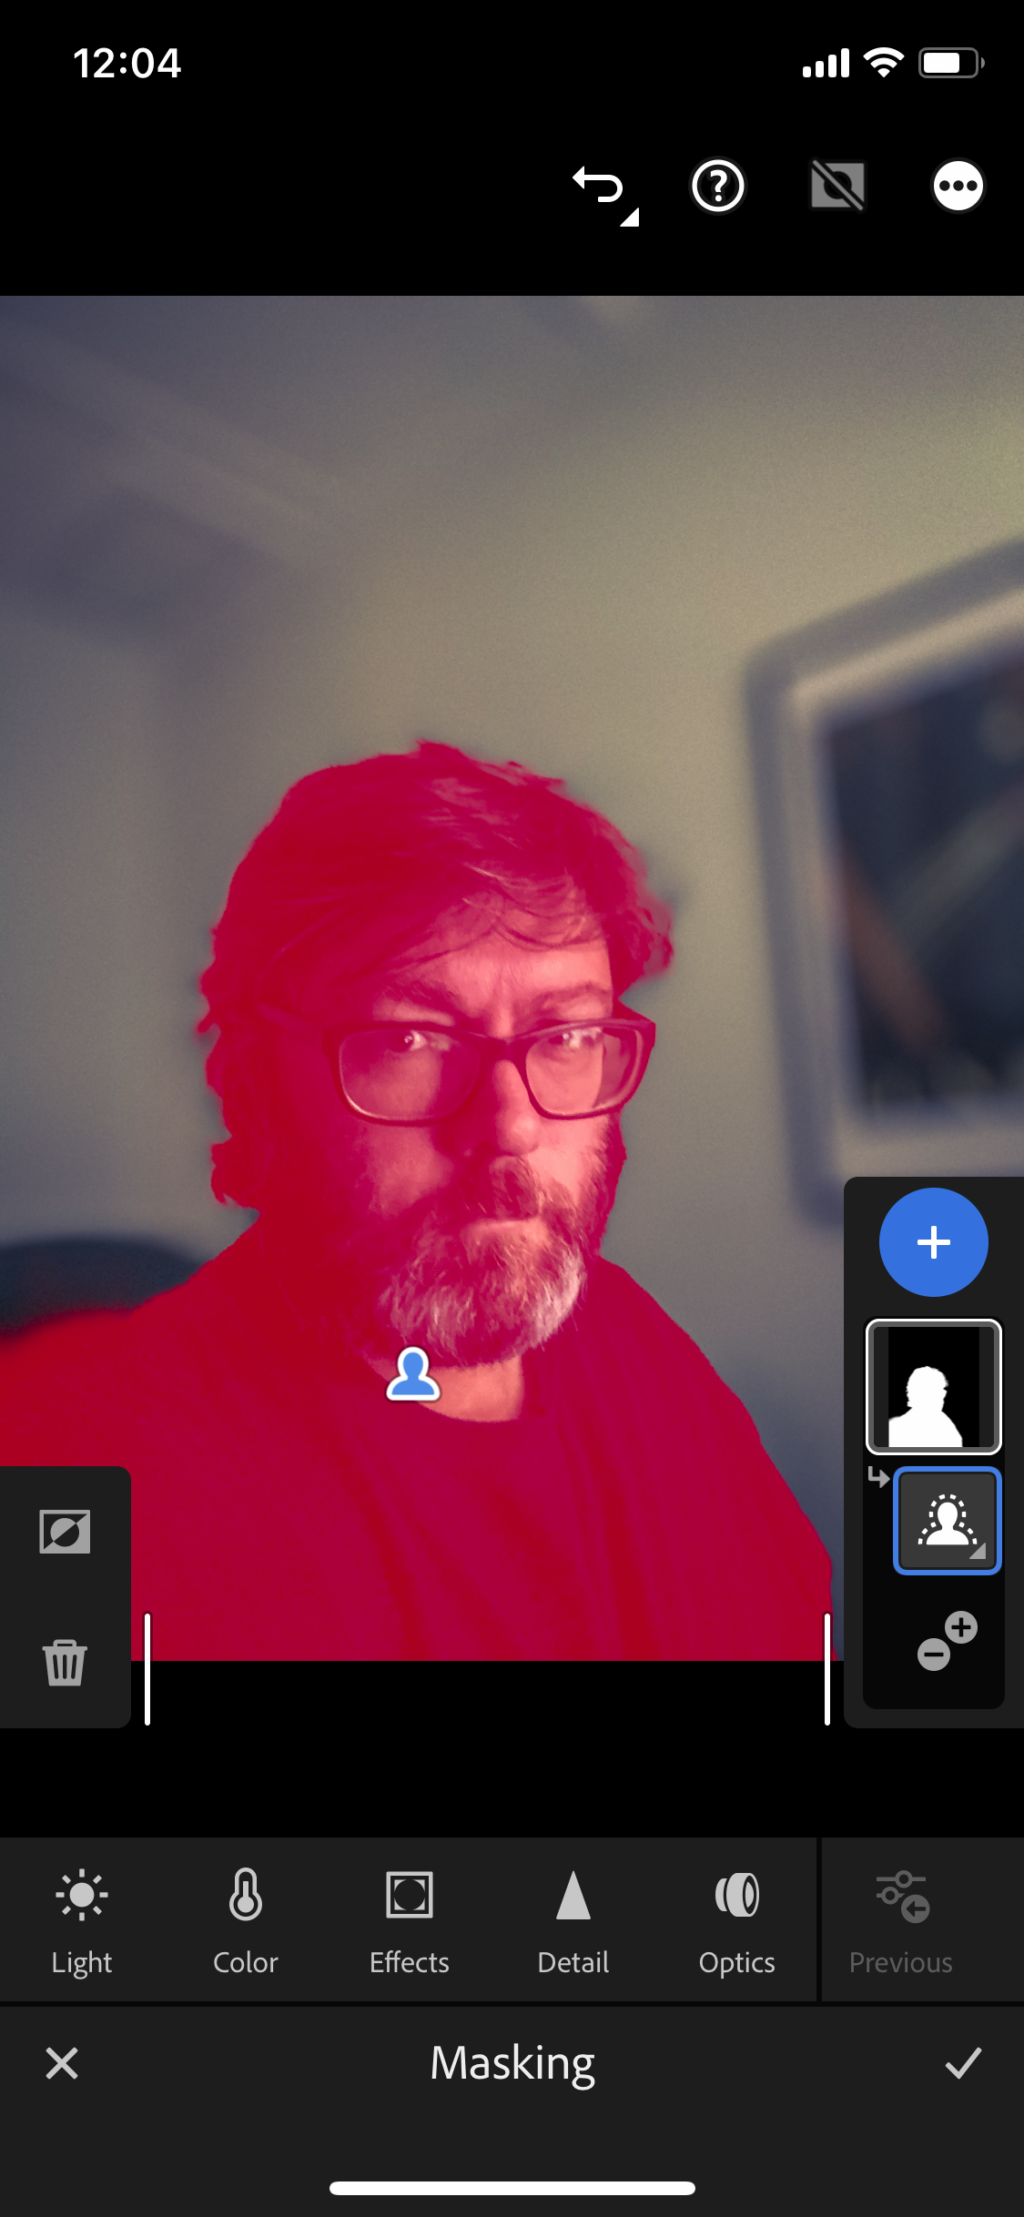
Next I want to stand out a little more against the background. The way I do that is with masking and exposure.
Firstly, I bring down the overall exposure of the image. Then in the masking tool, I use “Select Subject” and increase the exposure to where I want it.
I use the healing tool to clean up any blemishes or dirt etc.
Finally, I use the crop tool to bring the image into a classic portrait crop.

And that's about it.
Want a free iPhone Selfie Blueprint? Click here!
What I Could Have Done Better With This Selfie (Other than Smile)
Yeah, okay I look kinda angry. I should have smiled. My mistake. I think I was intently writing this piece so I forgot to smile.
Mistakes I Made:
- not smiling
- too little light for the iPhone to take a sharp shot (should have opened the curtains)
- distortion from glasses (should have reshot the original shot)
- desperately need a shave and haircut
- that picture frame in the background is distracting
Anyways…
In a few minutes, that selfie where I sit has gone from a very plain and boring image to something with a bit more consideration, light, colour and overall impact.
Sure, it may not be the perfect selfie and there are a few things to improve, but it's certainly better than the original.
The iPhone struggle to get sharp shots in low light and now that I have uploaded the image to a larger screen, I see it’s not as sharp. That can be fixed by shooting with a little more light (I should have pulled the curtains back).
It’s also having pretty obvious problems with the side of my face through my glasses so next time I would either check that first or even consider taking my glasses off if I still had to stay in my chair.
I am also not overly happy with the stuff in the background of my final shot. That is a little bit difficult to do when the challenge is to stay here in my seat, but in general, I would consider the background before I started worrying about shooting the shot. (In fact, looking for a background first is a trick that many street photographers use).
But in general, I am not too unhappy with this shot considering I literally didn’t get out of my seat and I think it’s a massive improvement on the shot that I did first.
The thing about this is that while it can be done on a camera phone, the same general principles apply to shooting images with any other camera. Consider the light, the composition and edit for the subject.
The humble camera in your phone allows you to practice photography skills like this basically without moving from your seat. It's a very low-effort way to continually improve your skills without even opening your camera bag.
And if you shoot with your phone for the majority of your images, that's even better.
To keep going with these easy improvements, it’s well worthwhile taking a look at the exercises offered by iPhone Photography School. There’s a discount right now here.
Happy shooting!
Want a free iPhone Selfie Blueprint? Click here!



4 Comments
A smile would have made a huge improvement, but I get it–you were discussing external elements that could be manipulated. Good post! I learned a lot!
lol – what, you don’t like my “Blue Steel” look? 😉
Which app do you use to take the photo?
Just the native photo app on the iPhone.