The is a guest post by Fiona Hall, an Antarctic specialist and Wildlife Photographer of the Year semi-finalist. Check out some of her awesome photos of Antarctica on her website.
The direction from which light strikes a scene, relative to the camera position, has a significant effect on colour, form, texture, and depth in the resulting photo. Here are some quick ideas on how to get the most out of your shot in any of the likely lighting conditions.
Frontlighting spills over your shoulder and falls squarely on the front of your subject. Because frontlighting is very even, auto-exposure systems handle it well. It produces bold, saturated colours, but when too strong can actually wash out some colours. The downside is that, because all the shadows are falling behind the subject and away from the camera, frontlit scenes lack a sense of depth or three-dimensionality.

Sidelighting comes from the left or right of a subject. Because the light is scraping across from side to side, it catches every surface blip and imperfection, leaving a trail of large and small shadows and exaggerating surface textures. It is ideal for landscapes, like desert badlands or beaches, where you want to convey the tactile qualities of a subject. Sidelight also imparts form and three-dimensionality to objects, giving a pumpkin its full roundness or a tree trunk its volume. Gentle sidelighting, especially from slightly above, works well for portraits because it creates a delicate modelling of facial features.
Photo by Stefan Mendelsohn
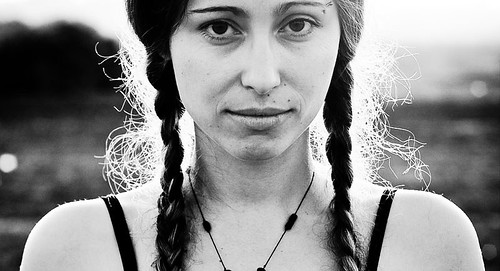
Backlighting can produce theatrical effects, particularly with landscapes. Shadows coming toward the camera exaggerate depth and distance and help lead the eye into the scene. When backlighting is used behind partially translucent subjects, like leaves or human hair, it creates a bright fringe called rim lighting that helps separate subjects from their surroundings. In backlit portraits, however, you may need to increase exposure by 1 to 1 1/2 stops over the metered value to keep faces from being lost in shadow. An alternate solution is to use flash fill. Keep the sun itself out of the frame or it will trick the meter into severe underexposure.
With many subjects, you can change the apparent direction of lighting by changing your shooting position – by taking a short walk if you're shooting a close-up of a barn or a horse, or a drive if you're shooting a landscape. Try to plan out your shoot and the likely conditions including the light direction and you will be well prepared.


4 Comments
Great explanation with great(er) examples!
Glad you enjoyed!
Hmmmm… very interesting write-up… THANKS for posting it!
No problems! 🙂