Over the last few years, RAW files have become the norm in digital photography, giving the photographer a significant increase of the control of their images as well as improved image quality. This wasn’t always the case, in the early days of digital photography, which in fact was only the first few years of the new millennium, RAWs were unwieldy, large files that were difficult to post process. To counter this Adobe introduce Adobe Raw Convertor to its Photoshop series in 2004 and at the same time launched its own Universal RAW file, called DNG, short for Digital Negative.
Adobe’s DNG takes RAW files from your own camera manufacturer and creates its own standardized RAW file. DNG is currently available for over 350 different cameras but what are its advantages and disadvantages, should you convert to DNG? Today well will try to dissect the pro’s and con’s of this interesting format.
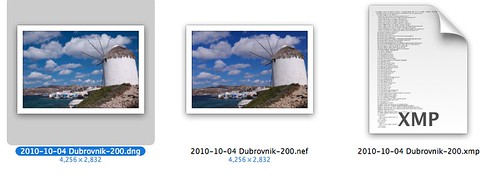
DNG next to an NEF with Sidecar. The DNG is 13mb the NEF 15mb by Jason Row Photography, on Flickr
So what are the advantages of DNG?
- As a universal RAW file, it is available for most cameras today and in the past. Photographers that use different cameras from different manufacturers or have changed brands and have large number of older files from a different company can convert their RAWs all to the same format. This means you are not at the mercy of companies that may go out of business and stop supporting their camera RAW formats.
- Metadata can be written directly to the DNG file meaning that when using image management software such as Lightroom, you do not need to export the file with a separate sidecar file in order to maintain the metadata.
- The DNG format RAW files are generally smaller than the manufacturers files, and more recently Adobe has introduced lossy compression to DNG allowing users to make their files even more compact.
- Because DNG is an Adobe format, Adobe products will continue to support and bring out the best in the DNG format, maintain very high compatibly across Adobe’s photographic products.
- Because metadata can be written into the DNG file, there is an extra level of copyright protection for photographers. Full copyright and ownership details as well as contact details can be fully embedded into the file. This is very useful for photographers that need to send their RAW files out of house for post production work.
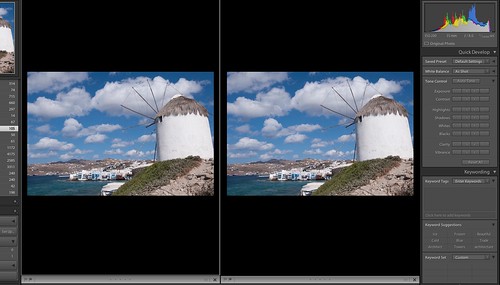
Side by Side in Lightroom by Jason Row Photography, on Flickr
Let’s look at some of the disadvantages
- Many camera manufacturers include data in their RAW files that can only be read by their own software. Nikon for example has some information in its NEF format that cannot be read by third party software. This includes manufacture specific camera features that are integrated into the camera and written to the RAW file.
- You are adding a further step to the post production process and whilst DNG conversion is generally quick, mass converting a large photo shoot and indeed a comprehensive back catalogue could be very time consuming.
- Because DNG is an Adobe format, you are at the mercy of Adobe’s strategic decisions. There is always the possibility, however unlikely, that Adobe might try to monazite the DNG format by charging either charging for the convertor or by not supporting older versions forcing you to upgrade to the latest Adobe product.
- When working on DNG files, the very fact that you can write directly to the file introduces the possibility of file corruption. Standard RAW files are not changed in anyway, image corrections are written to the sidecar file. In DNG this information is written to the file itself, meaning that corruption may lead to the loss of the image.

Some RAW files have data only accessible front their own software by Jason Row Photography, on Flickr
Whether or not you decide to convert your RAW images to DNG is entirely a personal decision. From research I have done across the internet, there seem to be very little in the way of issues from people that have done so, but equally very little in complaint from those that decided not to. In reality, you need to look at whether the advantages of converting are going to be significant enough to your workflow and image management to make the change worthwhile. In my case I decided that they were not, I am happy with my current workflows despite using RAW files from three different manufacturers.


16 Comments
Good summary! Few comments:
– DNG is an open specification
– DNGs as large monolithic files eat lot of backup space if one updates the files (changing one tag causes full re-write of tens of MBytes)
I found issues when trying to send images for consideration for a photo award and the submissions had to include the original Raw file and not the jpg file.
This can be an issue if you have converted to DNG…
DNG is a raw file.
Question really is, why do you enter competitions. Always found such things to be for people who are trying to gain self gratification without making the effort to learn. Not like you ever get feedback as to why you didn’t win.
Very True there Bing .. Thank you.
In some ways I can understand them wanting to view the Raw file to see what has been altered or manipulated in post, but there is no way that I would be sending my Raw files to anyone that I do not know.
Some photo contests are set up to collect images that they take ownership off and use how ever they want.
Steve….
Thank You for pointing this out.
There is way too much theft out there as it is. There is No Way that I am going to hand over my RAW files to Anyone.
I quit “flicker” because of that reason = and this was with a small file of jpg With my (C) “stamp” on it.
There are a few so called “contests” as well where the photographer should be very careful.
Hard drive space is vast and cheap, so I keep all my original raw files, and then I only import my best shots into Lightroom, converting to DNG. I don’t need Lightroom’s organization for every shot I take and keep, but even if I imported everything into Lightroom I’d still keep the original raw file as well. No reason to limit your options.
There is the option to “pack” the original RAW file inside of the DNG “box”. It obviously makes the DNG file bigger, but allows you to extract that RAW file in it’s original form later if you need to.
I shoot straight to DNG with my Leica.
I keep my original RAW and I also convert all of my files to DNG which I manage in Lightroom. I only have about 20,000 photos and I shoot about 70 photos per week, so I do not have any problem with disk storage and multiple back ups, especially with how cheap disks have become.
Jason, I am sorry for the conflict going on in your country, and I hope it can be settled peacefully.
As far as i know DNG is an open format.. I don’t agree when you say that choosing DNG you are at the mercy of Adobe.
DNG can be easily integrated into your workflow by a program I purchased called Breeze DownloaderPro. I have my copy configured to created the necessary folder, based on the DATE, add the “name” of the shoot, and it will download the card, convert to DNG and leave the RAW files in a separate folder, to be deleted if I deem to do so. This leaves me with the DNG ready to work, and on a 16GB card takes about 10-20 minutes.
OK so DNG is not what I thought it was. Correct me if I am wrong………… But basically as long as I am only working inside of lightroom and photoshop, then I am fine to stay as RAW (and just copy without DNG).
but if I ever want to go into a third party software, then I might want to look into DNG.
am I right?
There is a loss of data (15%) when a RAW file is converted to DNG, albeit unnoticeable in most cases. I used to use DNG and it worked great – until I had a problem with a Hasselblad file (.FFF), which had been converted to DNG. There was a serious moire pattern in an article of clothing. I tried several methods to remove it, but eventually had to give up on this image, as it was unusable in it’s current state. A few months later, a folder with the original .FFF files, turned up. I ran them through Hasselblad’s “Phocus” software and was able to remove the moire with just one slider.
I shoot straight to DNG on my Pentax K3. Anyone know if the results differ from shooting in native PEF then converting?
Nicely explained! I just learned here: https://www.aftershotpro.com/en/pages/dng-file/ how to edit DNG files but I wanted to learn more about the format itself. Thank you very much for sharing , you cleared some doubts to me