var advanced_ads_pro_visitor_conditions = {"referrer_cookie_name":"advanced_ads_pro_visitor_referrer","referrer_exdays":"365","page_impr_cookie_name":"advanced_ads_page_impressions","page_impr_exdays":"3650"};
var essb_settings = {"ajax_url":"https:\/\/www.lightstalking.com\/wp-admin\/admin-ajax.php","essb3_nonce":"bdc361df3a","essb3_plugin_url":"https:\/\/www.lightstalking.com\/wp-content\/plugins\/easy-social-share-buttons3","essb3_stats":true,"essb3_ga":false,"essb3_ga_ntg":false,"blog_url":"https:\/\/www.lightstalking.com\/","post_id":"2479"};
When processing your photo as a black and white image, it can be a bit confusing as to what the next step is. Do you dodge and burn, add a lens vignette, or adjust your contrast? While all these steps can greatly improve your image, there is one important adjustment that many overlook which will have a huge impact on the final product: adjusting the tones of your colors.
In Photoshop, it’s quite easy to switch your photo into black and white: just simply add a Black & White adjustment layer. When you add that layer, you’ll be presented with the adjustment layer menu, allowing you to customize your black and white tones (Figure 1).
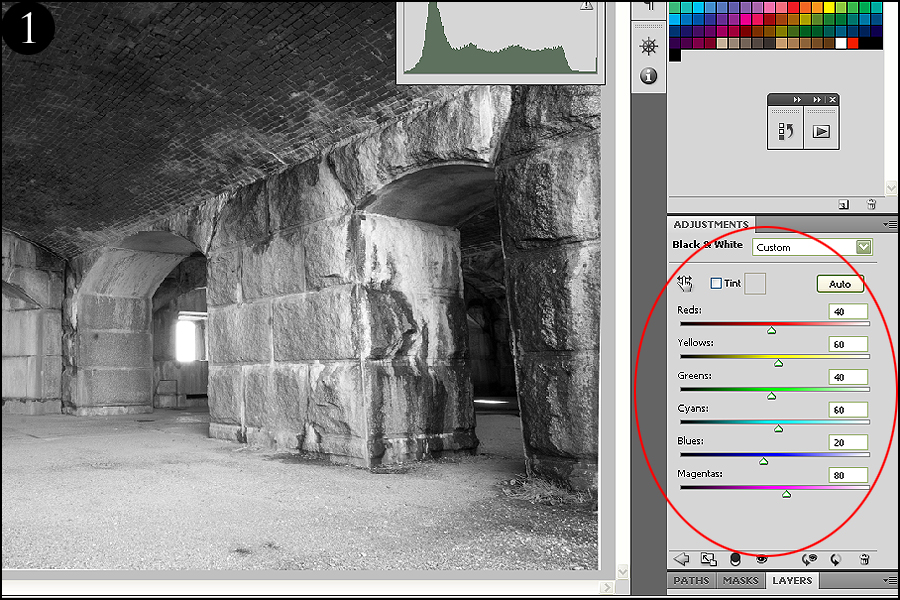
Many photographers who don’t know better skip over these important options. As you can see in the above figure, you’re met with several sliders that represent colors in your photo. What these sliders do is darken or lighten the tone of those specific colors present in your image. For example, let’s say you have a lot of red in your original color image. When you move the red slider, you’ll darken or lighten only the red color pixels in your photo. So in short, only the red colors will be affected, giving you a great level of tonal customization to create a high-impact image: you can darken the reds, brighten the yellows, and so forth.
Let’s see what happens when I adjust the red slider in my image (Figure 2). The default setting is at 40, but let’s drop that down a bit to darken only the red areas of my image.
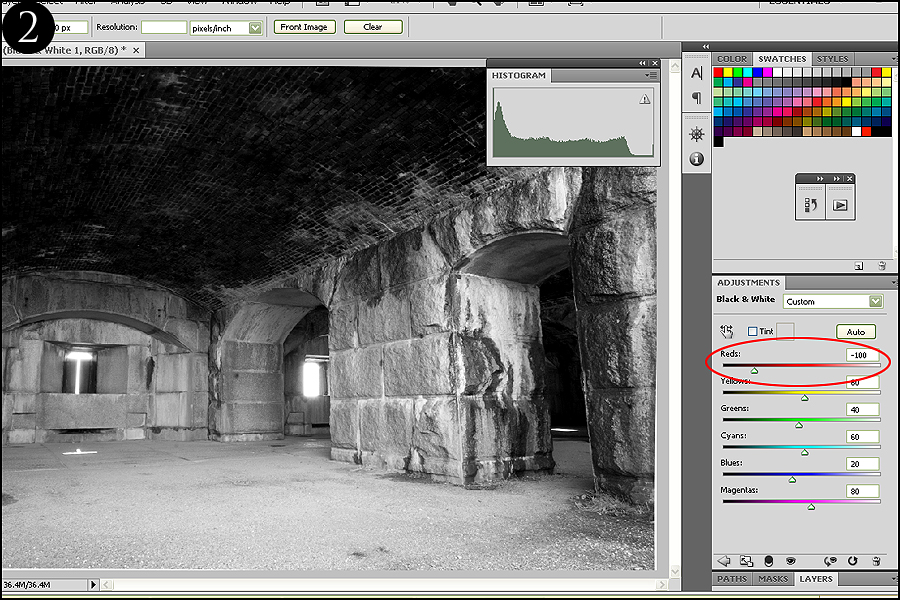
The roof was dark red in my original color photo. The only part of my image that was drastically darkened was the area around the ceiling, while the remainder of my photo was left unchanged.
This is a fantastic tool as many images that are converted to black and white can have a cloudy look to the tones – that is, a lack of dark blacks or bright whites. By adjusting your colors selectively, you can increase your tonal range and heighten the drama of a black and white with little to no damage to your photo.
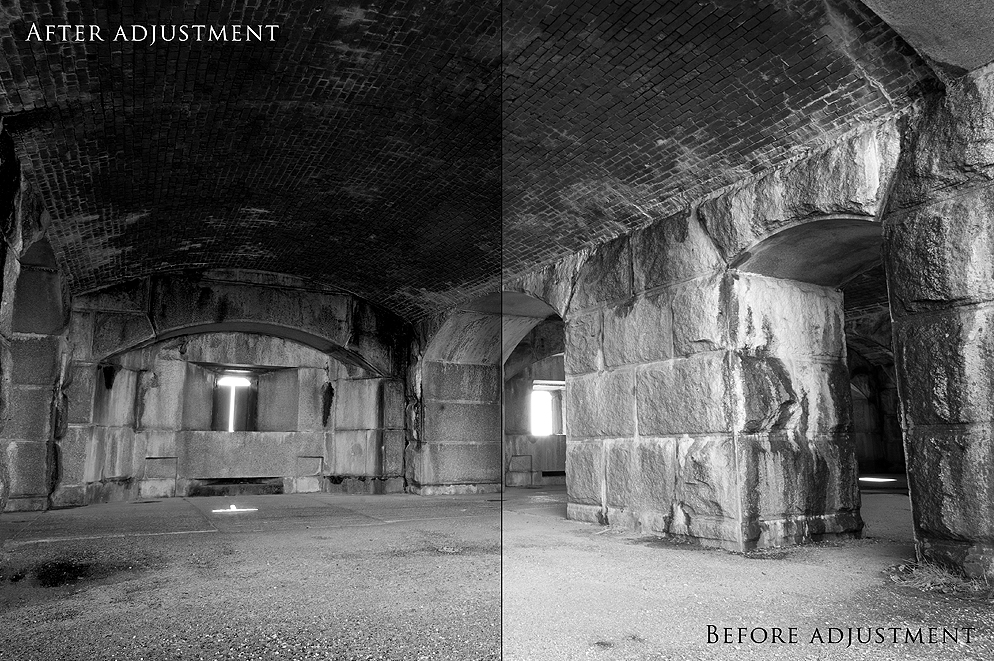
I’m going to go ahead and adjust the rest of my colors in order to expand my tonal range (Figure 3). As you can see in the side-by-side comparison, there is quite a difference.
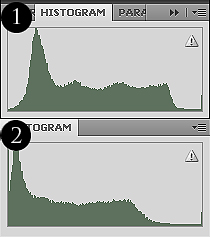
This difference is also reflected when I compare the histograms. In the first histogram (which is the original black and white image before I changed my color sliders), you can see that the tones are pretty bunched up in the middle. However, when I adjusted my colors, you can see how the histogram spreads out more to the left, indicating that I increased my darker tones. Click here if you want to learn how to read your histogram.
So if you aren’t adjusting your color tones yet, you really should start in order to bring out a great tonal range in your black and white images. Once you have this solid base down, you can then dodge and burn, adjust your levels, or perform these other kind of black and white editing techniques.
Read more great articles by Christopher O’Donnell at his blog or follow him on Facebook.
About Author
I'm a professional landscape photographer living on the coast of Maine. Through my work, I like to show a vantage point that is rarely seen in reality; a show of beauty, emotion, and serenity. Feel free to visit my website.
That is the first thing I do when converting to B&W, I saved some settings as Lightroom preset to quickly preview different settings, but I always tweak them by hand before I’m satisfied with the photograph.
You can also make the same tonal adjustments in Photoshop’s CAMERA RAW editor by clicking the “convert to grayscale” box in the HSL/grayscale tab. Using this mode, instead of the grayscale adjustment layer in PS, you have three levels of tonal adjustment for each color — hue, saturation and luminance — all which can impact the tones in black and white. Moreover, you have eight color sliders in Camera RAW (red, orange, yellow, green, aqua, blue, purple, magenta) as opposed to just the six colors when using grayscale layer adjustment (red, yellow, green, cyan, blue, magenta). I find the orange in particular is important when dealing with skin tones and this is not a color slider option when using the adjustment layer.
Hi Nikki – That is a great point and for those who use RAW (which most should anyways for more versatility), you should definitely convert there instead of in Photoshop. However it’s not reversible when you convert in RAW so down the line if you decide you want to go back to color, you’ll have to start over. Also, the technique above is better for those who have already edited a photo in color and want to convert it to black and white (like wedding photographers who want an edited color image but would like to send a b/w version to their clients as well).
So basically, if you want a b/w image from the beginning and only a b/w image, RAW editing is the way to go for a higher quality photo.
Actually, using the RAW sliders for black and white in Camera Raw is reversible. You just have to Open Object in Camera Raw instead of Open Image.
Holding the Shift key down in Windows will change the Open Image button into an Open Object button. Clicking on that button will open the image as a Smart Object in Photoshop. Inside Photoshop, double-clicking on the small double-squares inside the image thumbnail will re-open the image in Camera Raw so you can readjust your color sliders for black and white, or even change it back to color, inside Camera Raw.
Actually, using the RAW sliders for black and white in Camera Raw is reversible. You just have to Open Object in Camera Raw instead of Open Image.
Holding the Shift key down in Windows will change the Open Image button into an Open Object button. Clicking on that button will open the image as a Smart Object in Photoshop.
Inside Photoshop, double-clicking on the small double-squares inside the resulting image thumbnail will re-open the image in Camera Raw so you can readjust your color sliders for black and white, or even change it back to color, inside Camera Raw.
Another excellent article.
I have a black & white conversion action I always use. The process is rather lengthy to list here so I have put it up on my blog if anyone would like to check it out.
Thanks. I really enjoy black and white now that I’m using Photoshop CS5 for post processing. Its opened up a whole new world for me!
Firstly, well done to the guys at LightStalking for putting a lot of effort into the educational content on the site-anything that makes it easier for people to advance their photography is great. However, on this tutorial i must point out what i think is an error, not regarding how to make the adjustment, but the actual adjustment shown. The reds were reduced so far that the histogram is significantly blocked up against the left side. You can see significant detail has been lost between the first and second images. It is up to the photographer how they want to present their image artistically and if this is what he/she wanted then that is fine. But you will achieve full contrast just by reducing your darkest shadows down so they are at 5 or below on the histogram. As Ansel Adams taught, it is often subtle details in shadows that add real depth to an image. The only thing that is important is the final image, not what the histogram looks like. The histogram is a useful tool however because it quickly indicates where the detail is, and where you may be losing it. And losing detail, particularly the subtle detail, will make you image less interesting.
thanks for the help great tips i will use for sure
Useful article – I do this in Bibble – as in the attached where I had a choice of making the statue’s robes darker or lighter relative to the sheep. In this case it was a fairly strong adjustment; subtle changes also work well and can lift a failed colour shot to a great B&W
not quite sure what happened with my previous comment – not learned how to attach pics yet — here goes ….
not quite sure what happened with my previous comment – not learned how to attach pics yet — here goes
Valuable information, Christopher. I have been forwarding many LIghtStalking URLs to my camera club, since many are newbies and can really benefit from instruction like this. Many thanks!!
var advanced_ads_cookies = {"cookie_path":"\/","cookie_domain":""};
var advadsCfpInfo = {"cfpExpHours":"3","cfpClickLimit":"3","cfpBan":"7","cfpPath":"","cfpDomain":"www.lightstalking.com"};
var beloadmore = {"url":"https:\/\/www.lightstalking.com\/wp-admin\/admin-ajax.php","query":{"post__not_in":[2479],"category_name":"post-production","posts_per_page":3}};
var tve_dash_front = {"ajaxurl":"https:\/\/www.lightstalking.com\/wp-admin\/admin-ajax.php","force_ajax_send":"1","is_crawler":"","recaptcha":[],"post_id":"2479"};
var TVE_Ult_Data = {"ajaxurl":"https:\/\/www.lightstalking.com\/wp-admin\/admin-ajax.php","ajax_load_action":"tve_ult_ajax_load","conversion_events_action":"tve_ult_conversion_event","shortcode_campaign_ids":[],"matched_display_settings":[],"campaign_ids":[],"post_id":2479,"is_singular":true,"tu_em":"","evergreen_redirects":[]};
(function() { var po = document.createElement('script'); po.type = 'text/javascript'; po.async=true;; po.src = 'https://www.lightstalking.com/wp-content/plugins/easy-social-share-buttons3/lib/modules/conversions-pro/assets/share-conversions-tracker.js'; var s = document.getElementsByTagName('script')[0]; s.parentNode.insertBefore(po, s); })();(function() { var po = document.createElement('script'); po.type = 'text/javascript'; po.async=true;; po.src = 'https://www.lightstalking.com/wp-content/plugins/easy-social-share-buttons3/assets/modules/pinterest-pro.min.js'; var s = document.getElementsByTagName('script')[0]; s.parentNode.insertBefore(po, s); })();(function() { var po = document.createElement('script'); po.type = 'text/javascript'; po.async=true;; po.src = 'https://www.lightstalking.com/wp-content/plugins/easy-social-share-buttons3/assets/modules/subscribe-forms.min.js'; var s = document.getElementsByTagName('script')[0]; s.parentNode.insertBefore(po, s); })();(function() { var po = document.createElement('script'); po.type = 'text/javascript'; po.async=true;; po.src = 'https://www.lightstalking.com/wp-content/plugins/easy-social-share-buttons3/assets/js/essb-core.min.js'; var s = document.getElementsByTagName('script')[0]; s.parentNode.insertBefore(po, s); })();
var essb_handle_stats = function(oService, oPostID, oInstance) { var element = jQuery('.essb_'+oInstance); var instance_postion = jQuery(element).attr("data-essb-position") || ""; var instance_template = jQuery(element).attr("data-essb-template") || ""; var instance_button = jQuery(element).attr("data-essb-button-style") || ""; var instance_counters = jQuery(element).hasClass("essb_counters") ? true : false; var instance_nostats = jQuery(element).hasClass("essb_nostats") ? true : false; if (instance_nostats) { return; } var instance_mobile = false; if( (/Android|webOS|iPhone|iPad|iPod|BlackBerry|IEMobile|Opera Mini/i).test(navigator.userAgent) ) { instance_mobile = true; } if (typeof(essb_settings) != "undefined") { jQuery.post(essb_settings.ajax_url, { 'action': 'essb_stat_log', 'post_id': oPostID, 'service': oService, 'template': instance_template, 'mobile': instance_mobile, 'position': instance_postion, 'button': instance_button, 'counter': instance_counters, 'nonce': essb_settings.essb3_nonce }, function (data) { if (data) { }},'json'); } }; var essb_log_stats_only = function(service, postId, position) { var instance_mobile = false; if( (/Android|webOS|iPhone|iPad|iPod|BlackBerry|IEMobile|Opera Mini/i).test(navigator.userAgent) ) { instance_mobile = true; } if (typeof(essb_settings) != "undefined") { jQuery.post(essb_settings.ajax_url, { 'action': 'essb_stat_log', 'post_id': postId, 'service': service, 'template': position, 'mobile': instance_mobile, 'position': position, 'button': position, 'counter': false, 'nonce': essb_settings.essb3_nonce }, function (data) { if (data) { }},'json'); } };
let ccwpDOMLoaded=!1;
let ccwp_loaded = false;
let resources_length=0;
let resources =undefined;
let is_last_resource = 0;
ccwpUserInteractions=["keydown","mousemove","wheel","touchmove","touchstart","touchend","touchcancel","touchforcechange"];
ccwpUserInteractions.forEach(function(e){
window.addEventListener(e,calculate_load_times);
});
function calculate_load_times() {
// Check performance support
if (performance === undefined) {
console.log("Performance NOT supported");
return;
}
// Get a list of "resource" performance entries
resources = performance.getEntriesByType("resource");
if (resources === undefined || resources.length <= 0) {
console.log("NO Resource performance records");
}
if(resources.length){
resources_length=resources.length;
}
for(let i=0; i < resources.length; i++) {
if(resources[i].responseEnd>0){
is_last_resource = is_last_resource + 1;
}
}
let uag = navigator.userAgent;
let gpat = /Google Page Speed Insights/gm;
let gres = uag.match(gpat);
let cpat = /Chrome-Lighthouse/gm;
let cres = uag.match(cpat);
let wait_till=300;
let new_ua = "Mozilla/5.0 (Linux; Android 11; moto g power (2022)) AppleWebKit/537.36 (KHTML, like Gecko) Chrome/109.0.0.0 Mobile Safari/537.36";
let new_ua2 = "Mozilla/5.0 (Macintosh; Intel Mac OS X 10_15_7) AppleWebKit/537.36 (KHTML, like Gecko) Chrome/109.0.0.0 Safari/537.36";
if(gres || cres || uag==new_ua || uag==new_ua2){
wait_till = 3000;
}
if(is_last_resource==resources.length){
setTimeout(function(){
console.log("ccwpTriggerDelayedScripts timeout : "+wait_till);
ccwpTriggerDelayedScripts();
},wait_till);
}
}
window.addEventListener("load", function(e) {
console.log("load complete");
setTimeout(function(){
calculate_load_times();
},100);
});async function ccwpTriggerDelayedScripts() {
if(ccwp_loaded){ return ;}
ccwpPreloadStyles();
ccwpPreloadDelayedScripts();
ccwpLoadCss();
ccwpScriptLoading();
ccwp_loaded=true;
}
function ccwpPreloadStyles() {
let e = document.createDocumentFragment();
var cssEle = document.querySelectorAll("link[rel=ccwpdelayedstyle]");
for(let i=0; i <= cssEle.length;i++){
if(cssEle[i]){
cssEle[i].href = removeVersionFromLink(cssEle[i].href);
let r = document.createElement("link");
r.href = cssEle[i].href;
r.rel = "preload";
r.as = "style";
e.appendChild(r);
}
}
document.head.appendChild(e);
}
function ccwpPreloadDelayedScripts() {
var e = document.createDocumentFragment();
document.querySelectorAll("script[type=ccwpdelayedscript]").forEach(function(t) {
var n = removeVersionFromLink(t.getAttribute("src"));
if (n) {
t.setAttribute("src", n);
var r = document.createElement("link");
r.href = n, r.rel = "preload", r.as = "script", e.appendChild(r)
}
}), document.head.appendChild(e)
}
function ccwpScriptLoading(){
var jsEle = document.querySelectorAll("script[type=ccwpdelayedscript]");
jsEle.forEach(function(t) {
t.type = "text/javascript";
if(t.src)
{
t.src = removeVersionFromLink(t.src);
}
});
}function ccwpLoadCss(){
var cssEle = document.querySelectorAll("link[rel=ccwpdelayedstyle]");
for(let i=0; i <= cssEle.length;i++){
if(cssEle[i]){
cssEle[i].href = removeVersionFromLink(cssEle[i].href);
cssEle[i].rel = "stylesheet";
cssEle[i].type = "text/css";
}
}var cssEle = document.querySelectorAll("style[type=ccwpdelayedstyle]");
for(let i=0; i <= cssEle.length;i++){
if(cssEle[i]){
cssEle[i].type = "text/css";
}
}
}
function removeVersionFromLink(link)
{
if(ccwpIsValidUrl(link))
{
const url = new URL(ccwpFormatLink(link));
url.searchParams.delete("ver");
url.searchParams.delete("time");
return url.href;
}
else{
return link;
}
}
function ccwpIsValidUrl(urlString)
{
if(urlString){
var expression =/[-a-zA-Z0-9@:%_\+.~#?&//=]{2,256}\.[a-z]{2,4}\b(\/[-a-zA-Z0-9@:%_\+.~#?&//=]*)?/gi;
var regex = new RegExp(expression);
return urlString.match(regex);
}
return false;
}
function ccwpFormatLink(link)
{
let http_check=link.match("http:");
let https_check=link.match("https:");
if(!http_check && !https_check)
{
return location.protocol+link;
}
return link;
}
14 Comments
That is the first thing I do when converting to B&W, I saved some settings as Lightroom preset to quickly preview different settings, but I always tweak them by hand before I’m satisfied with the photograph.
You can also make the same tonal adjustments in Photoshop’s CAMERA RAW editor by clicking the “convert to grayscale” box in the HSL/grayscale tab. Using this mode, instead of the grayscale adjustment layer in PS, you have three levels of tonal adjustment for each color — hue, saturation and luminance — all which can impact the tones in black and white. Moreover, you have eight color sliders in Camera RAW (red, orange, yellow, green, aqua, blue, purple, magenta) as opposed to just the six colors when using grayscale layer adjustment (red, yellow, green, cyan, blue, magenta). I find the orange in particular is important when dealing with skin tones and this is not a color slider option when using the adjustment layer.
Hi Nikki – That is a great point and for those who use RAW (which most should anyways for more versatility), you should definitely convert there instead of in Photoshop. However it’s not reversible when you convert in RAW so down the line if you decide you want to go back to color, you’ll have to start over. Also, the technique above is better for those who have already edited a photo in color and want to convert it to black and white (like wedding photographers who want an edited color image but would like to send a b/w version to their clients as well).
So basically, if you want a b/w image from the beginning and only a b/w image, RAW editing is the way to go for a higher quality photo.
Actually, using the RAW sliders for black and white in Camera Raw is reversible. You just have to Open Object in Camera Raw instead of Open Image.
Holding the Shift key down in Windows will change the Open Image button into an Open Object button. Clicking on that button will open the image as a Smart Object in Photoshop. Inside Photoshop, double-clicking on the small double-squares inside the image thumbnail will re-open the image in Camera Raw so you can readjust your color sliders for black and white, or even change it back to color, inside Camera Raw.
Actually, using the RAW sliders for black and white in Camera Raw is reversible. You just have to Open Object in Camera Raw instead of Open Image.
Holding the Shift key down in Windows will change the Open Image button into an Open Object button. Clicking on that button will open the image as a Smart Object in Photoshop.
Inside Photoshop, double-clicking on the small double-squares inside the resulting image thumbnail will re-open the image in Camera Raw so you can readjust your color sliders for black and white, or even change it back to color, inside Camera Raw.
Another excellent article.
I have a black & white conversion action I always use. The process is rather lengthy to list here so I have put it up on my blog if anyone would like to check it out.
https://shrimpography.blogspot.com/2010/10/black-and-white-conversion.html
Thanks. I really enjoy black and white now that I’m using Photoshop CS5 for post processing. Its opened up a whole new world for me!
Firstly, well done to the guys at LightStalking for putting a lot of effort into the educational content on the site-anything that makes it easier for people to advance their photography is great.
However, on this tutorial i must point out what i think is an error, not regarding how to make the adjustment, but the actual adjustment shown.
The reds were reduced so far that the histogram is significantly blocked up against the left side. You can see significant detail has been lost between the first and second images. It is up to the photographer how they want to present their image artistically and if this is what he/she wanted then that is fine. But you will achieve full contrast just by reducing your darkest shadows down so they are at 5 or below on the histogram. As Ansel Adams taught, it is often subtle details in shadows that add real depth to an image. The only thing that is important is the final image, not what the histogram looks like. The histogram is a useful tool however because it quickly indicates where the detail is, and where you may be losing it. And losing detail, particularly the subtle detail, will make you image less interesting.
thanks for the help great tips i will use for sure
Useful article – I do this in Bibble – as in the attached where I had a choice of making the statue’s robes darker or lighter relative to the sheep. In this case it was a fairly strong adjustment; subtle changes also work well and can lift a failed colour shot to a great B&W
not quite sure what happened with my previous comment – not learned how to attach pics yet — here goes ….
not quite sure what happened with my previous comment – not learned how to attach pics yet — here goes
Great advice. Works well with portrait work also.
https://www.flickr.com/photos/ken-b-images/3692363683/
Valuable information, Christopher. I have been forwarding many LIghtStalking URLs to my camera club, since many are newbies and can really benefit from instruction like this. Many thanks!!