Wedding photography is not something that can always be planned ahead especially when shot outdoors because the circumstances in terms of weather, light, etc., will not be always favorable for the best or most beautiful images. Sometimes, one will have to shoot in the harsh midday sun, or sometimes there will be just 10 minutes to photograph the bride and the groom because the event started late and so on. But as wedding photographers, we need to be adjusting to these factors to make the whole thing work and capture the best photos possible.
One of my goals as a wedding photographer is to be able to create high quality images in any lighting/location circumstance. It’s a continual learning process and I’d like to share one of my favorite techniques.
The Problem: When Parts of the Image Require Different Exposures
One challenge that all wedding/portrait photographers deal with is finding a way to balance the exposure of a bright afternoon sky with the exposure of a subject standing in front of the sky. This can be difficult because the difference in exposure levels between the sky and subject can be quite dramatic. If your subject is in the shade you could be dealing with a 3-4 f/stop difference in exposure levels! Let’s look at an example of this situation and what I did to manage it.
What to Do About It – A Practical Example
I was photographing a wedding on the Queen Mary in Long Beach, CA and it was a beautiful day without a cloud in the sky. I took the bridal party to the top deck of the ship and arranged them so the blue sky and some of downtown Long Beach was visible behind them. It was late in the day in August so the sun was getting low sky and was being blocked by one of the Queen Mary’s huge smoke stacks which created the shadow area that I placed the bridal party in. So the amount of light on the bridal party was considerably less than the amount of light coming from the sky.
I had a couple of options in this situation (aside from trying a graduated neutral density filter or manipulating the image in post). I could either expose for the bridal party (the subject of my image) and let the background blow out or I could expose for the background and compensate for the lower light levels on the bridal party by adding artificial light. I chose not to consider a compromise exposure between the subject and background because it would have resulted in and image where the bridal party was too underexposed and the sky was still too overexposed – not so pretty! So let’s take a look at the first of my two options – exposing for the light on the bridal party:
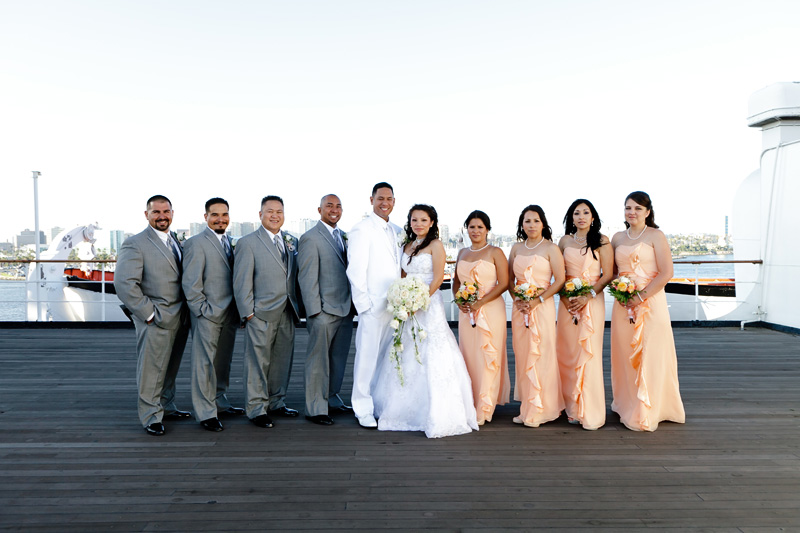
It’s quick and it gets the job done, but the big tradeoff is the sky is completely white and most of the detail is gone in the buildings behind the bridal party.
This happened because when I set my camera settings to let in enough light for a proper exposure on the bridal party the camera sensor received way too much light in the sky portion of the frame. Keep in mind that you can only set one f/stop and shutter speed setting for any image you take so without using supplemental lighting your exposure choice will always be a compromise in this kind of situation.
Experimenting With Other Light Sources
I wasn’t happy with the look of my first option, so I decided to add some of my own light to the image in order to balance the light levels. To do this, I first put the camera in Manual mode and figured out the exposure I wanted for the background:
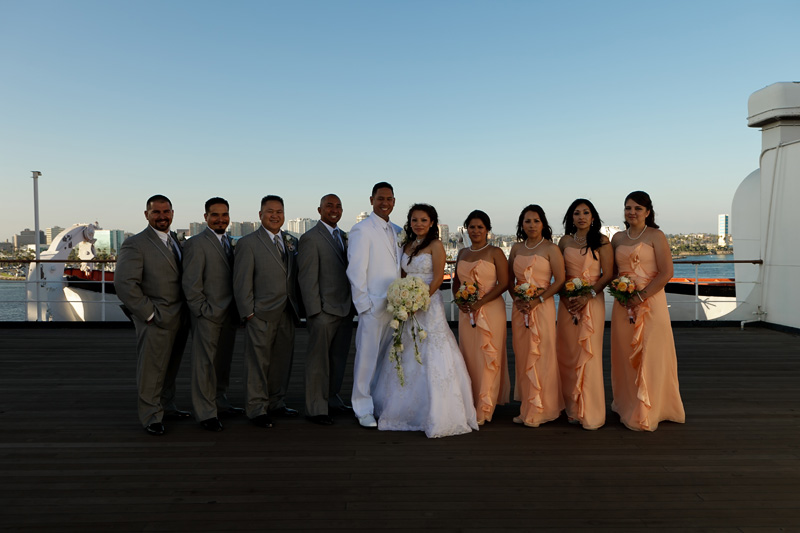
In this case it was F/6.3, 1/200th at ISO 100. My camera’s maximum sync speed is 1/200th so I had to be sure to choose an exposure combination that didn’t exceed my max sync speed. Now that I had the settings for a nice blue sky, I had to add enough light to the bridal party to bring their exposure up to the same F/6.3, 1/200th as the sky.
Because this image had 10 people in it I needed to back my light source up to a distance that was more than my small Canon flash unit could handle. It just didn’t have enough power to get the correct exposure at this “light to subject” distance. When balancing subject and background light I often find that a flash doesn’t pack enough punch, so I highly recommend using a more powerful strobe light. I used a White Lightning x1600 monolight which has plenty of light output power to handle these types of situations.
Next, I attached a large shoot through umbrella to the monolight, raised it to about 7 feet high and aimed the light head down at the bridal party. The light position was 30-45 degrees from camera position. Any further away with this large of a group and I would have risked having very noticeable shadows cast from one person onto the other. Now all I needed to do was measure the monolight’s exposure by taking a light meter reading at the subject’s position (pointed towards the camera), and adjust the monolight’s flash output until I got a reading of F/6.3, 1/200th (the same as my sky exposure reading). Here’s my resulting image:
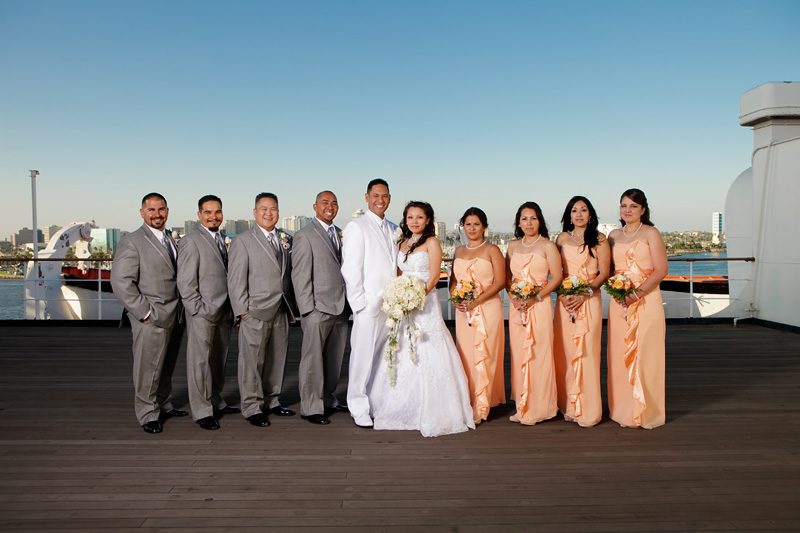
Just as a side note, you don’t always have to match the subject exposure to the background exposure. The ratio you choose will vary depending on the kind of look you’re going for. You could choose to really underexpose the sky to make it a deep dark blue if you like the way that looks – it’s all a matter of personal preference.


5 Comments
As a far less skilled and equipped amateur photog, what about bracketing+post? (Maybe that’s what you’d do in a circumstance where the supplemental lighting was unavailable?)
You wanna get it right in the camera and rely less on post. Depending on who does your post it could cost you some valuable time or money to get something fixed rather than getting it right in the camera. I would think wedding photographers would know how to use their equipment as their clients are investing alot of money in their services and others.
Hi Scott. Bracketing exposures and using HDR in post is another way to achieve similar results but I have to manage thousands of photographs each wedding so I try to minimize my post production time as much as possible. Plus I’d have to use a tripod for the bracketed exposures and I prefer to be as mobile as possible. Thanks for the question!
is it possible bracketing in wedding or portrait photography. i thought only possible in landscape
I think bracketing would’ve worked better in this situation. In your final photo, the deck behind the bridal party is dark and it makes the photo look unnatural. In the photo with the blown out sky, the deck is naturally lighted. But yeah, this was a difficult situation and it’s pretty hard to make the call in the situation. Here the background with the sky and buildings is stationary so it’s better for bracketing than most situations. The blown out sky works a bit like a chroma screen.
It’s a great photo in any case and I’m sure the client was happy.