In a previous article we looked at various things that you can do with multiple exposures. One of those things was focus stacking. Focus stacking is a technique where you can create a deep depth of field by combining 3 or 4 images with different focus points. There are a number of reasons as to why you might want to do this, one being to overcome the softness incurred when you shoot beyond the diffraction limits of your lens/sensor combination. In this guide we will show you how to create a focused stacked image using photoshop. In this demo we used Photoshop CS6 but it can also be achieved in CS4 and 5.
How to Shoot the Images for Best Results With Focus Stacking
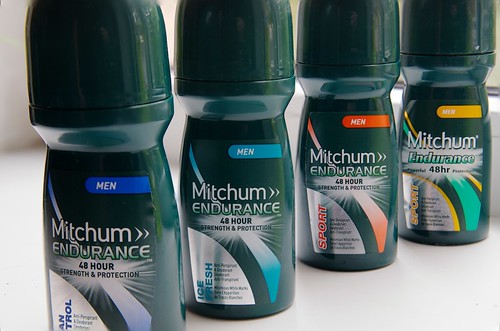
Focus stacking can be used for a number of different types of shots, two of the most viable being landscapes and macro photos. We are using a simple set up of 4 small bottles to demonstrate the effect. The bottles have been places equidistant from each other, in an line moving away from the camera. The camera is a Nikon D5100 with a Nikon 24-70mm lens set to 50mm and f4 aperture. The camera needs to be mounted on a good solid tripod to ensure no movement between shots. You also really need to have consistent, unchanging light, in this case the light from a window on an evenly overcast day.

For a normal shot, at F4, you can see that there is a lot of the image that is out of focus. So to get our focus stack we will shoot four separate shots, each at the same exposure but each focused on the center point of the label on each of the individual bottles. I used autofocus and live preview to get focus, magnifying the image on the D5100 screen to check and using the camera’s joypad to move the focus point for each shot, you can also focus manually. For each shot, the set up and exposure was identical, only the focus point changed.

How to Create the Final Image
Once shot, all four images were brought into Photoshop. Starting with the first image, the one with the frontmost focus, from the menu click Select, Select All. From Edit, select Copy. Now go to File, New to create a new image. Give the image a name and leave the size as is, this will automatically be the size of the image you just copied. Click Ok to create the new image.
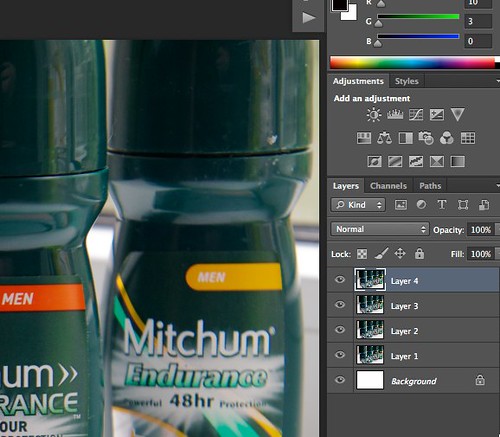
Now select Edit, Paste to paste the entire selection to the new image. Now create a new layer by going to Layer, New, Layer. Give this a name if you prefer and click ok. Go to the second image in the focus stack and repeat the Select All, Copy. Return to the new image and paste this into the new layer. Repeat this exercise for the last two shots, creating a new layer and pasting the images into it. You should now have a five layered image, the uppermost layer being the last of the four focus stack shots.
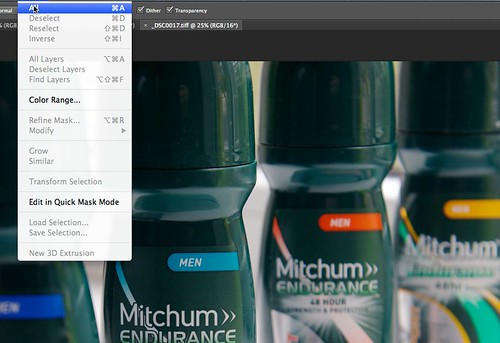
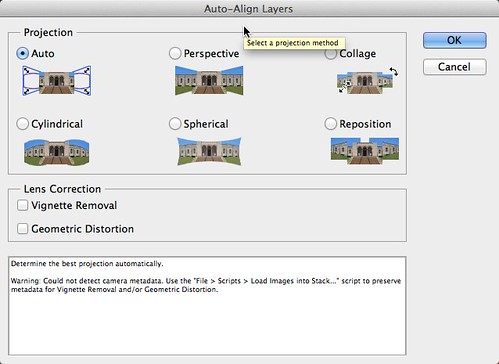
Next select all the layers in layers palette and go to Image, Auto-Align Layers. From the window, select Auto and click OK.
Once completed, go to Image, Auto-Blend Layers and from the window select Stack Images. Click OK

Finally, you may need to crop into the image a touch to remove any softness caused by the focus differential. Once done, you can flatten the image and save it.
Jason Row is a British born travel photographer now living in Ukraine. You can follow him on Facebook or visit his site, The Odessa Files. He also maintains a blog chronicling his exploits as an Expat in the former Soviet Union


1 Comment
I recommend that you exchange the part on manually copying the different images into separate layers with either
1) In Photoshop: File > Scripts > Load Files into Stack…
2) In Bridge: Tools > Photoshop > Load Fines into Photoshop Layers…