Both bokeh and blur are terms that are used interchangeably in photography. Bokeh comes from the way the lens pulls in the points of light that are not in focus. Bokeh or blur can be good or distracting depending on the preference of the photographer and how it's used in the image.
Bokeh may create a smooth, buttery background with almost a painterly effect. Or, it can be busy, with multiple shapes and colors. Experience and practice enhances the effective and intentional use of bokeh.
How to Create Bokeh?
Bokeh typically surfaces from small highlights in the background. These highlights can be backlit or lit from the side. Examples include lights on a Christmas tree or lights dancing through the leaves in the background of the subject. Bokeh is not limited to just background highlights. Blur happens in all out-of-focus areas of the image.

Photo by Kevin Dooley
3 Ways to Impact Bokeh
1. Increase Subject-Background Distance
To enhance or increase bokeh in your photographs, the distance between the subject and the background should be increased. Separating your subject from the background allows you to utilize a background that may not be as attractive. Because of the blur, the subject is highlighted, stands out from the background which is effectively muted or softened.
Another way is to shrink the distance between the subject and the camera.
Either way, a shallow depth of field increases the amount that is out of focus. The more that is out of focus, the more blur. If highlights are in the background, coming from the side, beautiful (or distracting, depending on preference) bokeh appears.
2. Wider Apertures Emphasize Bokeh
Bokeh occurs for parts of the scene that are outside the depth of field. Photographers sometimes intentionally use a narrow depth of field to create images that stand out from out-of-focus areas. Using lenses with a fast aperture 2.8 or 1.8 emphasizes bokeh or blur. However bokeh can also be created with higher f/stop numbers.
For a given subject, the background and lighting choices of which aperture to use easily vary. Particularly in Macro, it's a good practice to photograph an image using the range of f/stops to see which looks best. One image at a f/3.3 may work perfect, yet another worked better with an f/7.1 or f/8.
The Black-Eyed Susan was captured with a wide aperture f/5 on my 105mm Macro giving a very shallow depth of field, The background is soft and smooth contrasting nicely with the rich, purple, textured center that was the focal point.
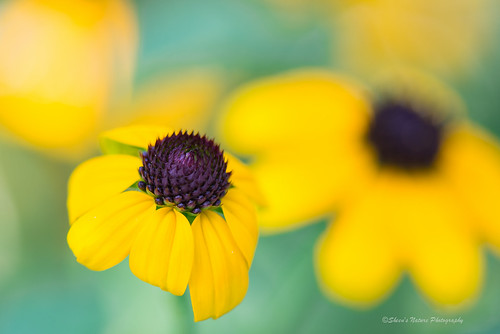
Photo by Sheen's Nature Photography
The Daisies were bright white in the garden without a lot of surrounding color. Since daisies are quite common, the busy bokeh became more of the statement versus ‘just the daisies'. The distance between the camera and the subject was about 12 inches. The distance between the subject and the background highlights was about twenty feet. The aperture was only an f/14 which created sharper circles.
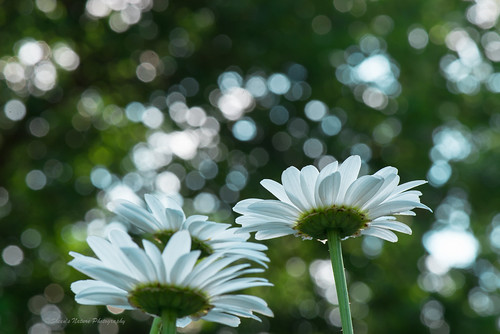
Photo by Sheen's Nature Photography
3. Longer Focal Length Produces a Softer Background
Focal length also affects depth of field. With telephoto lengths, the depth of field can be very shallow, very quickly. In the case of bird photography or wildlife photography an f/8 may be the widest you can go. Otherwise, parts of the animal or bird may not be in focus.
The Sandhill Crane used settings of f/5.6 on my Sigma 150-500 lens as this was taken on a nature trail that was quite shady. This worked because it was a side profile. Had the Crane moved his long bill toward or away from the camera, the bill would have been noticeably out of focus. The blur has soft, muted hues of greens. The morning sun also created soft backlit bokeh.
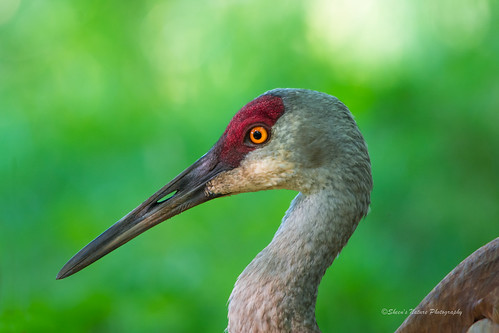
Photo by Sheen's Nature Photography
For the Red-tailed Hawk (note: this was a rescued Hawk, I will always note if a bird is captive), an f/8 had a wider depth of field as I wanted the face and chest to be in focus and the background soft.
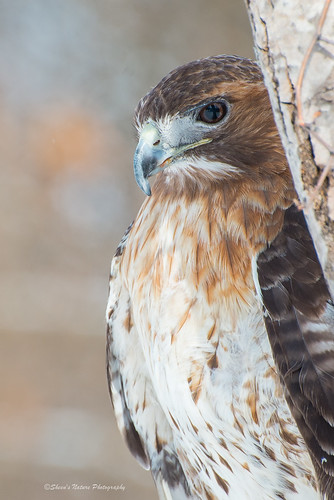
Photo by Sheen's Nature Photography
For mid-range zooms and prime lenses, working with bigger apertures also makes magical bokeh moments. The woodland flowers were taken with an 85mm prime lens. The rendering of the bokeh at an f/4 was gentle with soft shapes of color in the background.
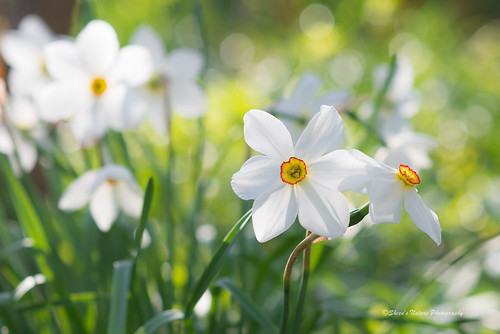
Photo by Sheen's Nature Photography
Is Bokeh an Art or Science?
The answer is both. Creating the buttery or textured bokeh that makes your subject stand out takes practice and understanding the lens you are working with. Practicing with back lighting, side lighting, aperture and positioning your subject's distance from the camera and the background will turn the science into artistic and beautiful images.


9 Comments
Great article! Thanks for posting this!
You’re very welcome!!
Thanks for posting!!
HI Patty – you’re welcome!
Very informative…thank you.
Thanks for the feedback Throgmorton!
This is probably the most underrated form of photography and also viewed by many who do not know the real art of making such a picture.
Hi Robert! I agree – there is very much an artistic side to this. Getting the right bokeh from the dramatic to soft can easily add beauty and complement the subject. The wrong amount or type can also be distracting. It’s a combination of practice and personal preference. Thanks for commenting!
For point light bokeh will take on the shape of the iris, round, octagolal or star. However, if you place a cut out filter over the lens the boken will take on the shape of the cut ou.